centos7安装fastdfs
参考这个 https://blog.csdn.net/stormkai/article/details/88600370 和 https://www.cnblogs.com/hahajayou/p/haha.html
以及这个 https://www.cnblogs.com/handsomeye/p/9451568.html
启动tracker(支持start|stop|restart):
/usr/bin/fdfs_trackerd /etc/fdfs/tracker.conf start
查看tracker.log的日志: 在自己配置的地方:(这个在tracker.conf中设置过的为/home/dfs)
[root@ /home/dfs/logs]$ ls
storaged.log trackerd.log
查看端口情况:netstat -apn|grep fdfs
启动storage(支持start|stop|restart) : /usr/bin/fdfs_storaged /etc/fdfs/storage.conf start
查看端口情况:netstat -apn|grep fdfs
通过monitor来查看storage是否成功绑定:
/usr/bin/fdfs_monitor /etc/fdfs/storage.conf
最终文件保存在与log同级目录的data里面
[root@ /home/dfs/logs]$ fdfs_upload_file /etc/fdfs/client.conf /test/company_logo.png //上传测试,返回此文件的id
group1/M00/00/00/wKhQhV_wXymAO8ujAAAQK0DSTy0522.png
[root@ /home/dfs/logs]$ /usr/bin/fdfs_test /etc/fdfs/client.conf upload /test/company_logo.png //上传测试,返回此文件的详细信息
最后一行的example file url: http://192.168.80.133/group1/M00/00/00/wKhQhV_wOsKASkJtAAAQK0DSTy0831_big.png 返回此文件的连接地址
- 启动 storage 服务:/usr/bin/fdfs_storaged /etc/fdfs/storage.conf,首次启动会很慢,因为它在创建预设存储文件的目录
- 重启 storage 服务:/usr/bin/fdfs_storaged /etc/fdfs/storage.conf restart
- 查看是否有 storage 进程:ps aux | grep storage
- 查看端口情况:netstat -apn|grep fdfs
- 测试是否部署成功 •利用自带的 client 进行测试
- 复制一份配置文件:cp /etc/fdfs/client.conf.sample /etc/fdfs/client.conf
- 编辑:vim /etc/fdfs/client.conf,编辑内容看下面中文注释
connect_timeout=30
network_timeout=60
# 下面这个路径是保存 store log 的地方,需要我们改下,指向我们一个存在的目录
# 创建目录:mkdir -p /opt/fastdfs/client/data-and-log
base_path=/opt/fastdfs/client/data-and-log
# 指定 tracker 服务器的 IP 和端口
tracker_server=192.168.1.114:22122
log_level=info
use_connection_pool = false
connection_pool_max_idle_time = 3600
load_fdfs_parameters_from_tracker=false
use_storage_id = false
storage_ids_filename = storage_ids.conf
http.tracker_server_port=80
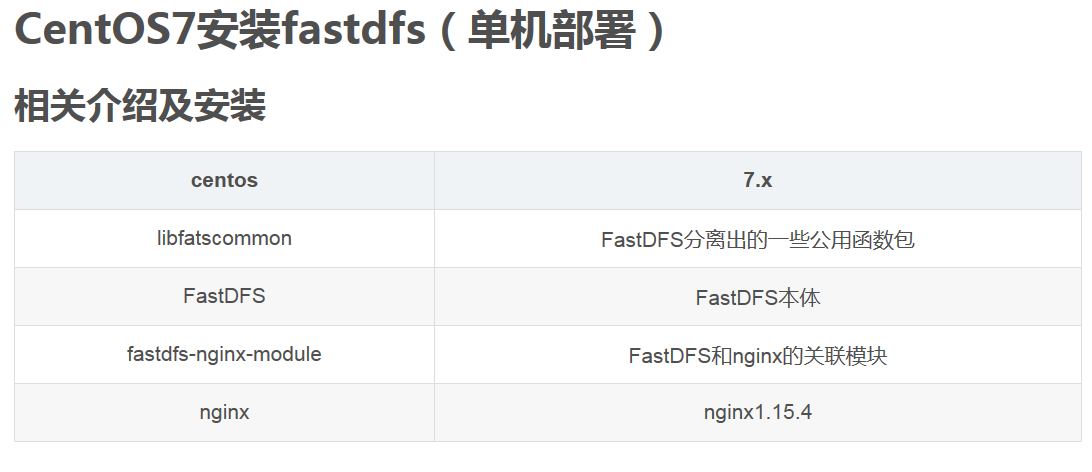
安装编译环境
yum install git gcc gcc-c++ make automake autoconf libtool pcre pcre-devel zlib zlib-devel openssl-devel wget vim -y
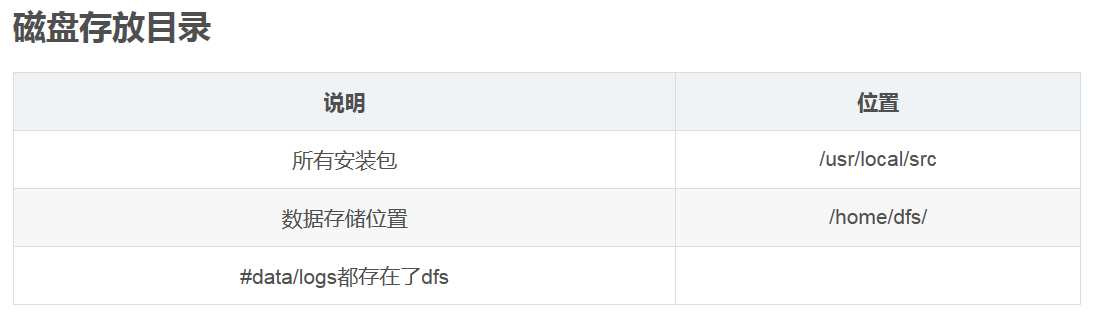
mkdir /home/dfs #创建数据存储目录
cd /usr/local/src #切换到安装目录准备下载安装包
安装libfatscommon
git clone https://github.com/happyfish100/libfastcommon.git --depth 1
cd libfastcommon/
./make.sh && ./make.sh install #编译安装
安装FastDFS
cd ../ #返回上一级目录
git clone https://github.com/happyfish100/fastdfs.git --depth 1
cd fastdfs/
./make.sh && ./make.sh install #编译安装
#配置文件准备
cp /etc/fdfs/tracker.conf.sample /etc/fdfs/tracker.conf
cp /etc/fdfs/storage.conf.sample /etc/fdfs/storage.conf
cp /etc/fdfs/client.conf.sample /etc/fdfs/client.conf #客户端文件,测试用
cp /usr/local/src/fastdfs/conf/http.conf /etc/fdfs/ #供nginx访问使用
cp /usr/local/src/fastdfs/conf/mime.types /etc/fdfs/ #供nginx访问使用
安装fastdfs-nginx-module
cd ../ #返回上一级目录
git clone https://github.com/happyfish100/fastdfs-nginx-module.git --depth 1
cp /usr/local/src/fastdfs-nginx-module/src/mod_fastdfs.conf /etc/fdfs
安装nginx
wget http://nginx.org/download/nginx-1.15.4.tar.gz #下载nginx压缩包
tar -zxvf nginx-1.15.4.tar.gz #解压
cd nginx-1.15.4/
#添加fastdfs-nginx-module模块
./configure --add-module=/usr/local/src/fastdfs-nginx-module/src/
make && make install #编译安装

 浙公网安备 33010602011771号