Spring基础
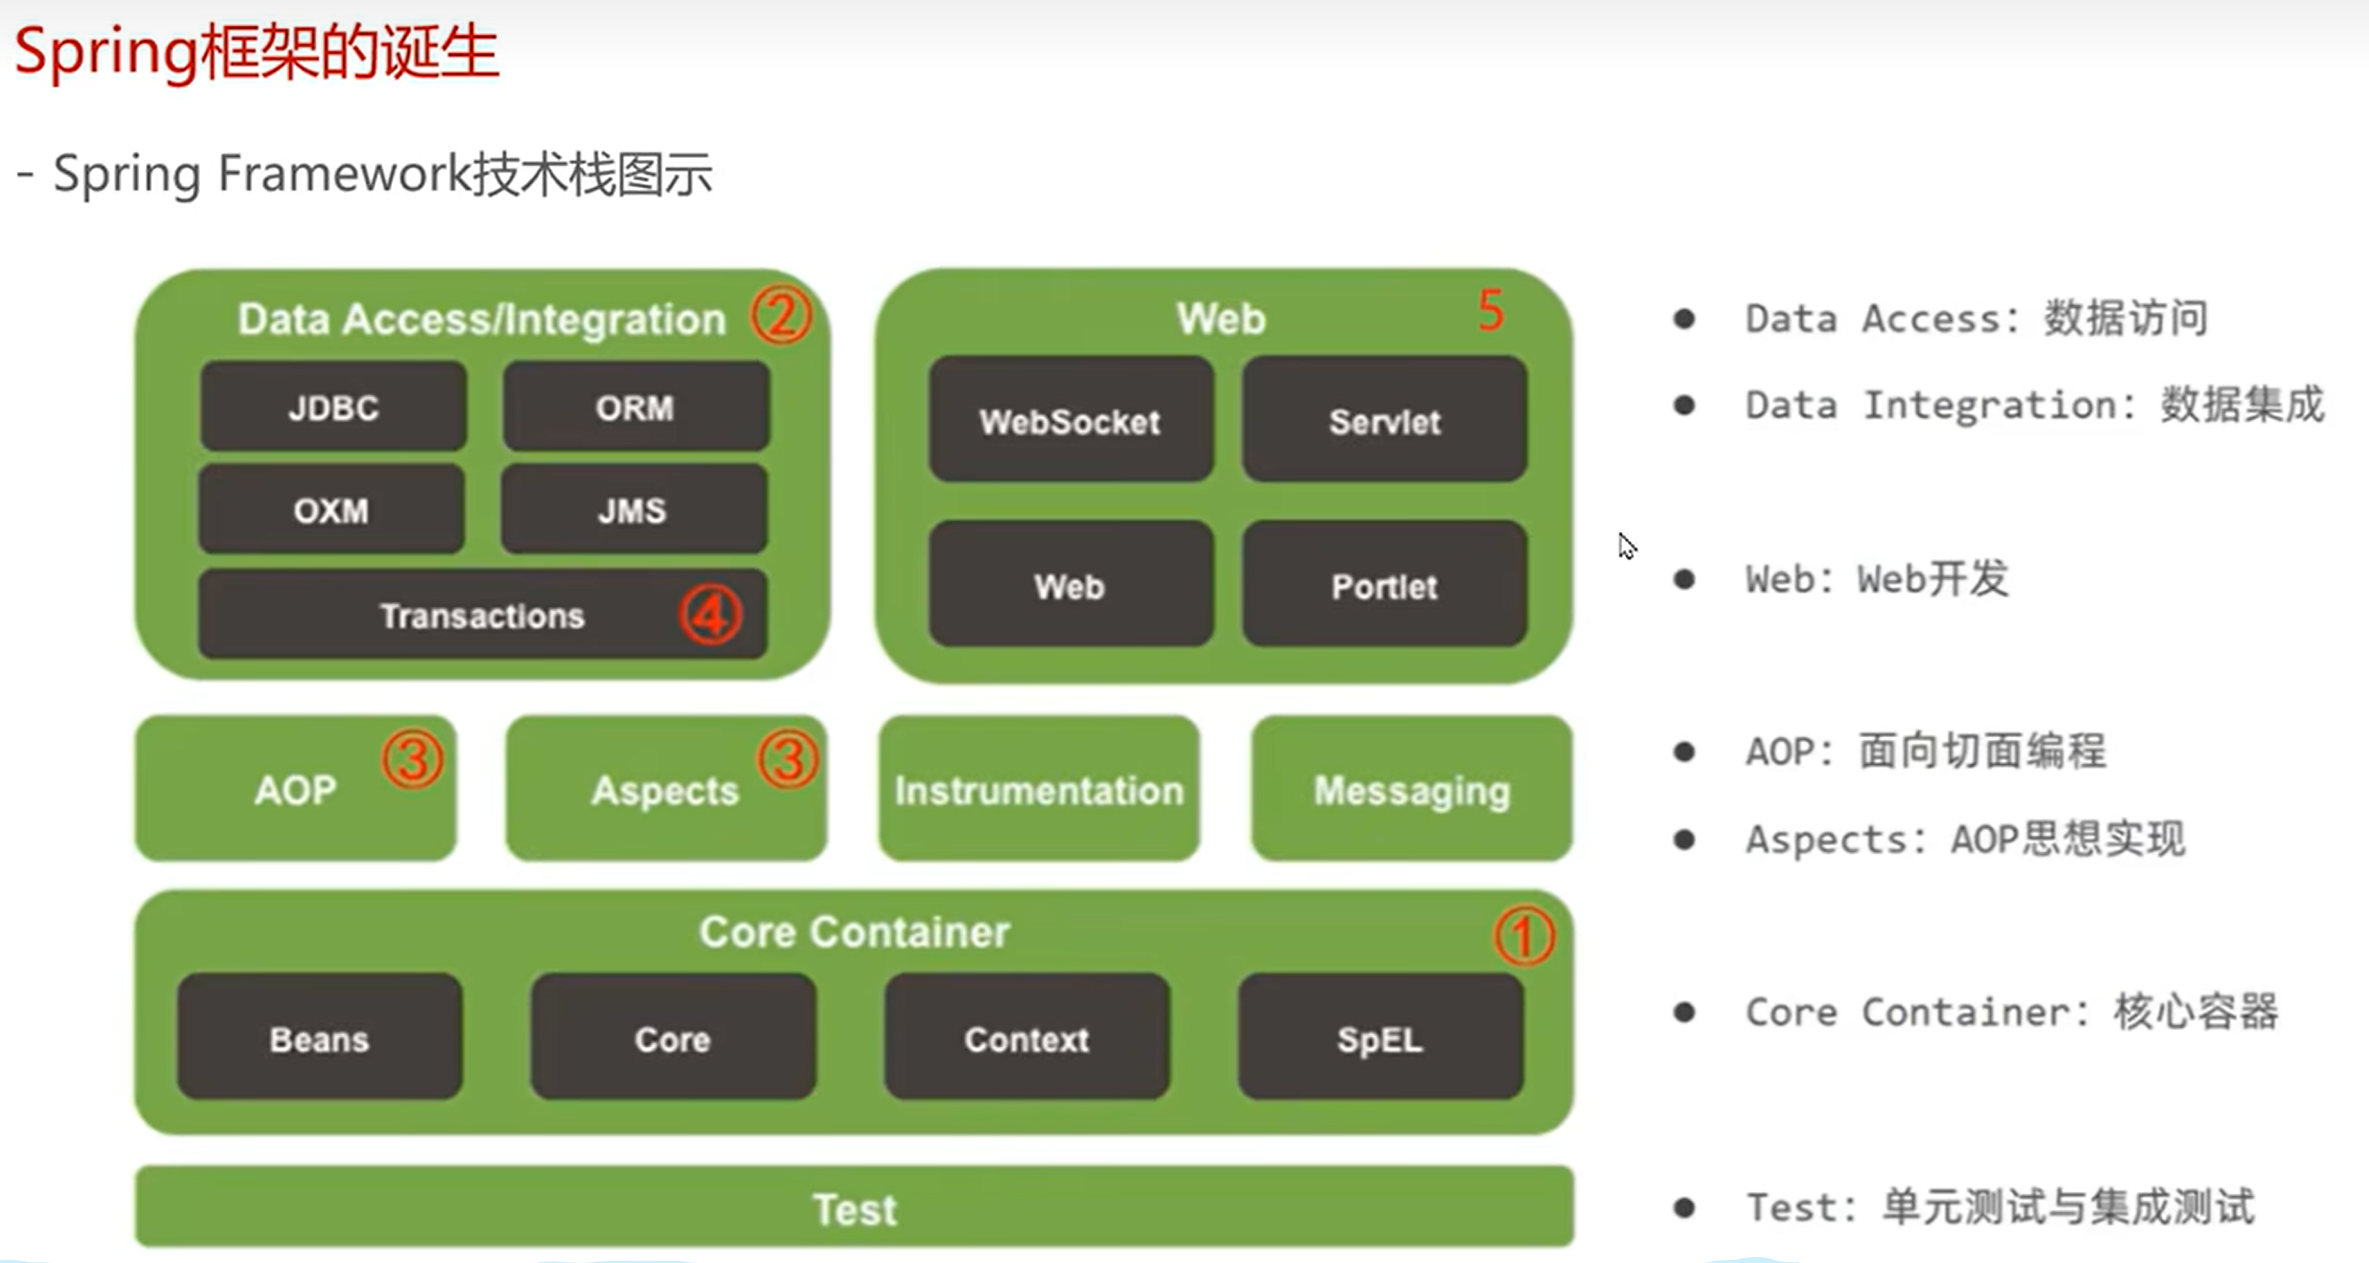
Spring基础
BeanFactory的快速入门
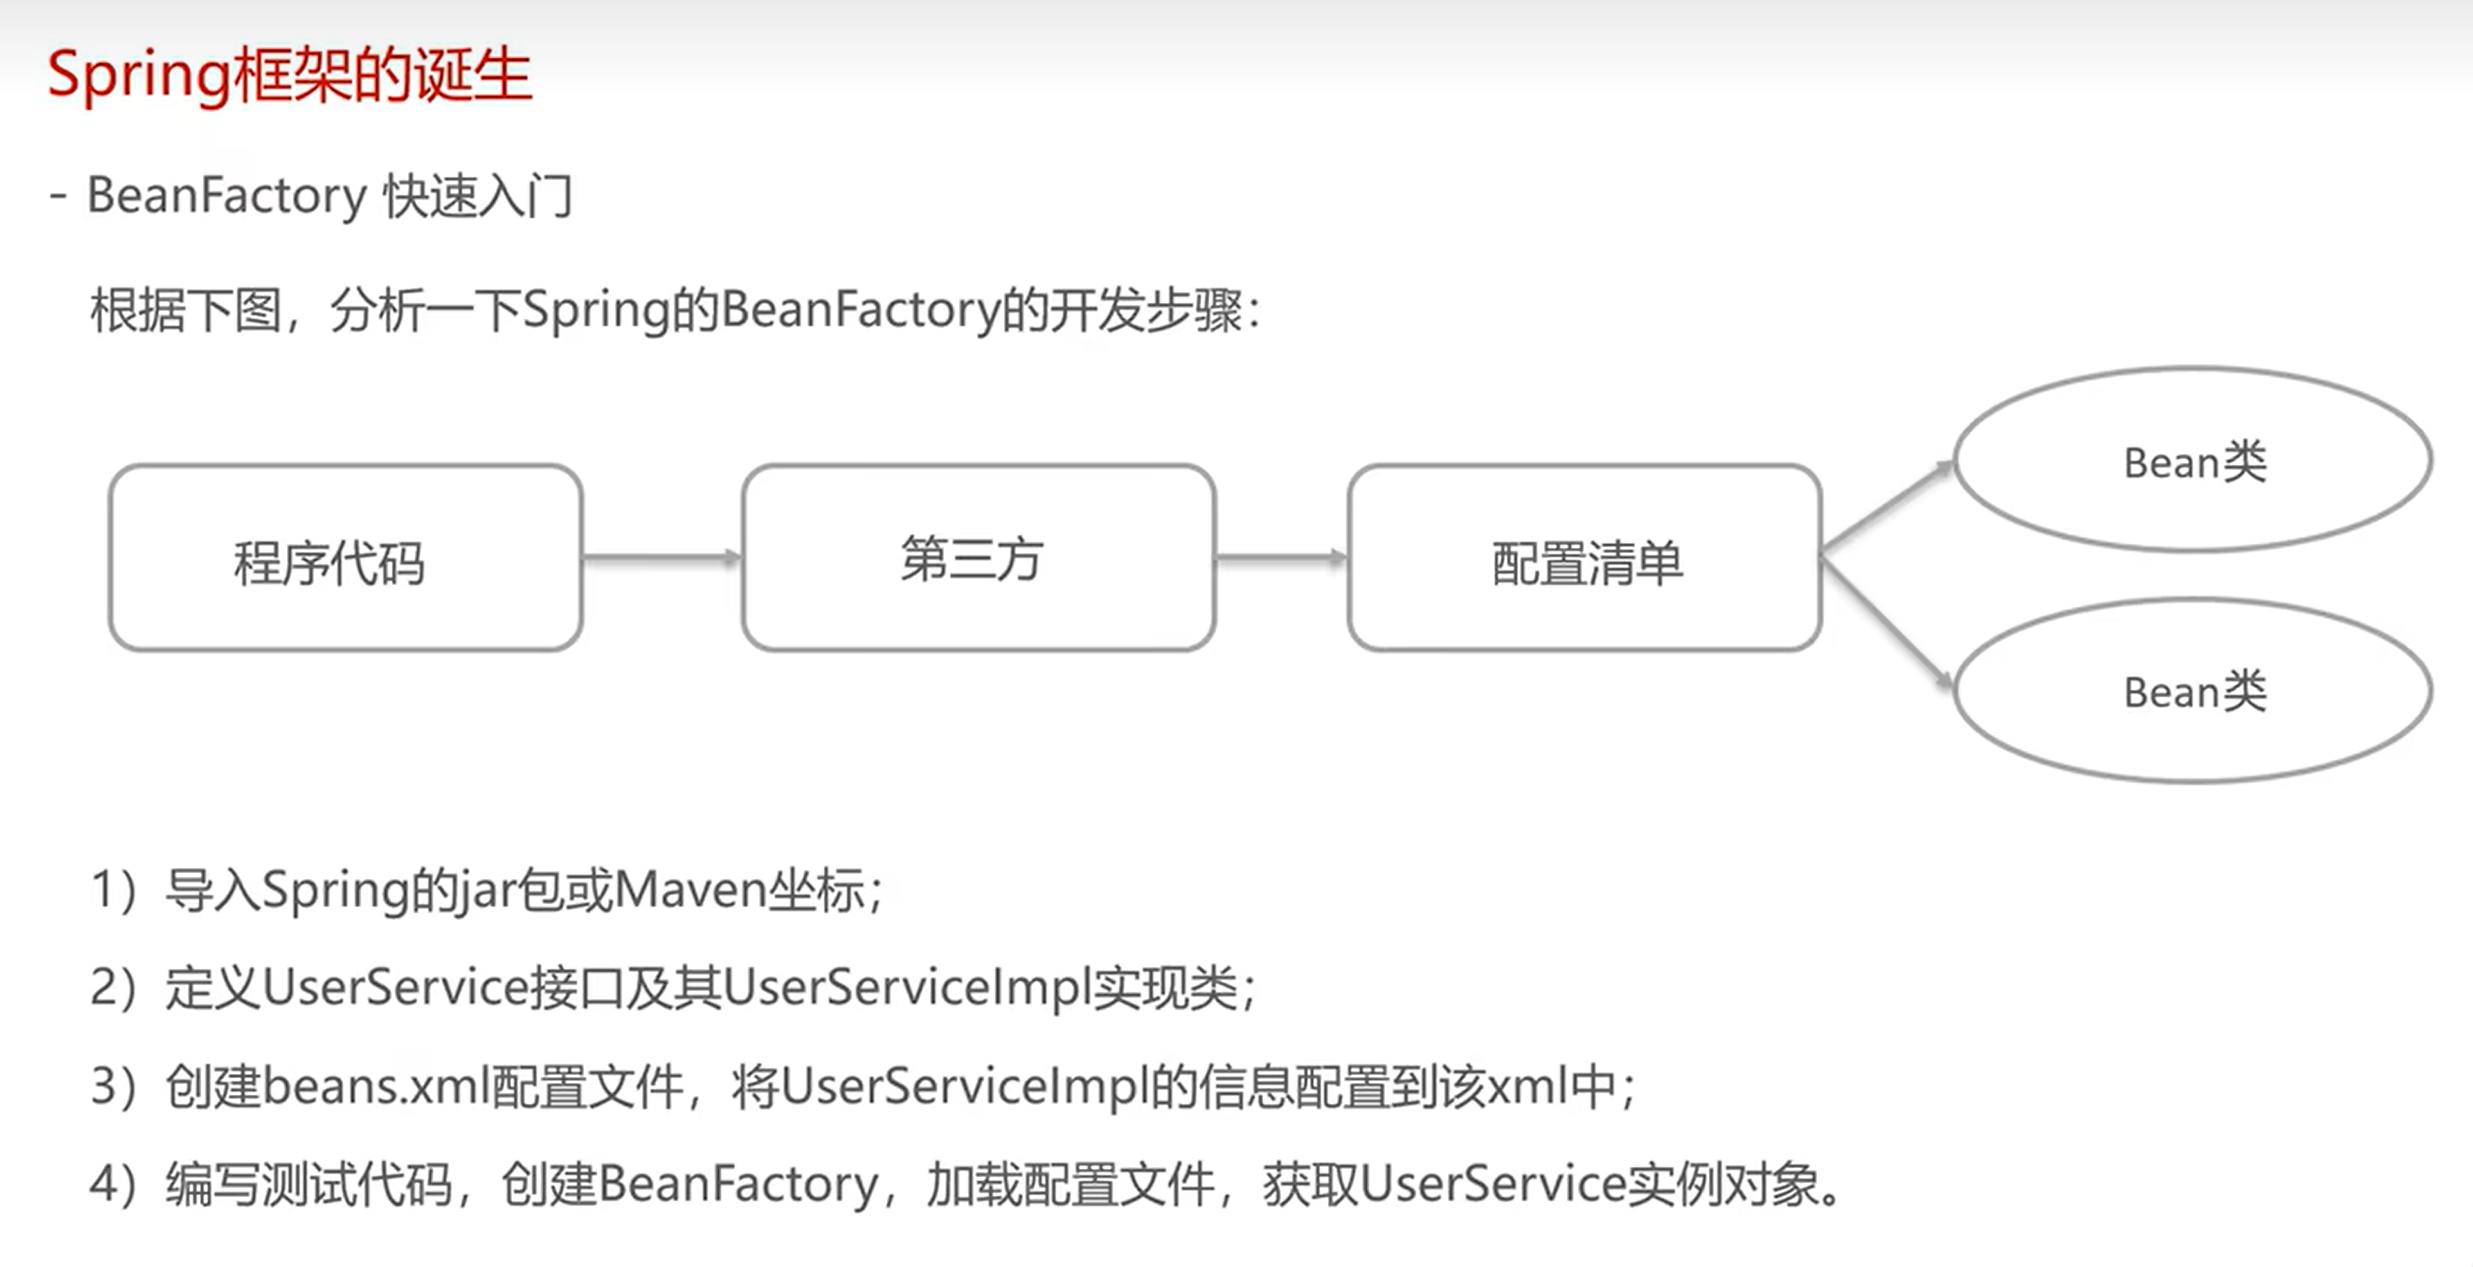
第一步体现的是“第三方”;第二步体现的是Bean类;第三步是配置清单;第四步是程序代码
测试代码
public class BeanFactoryText {
    public static void main(String[] args) {
        //创建一个工厂对象
        DefaultListableBeanFactory beanFactory = new DefaultListableBeanFactory();
        //创建一个读取器(xml文件)
        XmlBeanDefinitionReader reader = new XmlBeanDefinitionReader(beanFactory);
        //读取配置文件给工厂
        reader.loadBeanDefinitions("beams.xml");
        //根据id获取Bean实例对象
        UserService userService = (UserService) beanFactory.getBean("userService");
        UserDao userDaoService = (UserDao)  beanFactory.getBean("userDao");


    }
}
Service需要用到Dao层,可以把Dao直接注入给Service
注:
①<property name="userDao" ref="userDao"></property>中对于name的取值,是看UserServiceImpl中setXxx中的Xxx,并且要小写变成xxx
----beams.xml----
<?xml version="1.0" encoding="UTF-8"?>
<beans xmlns="http://www.springframework.org/schema/beans"
       xmlns:xsi="http://www.w3.org/2001/XMLSchema-instance"
       xsi:schemaLocation="http://www.springframework.org/schema/beans http://www.springframework.org/schema/beans/spring-beans.xsd">
<bean id="userService" class="com.example.demo.service.impl.UserServiceImpl" >
    <property name="userDao" ref="userDao"></property>
</bean>

    <bean id="userDao" class="com.example.demo.dao.impl.UserDaoServiceImpl"></bean>
</beans>

----UserServiceImpl----
public class UserServiceImpl implements UserService {

    //BeanFacotry去调用该方法,从容器中获得userDao设置到此处
    public void setUserDao(UserDao userDao) {
        System.out.println("BeanFacotry去调用该方法,从容器中获得userDao设置到此处 = " + userDao);
    }
}
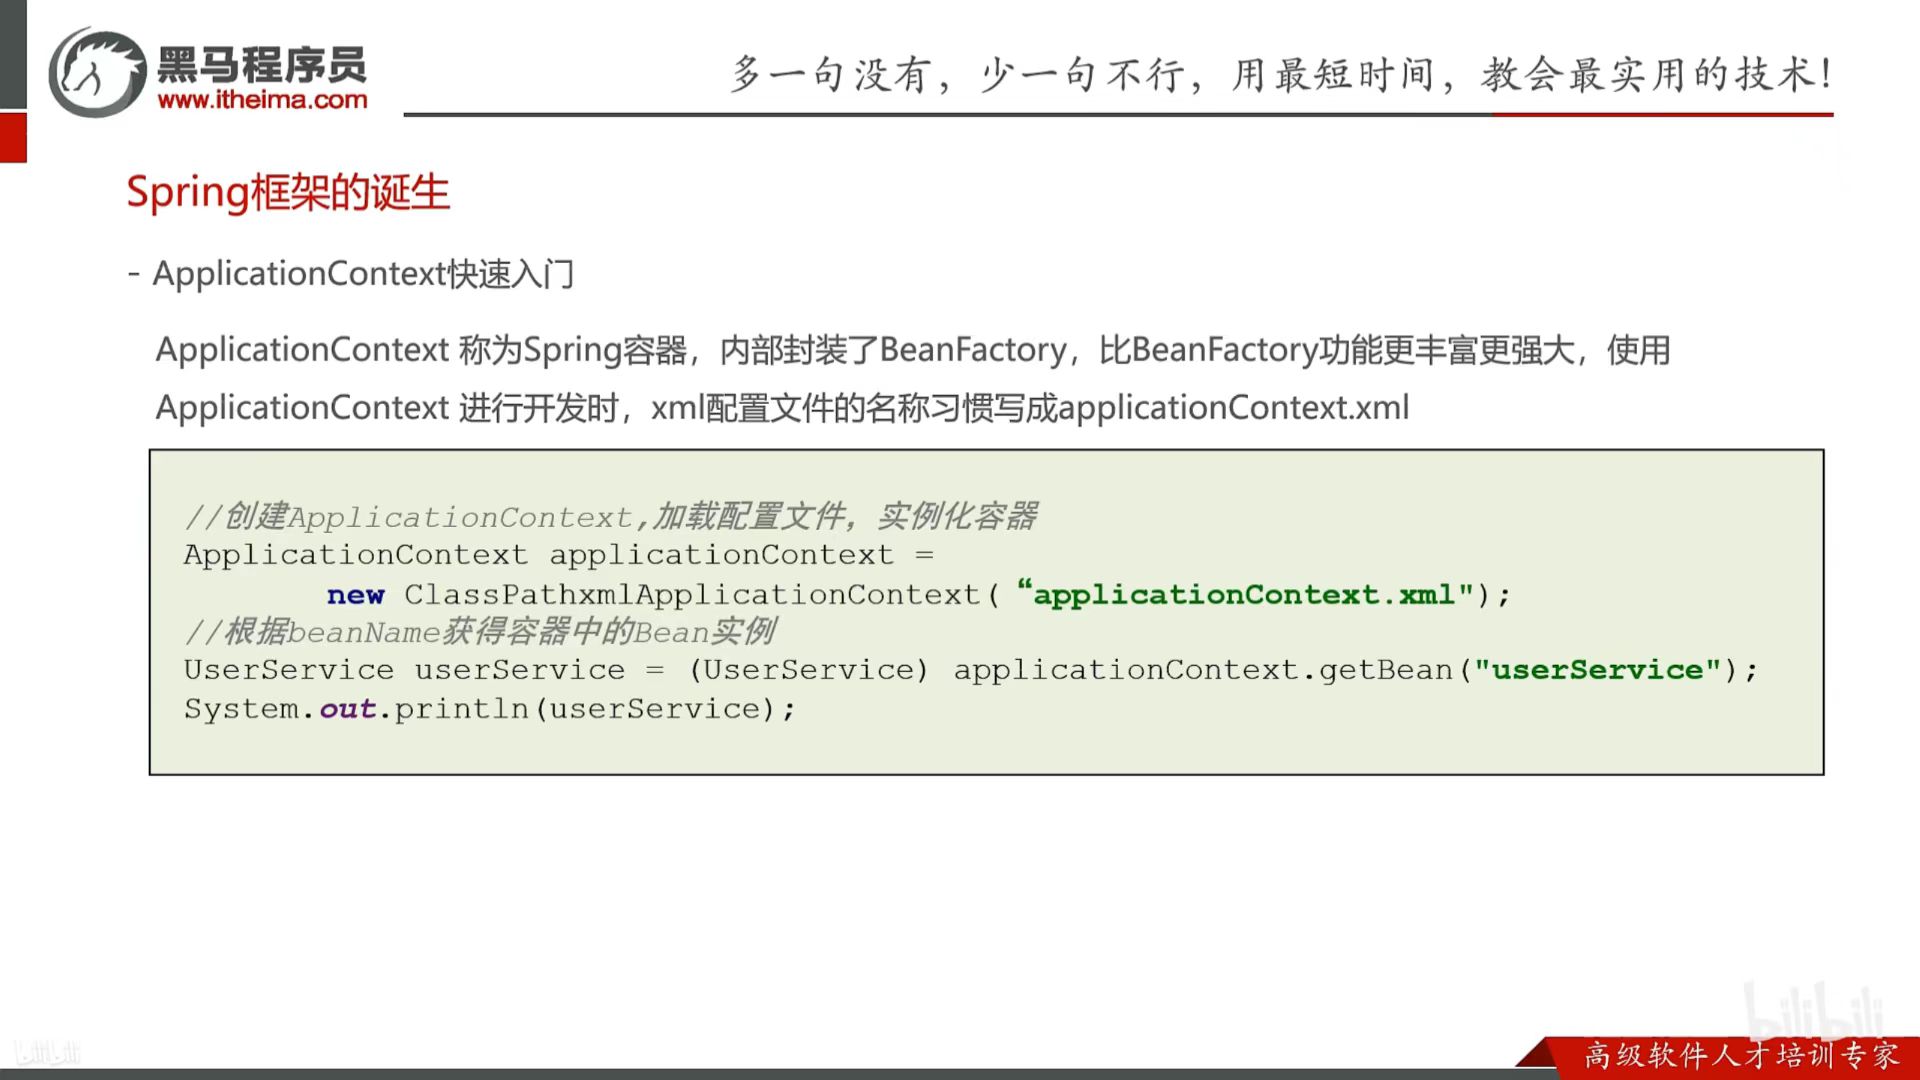
ApplicationContext快速入门
public class ApplicationContextTest {
    public static void main(String[] args) {
        ApplicationContext applicationContext = new ClassPathXmlApplicationContext("beams.xml");
        UserService userservice =(UserService)applicationContext.getBean("userService");
        System.out.println(userservice);
    }
}
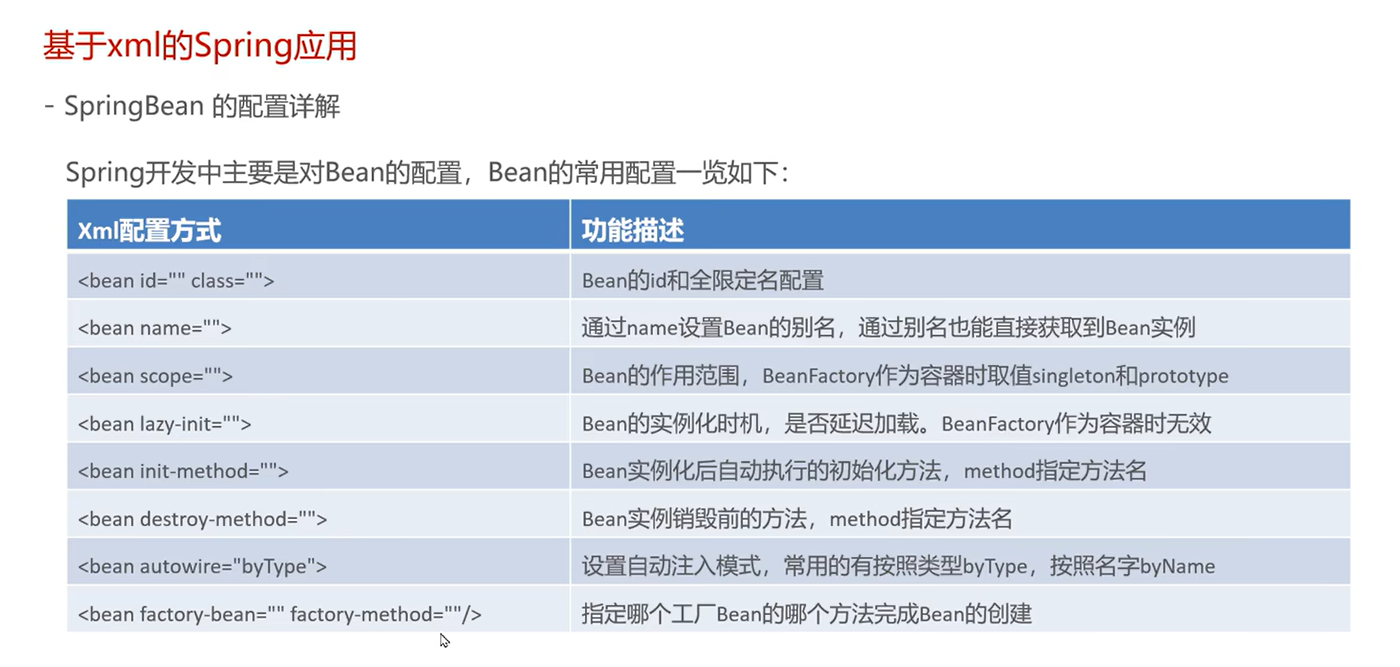
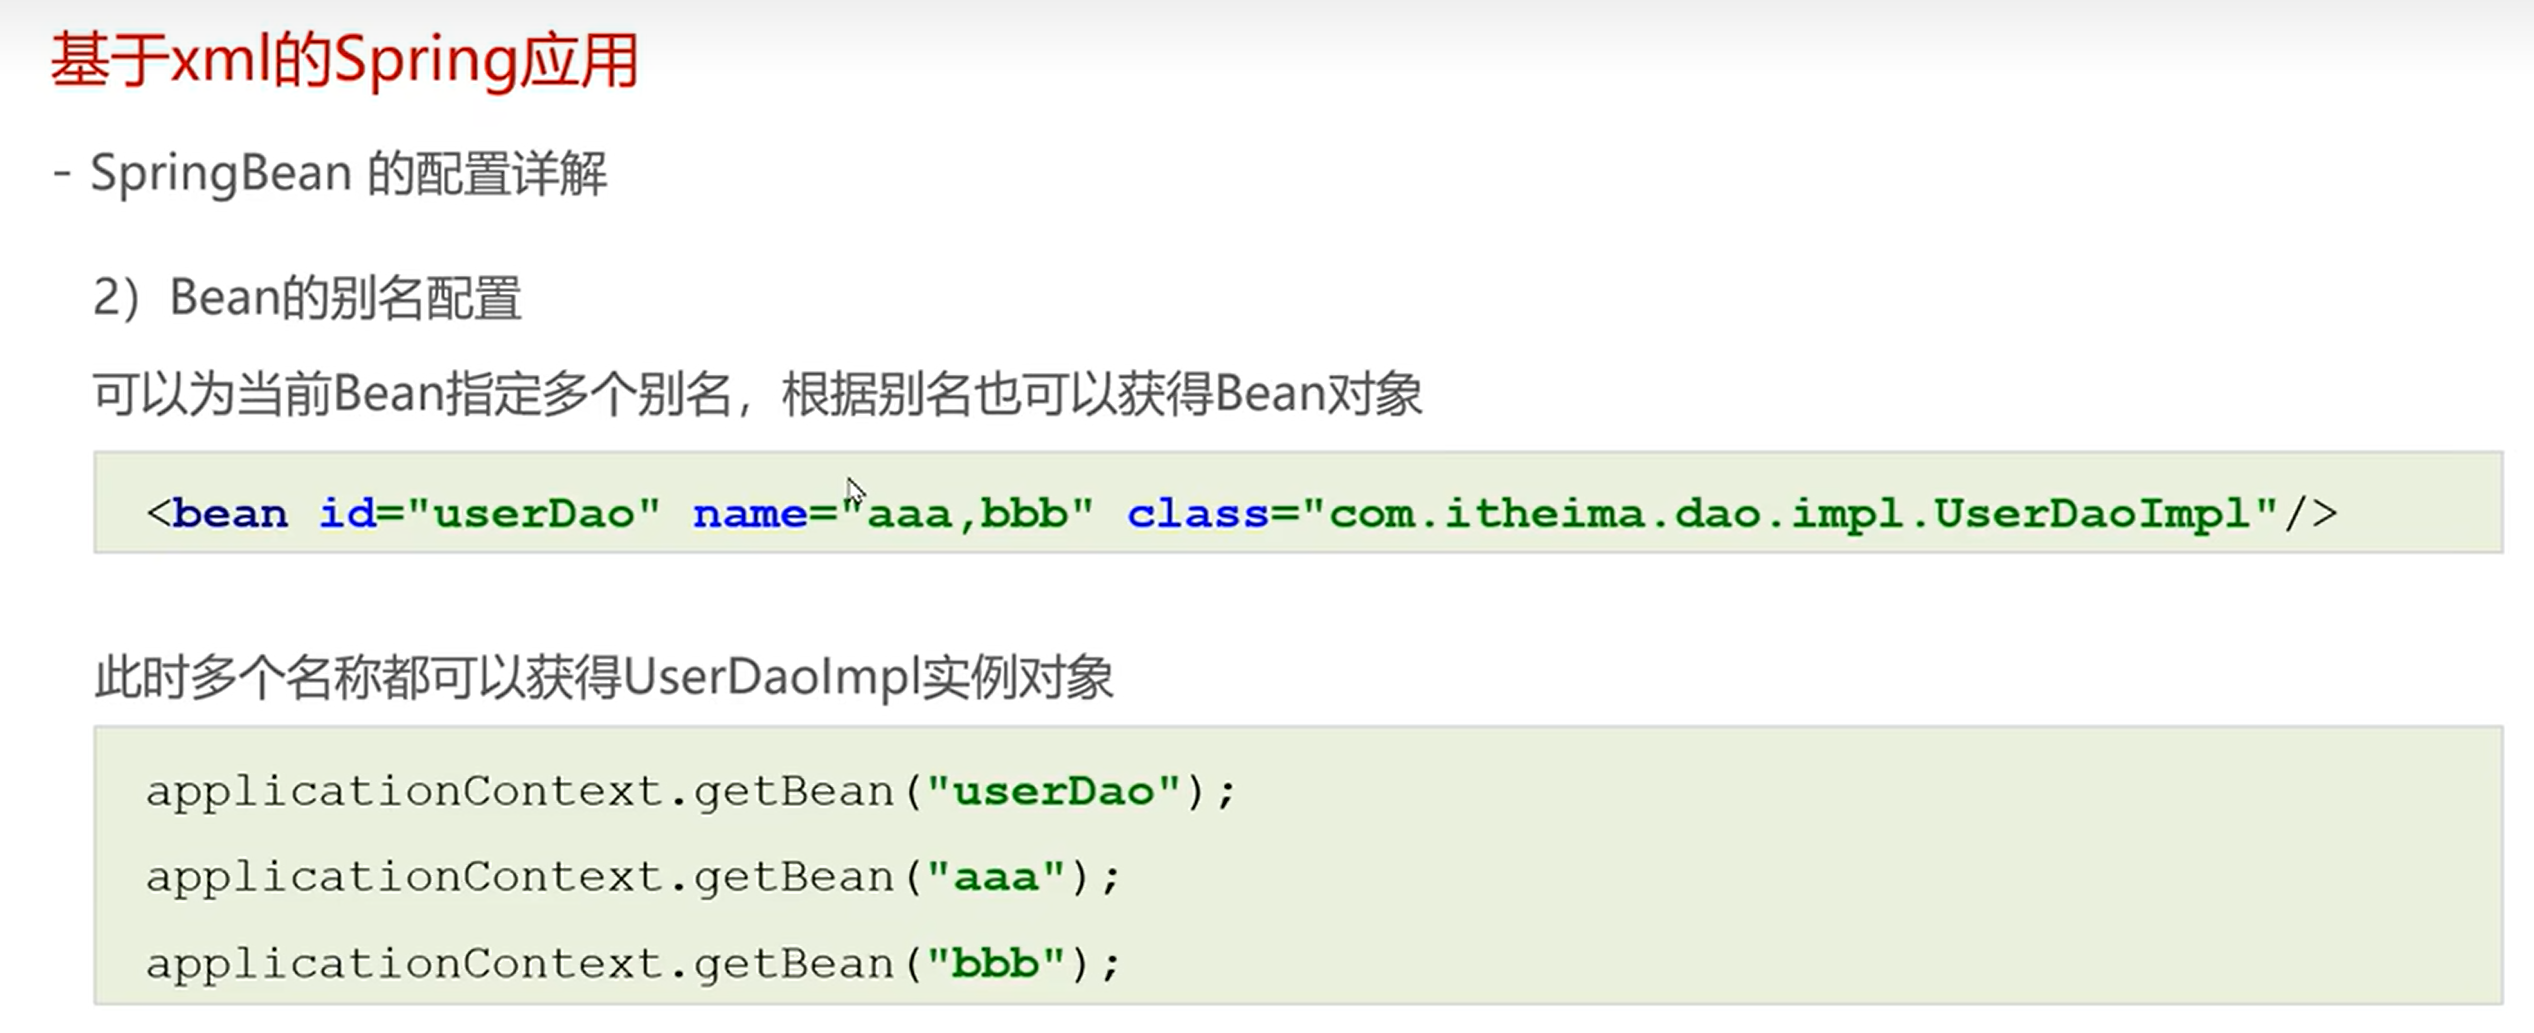
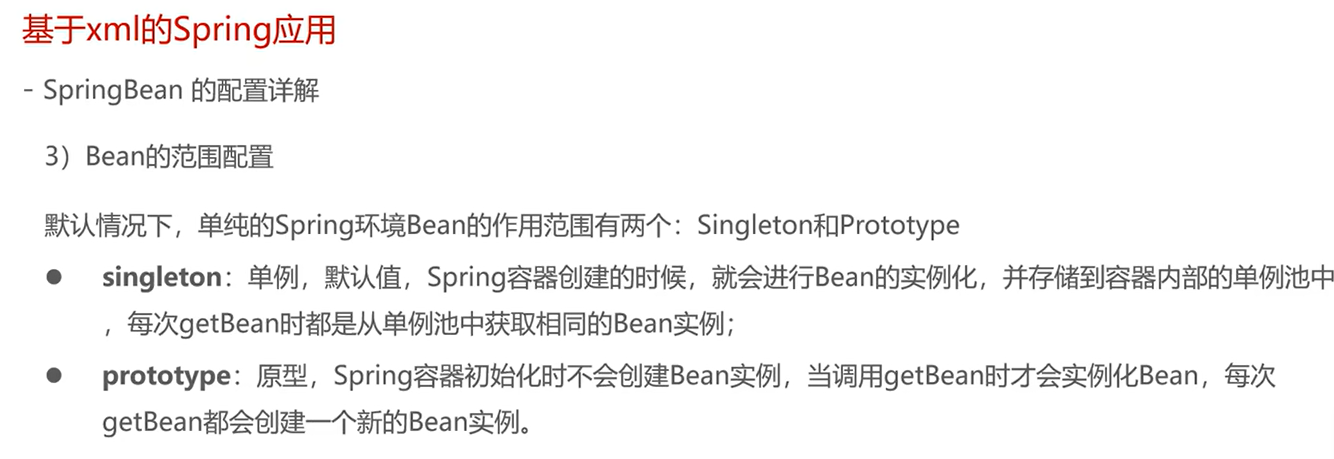
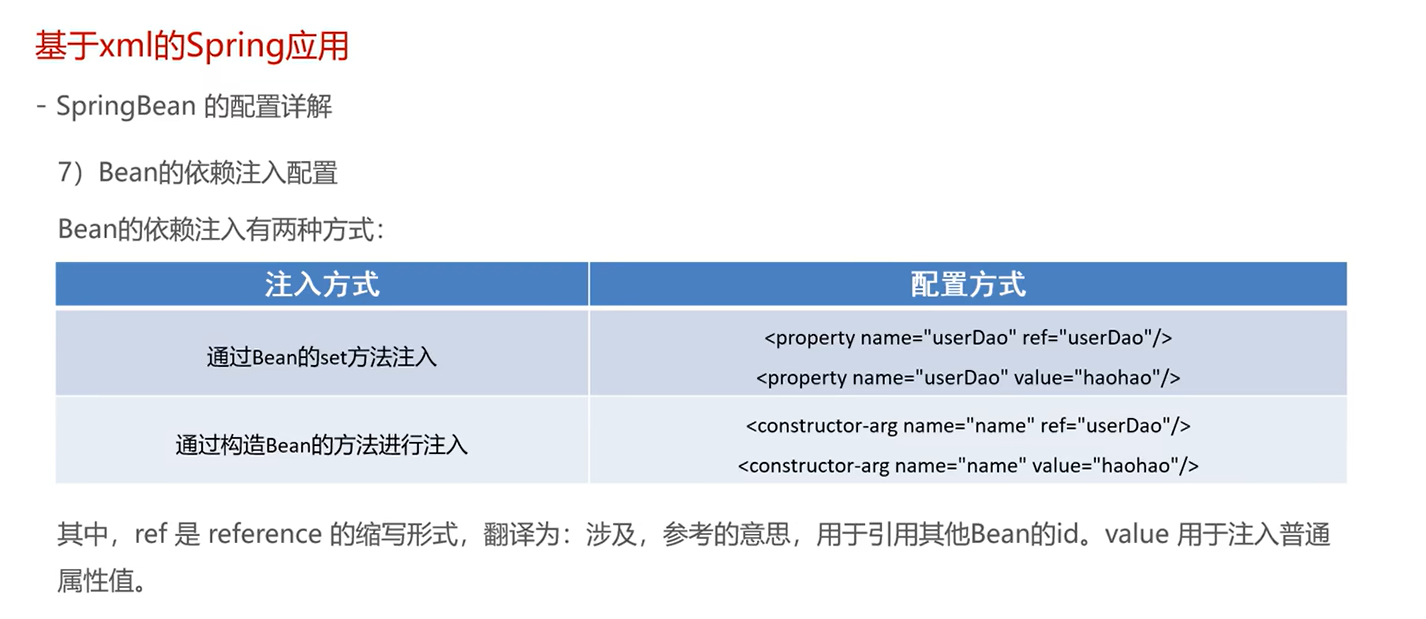
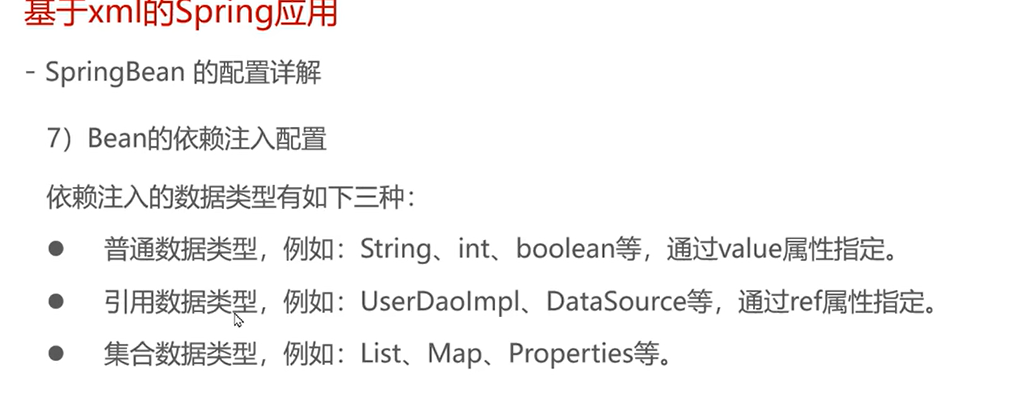
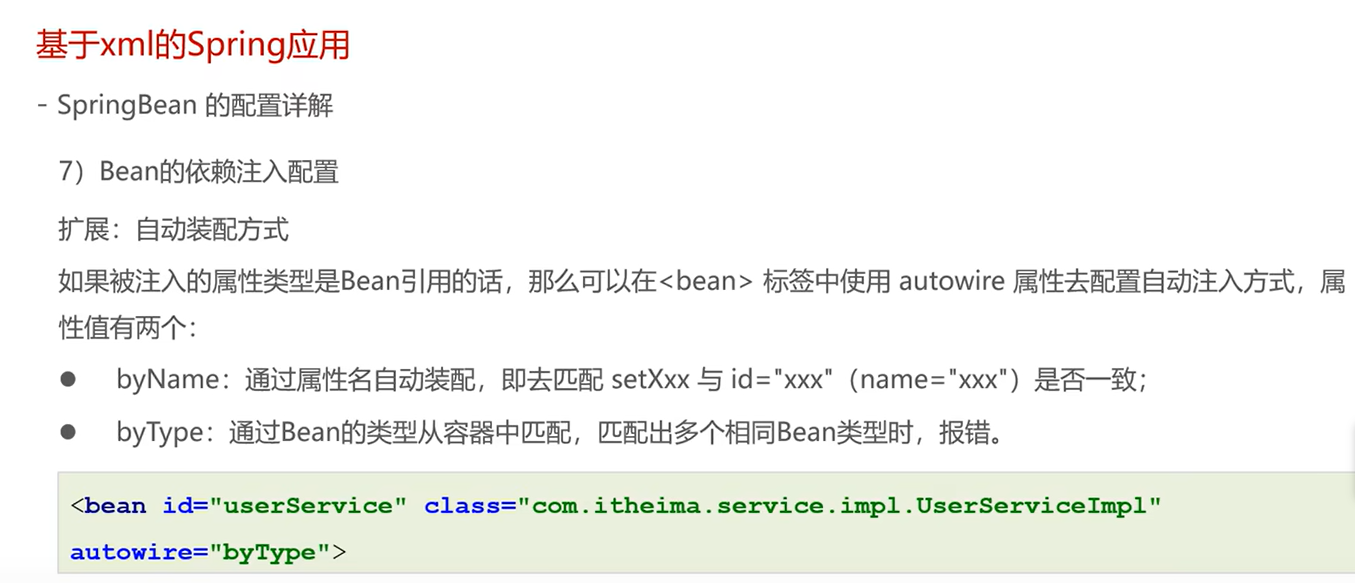
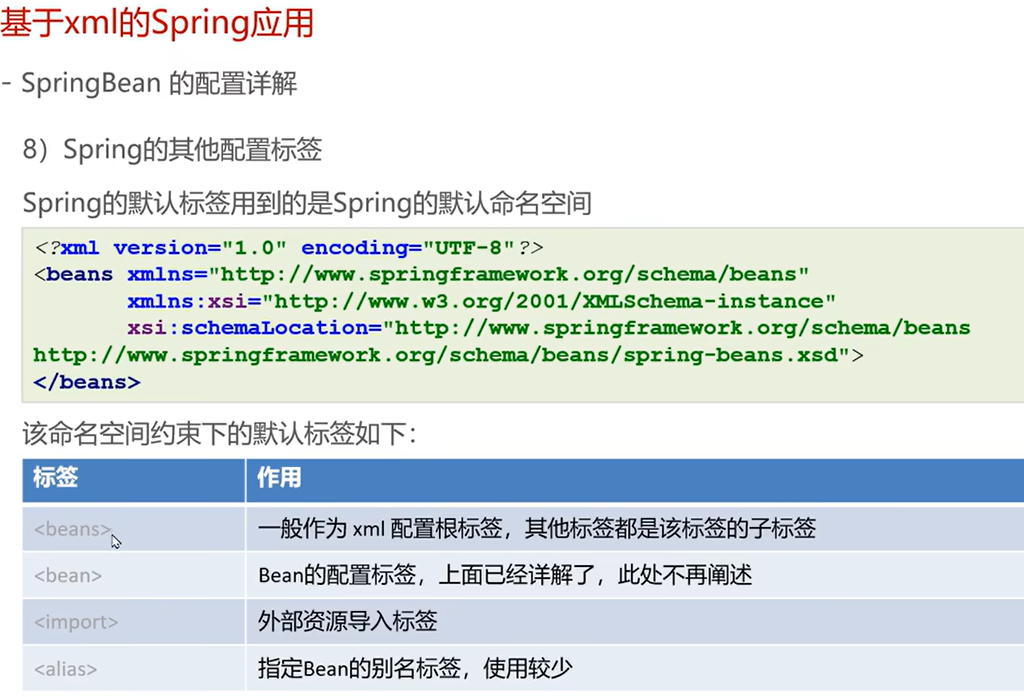
基于xml的Spring应用
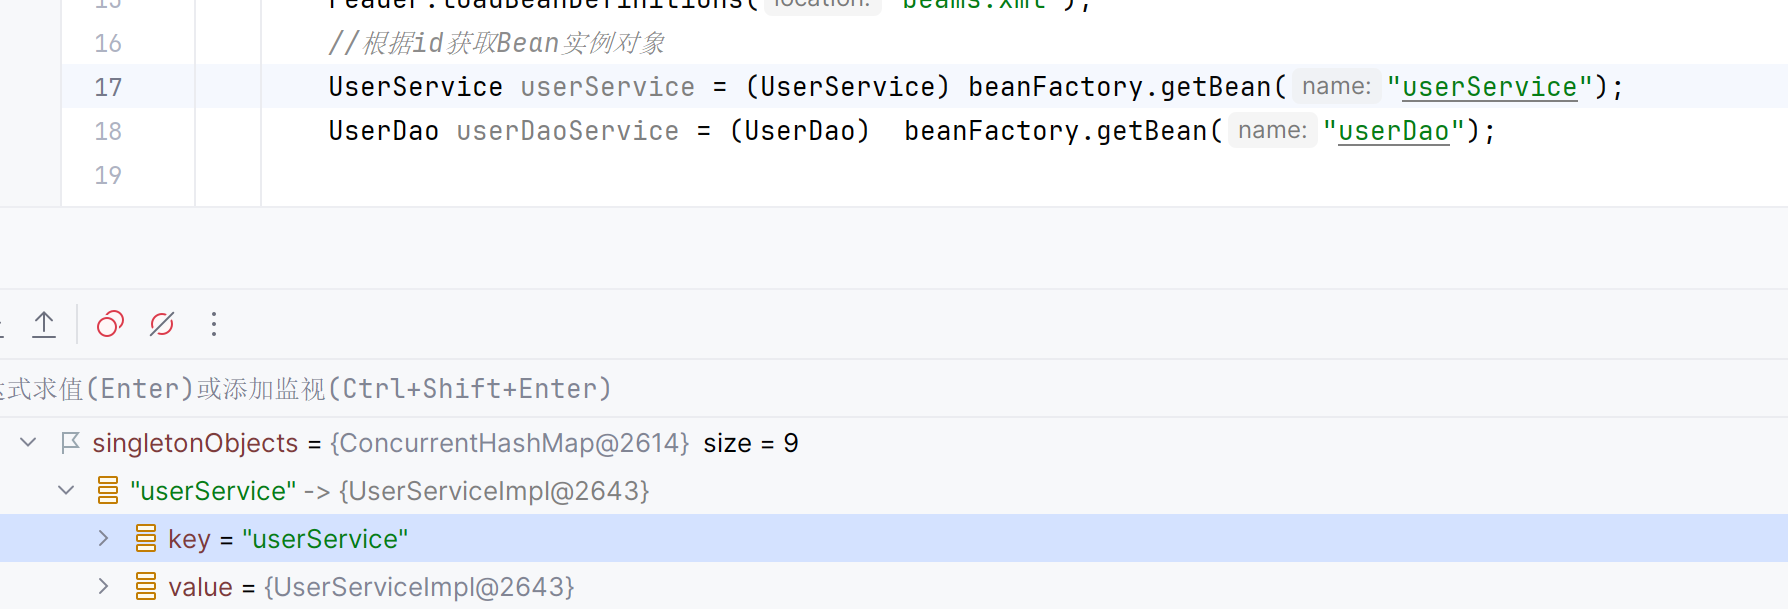
<bean id="userService" class="com.example.demo.service.impl.UserServiceImpl" >中id会对应getbean的name。其实所有的对象都是用 Map集合存储;假设去掉id后,就变成getbean(com.example.demo.service.impl.UserServiceImpl);其中singletonObjects就是单例池。
对于prototype会一直不往单例池中存储实例化Bean
public class ApplicationContextTest {
    public static void main(String[] args) {
        ApplicationContext applicationContext = new ClassPathXmlApplicationContext("beams.xml");
        UserService userservice =(UserService)applicationContext.getBean("userService");
        UserService userservice1 =(UserService)applicationContext.getBean("userService");
        UserService userservice2 =(UserService)applicationContext.getBean("userService");
        System.out.println(userservice);
        System.out.println(userservice1);
        System.out.println(userservice2);

    }
}


----singleton//获取相同bean实例
打印输出
com.example.demo.service.impl.UserServiceImpl@396d5246
com.example.demo.service.impl.UserServiceImpl@396d5246
com.example.demo.service.impl.UserServiceImpl@396d5246
-----prototype//每次都实例化一个新的bean实例
Bcom.example.demo.service.impl.UserServiceImpl@4c12331b
com.example.demo.service.impl.UserServiceImpl@7586beff
com.example.demo.service.impl.UserServiceImpl@3b69e7d1

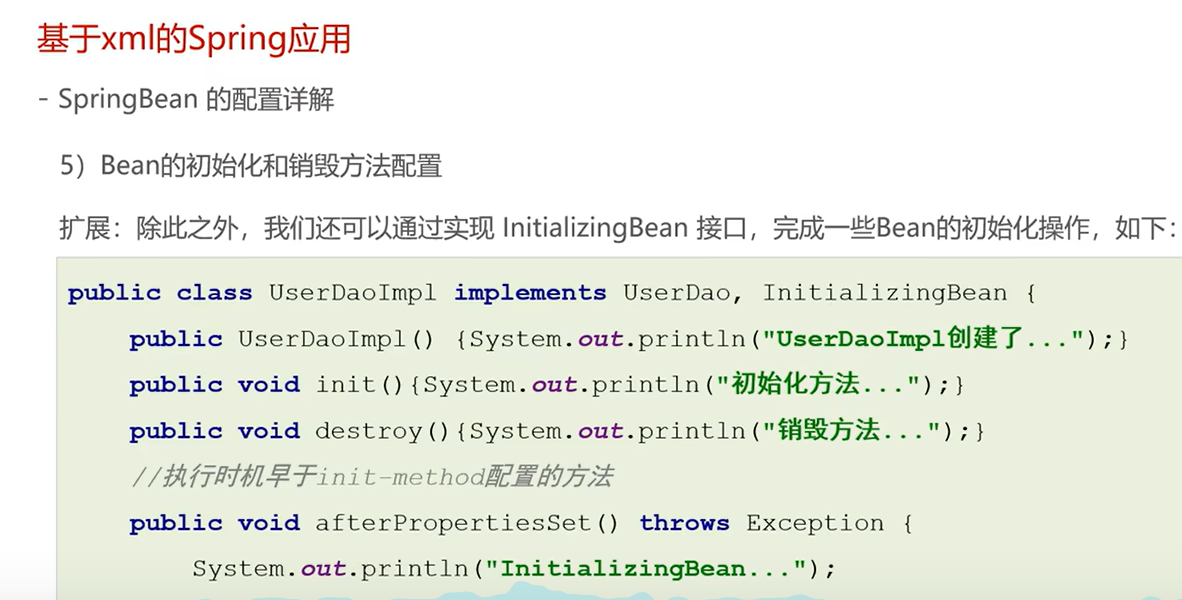
- init-method 是在构造方法之后,要区别于创建对象的构造方法
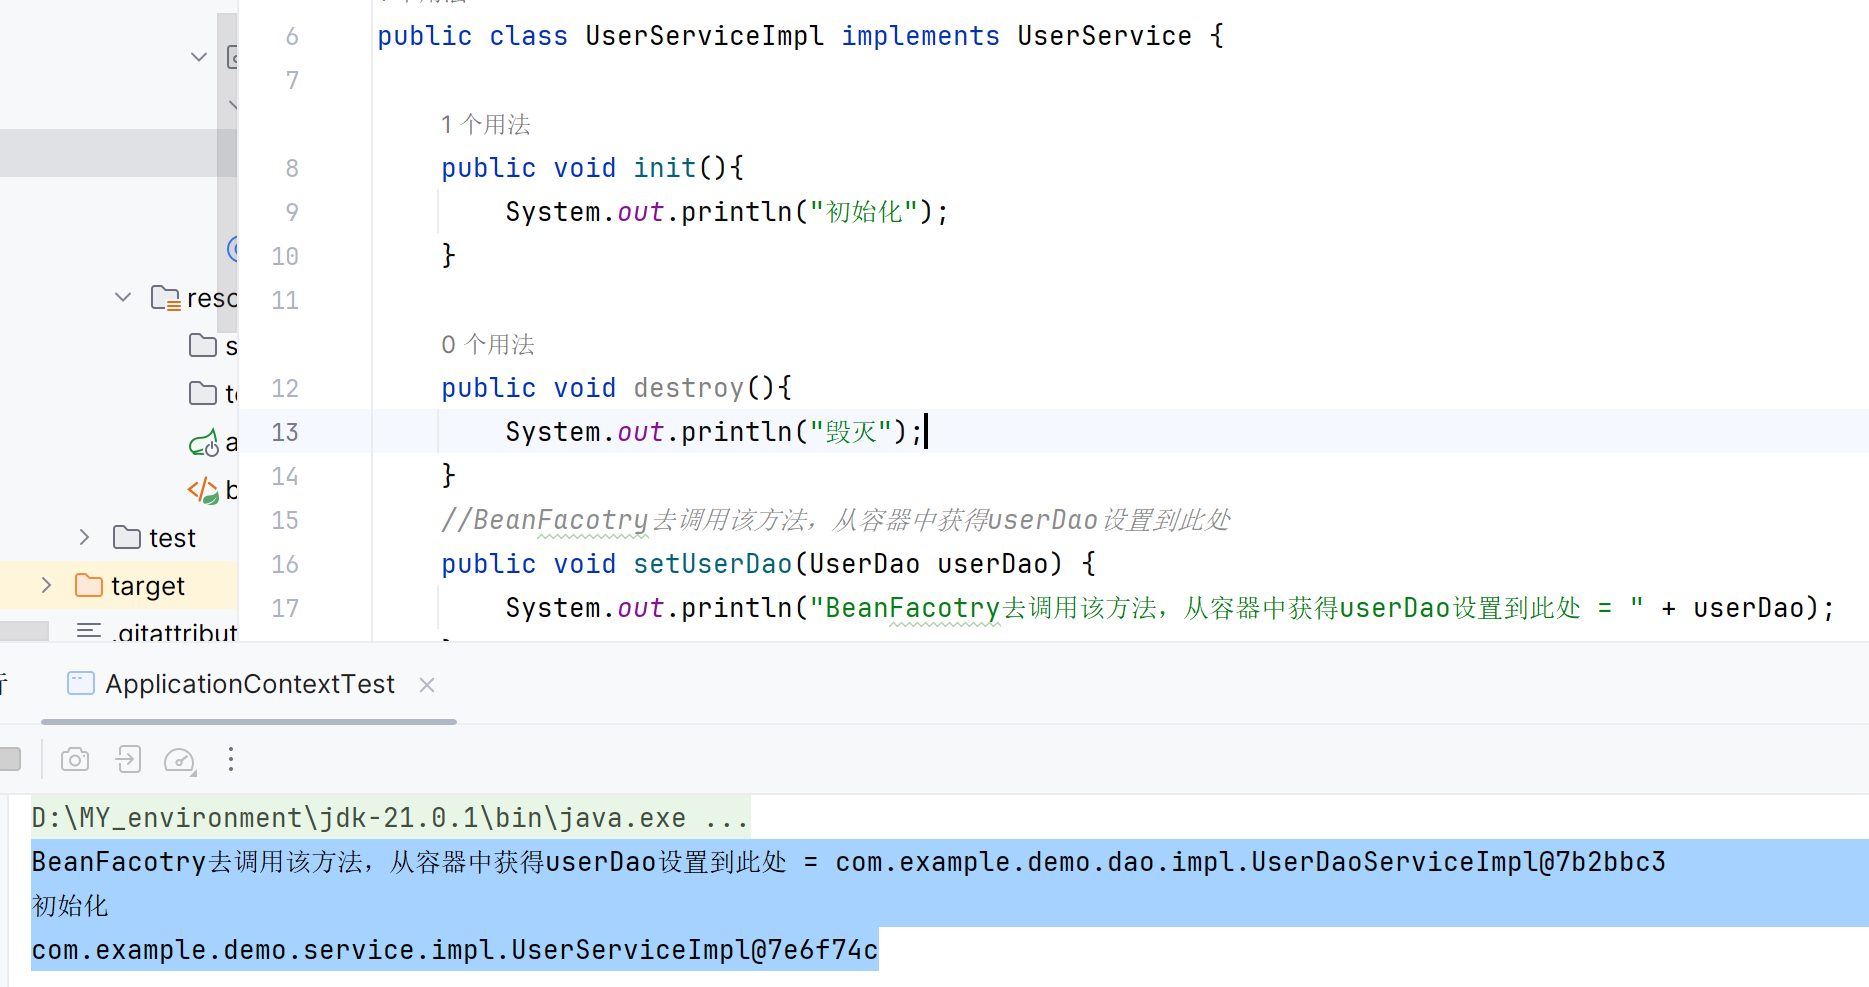
public class UserServiceImpl implements UserService, InitializingBean{

    public void init(){
        System.out.println("初始化方法调用");
    }

    public void destroy(){
        System.out.println("毁灭");
    }

    public UserServiceImpl() {
        System.out.println("构造函数调用完毕");
    }

    //BeanFacotry去调用该方法,从容器中获得userDao设置到此处
    public void setUserDao(UserDao userDao) {
        System.out.println( "属性设置完毕");
        System.out.println("BeanFacotry去调用该方法,从容器中获得userDao设置到此处 = " + userDao);
    }

    @Override
    public void afterPropertiesSet() throws Exception {
        System.out.println( "afterPropertiesSet调用完毕");
    }
}

----打印输出----
构造函数调用完毕
属性设置完毕
BeanFacotry去调用该方法,从容器中获得userDao设置到此处 = com.example.demo.dao.impl.UserDaoServiceImpl@1aafa419
afterPropertiesSet调用完毕
初始化方法调用
com.example.demo.service.impl.UserServiceImpl@6a78afa0
constructor-arg 的对象不止是 构造函数
<bean id="userService" class="com.example.demo.service.impl.UserServiceImpl" init-method="init">
    <constructor-arg name="name" value="ciki"></constructor-arg>
    <property name="userDao" ref="userDao"></property>
</bean>

public UserServiceImpl(String name) {
    System.out.println("name = " + name);
    System.out.println("有参构造函数调用完毕");
}
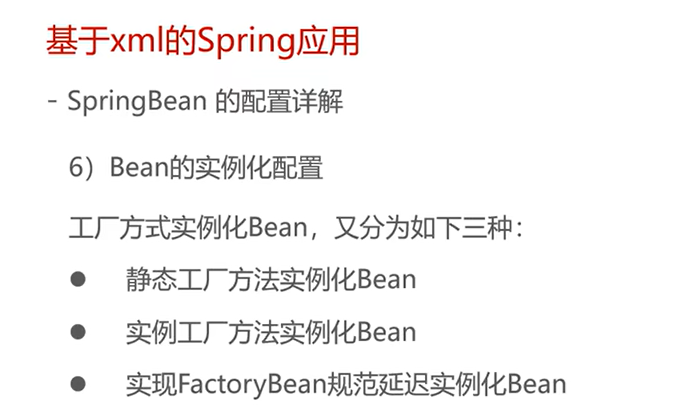
- 不会再把MyBeanFactory注册为对象, 而是把factory-method里的userDao方法返回的对象注册为对象
 <bean id="userDao1" class="com.example.demo.factory.MyBeanFactory" factory-method="userDao"></bean>

public class MyBeanFactory {
/*spring容器调用MyBeanFactory中的静态方法,将返回的对象存储到容器中
*
* */
    public static UserDao userDao(){
        //可以在Bean创建前进行一些其它业务逻辑
        return new UserDaoServiceImpl();
    }
}
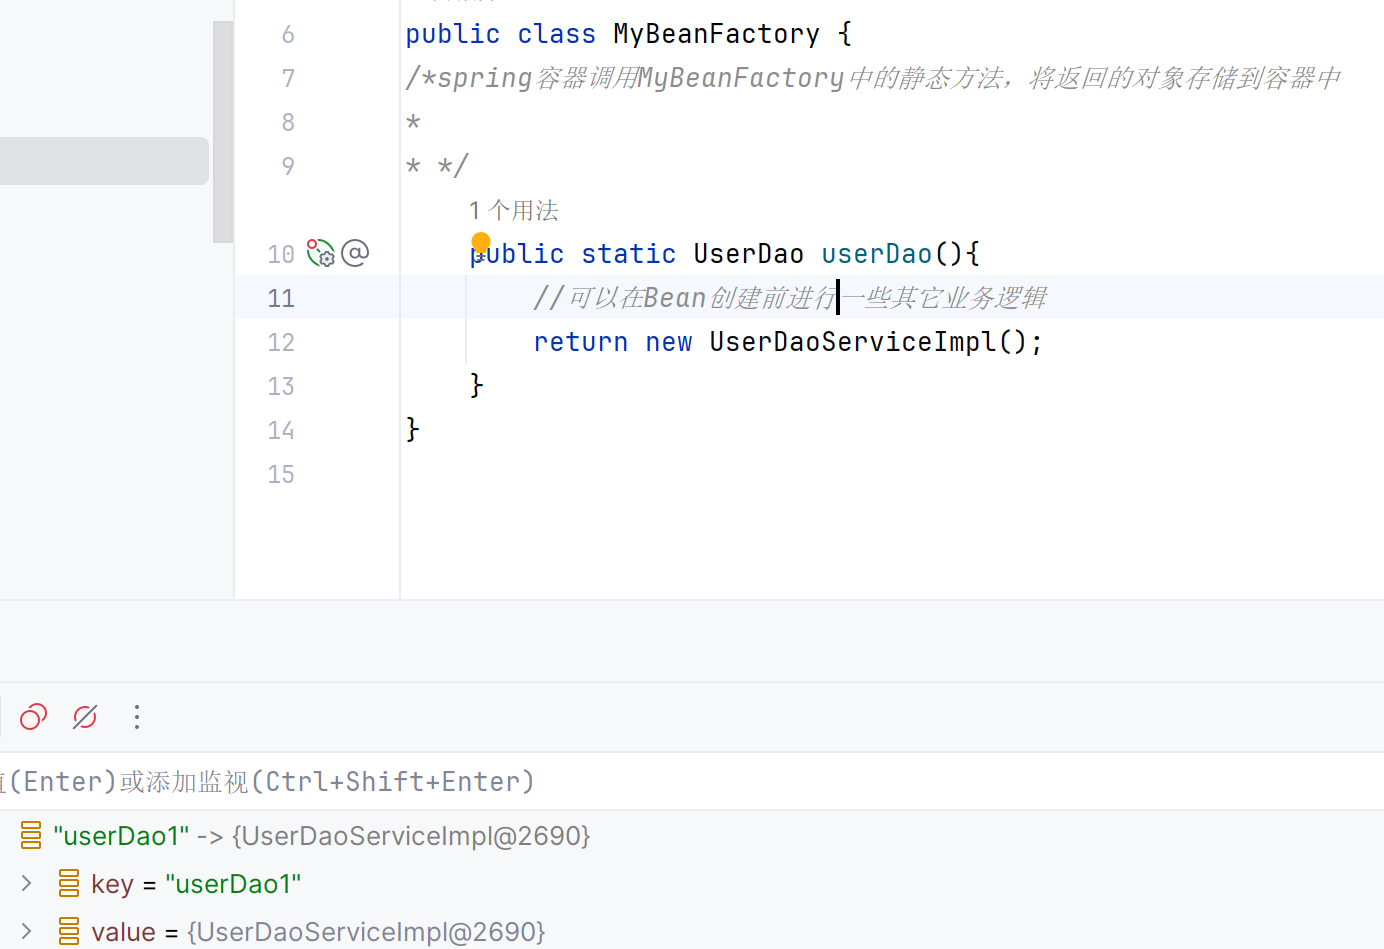
注:静态工厂方式不需要创建MyBeanFactory对象,就可以直接调用userDao方法;而实例工厂方式需要先创建MyBeanFactory对象,再调用userDao方法
public class MyBeanFactory1 {

    public UserDao userDao(){
        //可以在Bean创建前进行一些其它业务逻辑
        return new UserDaoServiceImpl();
    }
}

<!--配置工厂对象-->
    <bean id="MyBeanFactory1" class="com.example.demo.factory.MyBeanFactory1"></bean>
    <bean id="userDao2" factory-bean="MyBeanFactory1" factory-method="userDao"></bean>
----UserServiceImpl----
   private List<String> stringlist;

    public void setStringlist(List<String> stringlist) {
        this.stringlist = stringlist;
    }

    private List<UserDao>userDaoList;

    public void setUserDaoList(List<UserDao> userDaoList) {
        this.userDaoList = userDaoList;
    }

--beam.s--
    <bean id="userService" class="com.example.demo.service.impl.UserServiceImpl">
        <property name="stringlist" >
            <list>
                <value>aaa</value>
                <value>bbb</value>
                <value>ccc</value>
            </list>
        </property>
        <property name="userDaoList">
            <list>
                <bean class="com.example.demo.dao.impl.UserDaoServiceImpl"></bean>
                <bean class="com.example.demo.dao.impl.UserDaoServiceImpl"></bean>
                <bean class="com.example.demo.dao.impl.UserDaoServiceImpl"></bean>
            </list>
        </property>
    </bean>

或者
<ref bean="userDao1"></ref>
原来
<bean id="userService" class="com.example.demo.service.impl.UserServiceImpl" >
    <property name="userDao" ref="userDao"></property>
</bean>

    <bean id="userDao" class="com.example.demo.dao.impl.UserDaoServiceImpl"></bean>
现在
<bean id="userService" class="com.example.demo.service.impl.UserServiceImpl" autowire="byName">
</bean>
<bean id="userDao" class="com.example.demo.dao.impl.UserDaoServiceImpl"></bean>
此时第二个bean的id名字要求是setXxx中的xxx
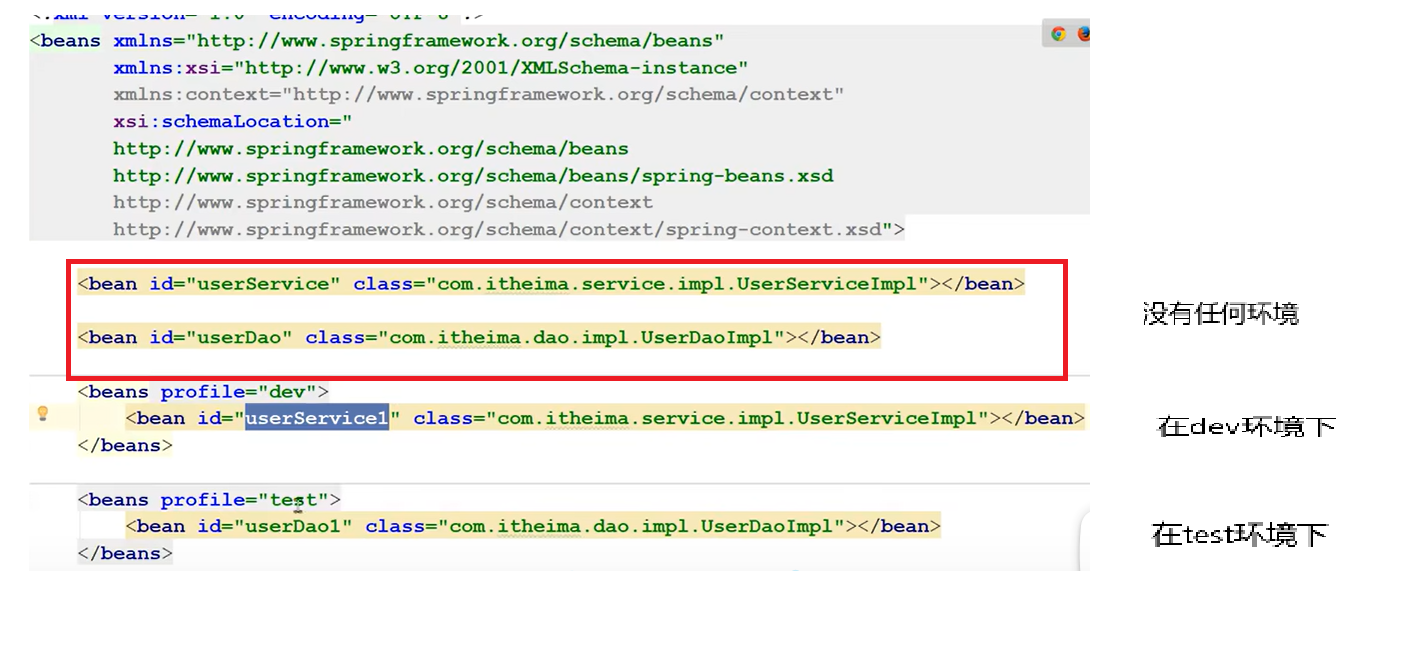
如果不指定环境,则使用默认环境,否则用语句指定环境,但公共部分即没有用特定环境的语句也生效。

- 通过import引入其他模块的配置文件
<import resource="orders.xml"></import>
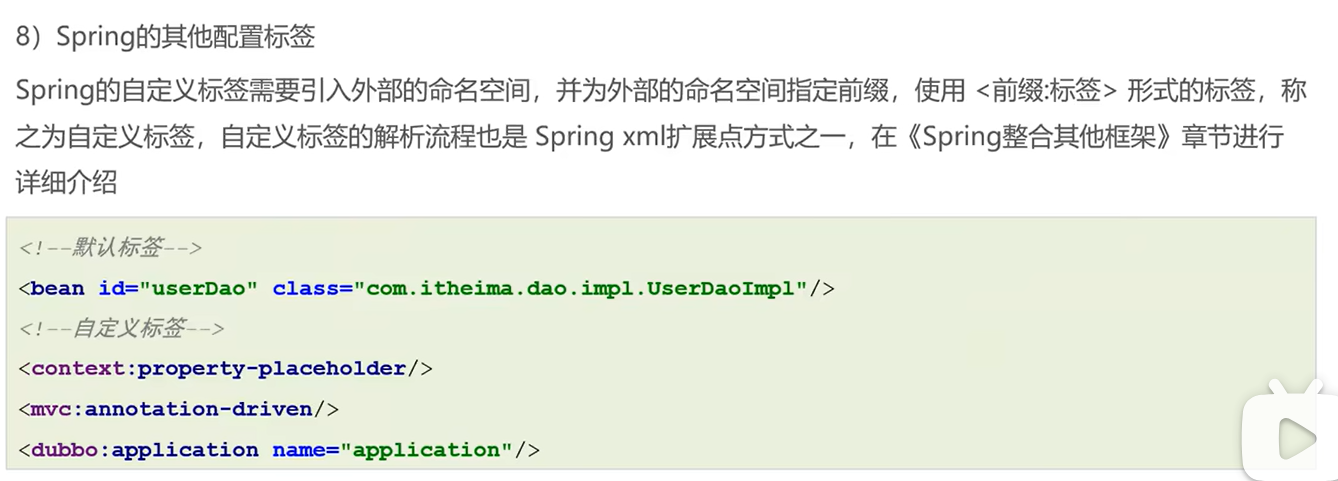
- 自定义标签
先在pom.xml导入依赖webmvn
对于第三方导入
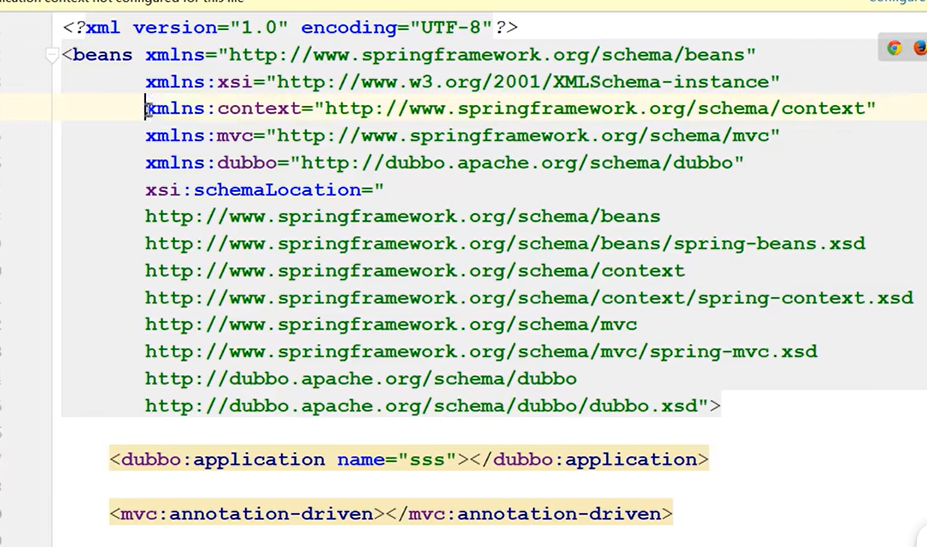
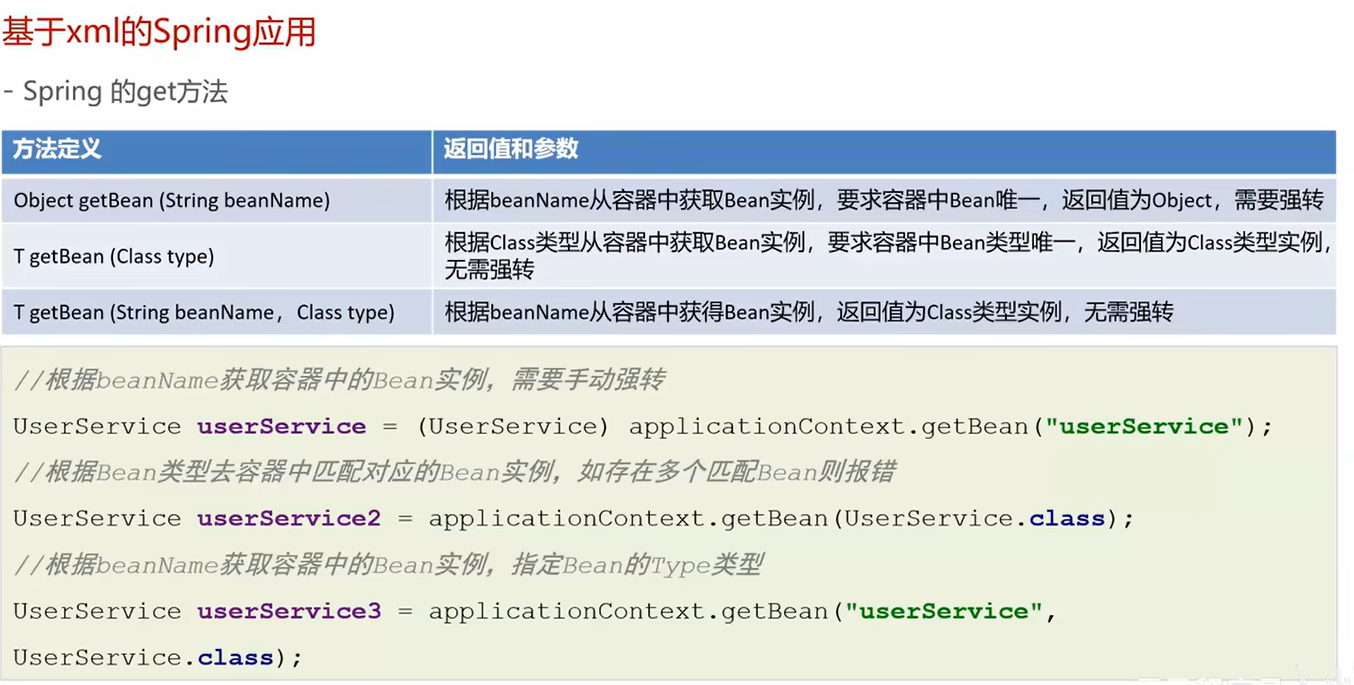
三种getBean的常用Api
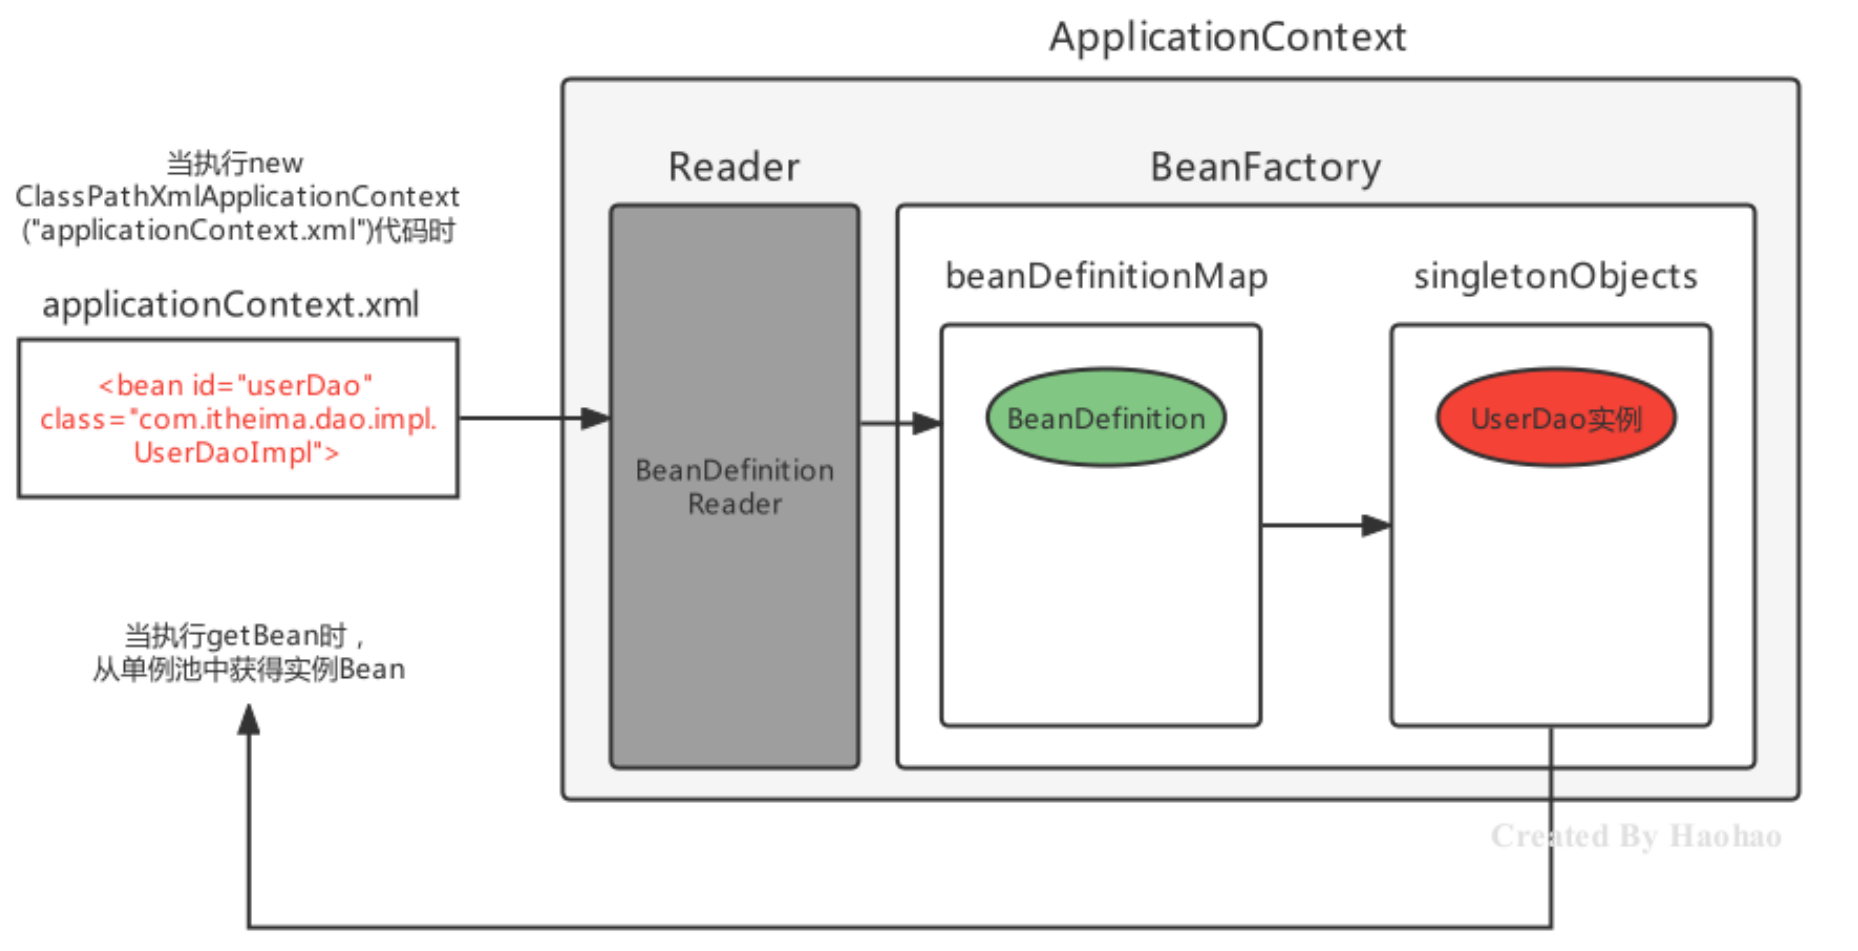
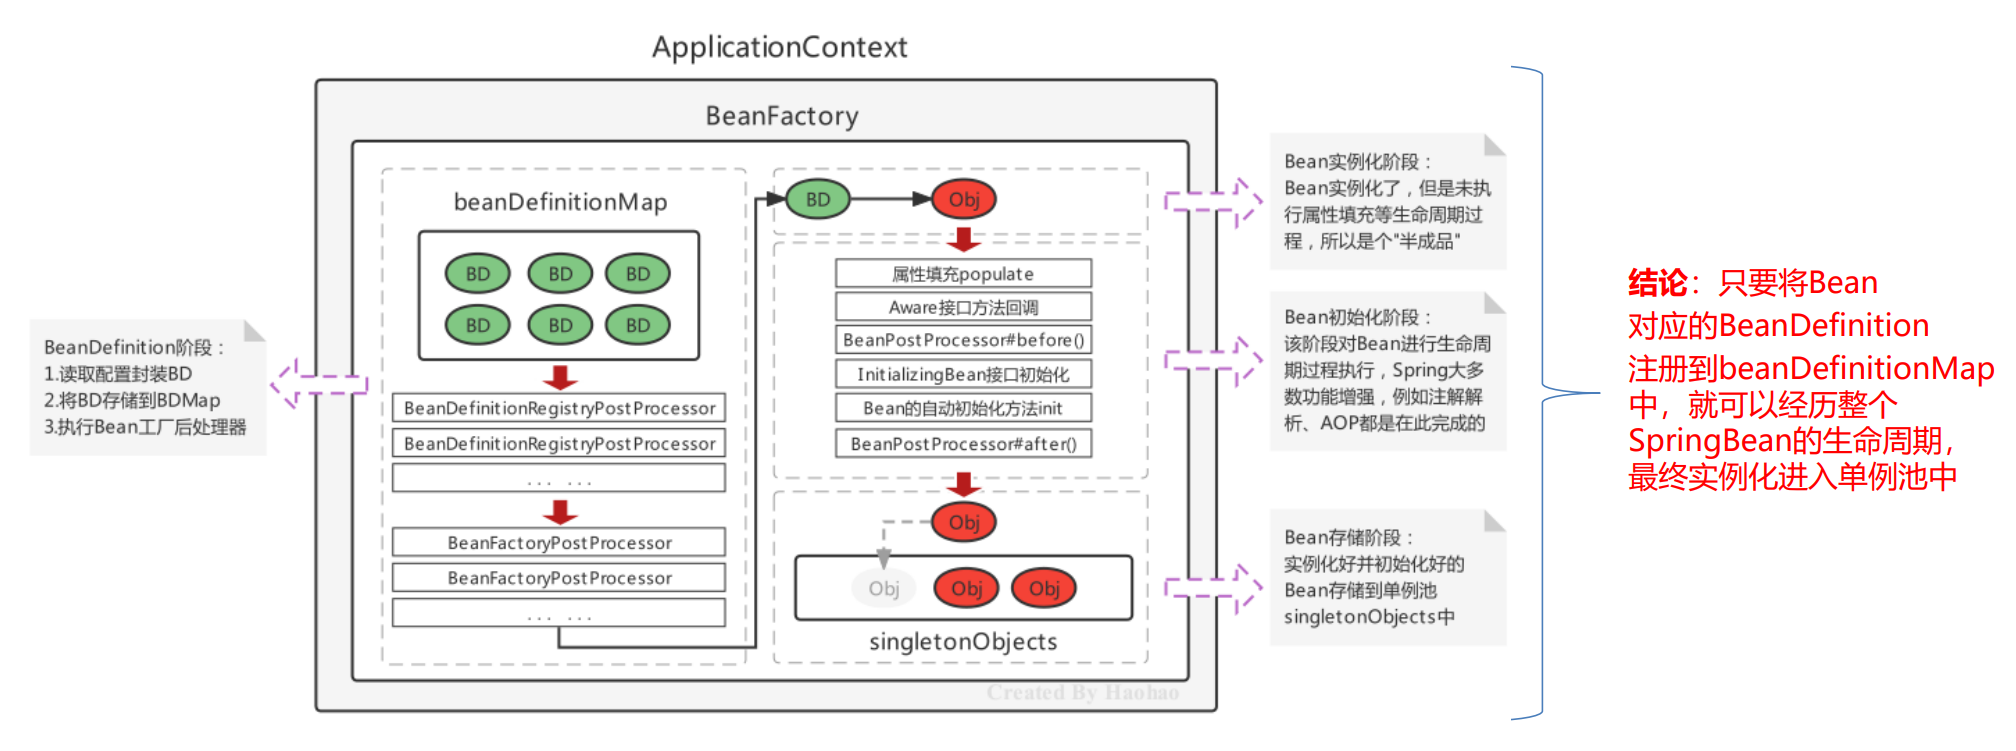
Bean 实例化的基本流程
Spring容器在进行初始化时,会将xml配置的的信息封装成一个BeanDefinition对象,所有的 BeanDefinition存储到一个名为beanDefinitionMap的Map集合中去,Spring框架在对该Map进行遍历,使用反射创建Bean实例对象,创建好的Bean对象存储在一个名为singletonObjects的Map集合中,当调用getBean方法 时则最终从该Map集合中取出Bean实例对象返回。
DefaultListableBeanFactory对象内部维护着一个Map用于存储封装好的BeanDefinitionMap。
public class DefaultListableBeanFactory extends ... implements ... {
//存储<bean>标签对应的BeanDefinition对象
//key:是Bean的beanName,value:是Bean定义对象BeanDefinition
private final Map<String, BeanDefinition> beanDefinitionMap;
}
Bean 实例化的基本流程
⚫ 加载xml配置文件,解析获取配置中的每个
⚫ 将BeanDefinition存储在一个名为beanDefinitionMap的Map<String,BeanDefinition>中;
⚫ ApplicationContext底层遍历beanDefinitionMap,创建Bean实例对象;
⚫ 创建好的Bean实例对象,被存储到一个名为singletonObjects的Map<String,Object>中;
⚫ 当执行applicationContext.getBean(beanName)时,从singletonObjects去匹配Bean实例返回。
Spring的后处理器
Spring的后处理器是Spring对外开发的重要扩展点,允许我们介入到Bean的整个实例化流程中来,以达到动态注册BeanDefinition,动态修改BeanDefinition,以及动态修改Bean的作用。Spring主要有两种后处理器:
⚫ BeanFactoryPostProcessor:Bean工厂后处理器,在BeanDefinitionMap填充完毕,Bean实例化之前执行;
⚫ BeanPostProcessor:Bean后处理器,一般在Bean实例化之后,填充到单例池singletonObjects之前执行
Spring Bean的生命周期
Spring Bean的生命周期是从 Bean 实例化之后,即通过反射创建出对象之后,到Bean成为一个完整对象,最终存储 到单例池中,这个过程被称为Spring Bean的生命周期。
- Spring Bean的生命周期大体上分为三个阶段:
⚫ Bean的实例化阶段:Spring框架会取出BeanDefinition的信息进行判断当前Bean的范围是否是singleton的, 是否不是延迟加载的,是否不是FactoryBean等,最终将一个普通的singleton的Bean通过反射进行实例化;
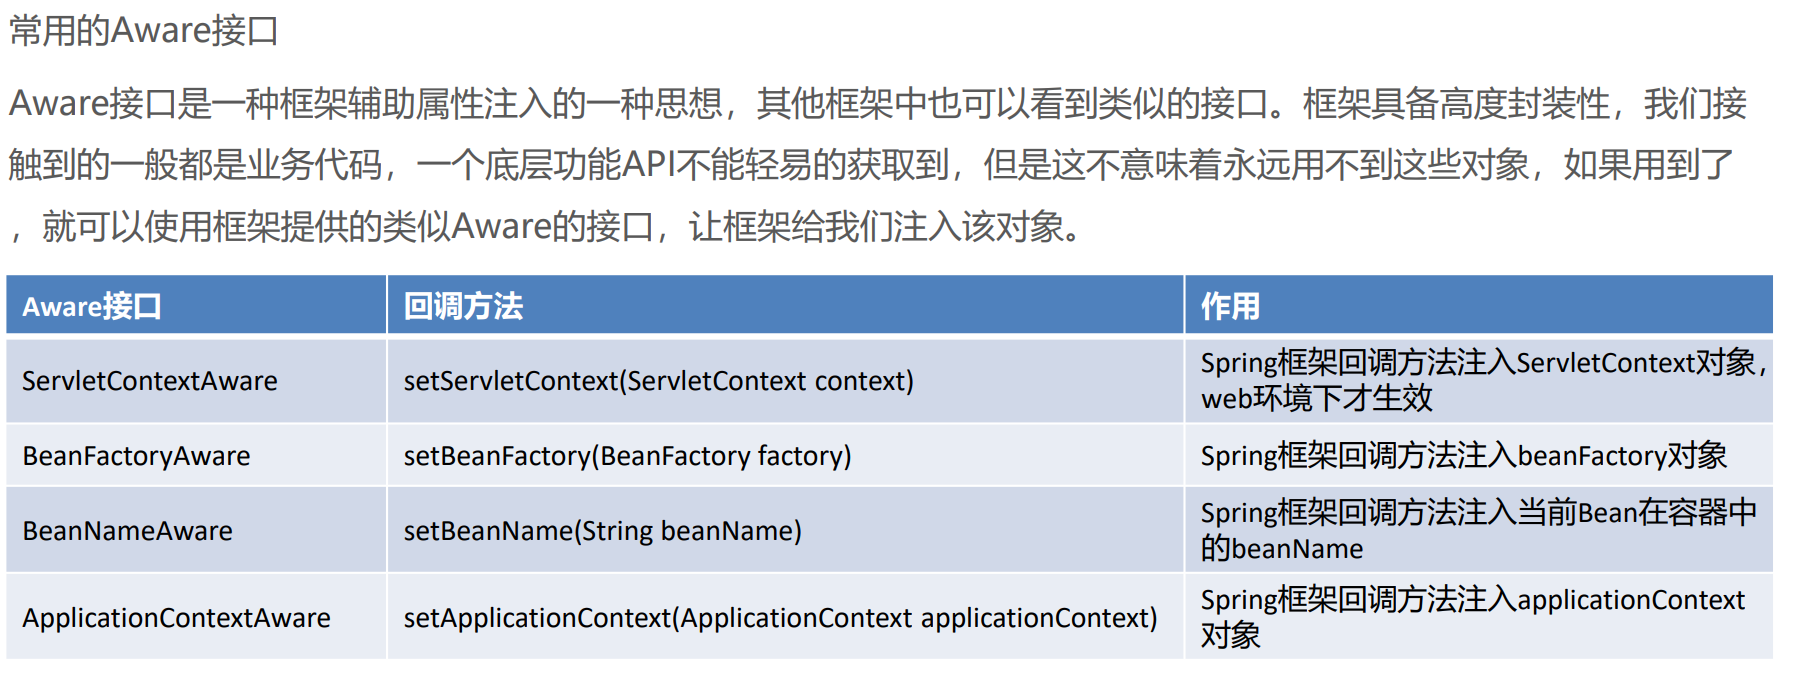
⚫ Bean的初始化阶段:Bean创建之后还仅仅是个"半成品",还需要对Bean实例的属性进行填充、执行一些Aware 接口方法、执行BeanPostProcessor方法、执行InitializingBean接口的初始化方法、执行自定义初始化init方法 等。该阶段是Spring最具技术含量和复杂度的阶段,Aop增强功能,后面要学习的Spring的注解功能等、 spring高频面试题Bean的循环引用问题都是在这个阶段体现的;
⚫ Bean的完成阶段:经过初始化阶段,Bean就成为了一个完整的Spring Bean,被存储到单例池 singletonObjects中去了,即完成了Spring Bean的整个生命周期。
- Spring Bean的初始化过程涉及如下几个过程:
⚫ Bean实例的属性填充
⚫ Aware接口属性注入
⚫ BeanPostProcessor的before()方法回调
⚫ InitializingBean接口的初始化方法回调
⚫ 自定义初始化方法init回调
⚫ BeanPostProcessor的after()方法回调
- Bean实例属性填充
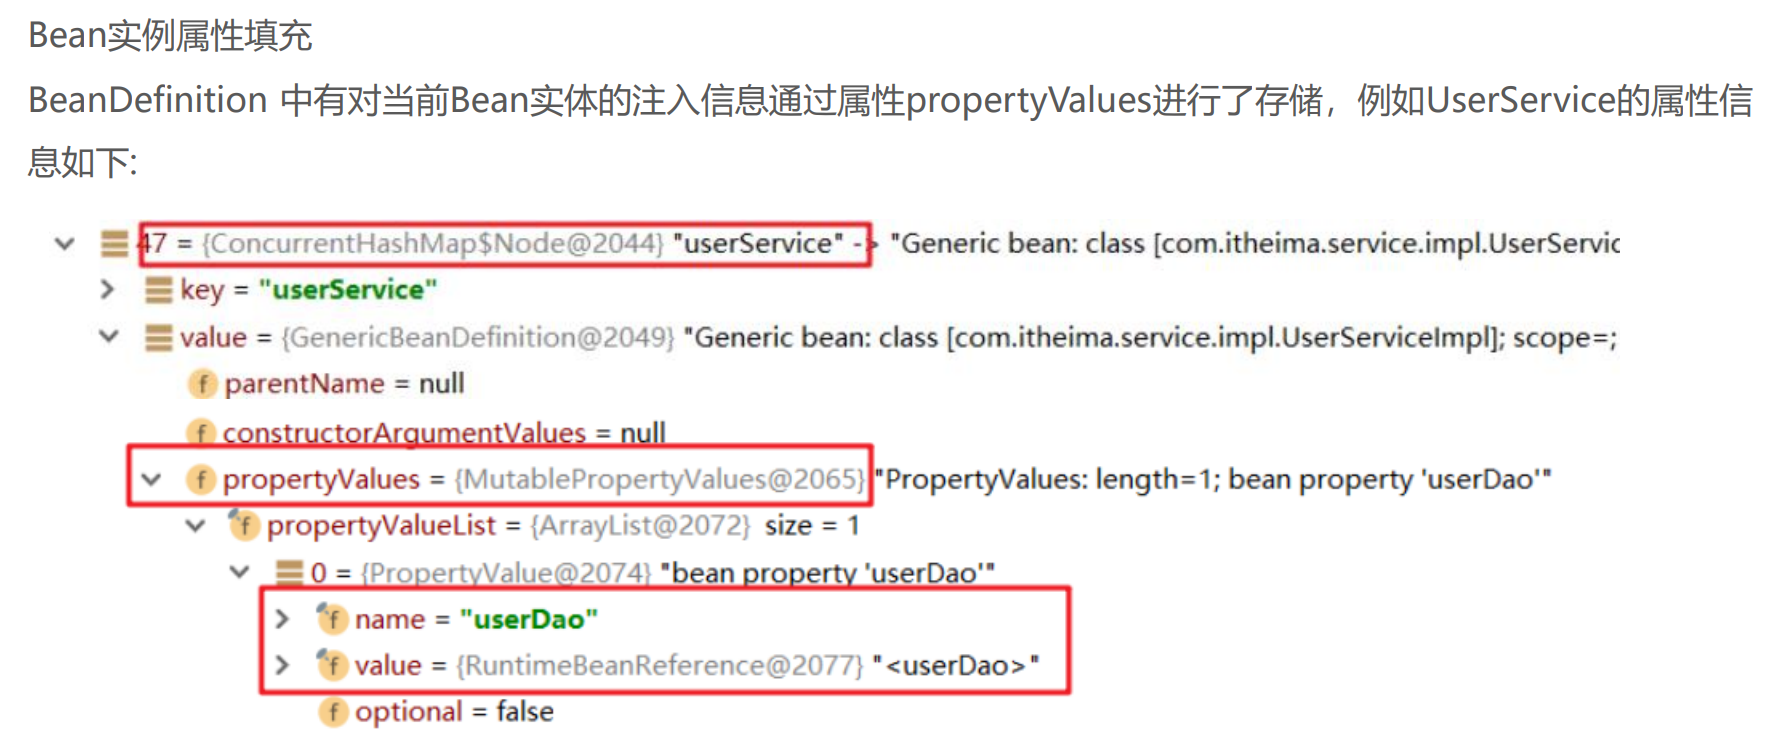
Spring在进行属性注入时,会分为如下几种情况:
⚫ 注入普通属性,String、int或存储基本类型的集合时,直接通过set方法的反射设置进去;
⚫ 注入单向对象引用属性时,从容器中getBean获取后通过set方法反射设置进去,如果容器中没有,则先创建被注入对象Bean实例(完成整个生命周期)后,在进行注入操作;
----单向对象引用属性
bean id="userService" class="com.example.demo.service.impl.UserServiceImpl" >
    <property name="userDao" ref="userDao"></property>
</bean>
<bean id="userDao" class="com.example.demo.dao.impl.UserDaoServiceImpl"></bean>
故需要先出现UserDaoServiceImpl才可以完成UserServiceImpl对象的注入,但是UserDaoServiceImpl不需要UserServiceImpl对象先注入完成
⚫ 注入双向对象引用属性时,就比较复杂了,涉及了循环引用(循环依赖)问题,下面会详细阐述解决方案。

public class UserServiceImpl implements UserService{
public void setUserDao(UserDao userDao) {}
}
public class UserDaoImpl implements UserDao{
public void setUserService(UserService userService){}
}
<bean id="userService" class="com.itheima.service.impl.UserServiceImpl">
<property name="userDao" ref="userDao"/>
</bean>
<bean id="userDao" class="com.itheima.dao.impl.UserDaoImpl">
<property name="userService" ref="userService"/>
</bean
Spring提供了三级缓存存储 完整Bean实例 和 半成品Bean实例 ,用于解决循环引用问题 在DefaultListableBeanFactory的上四级父类DefaultSingletonBeanRegistry中提供如下三个Map:
public class DefaultSingletonBeanRegistry ... {
//1、最终存储单例Bean成品的容器,即实例化和初始化都完成的Bean,称之为"一级缓存"
Map<String, Object> singletonObjects = new ConcurrentHashMap(256);
//2、早期Bean单例池,缓存半成品对象,且当前对象已经被其他对象引用了,称之为"二级缓存"
Map<String, Object> earlySingletonObjects = new ConcurrentHashMap(16);
//3、单例Bean的工厂池,缓存半成品对象,对象未被引用,使用时在通过工厂创建Bean,称之为"三级缓存"
Map<String, ObjectFactory<?>> singletonFactories = new HashMap(16)
}
UserService和UserDao循环依赖的过程结合上述三级缓存描述一下
⚫ UserService 实例化对象,但尚未初始化,将UserService存储到三级缓存;
⚫ UserService 属性注入,需要UserDao,从缓存中获取,没有UserDao;
⚫ UserDao实例化对象,但尚未初始化,将UserDao存储到到三级缓存;
⚫ UserDao属性注入,需要UserService,从三级缓存获取UserService,UserService从三级缓存移入二级缓存;
⚫ UserDao执行其他生命周期过程,最终成为一个完成Bean,存储到一级缓存,删除二三级缓存;
⚫ UserService 注入UserDao;
⚫ UserService执行其他生命周期过程,最终成为一个完成Bean,存储到一级缓存,删除二三级缓存。
Aware接口
Spring IoC 整体流程总结

Spring xml方式整合第三方框架
Spring整合MyBatis的原理剖析
整合包里提供了一个SqlSessionFactoryBean和一个扫描Mapper的配置对象,SqlSessionFactoryBean一旦被实例化,就开始扫描Mapper并通过动态代理产生Mapper的实现类存储到Spring容器中。相关的有如下四个类:
⚫ SqlSessionFactoryBean:需要进行配置,用于提供SqlSessionFactory;
⚫ MapperScannerConfigurer:需要进行配置,用于扫描指定mapper注册BeanDefinition;
⚫ MapperFactoryBean:Mapper的FactoryBean,获得指定Mapper时调用getObject方法;
⚫ ClassPathMapperScanner:definition.setAutowireMode(2) 修改了自动注入状态,所以MapperFactoryBean中的setSqlSessionFactory会自动注入进去
①配置SqlSessionFactoryBean作用是向容器中提供SqlSessionFactory,SqlSessionFactoryBean实现了 FactoryBean和InitializingBean两个接口,所以会自动执行getObject() 和afterPropertiesSet()方法 FactoryBean里的GetObject是为了实例化Bean
<!--配置SqlSessionFactoryBean,作用将SqlSessionFactory存储到spring容器-->
    <bean class="org.mybatis.spring.SqlSessionFactoryBean">
        <property name="dataSource" ref="dataSource"></property>
    </bean>

第一步是对属性的填充
public class SqlSessionFactoryBean implements FactoryBean<SqlSessionFactory>, InitializingBean{
    private DataSource dataSource;

    public void setDataSource(DataSource dataSource) {
        if (dataSource instanceof TransactionAwareDataSourceProxy) {
            this.dataSource = ((TransactionAwareDataSourceProxy)dataSource).getTargetDataSource();
        } else {
            this.dataSource = dataSource;
        }

    }
}

然后会实现InitializingBean接口
--------
public interface InitializingBean {
    void afterPropertiesSet() throws Exception;
}

SqlSessionFactoryBean implements FactoryBean<SqlSessionFactory>, InitializingBean{
    public void afterPropertiesSet() throws Exception {
    //创建SqlSessionFactory对象
    this.sqlSessionFactory = this.buildSqlSessionFactory();
    }

    protected SqlSessionFactory buildSqlSessionFactory() throws Exception {
        ......
    //放入配置文件
        return this.sqlSessionFactoryBuilder.build(targetConfiguration);
    }
}

---------
    //由于FactoryBean,则必有该方法
    public SqlSessionFactory getObject() throws Exception {
        if (this.sqlSessionFactory == null) {
            this.afterPropertiesSet();
        }
    //返回sqlSessionFactory对象
        return this.sqlSessionFactory;
    }
getObject()返回的类型取决于 FactoryBean
②ref="favoriteMapper"虽然引用了"favoriteMapper",但是并没有显示写明,因为已完成配置Mapper包扫描,所以favoriteMapper已经被注入到容器里面
----pom.xml----
 <!-- 数据源druid -->
        <dependency>
            <groupId>com.alibaba</groupId>
            <artifactId>druid</artifactId>
            <version>1.1.23</version>
        </dependency>

---beam.xml----
    <!--配置数据源-->
    <bean id="dataSource" class="com.alibaba.druid.pool.DruidDataSource">
        <property name="url" value="jdbc:mysql://localhost:3306/car_rent"></property>
        <property name="username" value="root"></property>
        <property name="password" value="12345"></property>
    </bean>


    <!--配置SqlSessionFactoryBean,作用将SqlSessionFactory存储到spring容器-->
    <bean class="org.mybatis.spring.SqlSessionFactoryBean">
        <property name="dataSource" ref="dataSource"></property>
    </bean>
    <!--配置Mapper包扫描,扫描指定的包,产生Mapper对象存储到Spring容器-->
    <bean class="org.mybatis.spring.mapper.MapperScannerConfigurer">
        <property name="basePackage" value="com.example.demo.mapper"></property>
    </bean>

    <bean id="userService" class="com.example.demo.service.impl.UserServiceImpl">
        <property name="favoriteMapper" ref="favoriteMapper"></property>
    </bean>
③ 配置MapperScannerConfigurer作用是扫描Mapper,向容器中注册Mapper对应的MapperFactoryBean, MapperScannerConfigurer实现了BeanDefinitionRegistryPostProcessor和InitializingBean两个接口,会在 postProcessBeanDefinitionRegistry方法中向容器中注册MapperFactoryBean
class MapperScannerConfigurer implements BeanDefinitionRegistryPostProcessor, InitializingBean{
    public void postProcessBeanDefinitionRegistry(BeanDefinitionRegistry registry) {
    ClassPathMapperScanner scanner = new ClassPathMapperScanner(registry);
    scanner.scan(StringUtils.tokenizeToStringArray(this.basePackage, ",; \t\n"));
    }
}

class ClassPathMapperScanner extends ClassPathBeanDefinitionScanner {
    public Set<BeanDefinitionHolder> doScan(String... basePackages) {
    Set<BeanDefinitionHolder> beanDefinitions = super.doScan(basePackages);
    if (beanDefinitions.isEmpty()) {
    } else {
    this.processBeanDefinitions(beanDefinitions);
    }
    }
    private void processBeanDefinitions(Set<BeanDefinitionHolder> beanDefinitions) {
    //设置Mapper的beanClass是org.mybatis.spring.mapper.MapperFactoryBean
    definition.setBeanClass(this.mapperFactoryBeanClass);
    definition.setAutowireMode(2); //设置MapperBeanFactory 进行自动注入
    }
    //PS:autowireMode取值:1是根据名称自动装配,2是根据类型自动装配
}

class ClassPathBeanDefinitionScanner{
    public int scan(String... basePackages) {
    this.doScan(basePackages);
    }
    protected Set<BeanDefinitionHolder> doScan(String... basePackages) {
    //将扫描到的类注册到beanDefinitionMap中,此时beanClass是当前类全限定名
    this.registerBeanDefinition(definitionHolder, this.registry);
    return beanDefinitions;
    }
}

UserMapper userMapper = applicationContext.getBean(UserMapper.class);
public class MapperFactoryBean<T> extends SqlSessionDaoSupport implements FactoryBean<T> {
    public MapperFactoryBean(Class<T> mapperInterface) {
    this.mapperInterface = mapperInterface;
    }
    public void setSqlSessionFactory(SqlSessionFactory sqlSessionFactory) {
    this.sqlSessionTemplate = this.createSqlSessionTemplate(sqlSessionFactory);
    }
    public T getObject() throws Exception {
    return this.getSqlSession().getMapper(this.mapperInterface);
    }
}
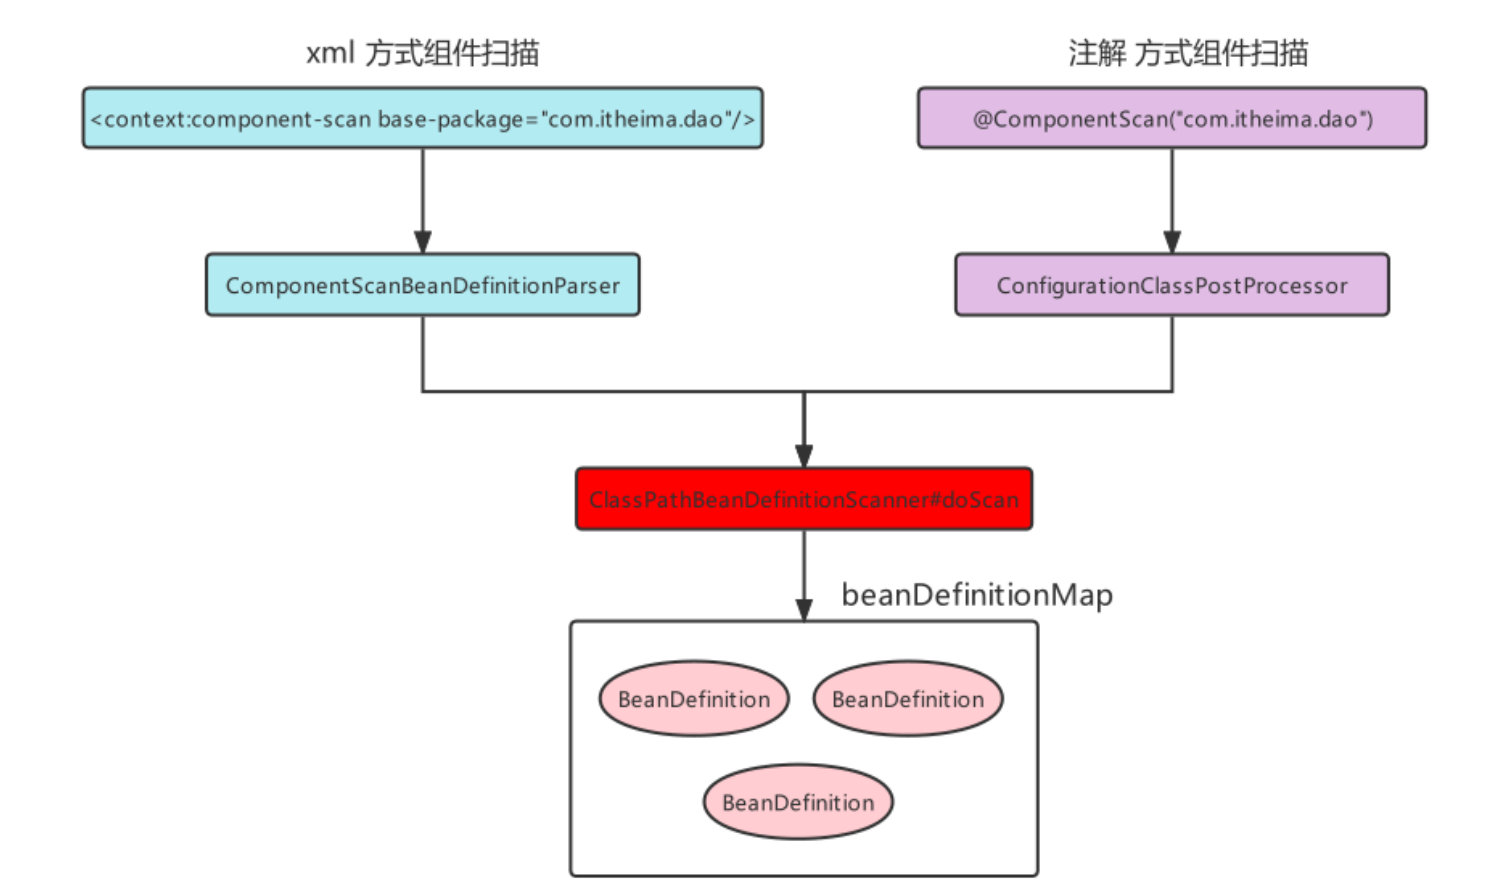
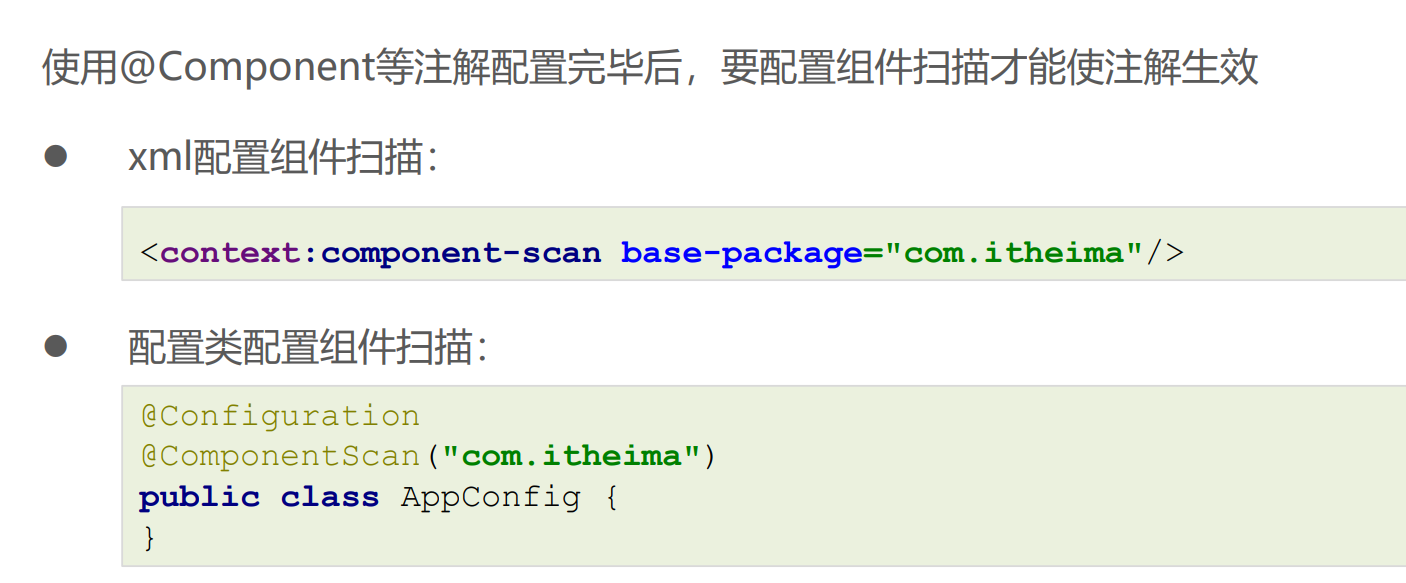
基于注解的Spring应用
bean的基本注解开发
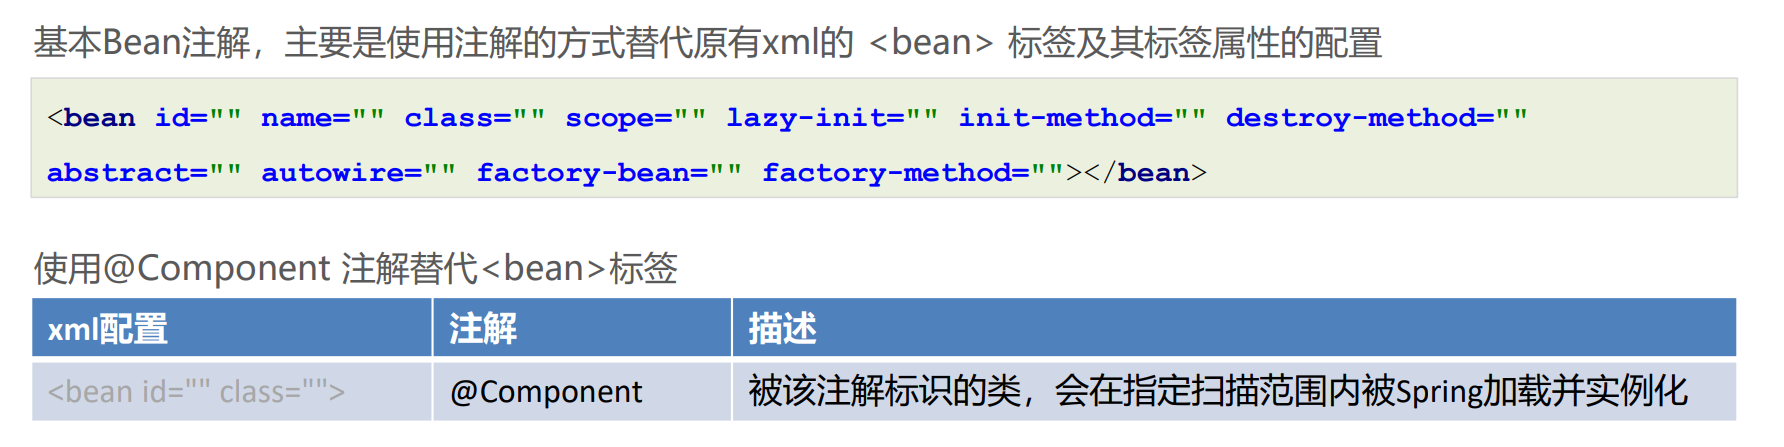
可以通过@Component注解的value属性指定当前Bean实例的beanName,也可以省略不写,不写的情况下为当前 类名首字母小写
由bean后工厂处理器实现
// <bean id="userDao" class="com.example.demo.dao.impl.UserDaoImpl"></bean>
@Component("userDao")

--bean.xml--
<!--注解组件扫描,扫描指定的基本包及其子包下的类,识别使用@component注解-->
    <context:component-scan base-package="com.example.demo"/>
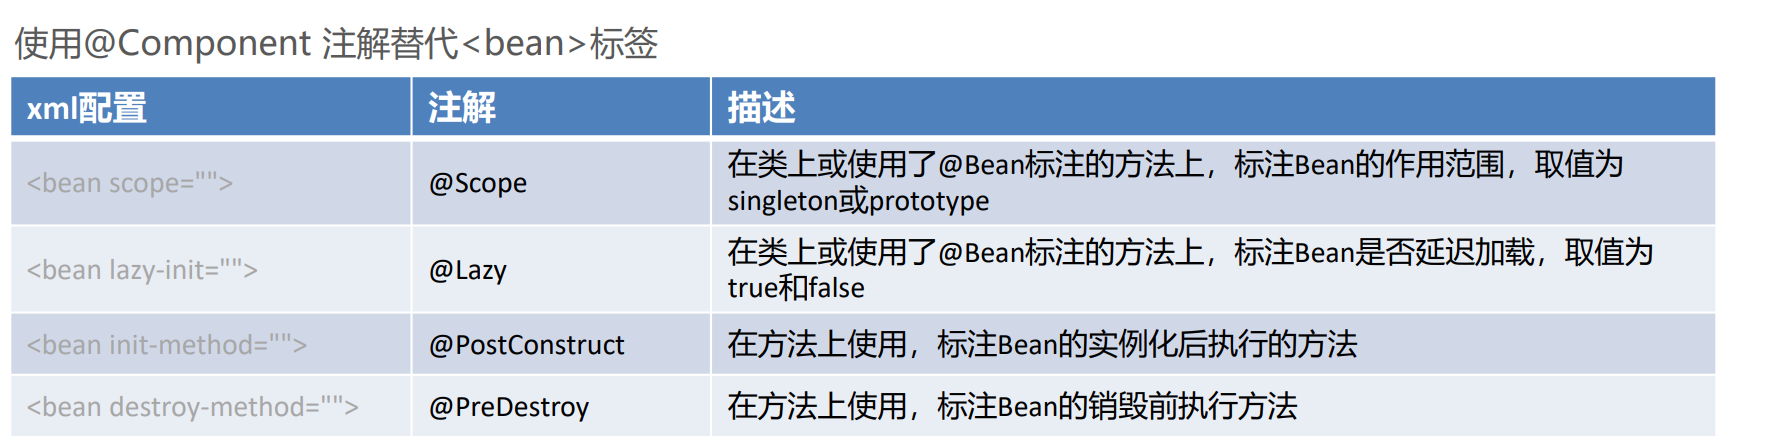
@Component("userDao")
@Scope("singleton")
@Lazy(true)
public class UserDaoImpl implements UserDao {
    public UserDaoImpl() {
        System.out.println("UserDaoImpl无参构造");
    }

    @PostConstruct
    public void init(){
        System.out.println("初始化");
    }
    @PreDestroy
    public void destroy(){
        System.out.println("销毁");
    }

}
----
public class Demo3Application {

    public static void main(String[] args) {
        ClassPathXmlApplicationContext applicationContext = new ClassPathXmlApplicationContext("bean.xml");
        Object userDao = applicationContext.getBean("userDao");
        System.out.println(userDao);
        applicationContext.close();

    }

}
----打印输出
UserDaoImpl无参构造
初始化
com.example.demo.dao.impl.UserDaoImpl@77681ce4
销毁
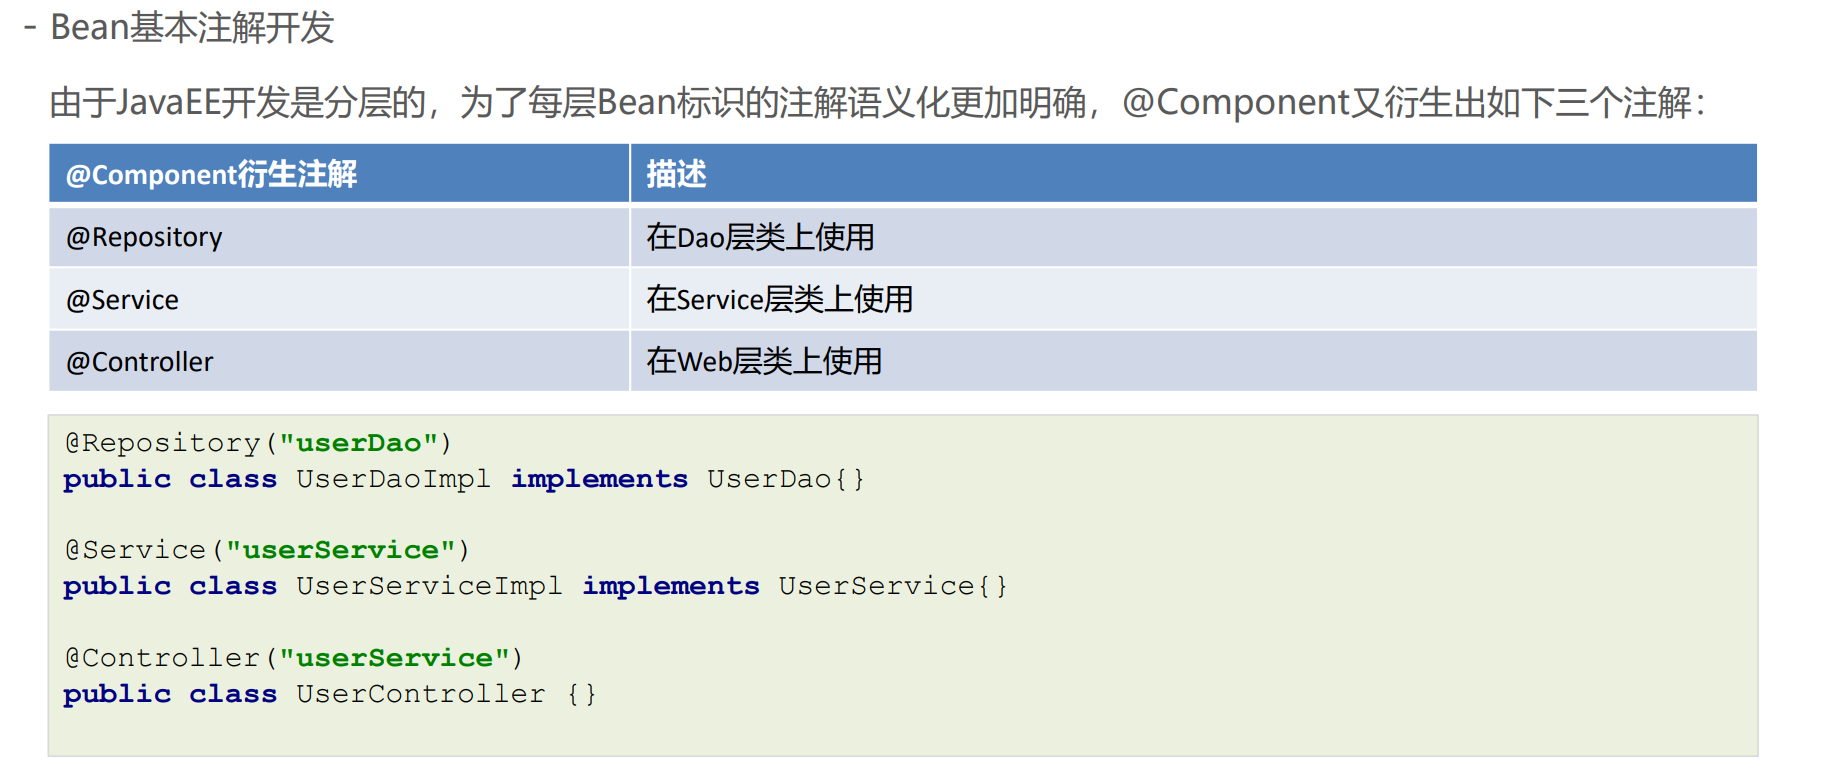
@Component又衍生出的三个注解:主要是为了更加方便分层,如果哪一层都不是则采用@ Component
Bean依赖注入注解开发
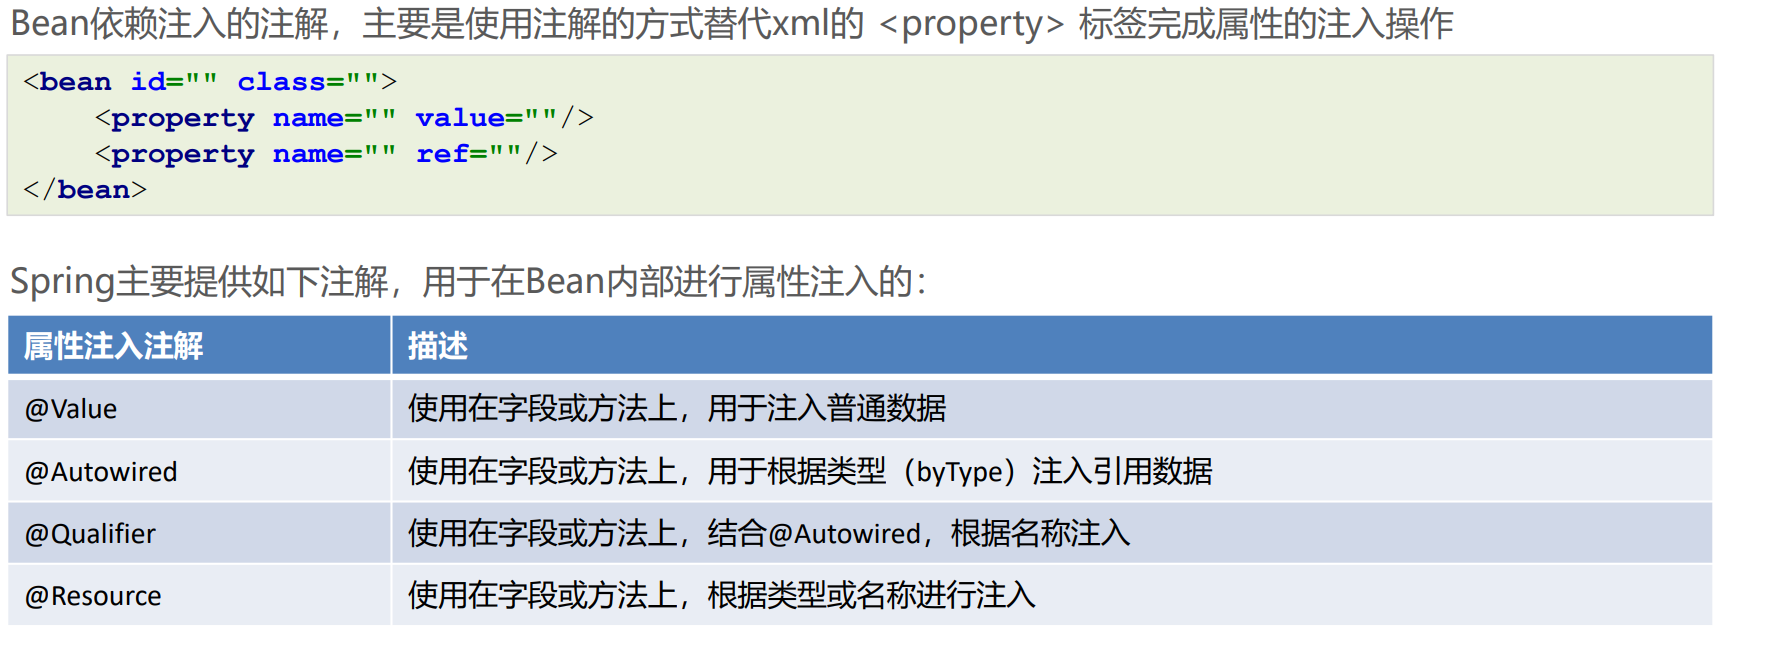
@Value
通过@Value 直接注入普通属性
@Value("Lili")
private String name;
------即代替了setName方法,可以直接去掉setName方法
public static void main(String[] args) {
    ClassPathXmlApplicationContext applicationContext = new ClassPathXmlApplicationContext("bean.xml");
    UserDao userDao = (UserDao)applicationContext.getBean(UserDao.class);
    userDao.show();
}
------或者直接在setName的方法上注入
 @Value("Lili")
public void setName(String name) {
    this.name = name;
}
通过@Value 注入properties文件中的属性
--配置文件中
#自定义
view.page=view
local.username=min20
--类中
@Value("${view.page}")
private String page;

@Value("${local.username}")
private String username;

----通过@Value 注入properties文件中的属性
@Value("${jdbc.username}")
private String username;
@Value("${jdbc.username}")
public void setUsername(String username){
    System.out.println(username);
}
----加载properties文件
<context:property-placeholder location="classpath:jdbc.properties"/>
@Autowired
@Autowired注解,用于根据类型进行注入,但是当容器中同一类型的Bean实例有多个时,会尝试自动根据名字进行匹配,但是当容器中同一类型的Bean实例有多个时,且名字与被注入Bean名称不匹配时会报错。
//使用在属性上直接注入
@Autowired
private UserDao userDao;

//使用在方法上直接注入
@Autowired
public void setUserDao(UserDao userDao){
    System.out.println(userDao);
}
@Service("userService")
public class userServiceImpl implements UserService {

    //按照类型识别,故识别类型为UserDao,注意这里是根据UserDao类型,类的注入是通过@Repository
    //如果有多个类型则按照命名,例如这里是userDao1
    @Autowired
    private UserDao userDao1;

    public void setUserDao(UserDao userDao) {
        this.userDao = userDao;
    }

    @Override
    public void show() {
        System.out.println("userDao = " + userDao);
    }
}

//匹配当前Bean,此时都是同一类型UserDao
@Repository("userDao1")
public class UserDaoImpl implements UserDao{}
@Repository("userDao2")
public class UserDaoImpl2 implements UserDao{}

那么此时打印输出的是UserDaoImpl

如果改为
@Autowired
private UserDao userDao2;
那么打印输出的是UserDaoImpl2
@Autowired
@Qualifier("userDao2")
private UserDao userDao;

//匹配当前Bean,此时都是同一类型UserDao
@Repository("userDao1")
public class UserDaoImpl implements UserDao{}
@Repository("userDao2")
public class UserDaoImpl2 implements UserDao{}
那么打印输出的是UserDaoImpl2
@Resource注解既可以根据类型注入,也可以根据名称注入,无参就是根据类型注入,有参数就是根据名称注入
PS:@Resource注解存在与 javax.annotation 包中,Spring对其进行了解析
作用相当于
@Resource(name = "userDao2")
private UserDao userDao
知识点扩展:
由于yyy的参数列表是List
但是xxx的参数列表就一个,所以先按照类型再按照名称
@Autowired
public void xxx(UserDao userDao1){
    System.out.println("xxx = " + userDao);
}

@Autowired
public void yyy(List<UserDao> userDao){
    System.out.println("yyy = " + userDao);
}
------
@Repository("userDao1")
public class UserDaoImpl implements UserDao{}
@Repository("userDao2")
public class UserDaoImpl1 implements UserDao{}

------打印输出
xxx = com.example.demo.dao.impl.UserDaoImpl@6601cc93
yyy = [com.example.demo.dao.impl.UserDaoImpl@6601cc93, com.example.demo.dao.impl.UserDaoImpl1@2babf189]
非自定义Bean注解开发
非自定义Bean不能像自定义Bean一样使用@Component进行管理,非自定义Bean要通过工厂的方式进行实例化, 使用@Bean标注方法即可,@Bean的属性为beanName,如不指定为当前工厂方法名称
考虑非自定义Bean需要参数的注入
如果@Bean工厂方法需要参数的话,则有如下几种注入方式:
⚫ 使用@Autowired 根据类型自动进行Bean的匹配,@Autowired可以省略 ;
⚫ 使用@Qualifier 根据名称进行Bean的匹配;
⚫ 使用@Value 根据名称进行普通数据类型匹配。
//将方法返回值Bean实例以@Bean注解指定的名称存储到Spring容器中
@Bean("dataSource")
public DataSource dataSource(){
DruidDataSource dataSource = new DruidDataSource();
dataSource.setDriverClassName("com.mysql.jdbc.Driver");
dataSource.setUrl("jdbc:mysql://localhost:3306/mybatis");
dataSource.setUsername("root");
dataSource.setPassword("root");
return dataSource;
}
//考虑非自定义Bean需要参数的注入
@Bean
public Object objectDemo02(
    @Qualifier("userDao") UserDao userDao,
    @Value("${jdbc.username}") String username,
    UserDao userDao//@Autowired可以省略
){
    System.out.println(userDao);
    System.out.println(username);
    System.out.println(userDao);
    return new Object();
}

@Bean
@Autowired //根据类型匹配参数
public Object objectDemo01(UserDao userDao){
System.out.println(userDao);
return new Object();
}
Bean配置类的注解开发
@Import(OthersBean.class)后此时可以去掉OthersBean上的@ Component
其实就是为了用注解方式去加载Spring的核心配置来替换掉xml方式的Spring
@Configuration  //标注当前类是一个配置类(替代配置文件)+@Component
//<context:component-scan base-package="com.itheima"/>
@ComponentScan("com.example.demo")
//<context:property-placeholder location="classpath:jdbc.properties"/>
@PropertySource("classpath:jdbc.properties")
//<import resource=""></import>
@Import(OthersBean.class)
public class SpringConfig {
}
------
//xml方式的Spring容器
//ClassPathXmlApplicationContext applicationContext = new ClassPathXmlApplicationContext("bean.xml");
//注解方式去加载Spring的核心配置
ApplicationContext applicationContext = new AnnotationConfigApplicationContext(SpringConfig.class);
Object userDao =  applicationContext.getBean("userDao");
System.out.println("userDao = " + userDao);
@Configuration注解标识的类为配置类,替代原有xml配置文件,该注解第一个作用是标识该类是一个配置类,第 二个作用是具备@Component作用
base-package的配置方式:
⚫ 指定一个或多个包名:扫描指定包及其子包下使用注解的类
⚫ 不配置包名:扫描当前@componentScan注解配置类所在包及其子包下的类
@PropertySource 注解用于加载外部properties资源配置,替代原有xml中的 配置
@Import 用于加载其他配置类,替代原有xml中的配置
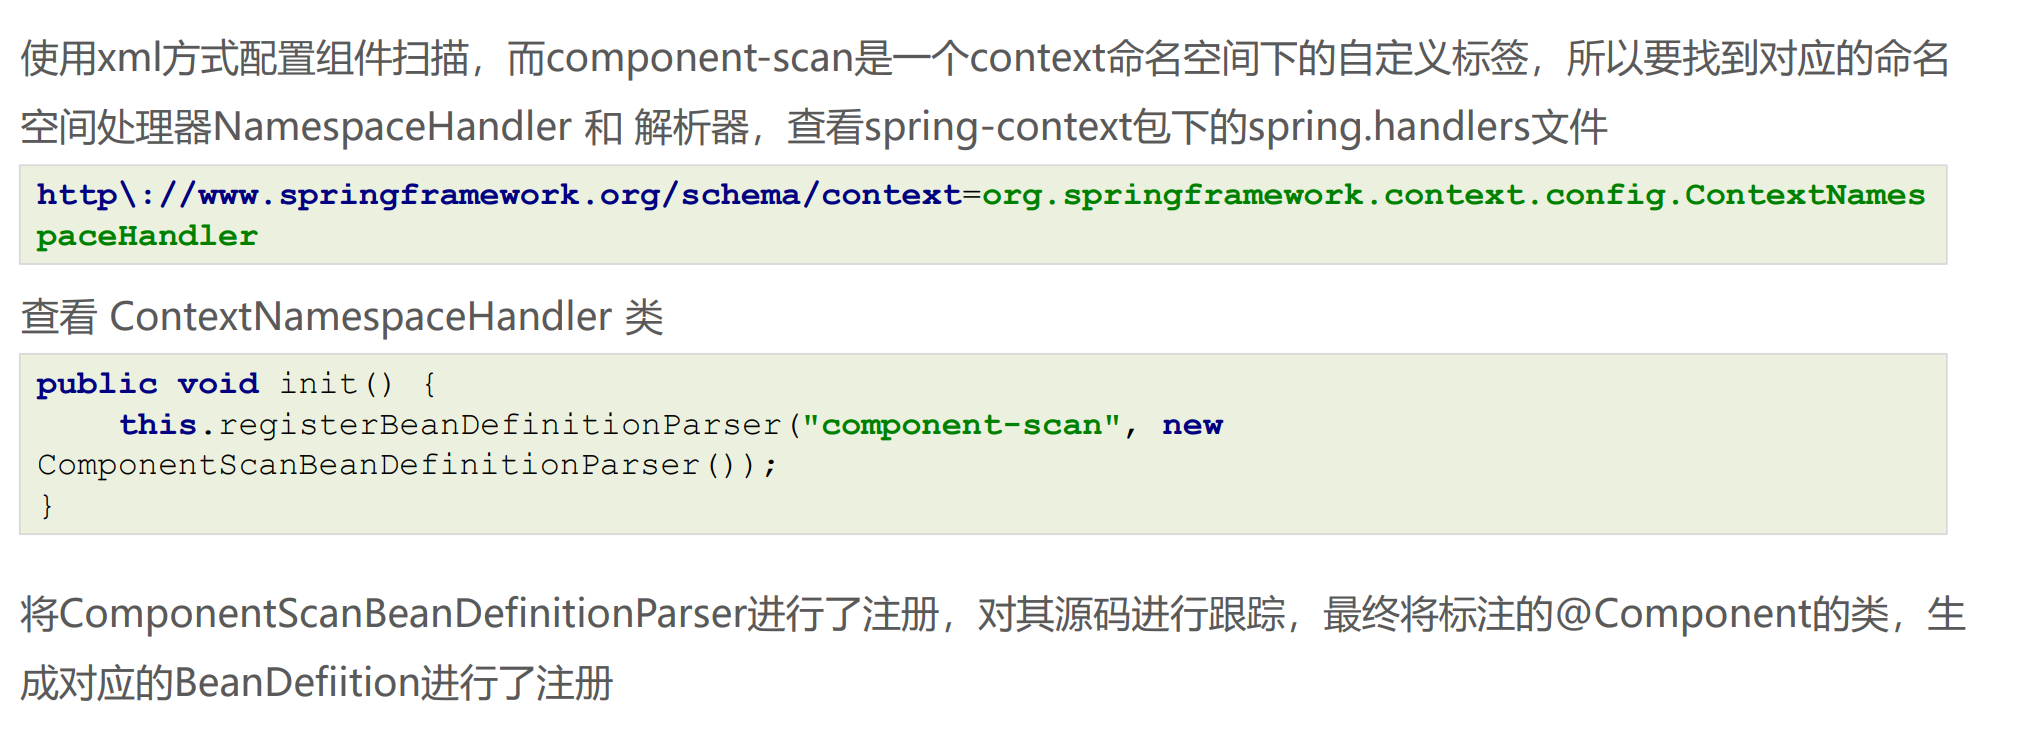
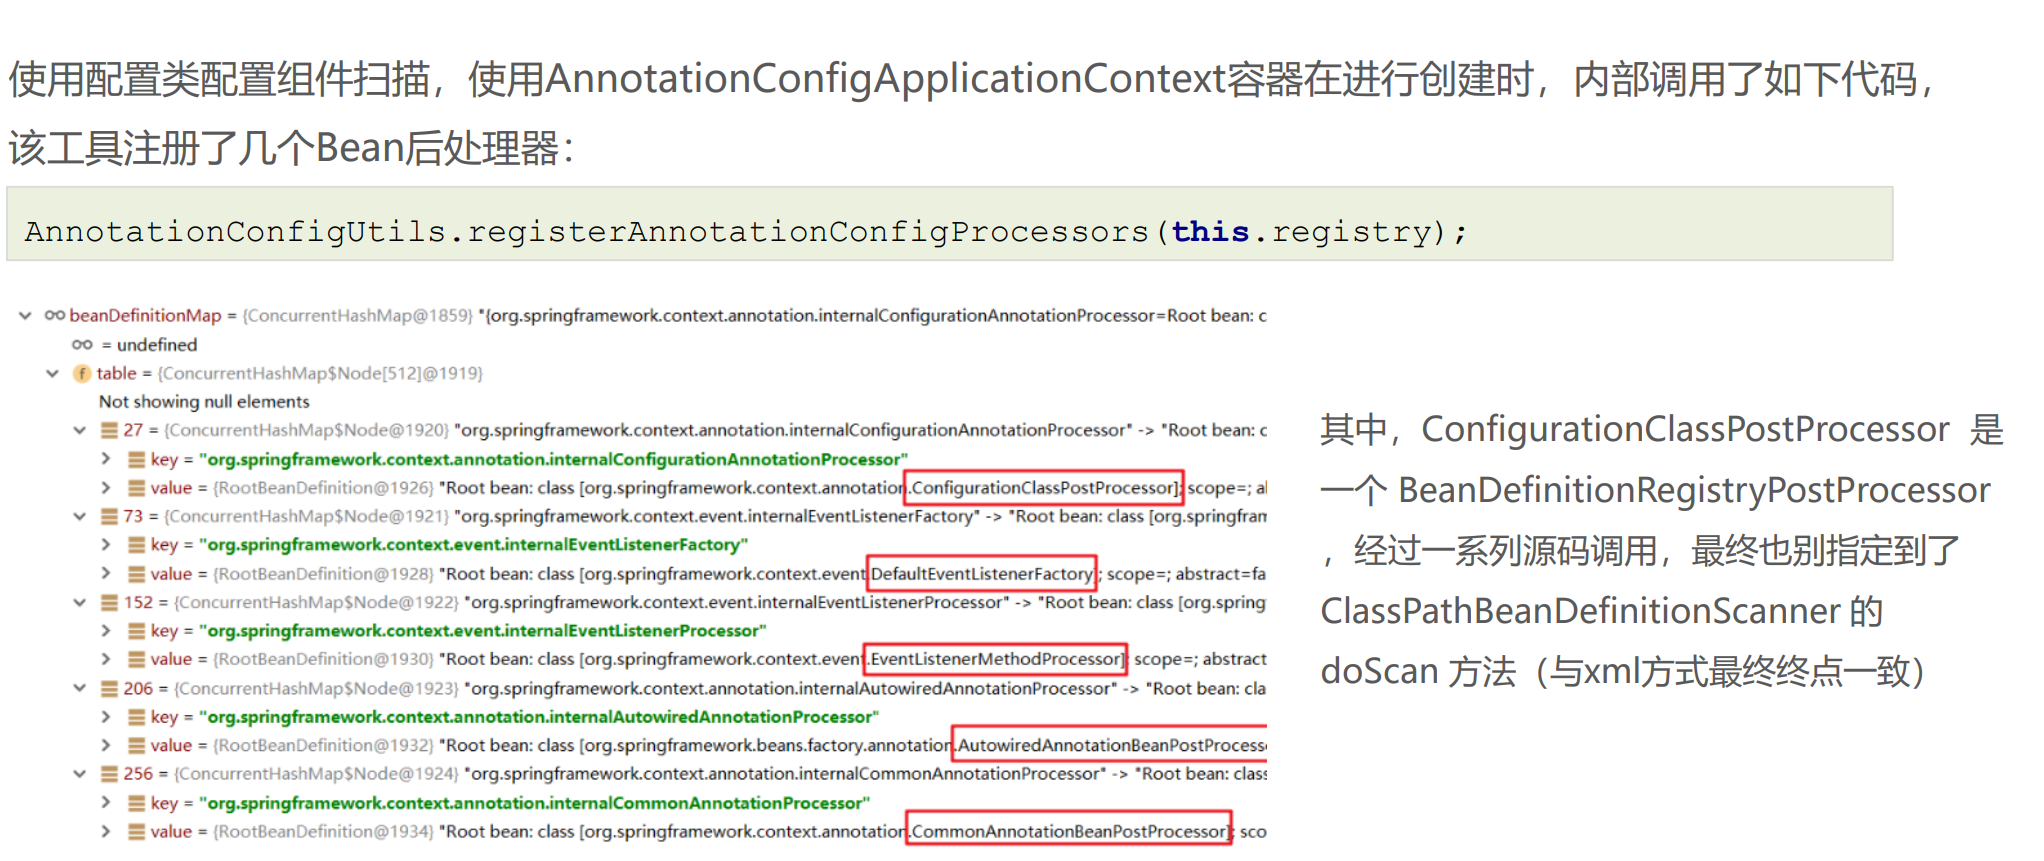
Spring注解的解析原理
Spring注解方式整合第三方框架
原有xml方式整合配置如下:
<!--配置数据源-->
<bean id="dataSource" class="com.alibaba.druid.pool.DruidDataSource">
<property name="url" value="jdbc:mysql://localhost:3306/mybatis"></property>
<property name="username" value="root"></property>
<property name="password" value="root"></property>
</bean>
<!--配置SqlSessionFactoryBean-->
<bean class="org.mybatis.spring.SqlSessionFactoryBean">
<property name="dataSource" ref="dataSource"></property>
</bean>
<!--配置Mapper包扫描-->
<bean class="org.mybatis.spring.mapper.MapperScannerConfigurer">
<property name="basePackage" value="com.itheima.dao"></property>
</bean>
①SqlSessionFactoryBean里面有getObject方法,返回的是一个SqlSessionFactory
②配置Mapper包扫描:为每个Mapper接口创建一个对应的FactoryBean,用到Mapper实现的时候调用对应的接口的FactoryBean的getObject方法
@Configuration  //标注当前类是一个配置类(替代配置文件)+@Component
//<context:component-scan base-package="com.itheima"/>
@ComponentScan("com.example.demo")
//<context:property-placeholder location="classpath:jdbc.properties"/>
@PropertySource("classpath:jdbc.properties")
//<import resource=""></import>
/*@Import(OthersBean.class)*/
//Mapper的接口扫描
@MapperScan("com.example.demo.mapper")

public class SpringConfig {
    @Bean
    public DataSource dataSource(
            @Value("${jdbc.driver}") String driver,
            @Value("${jdbc.url}") String url,
            @Value("${jdbc.username}") String username,
            @Value("${jdbc.password}") String password
    ){
        DruidDataSource dataSource = new DruidDataSource();
        dataSource.setDriverClassName(driver);
        dataSource.setUrl(url);
        dataSource.setUsername(username);
        dataSource.setPassword(password);
        return dataSource;
    }

    @Bean
    public SqlSessionFactoryBean sqlSessionFactoryBean(DataSource dataSource){
        SqlSessionFactoryBean sqlSessionFactoryBean = new SqlSessionFactoryBean();
        sqlSessionFactoryBean.setDataSource(dataSource);
        return sqlSessionFactoryBean;
    }

}
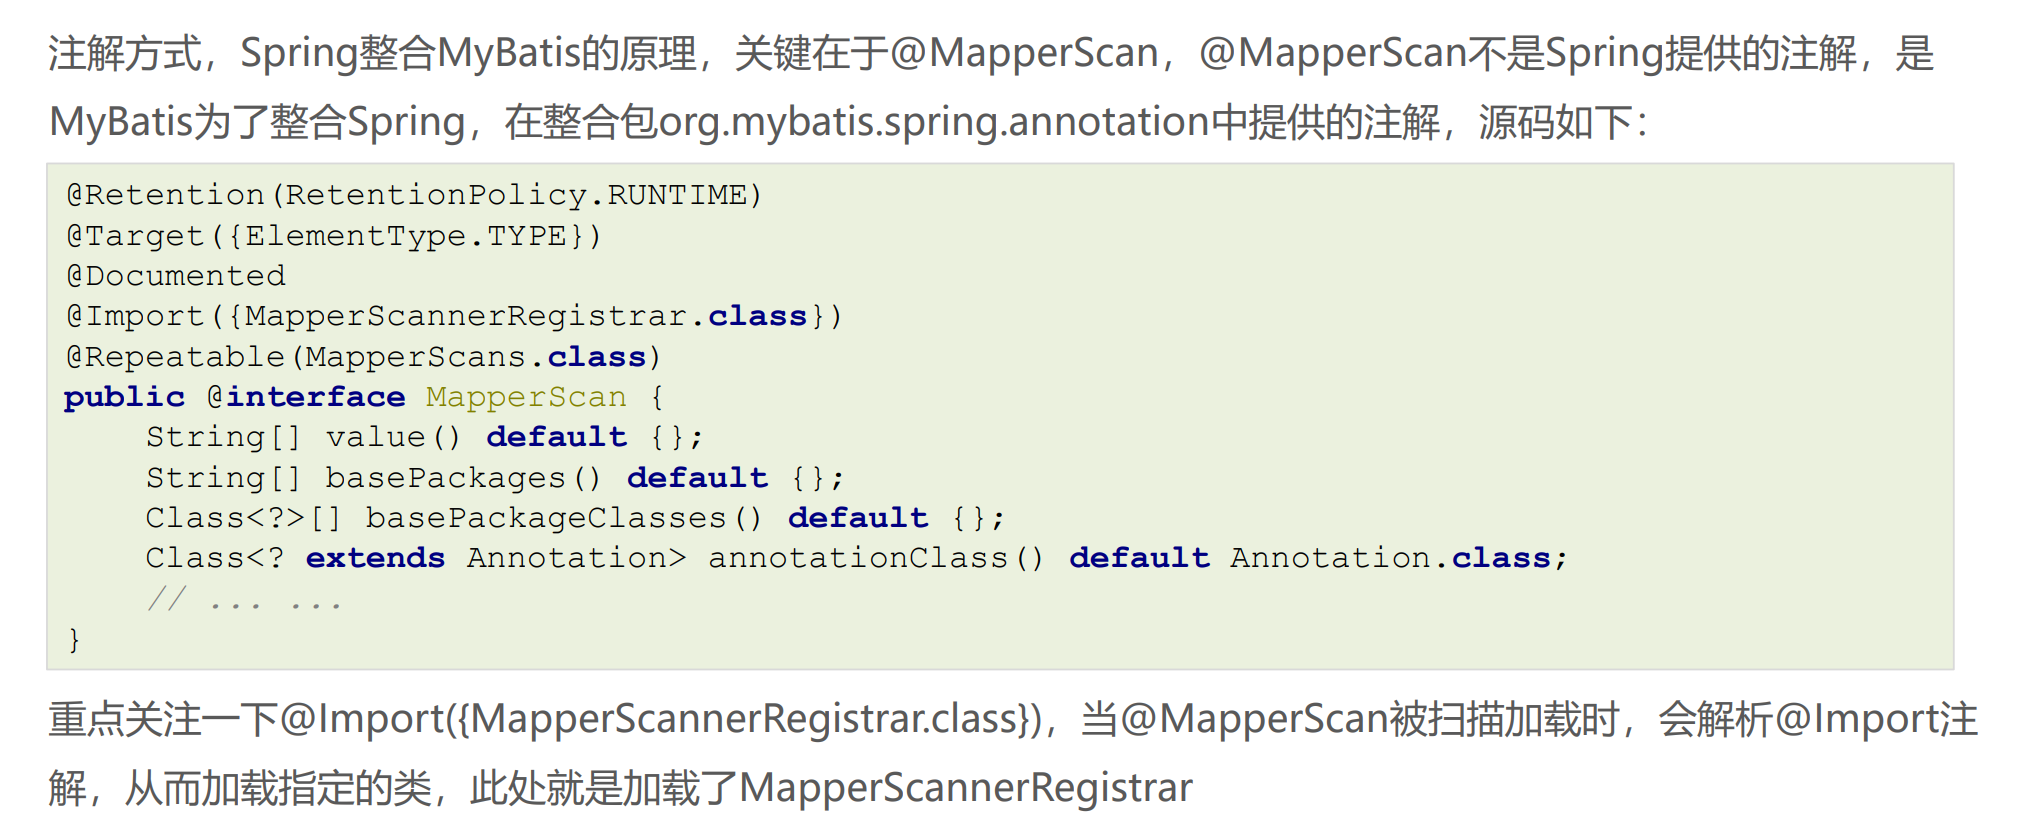
@Import
Spring与MyBatis注解方式整合有个重要的技术点就是@Import,第三方框架与Spring整合xml方式很多是凭借自定义标签完成的,而第三方框架与Spring整合注解方式很多是靠@Import注解完成的。
@Import可以导入如下三种类:
⚫ 普通的配置类
⚫ 实现ImportSelector接口的类
⚫ 实现ImportBeanDefinitionRegistrar接口的类
@Import导入实现了ImportSelector接口的类
@Configuration
@ComponentScan("com.itheima")
@Import({MyImportSelector.class})
public class ApplicationContextConfig {
}
------
public class MyImportSelector implements ImportSelector {
    @Override
    public String[] selectImports(AnnotationMetadata annotationMetadata) {
    //返回要进行注册的Bean的全限定名数组
    return new String[]{User2.class.getName()};
    }
}
ImportSelector接口selectImports方法的参数AnnotationMetadata代表注解的媒体数据,可以获得当前注解修饰的类的元信息,例如:获得组件扫描的包名
public class MyImportSelector implements ImportSelector {
    @Override
    public String[] selectImports(AnnotationMetadata annotationMetadata) {
        //参数annotationMetadata叫做注解媒体数组,该对象内部封装是当前使用了@Import注解的类上的其他注解的元信息
        Map<String, Object> annotationAttributes = annotationMetadata.getAnnotationAttributes(ComponentScan.class.getName());
        String[] basePackages = (String[]) annotationAttributes.get("basePackages");
        System.out.println(basePackages[0]);
        //返回的数组封装是需要被注册到Spring容器中的Bean的全限定名
        return new String[]{OtherBean2.class.getName()};
    }
}
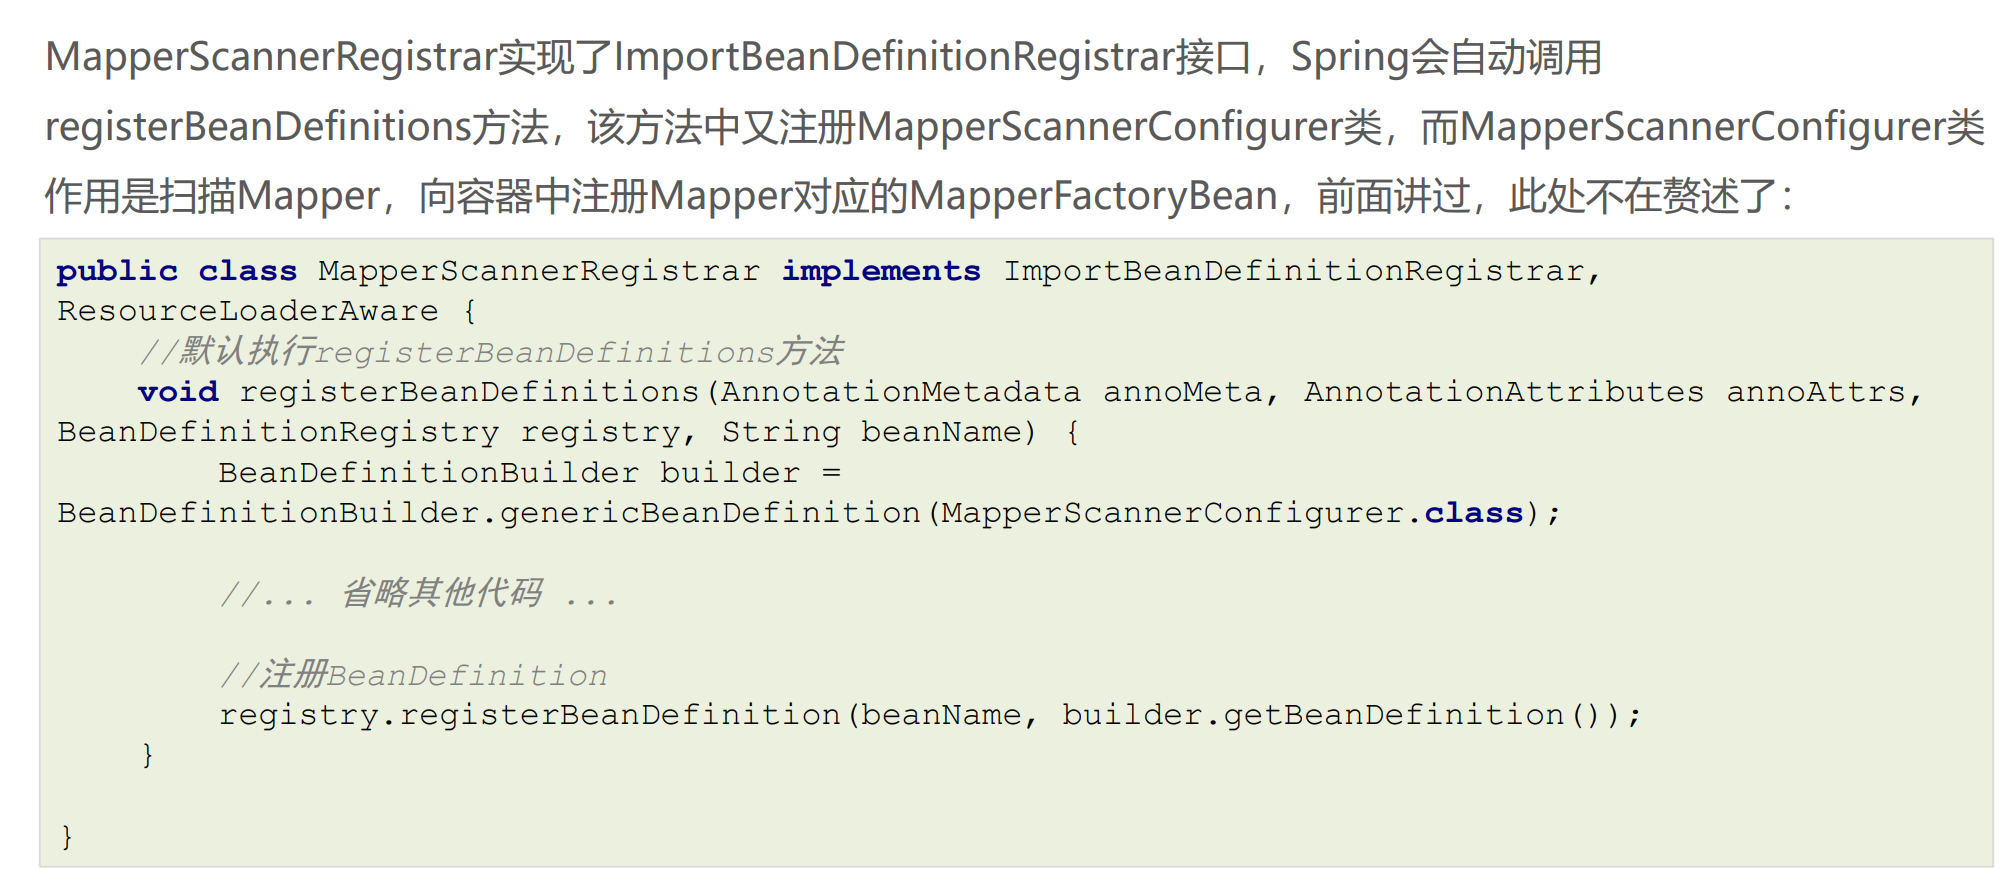
@Import导入实现ImportBeanDefinitionRegistrar接口的类,实现了该接口的类的registerBeanDefinitions方法会被自动调用,在该方法内可以注册BeanDefinition
public class MyImportBeanDefinitionRegistrar implements ImportBeanDefinitionRegistrar {
@Override
    public void registerBeanDefinitions(AnnotationMetadata importingClassMetadata,
    BeanDefinitionRegistry registry) {
    //使用给定的BeanDefinitionRegistry参数,手动注册BeanDefinition
    BeanDefinition beanDefinition = new RootBeanDefinition();
    beanDefinition.setBeanClassName("com.itheima.pojo.User2");
    registry.registerBeanDefinition("user2",beanDefinition);
}
--例如--
public class MyImportBeanDefinitionRegistrar implements ImportBeanDefinitionRegistrar {
    @Override
    public void registerBeanDefinitions(AnnotationMetadata importingClassMetadata, BeanDefinitionRegistry registry, BeanNameGenerator importBeanNameGenerator) {
        //注册BeanDefinition
        BeanDefinition beanDefinition = new RootBeanDefinition();
        beanDefinition.setBeanClassName(OtherBean2.class.getName());
        registry.registerBeanDefinition("otherBean2",beanDefinition);
    }
}
AOP
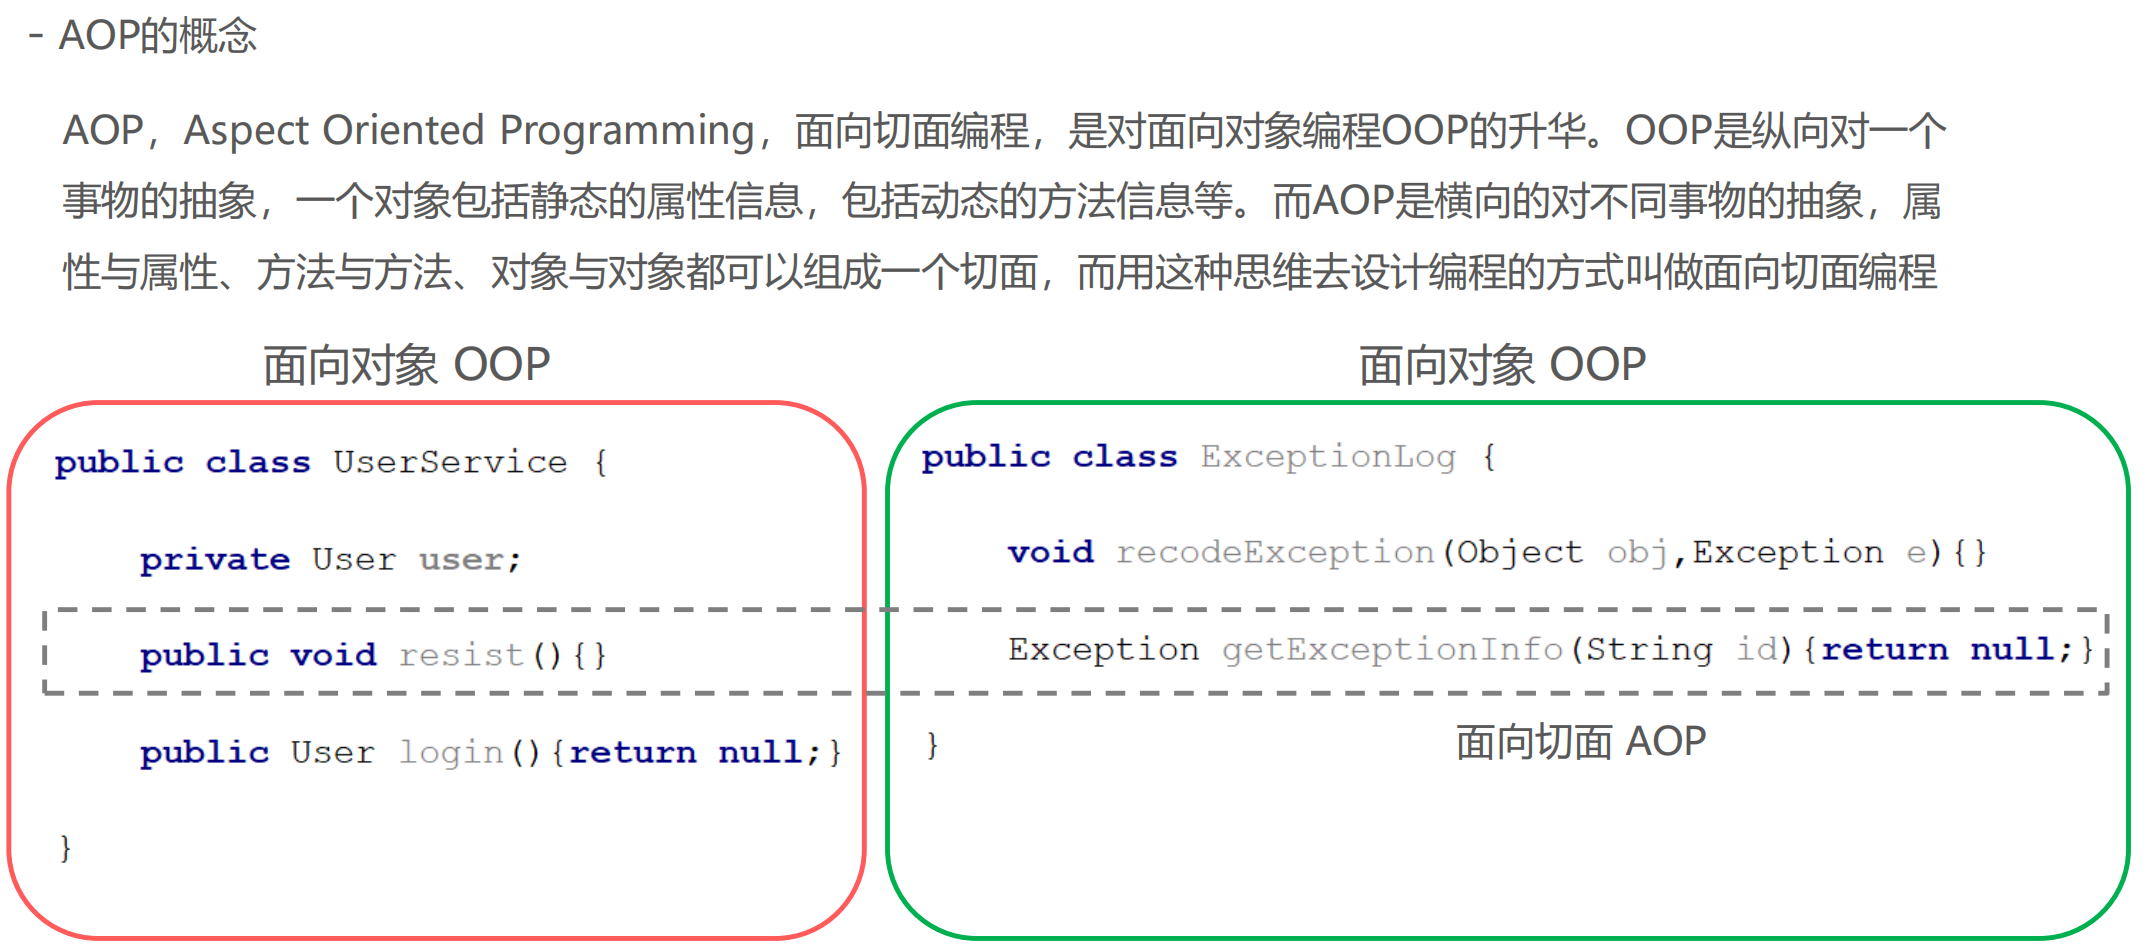
AOP的概念
AOP思想的实现方案
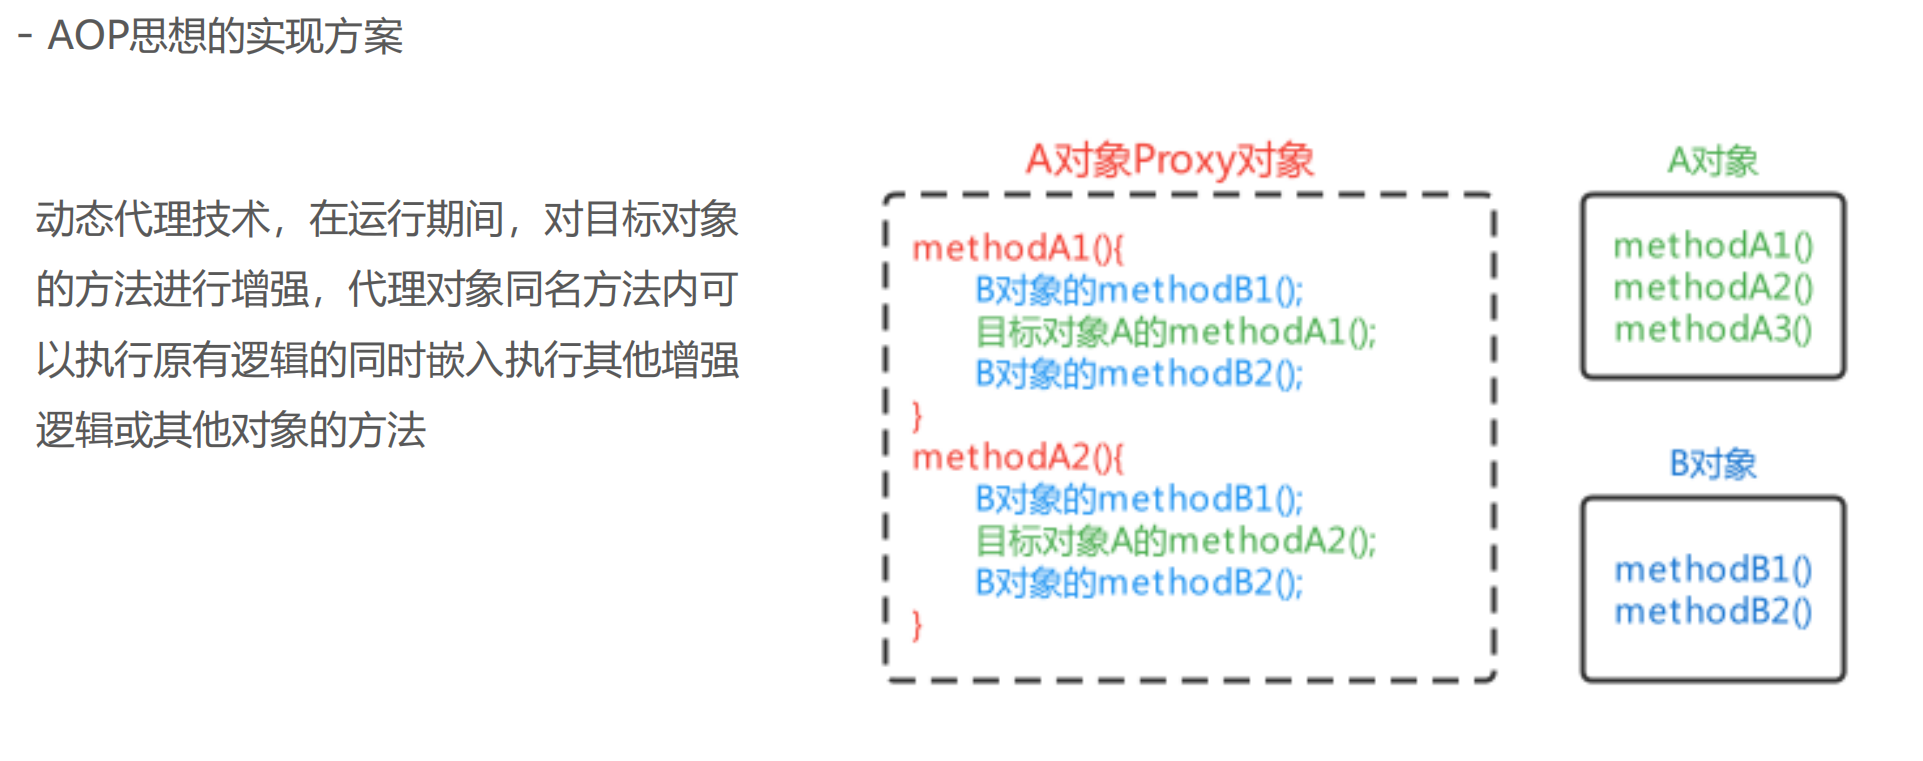
其中A对象被称为目标对象,A对象中的方法被称为目标方法,而B对象被称为增强对象,里面包括增强方法。需要对A对象产生Proxy对象,然后不再调用A对象,而是调用Proxy对象。
模拟AOP的基础代码
其实在之前学习BeanPostProcessor时,在BeanPostProcessor的after方法中使用动态代理对Bean进行了增
强,实际存储到单例池singleObjects中的不是当前目标对象本身,而是当前目标对象的代理对象Proxy,这样
在调用目标对象方法时,实际调用的是代理对象Proxy的同名方法,起到了目标方法前后都进行增强的功能,
对该方式进行一下优化,将增强的方法提取出去到一个增强类中,且只对com.itheima.service.impl包下的任
何类的任何方法进行增强
public class MockAopBeanPostProcessor implements BeanPostProcessor, ApplicationContextAware {
    private ApplicationContext applicationContext;//注入Spring容器对象
    public Object postProcessAfterInitialization(Object bean, String beanName) throws BeansException {
        MyAdvice myAdvice = applicationContext.getBean(MyAdvice.class);//获得Advice对象
        String packageName = bean.getClass().getPackage().getName();
        if("com.itheima.service.impl".equals(packageName)){
            //对Bean进行动态代理,返回的是Proxy代理对象
            Object proxyBean = Proxy.newProxyInstance(
                bean.getClass().getClassLoader(),
                bean.getClass().getInterfaces(),
                (Object proxy, Method method, Object[] args) -> {
                    myAdvice.beforeAdvice();//执行Advice的before方法

                    Object result = method.invoke(bean, args);//执行目标

                    myAdvice.afterAdvice();//执行Advice的after方法
                    return result; });
            //返回代理对象
            return proxyBean; }
        return bean; }
    public void setApplicationContext(ApplicationContext applicationContext) throws BeansException {
        this.applicationContext = applicationContext;
    }}
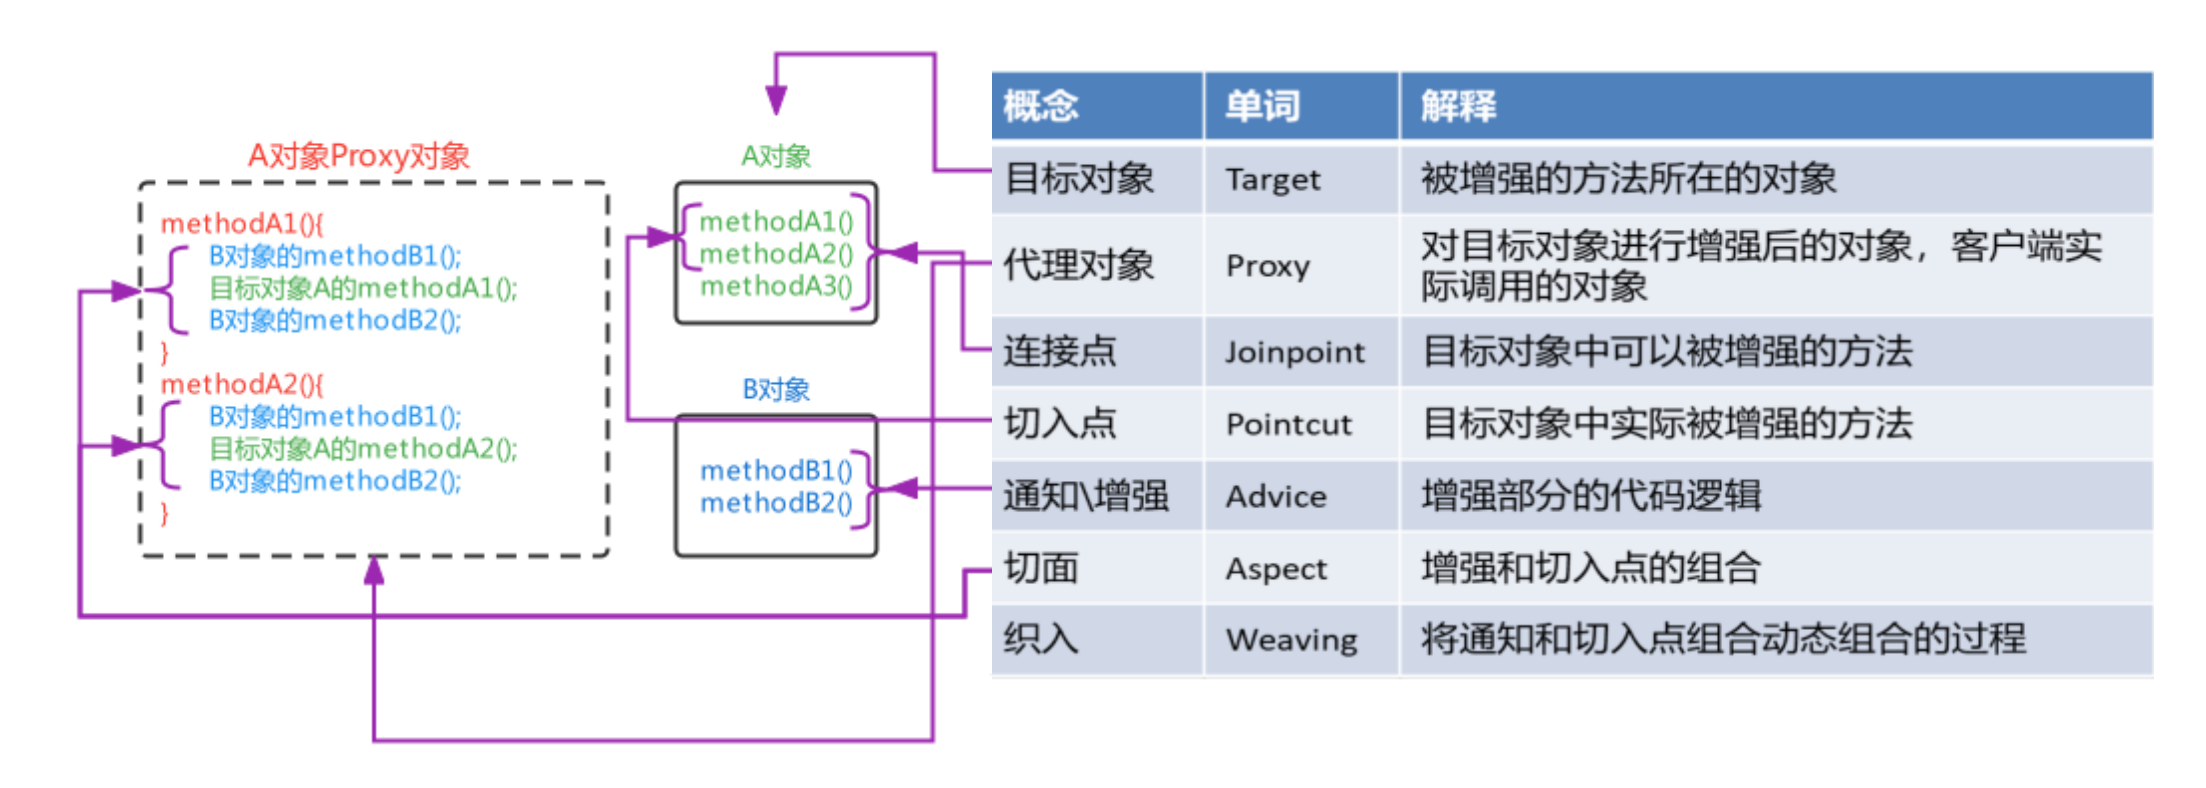
AOP相关概念
基于xml配置的AOP
xml方式AOP快速入门
通过配置文件的方式去解决上述问题
⚫ 配置哪些包、哪些类、哪些方法需要被增强
⚫ 配置目标方法要被哪些通知方法所增强,在目标方法执行之前还是之后执行增强
配置方式的设计、配置文件(注解)的解析工作,Spring已经帮我们封装好了
xml方式配置AOP的步骤:
1、导入AOP相关坐标;
2、准备目标类、准备增强类,并配置给Spring管理;
3、配置切点表达式(哪些方法被增强);
4、配置织入(切点被哪些通知方法增强,是前置增强还是后置增强)。
导入AOP相关坐标
<dependency>
<groupId>org.aspectj</groupId>
<artifactId>aspectjweaver</artifactId>
<version>1.9.6</version>
</dependency>
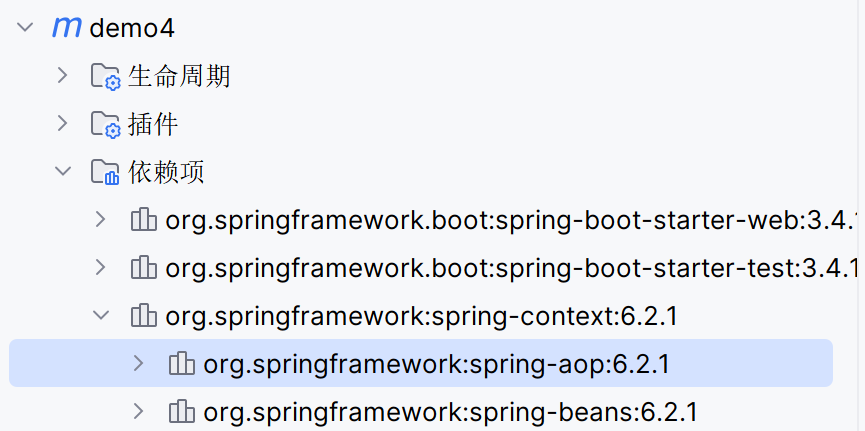
Spring-context坐标下已经包含spring-aop的包了,所以就不用额外导入了
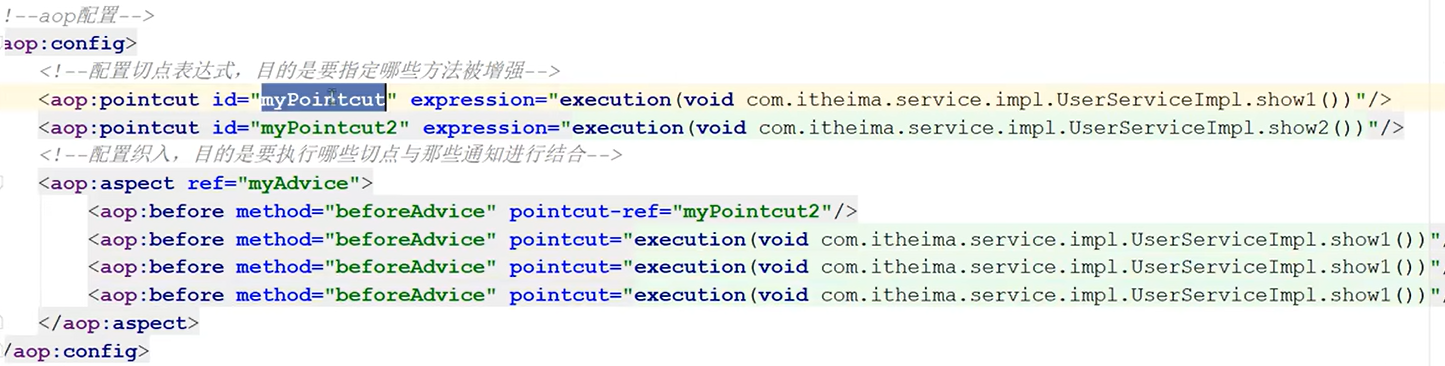
切点表达式的配置方式有两种,直接将切点表达式配置在通知上,也可以将切点表达式抽取到外面,在通知上
进行引用:pointcut-ref 可以帮助包的抽离,避免下图的重复写
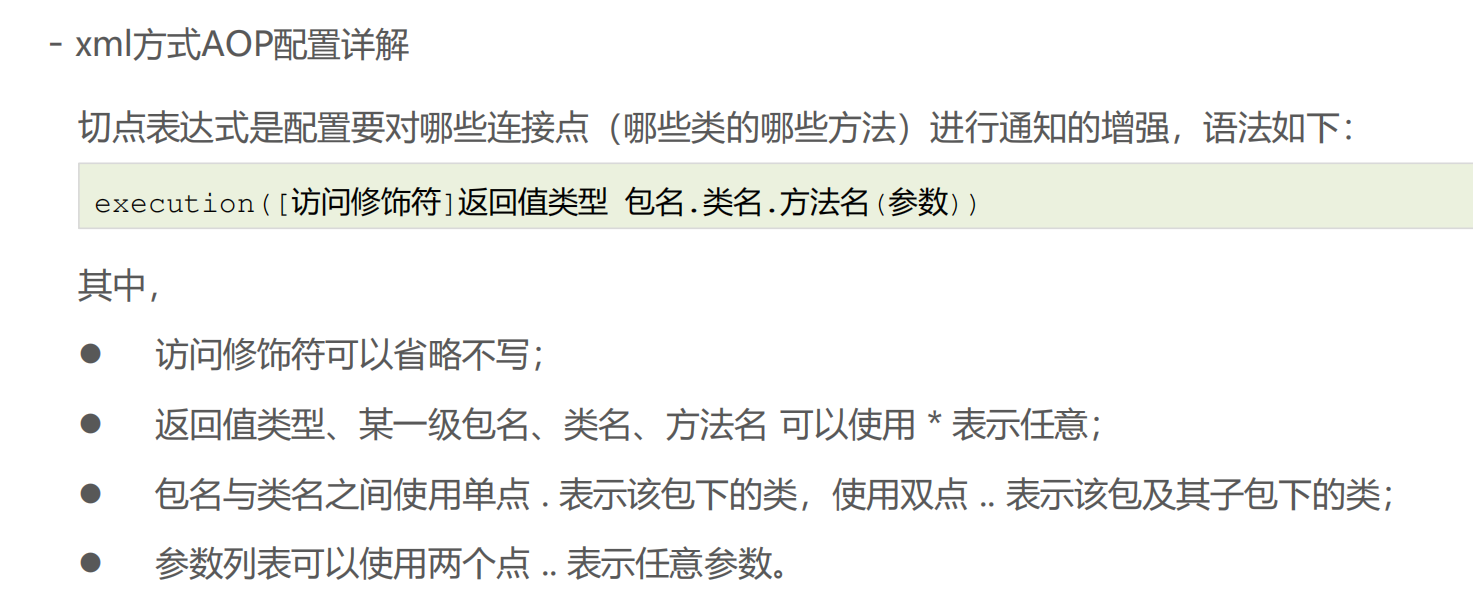
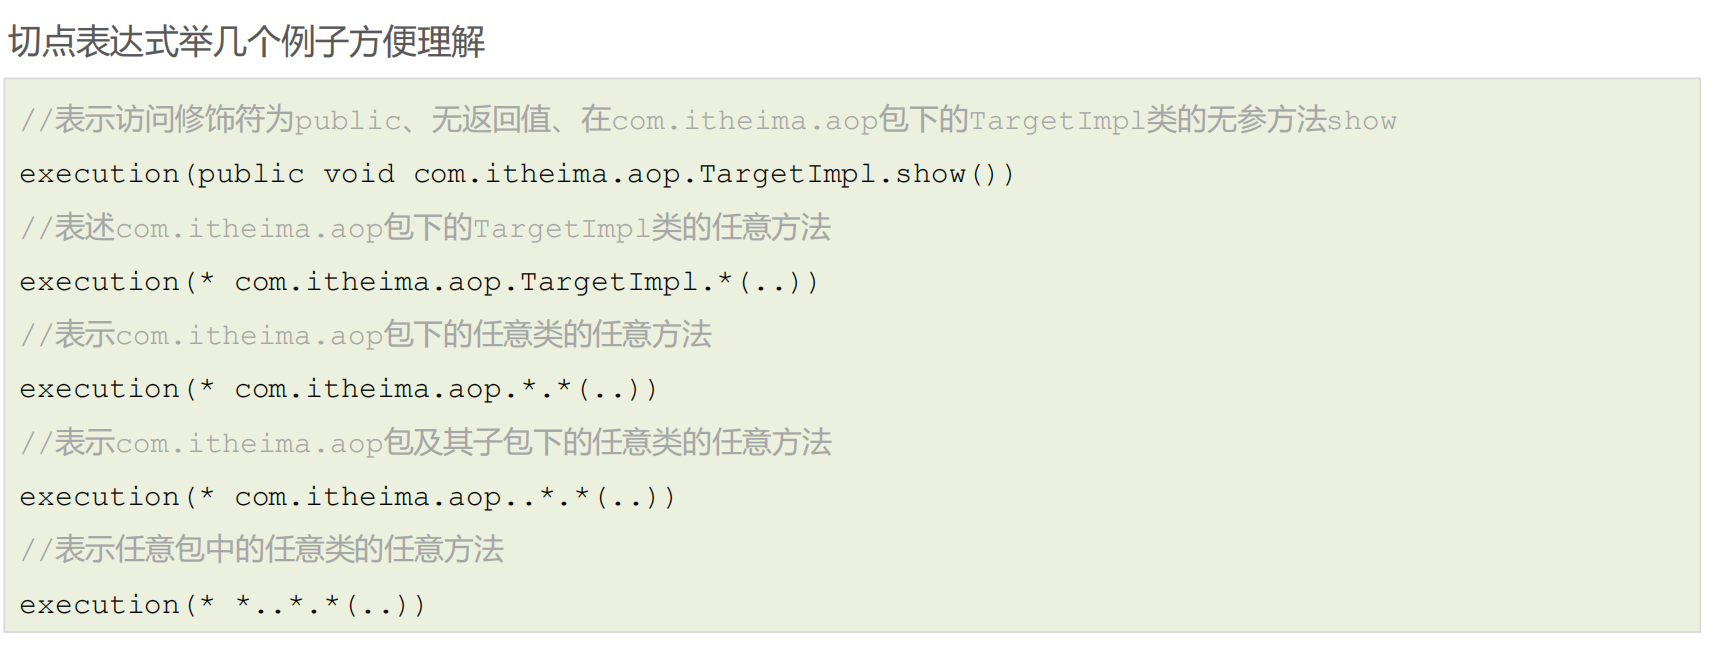
切点表达式的配置语法
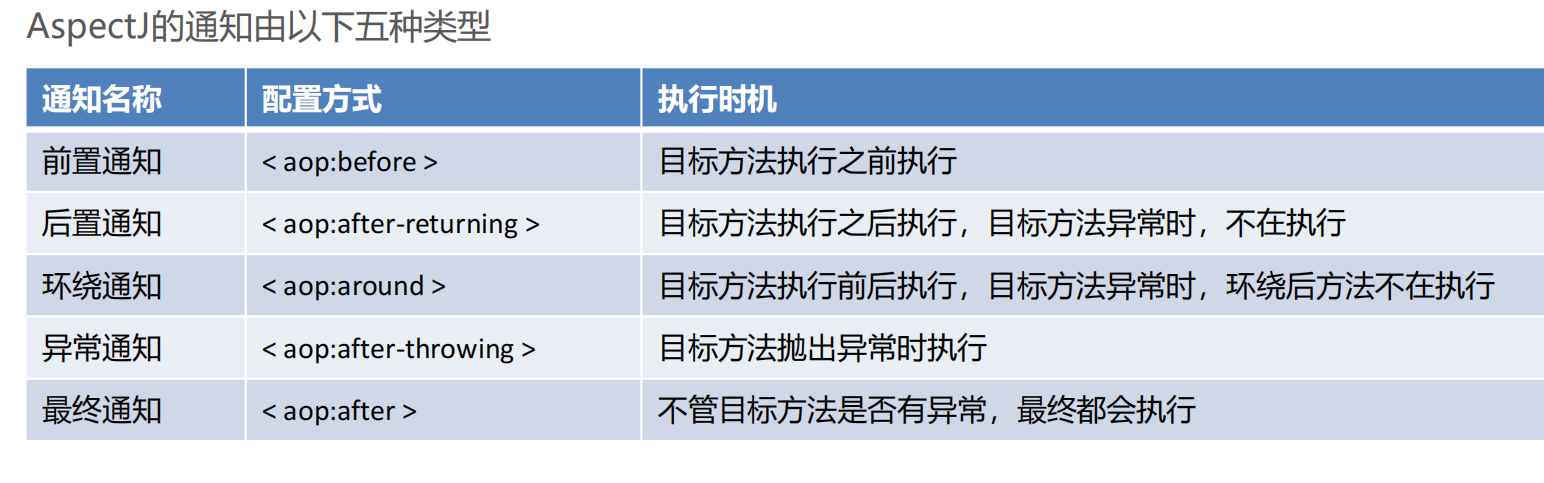
通知的类型
<?xml version="1.0" encoding="UTF-8"?>
<beans xmlns="http://www.springframework.org/schema/beans"
xmlns:xsi="http://www.w3.org/2001/XMLSchema-instance"
xmlns:context="http://www.springframework.org/schema/context"
xmlns:aop="http://www.springframework.org/schema/aop"
xsi:schemaLocation="
http://www.springframework.org/schema/beans
http://www.springframework.org/schema/beans/spring-beans.xsd
http://www.springframework.org/schema/context
http://www.springframework.org/schema/context/spring-context.xsd
http://www.springframework.org/schema/aop
http://www.springframework.org/schema/aop/spring-aop.xsd
">
<!--配置目标类-->
<bean id="userService" class="com.example.demo.service.impl.UserServiceImpl"></bean>
<!--配置的通知类-->
<bean id="myAdvice" class="com.example.demo.advice.MyAdvice"></bean>
<!--aop配置-->
<aop:config proxy-target-class="true">
<!--配置切点表达式,目的是要指定哪些方法被增强-->
<!-- <aop:pointcut id="myPointcut" expression="execution(void com.example.demo.service.impl.UserServiceImpl.show1())"/>-->
<aop:pointcut id="myPointcut2" expression="execution(* com.example.demo.service.impl.*.*(..))"/>
<!--配置织入,目的是要执行哪些切点与那些通知进行结合-->
<aop:aspect ref="myAdvice">
<!--前置通知-->
<aop:before method="beforeAdvice" pointcut-ref="myPointcut2"/>
<!--后置通知-->
<aop:after-returning method="afterReturningAdvice" pointcut-ref="myPointcut2"/>
<!--环绕通知-->
<!--<aop:around method="around" pointcut-ref="myPointcut2"/>-->
<!--异常抛出通知-->
<aop:after-throwing method="afterThrowingAdvice" pointcut-ref="myPointcut2" throwing="e"/>
<!--最终通知-->
<aop:after method="afterAdvice" pointcut-ref="myPointcut2"/>
</aop:aspect>
</aop:config>
</beans>
----------
//增强类,内部提供增强方法
@Component
public class MyAdvice {
public void beforeAdvice(){
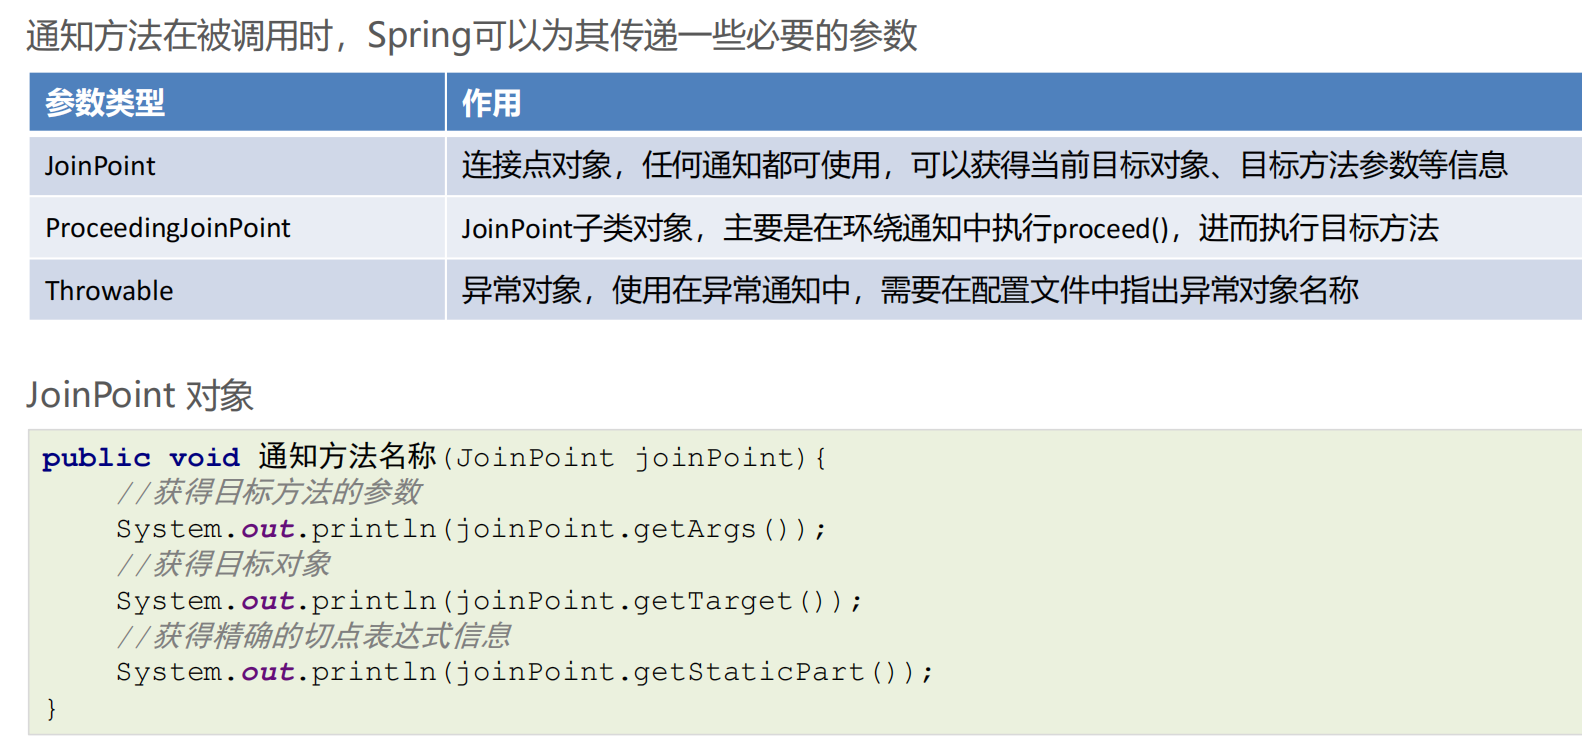
//System.out.println("当前目标对象是:"+joinPoint.getTarget());
//System.out.println("表达式:"+joinPoint.getStaticPart());
System.out.println("前置的增强....");
}
public void afterReturningAdvice(){
System.out.println("后置的增强....");
}
public Object around(ProceedingJoinPoint proceedingJoinPoint) throws Throwable {
System.out.println("环绕前的增强....");
Object res = proceedingJoinPoint.proceed();//执行目标方法
System.out.println("环绕后的增强....");
return res;
}
public void afterThrowingAdvice(Throwable e){
System.out.println("当前异常信息是:"+e);
System.out.println("异常抛出通知...报异常才执行");
}
public void afterAdvice(){
System.out.println("最终的增强....");
}
}
AOP的配置的两种方式
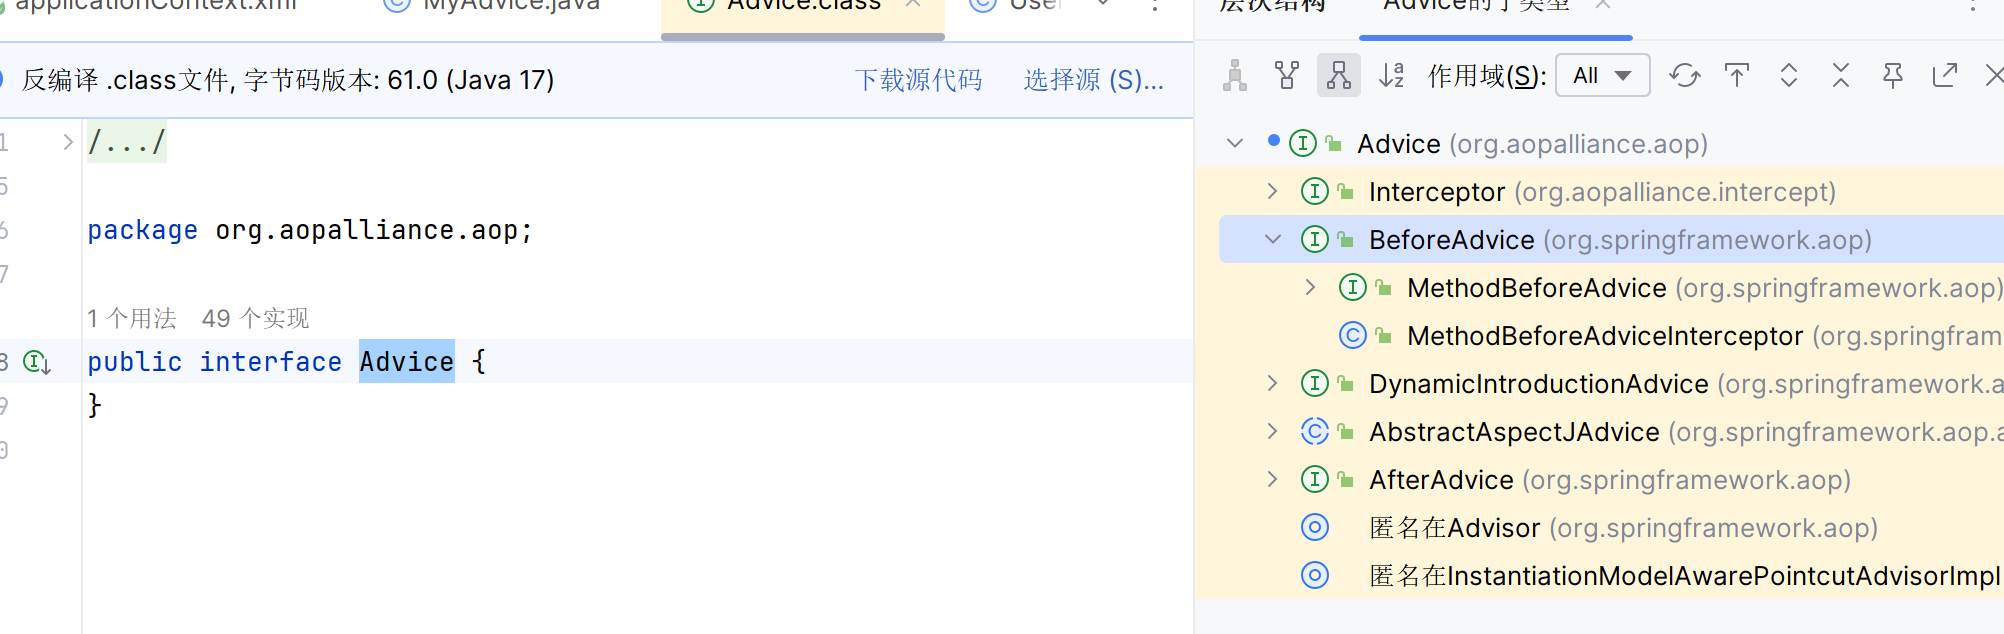
AOP的另一种配置方式,该方式需要通知类实现Advice的子功能接口
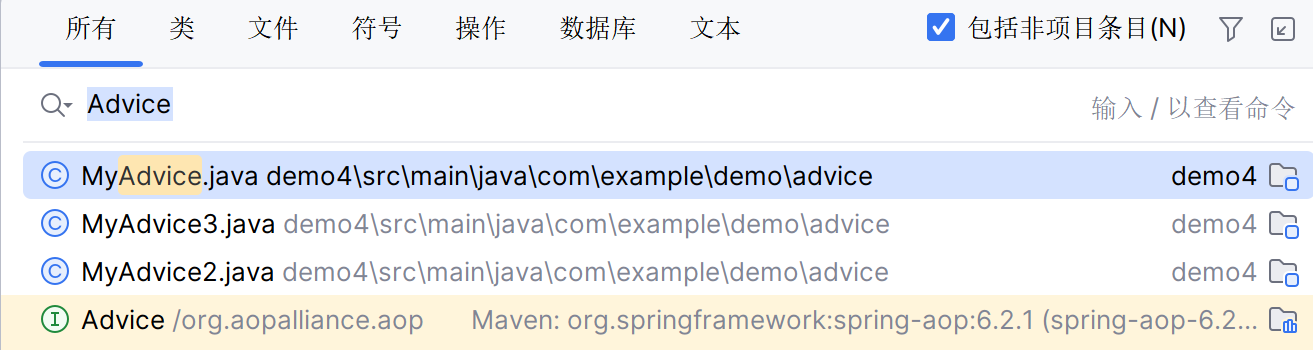
ctrl+H 转为子接口
<?xml version="1.0" encoding="UTF-8"?>
<beans xmlns="http://www.springframework.org/schema/beans"
       xmlns:xsi="http://www.w3.org/2001/XMLSchema-instance"
       xmlns:context="http://www.springframework.org/schema/context"
       xmlns:aop="http://www.springframework.org/schema/aop"
       xsi:schemaLocation="
       http://www.springframework.org/schema/beans
       http://www.springframework.org/schema/beans/spring-beans.xsd
       http://www.springframework.org/schema/context
       http://www.springframework.org/schema/context/spring-context.xsd
       http://www.springframework.org/schema/aop
       http://www.springframework.org/schema/aop/spring-aop.xsd
       ">

    <!--配置目标类-->
    <bean id="userService" class="com.example.demo.service.impl.UserServiceImpl"></bean>
    <!--配置的通知类-->
    <bean id="myAdvice2" class="com.example.demo.advice.MyAdvice2"></bean>

    <!--aop配置-->
    <aop:config>
        <aop:pointcut id="myPointcut2" expression="execution(* com.example.demo.service.impl.*.*(..))"/>
        <aop:advisor advice-ref="myAdvice2" pointcut-ref="myPointcut2"/>
    </aop:config>


</beans>
---------
@SpringBootApplication
public class Demo4Application {

    public static void main(String[] args) {
        ApplicationContext app = new ClassPathXmlApplicationContext("applicationContext2.xml");
        UserService bean = app.getBean(UserService.class);
        bean.show1();

    }

}
-------
public class MyAdvice2 implements MethodBeforeAdvice, AfterReturningAdvice {

    @Override
    public void before(Method method, Object[] objects, Object o) throws Throwable {
        System.out.println("前置通知..........");
    }

    @Override
    public void afterReturning(Object o, Method method, Object[] objects, Object o1) throws Throwable {
        System.out.println("后置通知...........");
    }


}
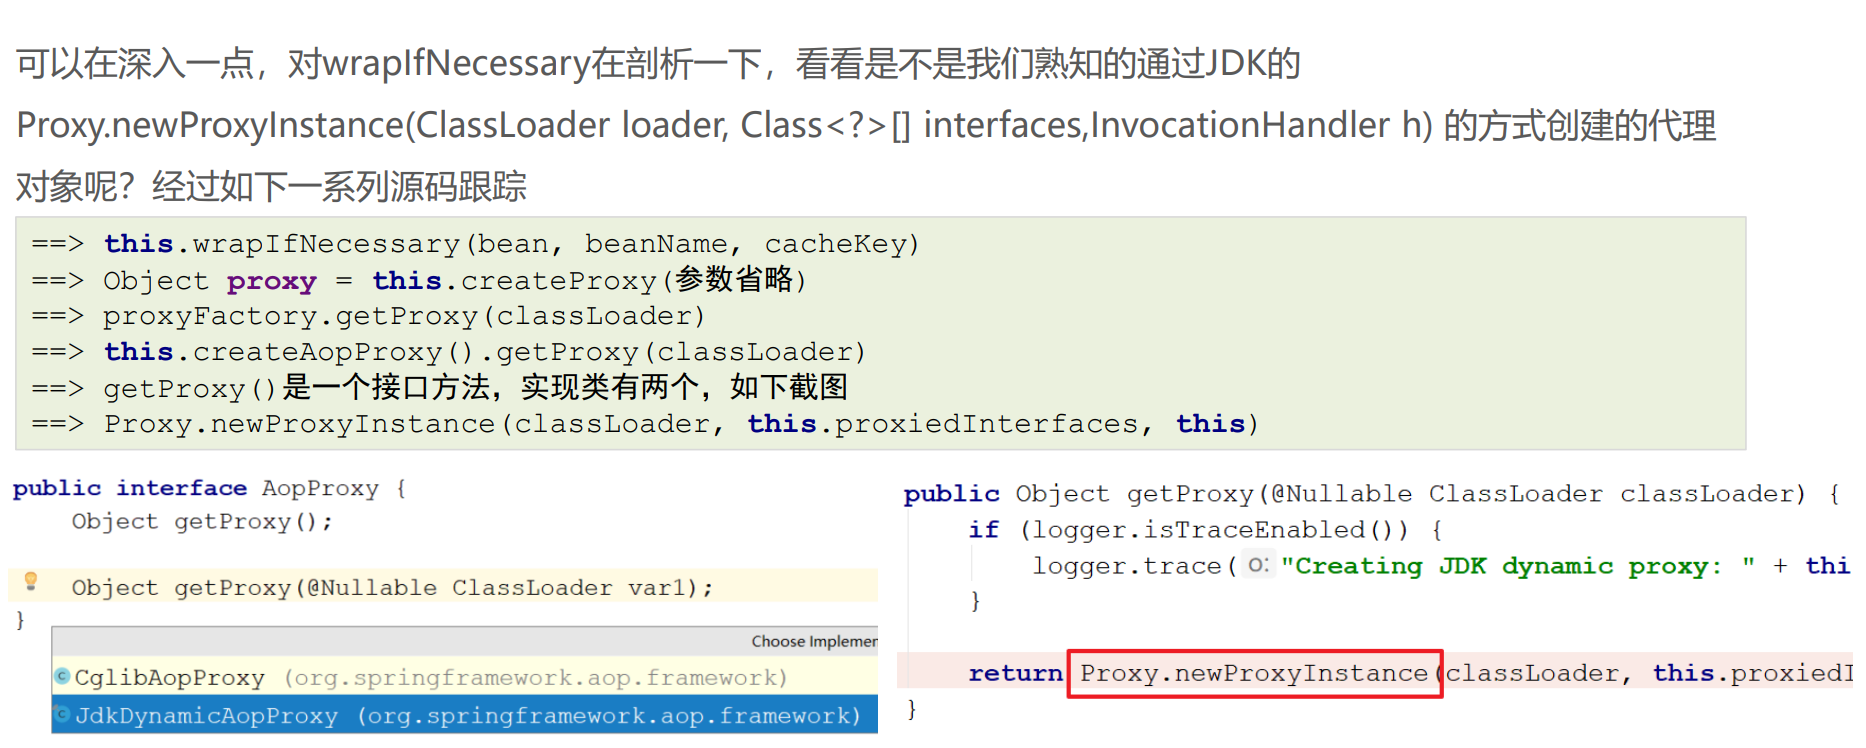
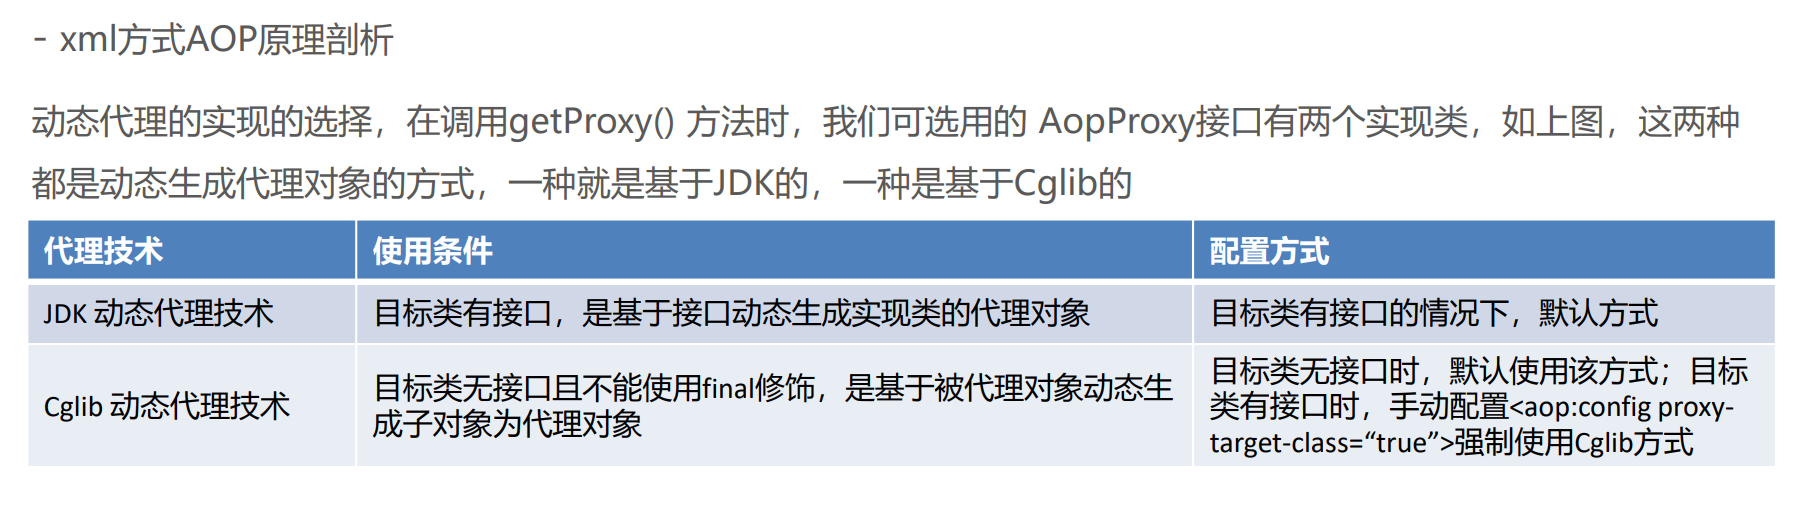
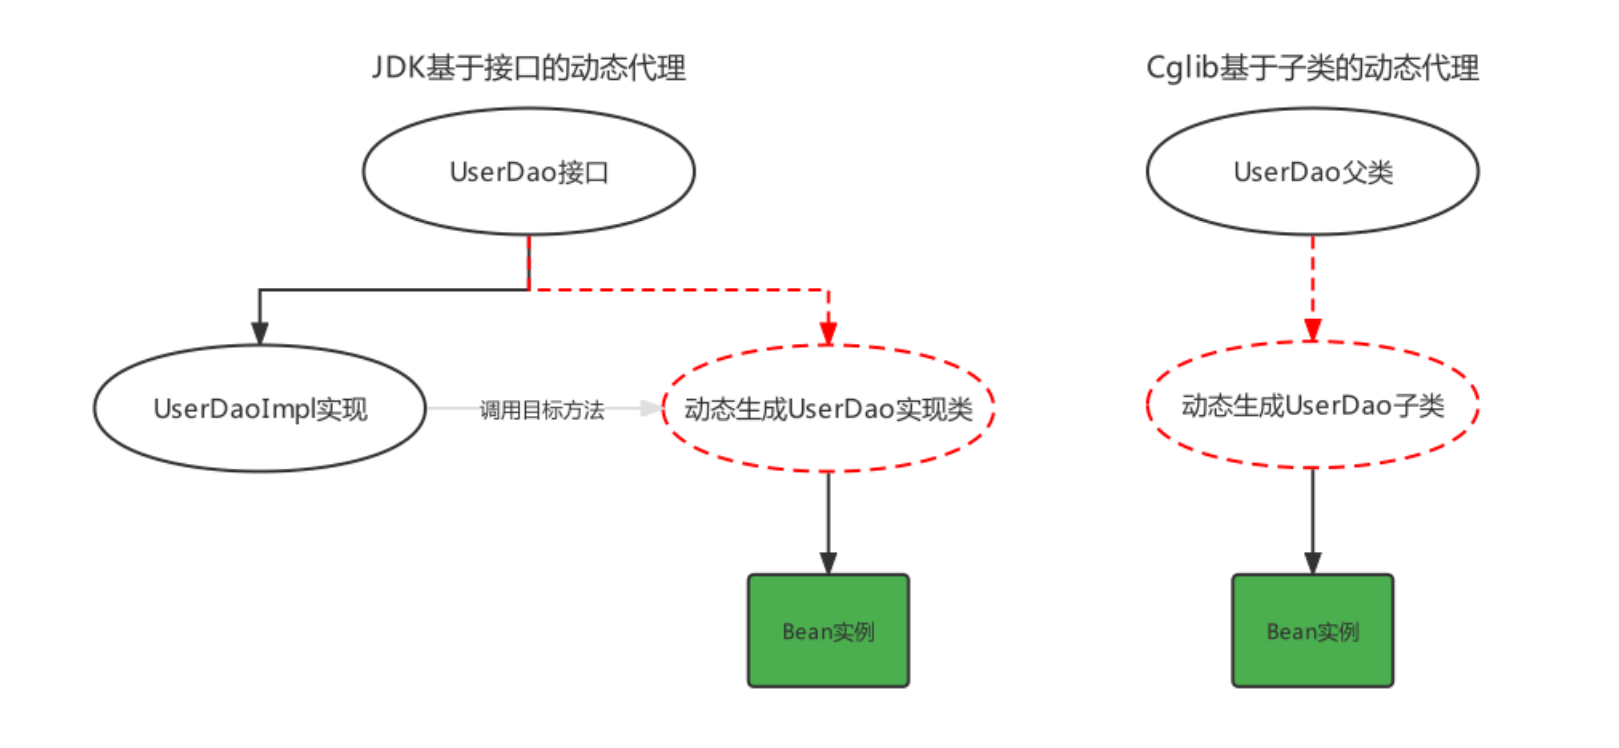
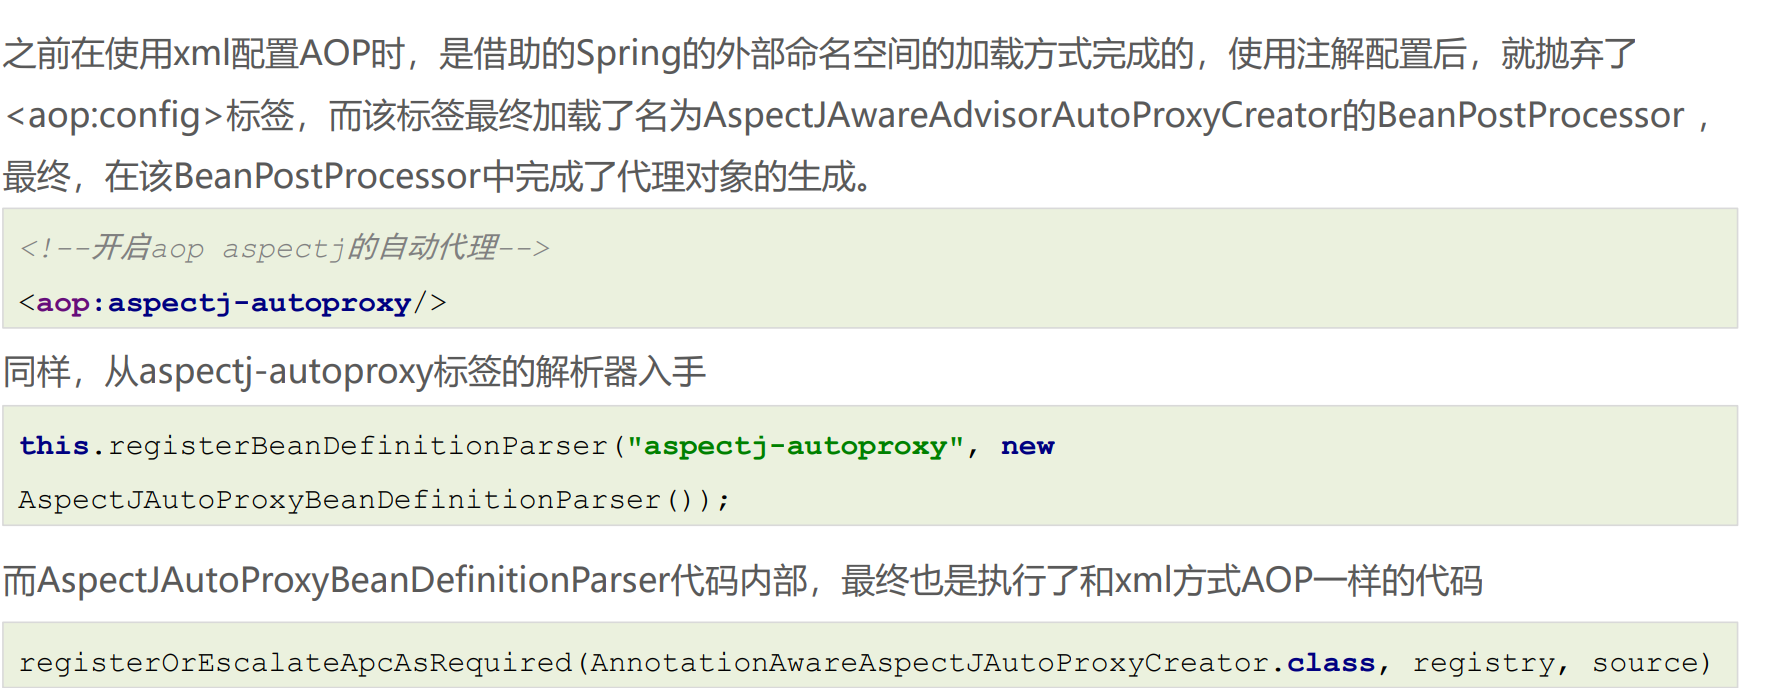
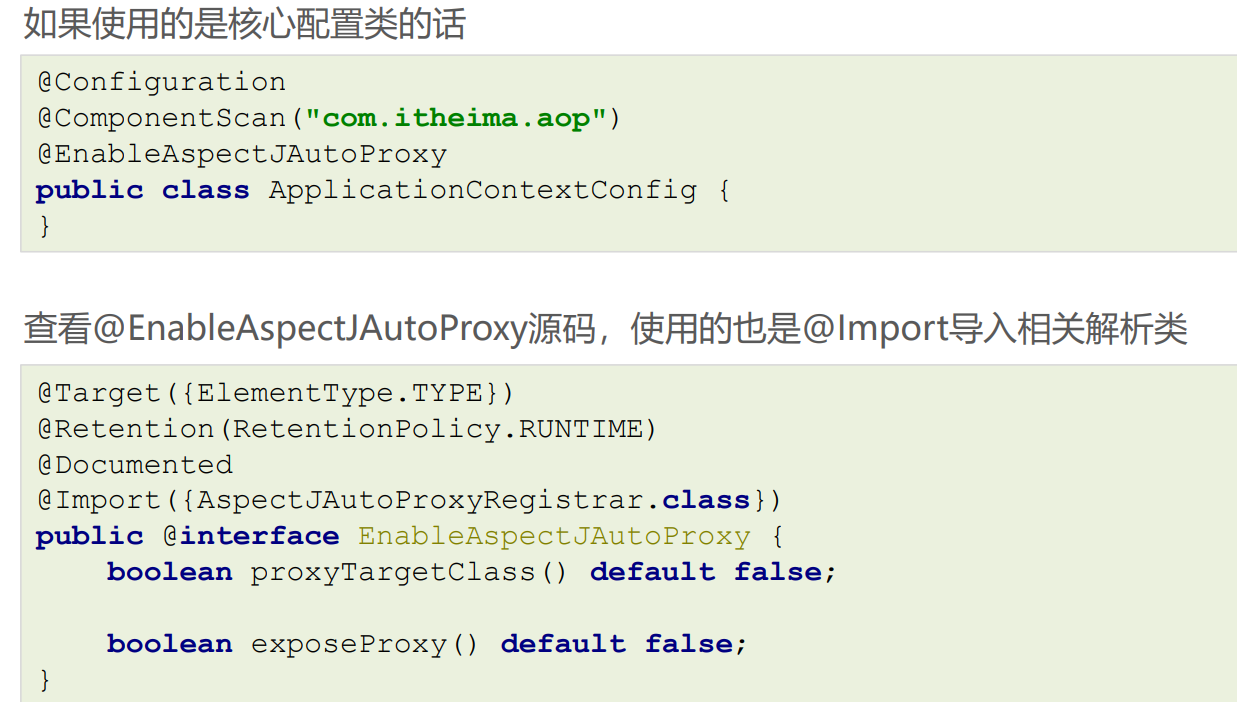
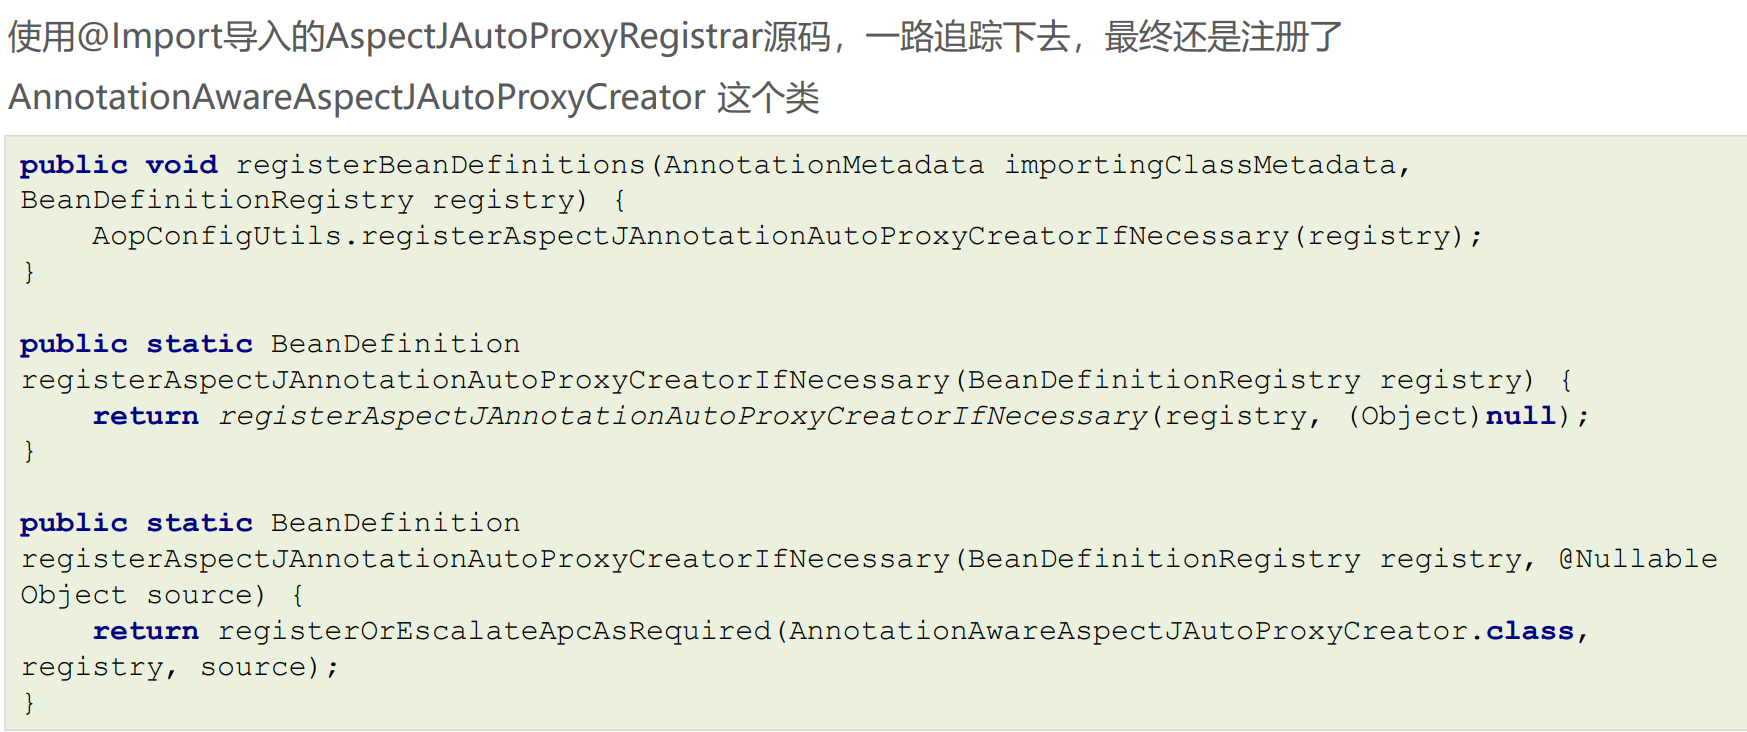
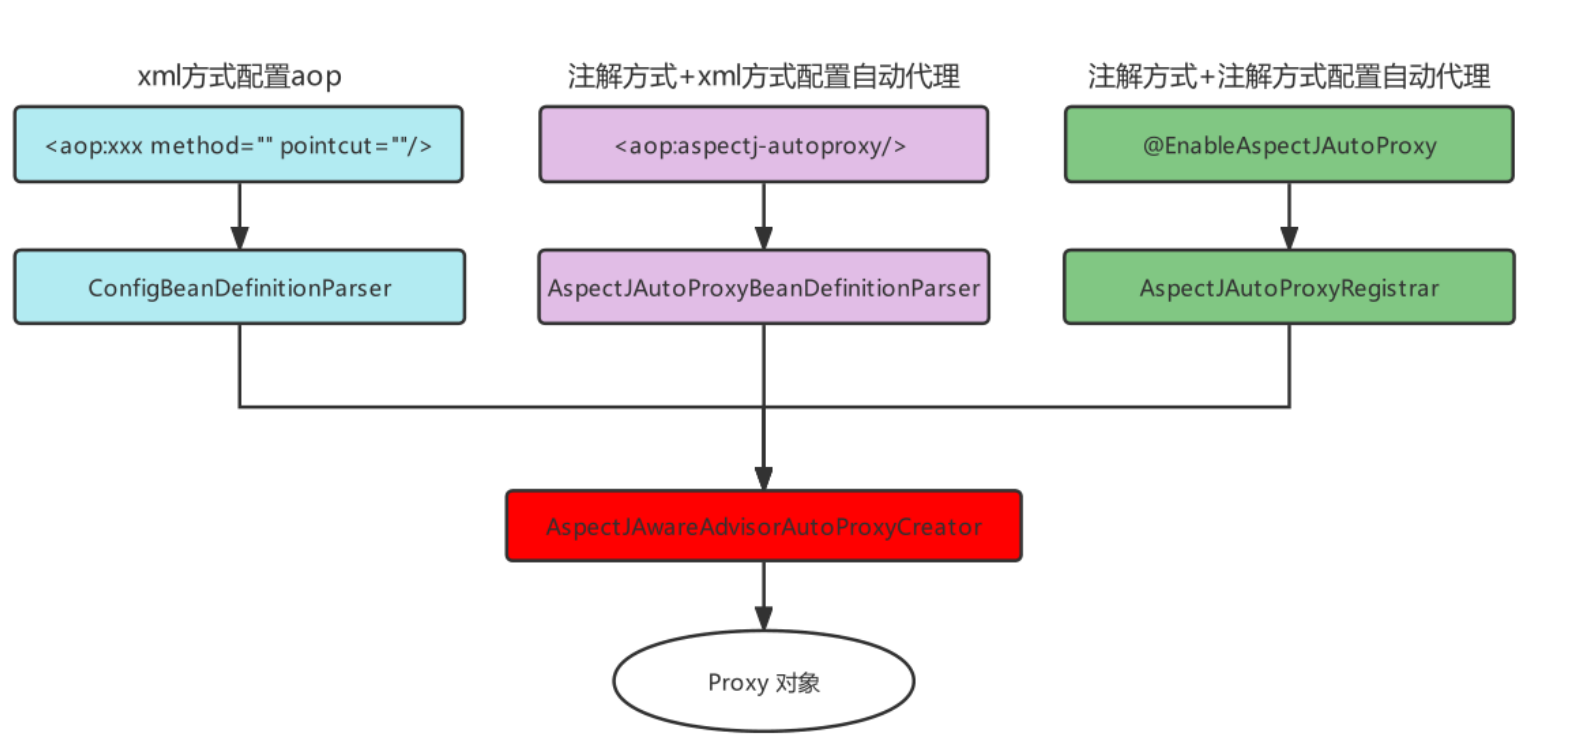
xml方式AOP原理剖析
----JDK的动态代理代码,之前已经写过了,下面看一下Cglib基于超类的动态代理
Target target = new Target();//目标对象
Advices advices = new Advices();//通知对象
Enhancer enhancer = new Enhancer();//增强器对象
enhancer.setSuperclass(Target.class);//增强器设置父类
//增强器设置回调
enhancer.setCallback((MethodInterceptor )(o, method, objects, methodProxy) -> {
    advices.before();
    Object result = method.invoke(target, objects);
    advices.afterReturning();
    return result;
});
//创建代理对象
Target targetProxy = (Target) enhancer.create();
//测试
String result = targetProxy.show("haohao")
注解方式AOP基本使用
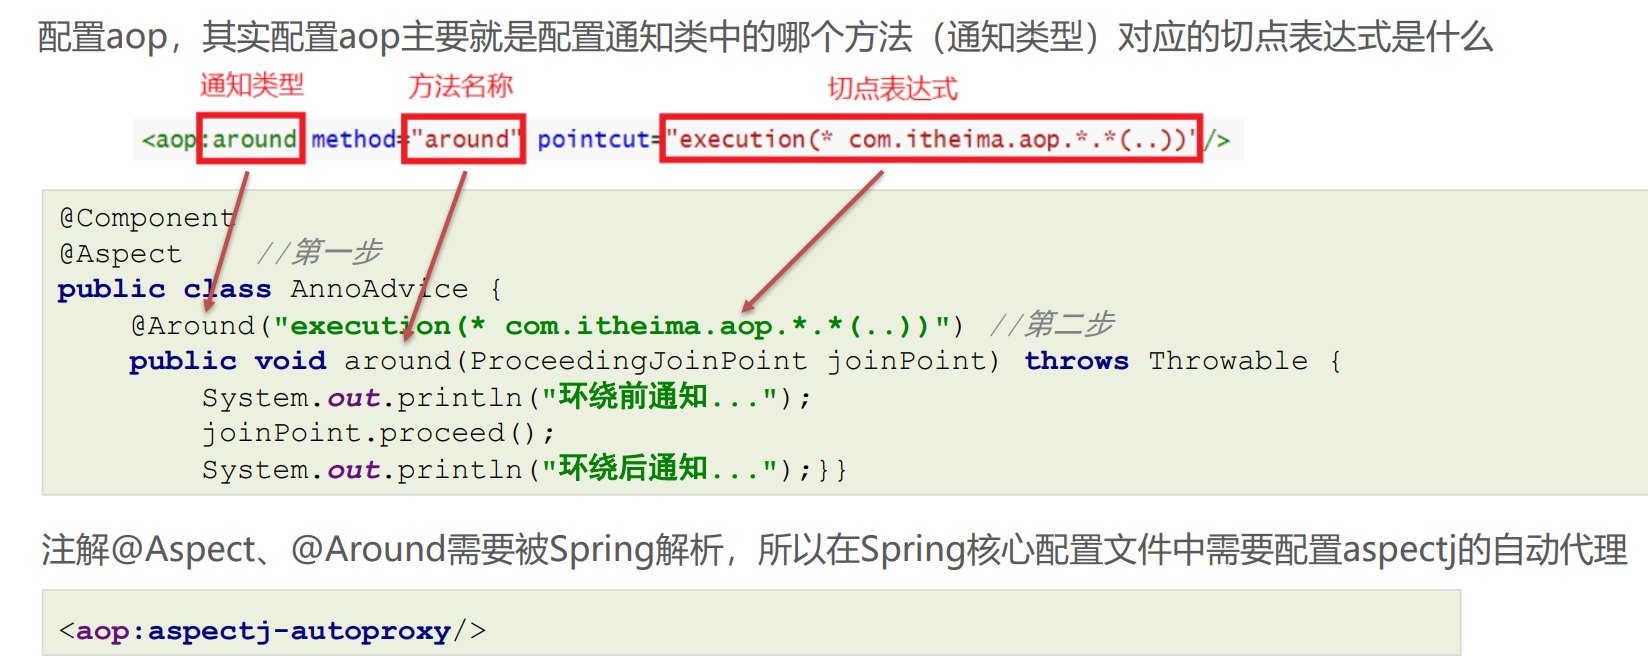
Spring的AOP也提供了注解方式配置,使用相应的注解替代之前的xml配置,
xml配置AOP时,我们主要配置了三部分:目标类被Spring容器管理、通知类被Spring管理、通知与切点的织入(切面),如下:
<!--配置目标-->
<bean id="target" class="com.itheima.aop.TargetImpl"></bean>
<!--配置通知-->
<bean id="advices" class="com.itheima.aop.Advices"></bean>
<!--配置aop-->
<aop:config proxy-target-class="true">
<aop:aspect ref="advices">
<aop:around method="around" pointcut="execution(* com.itheima.aop.*.*(..))"/>
</aop:aspect>
</aop:config>
-----------更改之后----------
目标类被Spring容器管理、通知类被Spring管理
@Service("userService")
public class UserServiceImpl implements UserService {}

@Component
@Aspect
public class MyAdvice {}

------
<?xml version="1.0" encoding="UTF-8"?>
<beans xmlns="http://www.springframework.org/schema/beans"
       xmlns:xsi="http://www.w3.org/2001/XMLSchema-instance"
       xmlns:context="http://www.springframework.org/schema/context"
       xmlns:aop="http://www.springframework.org/schema/aop"
       xsi:schemaLocation="
       http://www.springframework.org/schema/beans
       http://www.springframework.org/schema/beans/spring-beans.xsd
       http://www.springframework.org/schema/context
       http://www.springframework.org/schema/context/spring-context.xsd
       http://www.springframework.org/schema/aop
       http://www.springframework.org/schema/aop/spring-aop.xsd
       ">

    <!--组件扫描-->
    <context:component-scan base-package="com.example.demo"/>

    <!--使用注解配置AOP,需要开启AOP自动代理-->
    <aop:aspectj-autoproxy/>


</beans>
------
各种注解方式通知类型
//前置通知
@Before("execution(* com.itheima.aop.*.*(..))")
public void before(JoinPoint joinPoint){}
//后置通知
@AfterReturning("execution(* com.itheima.aop.*.*(..))")
public void AfterReturning(JoinPoint joinPoint){}
//环绕通知
@Around("execution(* com.itheima.aop.*.*(..))")
public void around(ProceedingJoinPoint joinPoint) throws Throwable {}
//异常通知
@AfterThrowing("execution(* com.itheima.aop.*.*(..))")
public void AfterThrowing(JoinPoint joinPoint){}
//最终通知
@After("execution(* com.itheima.aop.*.*(..))")
public void After(JoinPoint joinPoint){}
"execution(* com.itheima.aop.*.*(..))"代码被重复,不方便后续的修改,需要抽离出来
切点表达式的抽取,使用一个空方法,将切点表达式标注在空方法上,其他通知方法引用即可
//增强类,内部提供增强方法
@Component
@Aspect
public class MyAdvice {

    //切点表达式的抽取
    @Pointcut("execution(* com.example.demo.service.impl.*.*(..))")
    public void myPointcut(){}

    //<aop:before method="beforeAdvice" pointcut="execution(* com.itheima.service.impl.*.*(..))"/>
    @Before("execution(* com.example.demo.service.impl.*.*(..))")
    public void beforeAdvice(){
        //System.out.println("当前目标对象是:"+joinPoint.getTarget());
        //System.out.println("表达式:"+joinPoint.getStaticPart());
        System.out.println("前置的增强....");
    }

    @AfterReturning("execution(* com.example.demo.service.impl.*.*(..))")
    public void afterReturningAdvice(){
        System.out.println("后置的增强....");
    }

    @Around("MyAdvice.myPointcut()")
    public Object around(ProceedingJoinPoint proceedingJoinPoint) throws Throwable {
        System.out.println("环绕前的增强....");
        Object res = proceedingJoinPoint.proceed();//执行目标方法
        System.out.println("环绕后的增强....");
        return res;
    }

    @AfterThrowing(pointcut = "execution(* com.example.demo.service.impl.*.*(..))",throwing = "e")
    public void afterThrowingAdvice(Throwable e){
        System.out.println("当前异常信息是:"+e);
        System.out.println("异常抛出通知...报异常才执行");
    }

    @After("execution(* com.example.demo.service.impl.*.*(..))")
    public void afterAdvice(){
        System.out.println("最终的增强....");
    }

}
下面是为了全注解开发从而可以省略xml文件
ApplicationContext app = new AnnotationConfigApplicationContext(SpringConfig.class);
UserService bean = app.getBean(UserService.class);
bean.show2();
-------
@Configuration
@ComponentScan("com.itheima")   //<context:component-scan base-package="com.itheima"/>
@EnableAspectJAutoProxy //<aop:aspectj-autoproxy/>
public class SpringConfig {
}
原理解析
基于AOP的声明式事务控制
xml配置
<?xml version="1.0" encoding="UTF-8"?>
<beans xmlns="http://www.springframework.org/schema/beans"
       xmlns:xsi="http://www.w3.org/2001/XMLSchema-instance"
       xmlns:context="http://www.springframework.org/schema/context"
       xmlns:aop="http://www.springframework.org/schema/aop"
       xmlns:tx="http://www.springframework.org/schema/tx"
       xsi:schemaLocation="
       http://www.springframework.org/schema/beans
       http://www.springframework.org/schema/beans/spring-beans.xsd
       http://www.springframework.org/schema/context
       http://www.springframework.org/schema/context/spring-context.xsd
       http://www.springframework.org/schema/aop
       http://www.springframework.org/schema/aop/spring-aop.xsd
       http://www.springframework.org/schema/tx
       http://www.springframework.org/schema/tx/spring-tx.xsd
       ">

    <!--组件扫描-->
    <context:component-scan base-package="com.example.trans"/>

    <!--加载properties文件-->
    <context:property-placeholder location="classpath:jdbc.properties"/>

    <!--配置数据源信息-->
    <bean id="dataSource" class="com.alibaba.druid.pool.DruidDataSource">
        <property name="driverClassName" value="${jdbc.driver}"></property>
        <property name="url" value="${jdbc.url}"></property>
        <property name="username" value="${jdbc.username}"></property>
        <property name="password" value="${jdbc.password}"></property>
    </bean>

    <!--配置SqlSessionFactoryBean,作用将SqlSessionFactory存储到spring容器-->
    <bean class="org.mybatis.spring.SqlSessionFactoryBean">
        <property name="dataSource" ref="dataSource"></property>
    </bean>

    <!--MapperScannerConfigurer,作用扫描指定的包,产生Mapper对象存储到Spring容器-->
    <bean class="org.mybatis.spring.mapper.MapperScannerConfigurer">
        <property name="basePackage" value="com.example.trans.mapper"></property>
    </bean>

    <!--配置平台事务管理器-->
由于这里是mmybaits因此要用DataSourceTransactionManager
如果是别的则需要用别的对应的平台事务管理器
    <bean id="transactionManager" class="org.springframework.jdbc.datasource.DataSourceTransactionManager">
        <property name="dataSource" ref="dataSource"/>
    </bean>

    <!--配置Spring提供好的Advice-->
    <tx:advice id="txAdvice" transaction-manager="transactionManager">
        <tx:attributes>
            <!--
                配置不同的方法的事务属性
                name:方法名称  *代表通配符  添加操作addUser、addAccount、addOrders=>add*
                isolation:事务的隔离级别,解决事务并发问题
                timeout:超时时间 默认-1 单位是秒
                read-only:是否只读,查询操作设置为只读
                propagation:事务的传播行为,解决业务方法调用业务方法(事务嵌套问题)
            -->
            <!--<tx:method name="transferMoney" isolation="READ_COMMITTED" propagation="REQUIRED" timeout="3" read-only="false"/>
            <tx:method name="registAccount"/>
            <tx:method name="add*"/>
            <tx:method name="update*"/>
            <tx:method name="delete*"/>
            <tx:method name="select*"/>-->
            <tx:method name="*"/>

        </tx:attributes>
    </tx:advice>

    <!--事务增强的aop-->
    <aop:config>
        <!--配置切点表达式-->
        <aop:pointcut id="txPointcut" expression="execution(* com.example.trans.service.impl.*.*(..))"/>
        <!--配置织入关系  通知advice-ref引入Spring提供好的-->
        <aop:advisor advice-ref="txAdvice" pointcut-ref="txPointcut"/>
    </aop:config>


</beans>
注解开发和xml配置
@Service("accountService")
@Transactional(isolation = Isolation.READ_COMMITTED,propagation = Propagation.REQUIRED)
public class AccountServiceImpl implements AccountService {


    @Autowired
    private AccountMapper accountMapper;

    @Override
    //@Transactional(isolation = Isolation.READ_COMMITTED,propagation = Propagation.REQUIRED)
    public void transferMoney(String outAccount, String inAccount, Integer money) {
        accountMapper.decrMoney(outAccount,money);
        int i = 1/0;
        accountMapper.incrMoney(inAccount,money);
    }
}
--------
    <!--组件扫描-->
    <context:component-scan base-package="com.itheima"/>

    <!--加载properties文件-->
    <context:property-placeholder location="classpath:jdbc.properties"/>

    <!--配置数据源信息-->
    <bean id="dataSource" class="com.alibaba.druid.pool.DruidDataSource">
        <property name="driverClassName" value="${jdbc.driver}"></property>
        <property name="url" value="${jdbc.url}"></property>
        <property name="username" value="${jdbc.username}"></property>
        <property name="password" value="${jdbc.password}"></property>
    </bean>

    <!--配置SqlSessionFactoryBean,作用将SqlSessionFactory存储到spring容器-->
    <bean class="org.mybatis.spring.SqlSessionFactoryBean">
        <property name="dataSource" ref="dataSource"></property>
    </bean>

    <!--MapperScannerConfigurer,作用扫描指定的包,产生Mapper对象存储到Spring容器-->
    <bean class="org.mybatis.spring.mapper.MapperScannerConfigurer">
        <property name="basePackage" value="com.itheima.mapper"></property>
    </bean>

    <!--配置平台事务管理器-->
    <bean id="transactionManager" class="org.springframework.jdbc.datasource.DataSourceTransactionManager">
        <property name="dataSource" ref="dataSource"/>
    </bean>


    <!--<tx:advice id="txAdvice" transaction-manager="transactionManager">
        <tx:attributes>
            <tx:method name="*" isolation="READ_COMMITTED" propagation="REQUIRED" read-only="false" timeout="3"/>
        </tx:attributes>
    </tx:advice>-->

    <!--<aop:config>
        <aop:pointcut id="txPointcut" expression="execution(* com.itheima.service.impl.*.*(..))"/>
        <aop:advisor advice-ref="txAdvice" pointcut-ref="txPointcut"/>
    </aop:config>-->

    <!--事务的自动代理(注解驱动)-->
    <tx:annotation-driven transaction-manager="transactionManager"/>
</beans>
全注解开发
 public static void main(String[] args) {
        //ApplicationContext app = new ClassPathXmlApplicationContext("applicationContext2.xml");
        ApplicationContext app = new AnnotationConfigApplicationContext(SpringConfig.class);
        AccountService accountService = app.getBean(AccountService.class);
        accountService.transferMoney("lili","xixi",500);
    }
--------

@Configuration
@ComponentScan("com.example.trans")
@PropertySource("classpath:jdbc.properties")
@MapperScan("com.example.trans.mapper")
@EnableTransactionManagement //<tx:annotation-driven/>
public class SpringConfig {

    @Bean
    public DataSource dataSource(
            @Value("${jdbc.driver}") String driver,
            @Value("${jdbc.url}") String url,
            @Value("${jdbc.username}") String username,
            @Value("${jdbc.password}") String password
    ){
        DruidDataSource dataSource = new DruidDataSource();
        dataSource.setDriverClassName(driver);
        dataSource.setUrl(url);
        dataSource.setUsername(username);
        dataSource.setPassword(password);
        return dataSource;

    }

    //   <!--配置SqlSessionFactoryBean,作用将SqlSessionFactory存储到spring容器-->
    @Bean
    public SqlSessionFactoryBean sqlSessionFactoryBean(DataSource dataSource){
        SqlSessionFactoryBean sqlSessionFactoryBean = new SqlSessionFactoryBean();
        sqlSessionFactoryBean.setDataSource(dataSource);
        return sqlSessionFactoryBean;
    }
    //    <!--配置平台事务管理器-->
    @Bean
    public DataSourceTransactionManager transactionManager(DataSource dataSource){
        DataSourceTransactionManager dataSourceTransactionManager = new DataSourceTransactionManager();
        dataSourceTransactionManager.setDataSource(dataSource);
        return dataSourceTransactionManager;
    }
}
------
@Service("accountService")
@Transactional(isolation = Isolation.READ_COMMITTED,propagation = Propagation.REQUIRED)
public class AccountServiceImpl implements AccountService {


    @Autowired
    private AccountMapper accountMapper;

    @Override
    //@Transactional(isolation = Isolation.READ_COMMITTED,propagation = Propagation.REQUIRED)
    public void transferMoney(String outAccount, String inAccount, Integer money) {
        accountMapper.decrMoney(outAccount,money);
       int i = 1/0;
        accountMapper.incrMoney(inAccount,money);
    }
}
------
public interface AccountMapper {

    //+钱
    @Update("update tb_account set money=money+#{money} where account_name=#{accountName}")
    public void incrMoney(@Param("accountName") String accountName, @Param("money") Integer money);
    //-钱
    @Update("update tb_account set money=money-#{money} where account_name=#{accountName}")
    public void decrMoney(@Param("accountName") String accountName,@Param("money") Integer money);

}
Spring整合web环境
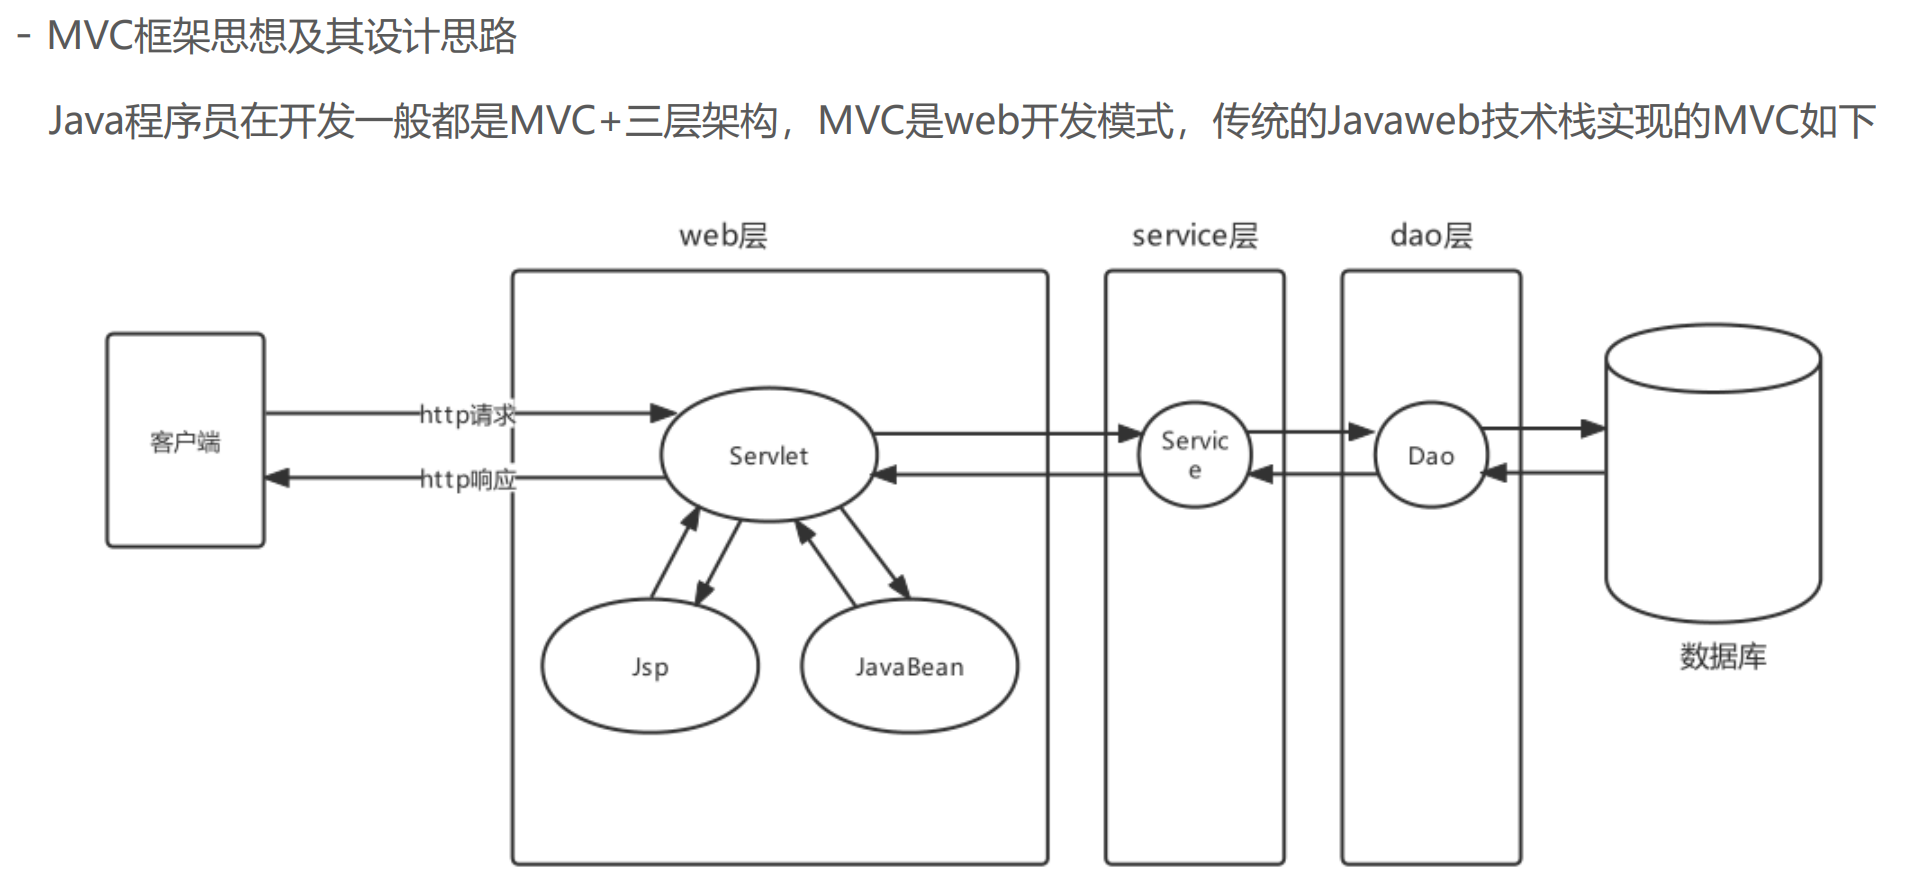
在进行Java开发时要遵循三层架构+MVC,Spring操作最核心的就是Spring容器,web层需要注入Service, service层需要注入Dao(Mapper),web层使用Servlet技术充当的话,需要在Servlet中获得Spring容器
AnnotationConfigApplicationContext applicationContext = new AnnotationConfigApplicationContext(ApplicationContextConfig.class);
AccountService accountService = (AccountService)applicationContext.getBean("accountService");
accountService.transferMoney("tom","lucy",100);
web层代码如果都去编写创建AnnotationConfigApplicationContext的代码,那么配置类重复被加载了,
Spring容器也重复被创建了,不能每次想从容器中获得一个Bean都得先创建一次容器,这样肯定是不允许。
所以,我们现在的诉求很简单,如下:
⚫ ApplicationContext创建一次,配置类加载一次;
⚫ 最好web服务器启动时,就执行第1步操作,后续直接从容器中获取Bean使用即可;
⚫ ApplicationContext的引用需要在web层任何位置都可以获取到
针对以上诉求我们给出解决思路,如下:
⚫ 在ServletContextListener的contextInitialized方法中执行ApplicationContext的创建。或在Servlet的init
方法中执行ApplicationContext的创建,并给Servlet的load-on-startup属性一个数字值,确保服务器启动
Servlet就创建;
⚫ 将创建好的ApplicationContext存储到ServletContext域中,这样整个web层任何位置就都可以获取到了
Spring其实已经为我们定义 好了一个ContextLoaderListener
先导入Spring-web的坐标:
<dependency>
<groupId>org.springframework</groupId>
<artifactId>spring-web</artifactId>
<version>5.3.7</version>
</dependency>
------
在web.xml中去配置ContextLoaderListener,并指定配置文件的位置
<context-param>
<param-name>contextConfigLocation</param-name>
<param-value>classpath:applicationContext.xml</param-value>
</context-param>

<listener>
<listener-class>org.springframework.web.context.ContextLoaderListener</listener-class>
</listener>
在Servlet中直接使用
@WebServlet("/accountServlet")
public class AccountServlet extends HttpServlet {
    protected void doGet(HttpServletRequest request, HttpServletResponse response) throws
    ServletException, IOException {
        //将创建好的ApplicationContext存储到ServletContext域中,这样整个web层任何位置就都可以获取到了
        ServletContext servletContext = request.getServletContext();
        ApplicationContext applicationContext =
        WebApplicationContextUtils.getWebApplicationContext(servletContext);

        AccountService accountService = applicationContext.getBean(AccountService.class);
        accountService.transferMoney("tom","lucy",500);}}
}

-----
如果核心配置类使用的是注解形式的,那么Spring容器是AnnotationConfigWebApplicationContext,如下配
置方式
public class MyAnnotationConfigWebApplicationContext extends
AnnotationConfigWebApplicationContext {
    public MyAnnotationConfigWebApplicationContext(){
        //注册核心配置类
        super.register(ApplicationContextConfig.class);
    }
}
<context-param>
<param-name>contextClass</param-name>
<param-value>com.itheima.web.MyAnnotationConfigWebApplicationContext</param-value>
</context-param>

<listener>
<listener-class>org.springframework.web.context.ContextLoaderListener</listener-class>
</listener>
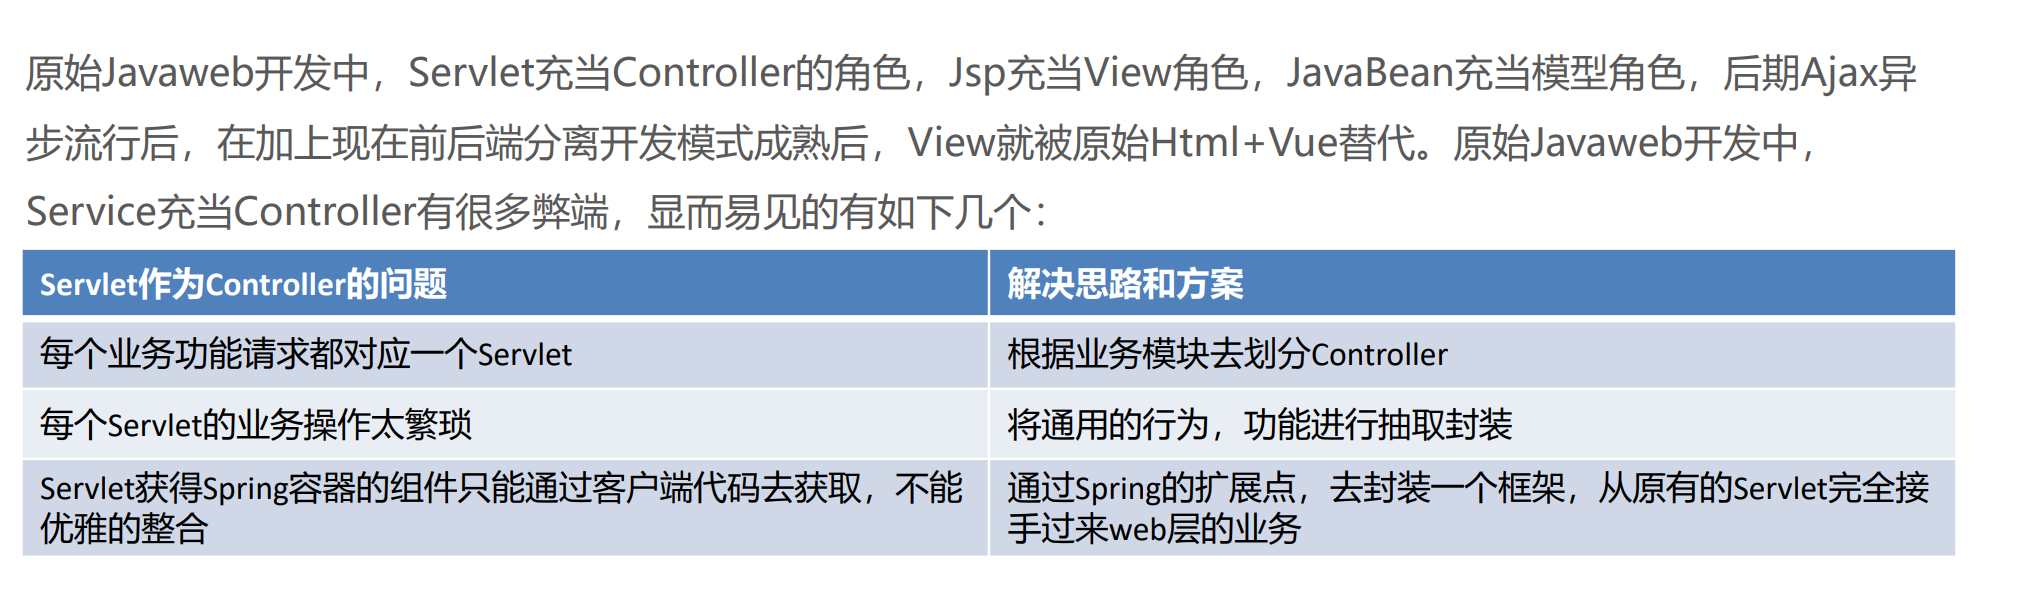
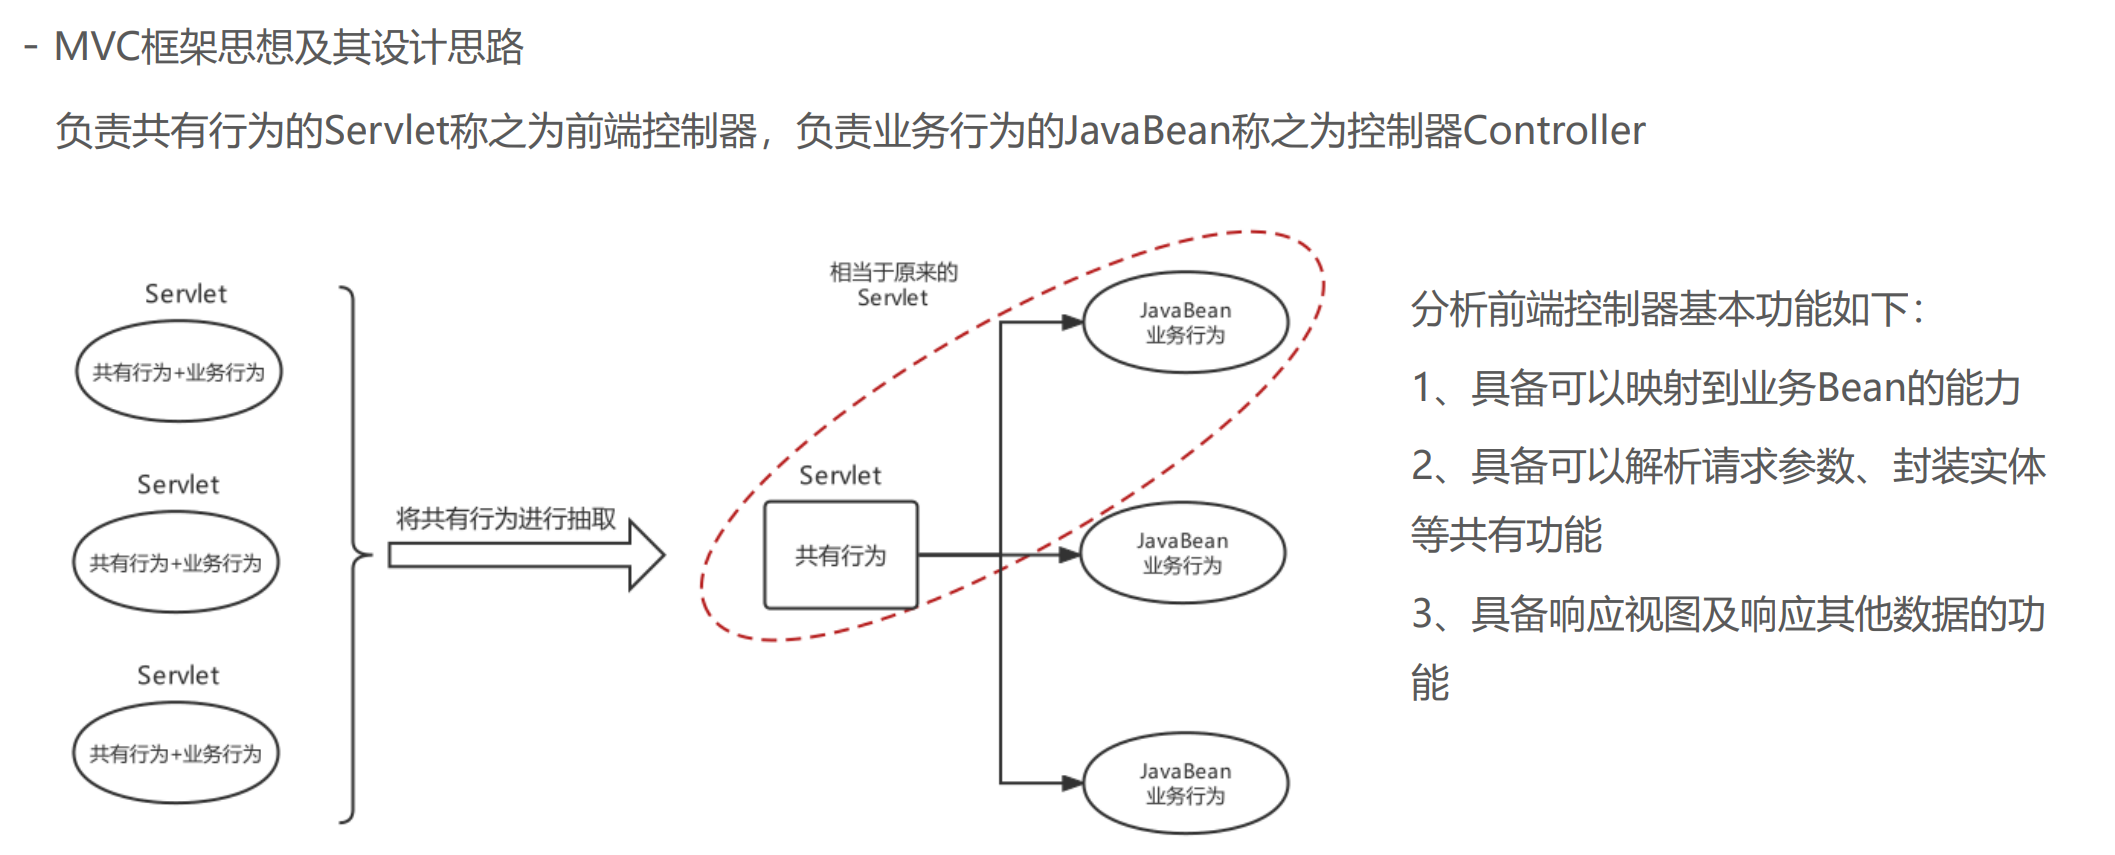
web层MVC框架思想与设计思路
SpringMVC
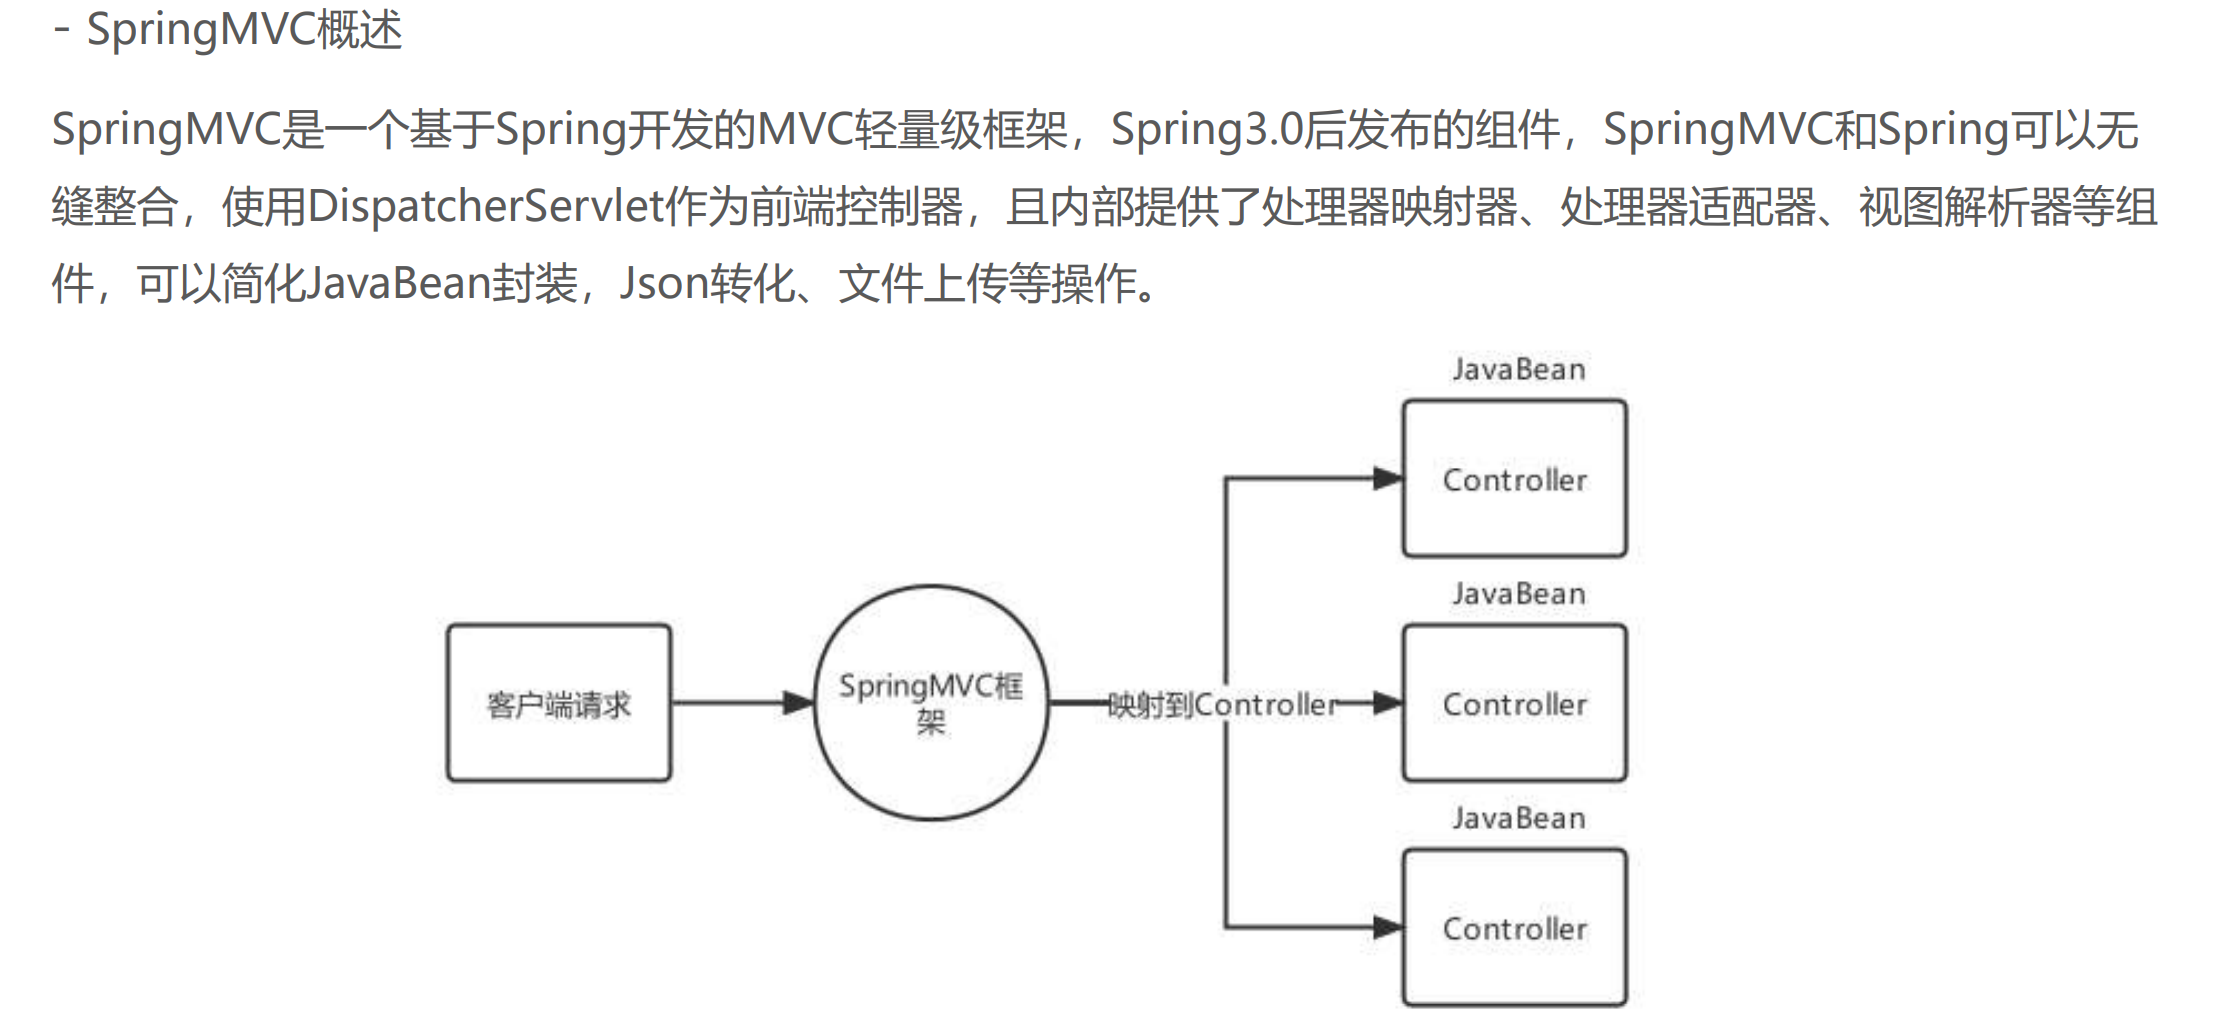
SpringMVC概述
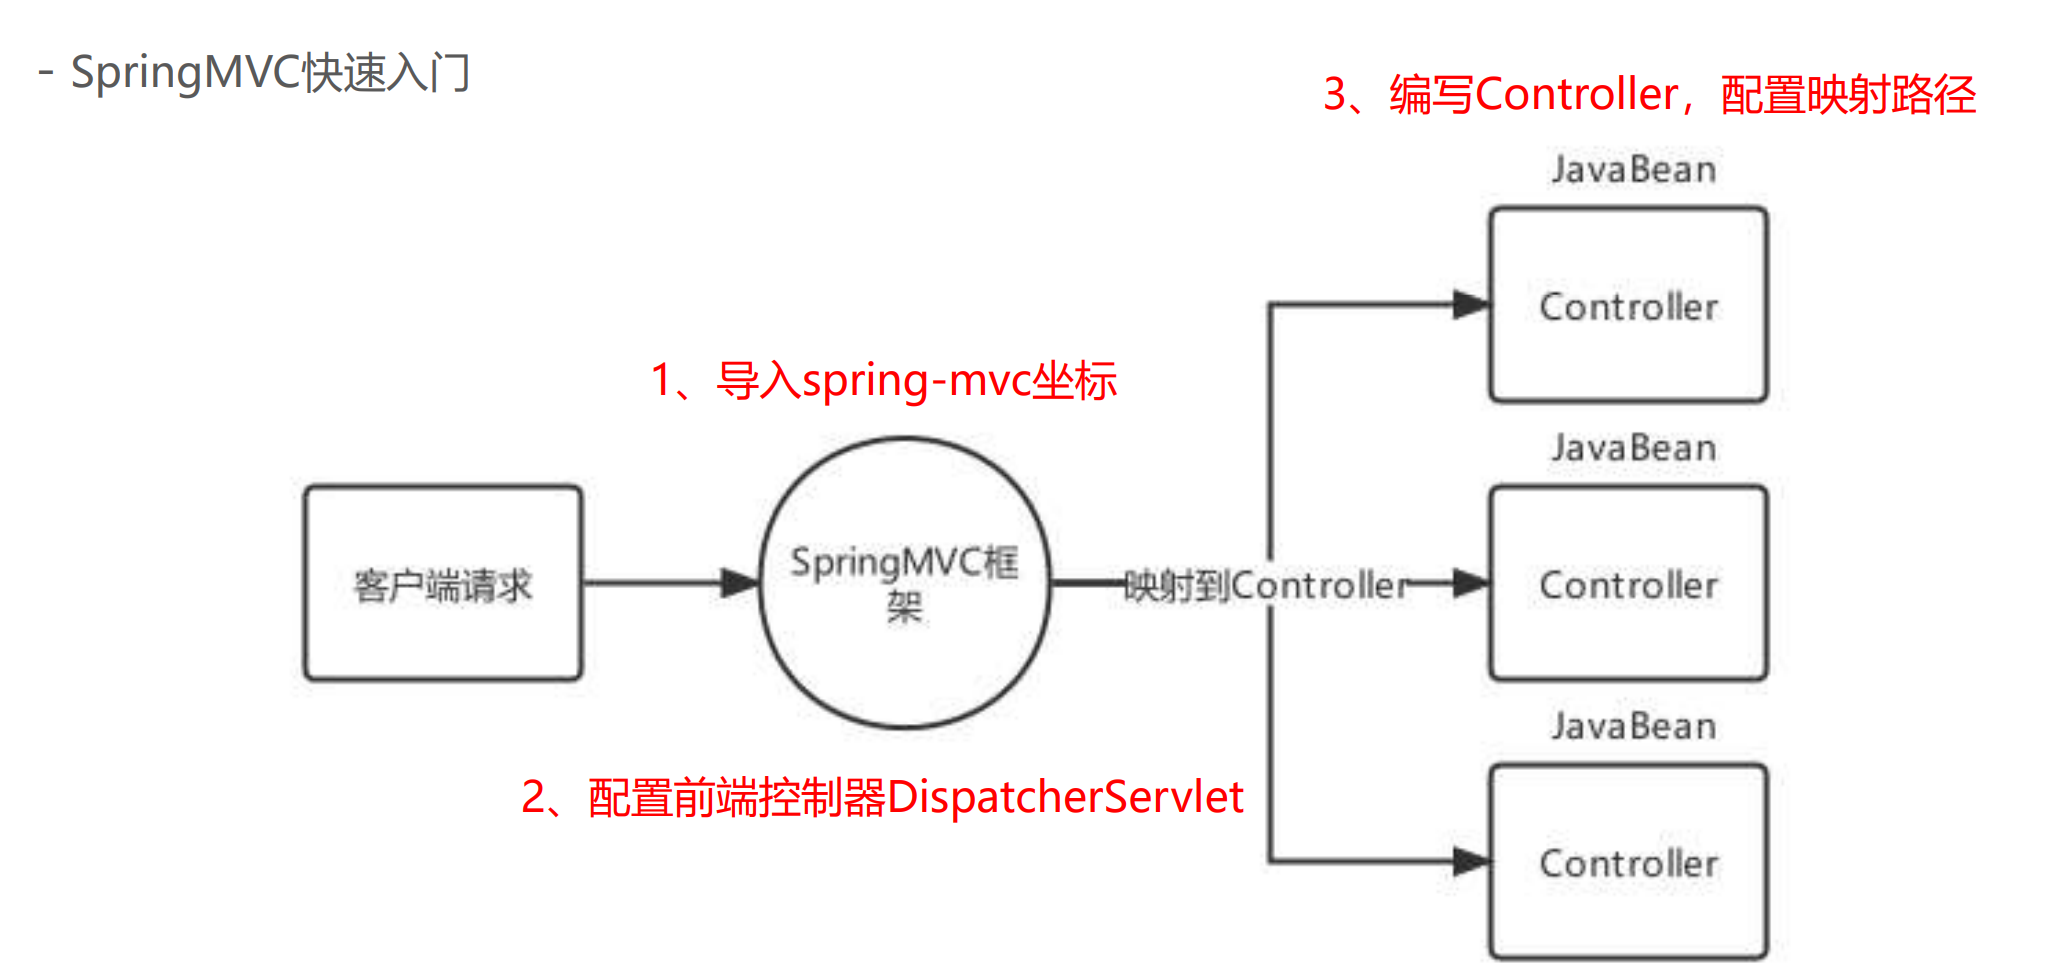
------导入Spring整合SpringMVC的坐标
<dependency>
 <groupId>org.springframework</groupId>
 <artifactId>spring-webmvc</artifactId>
 <version>5.3.7</version>
</dependency>
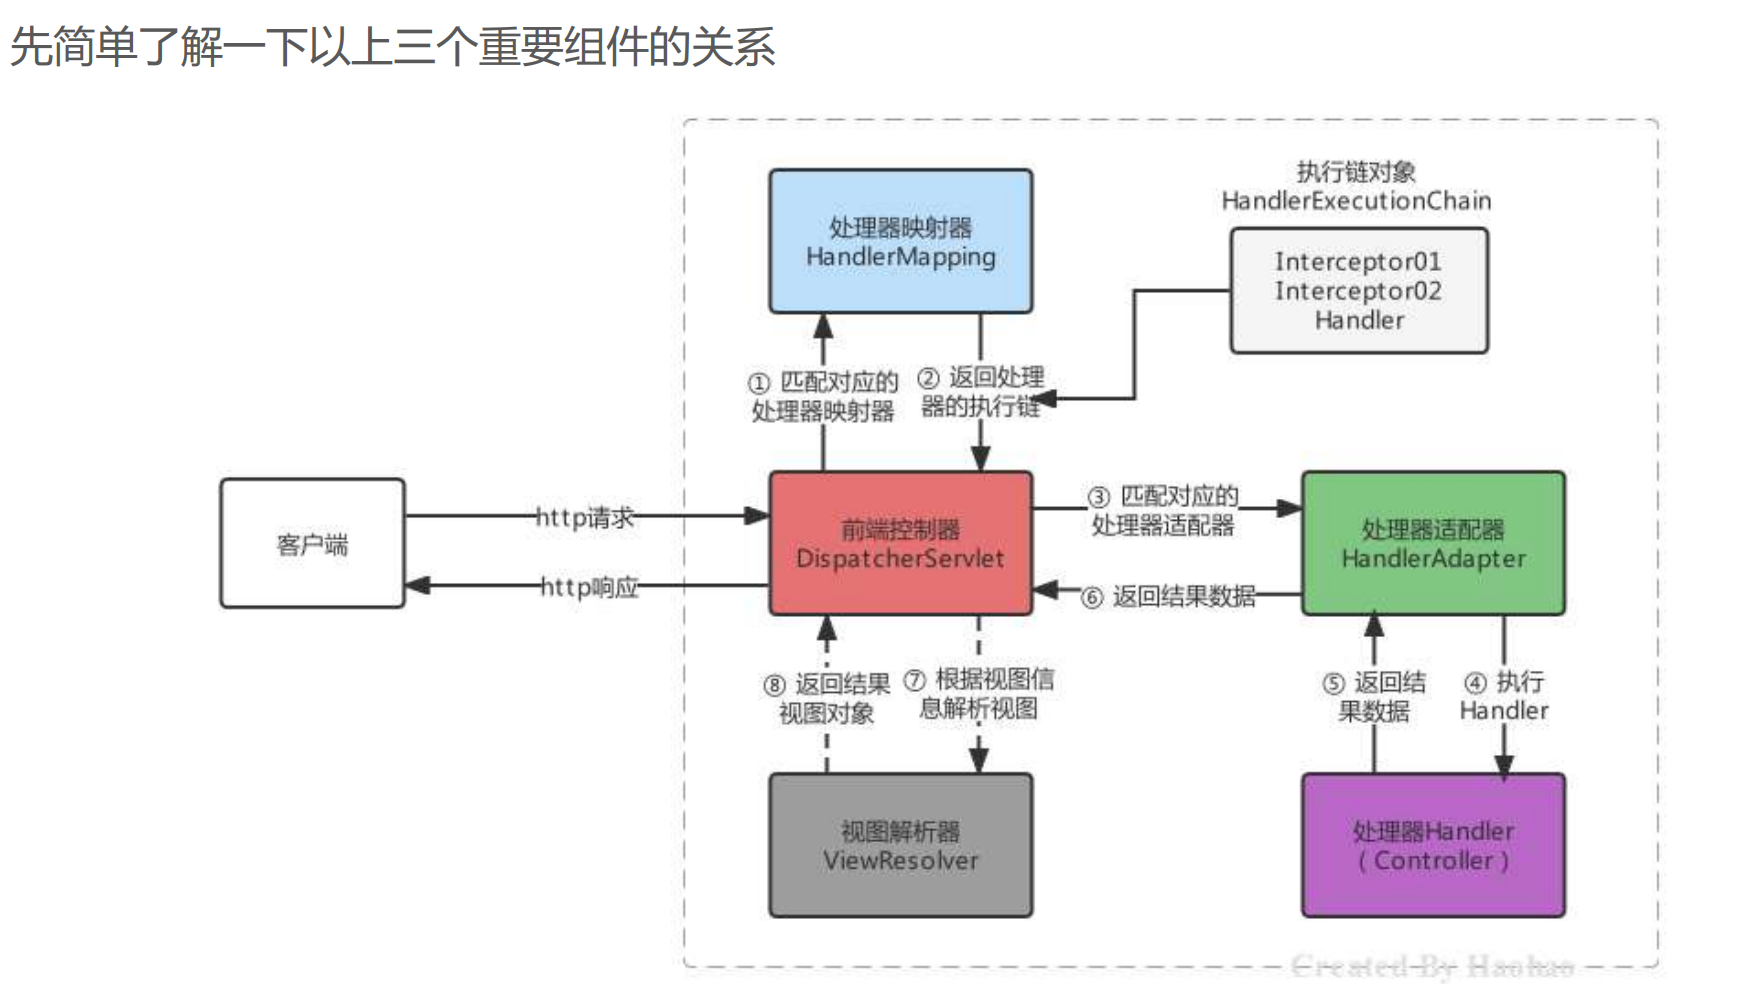
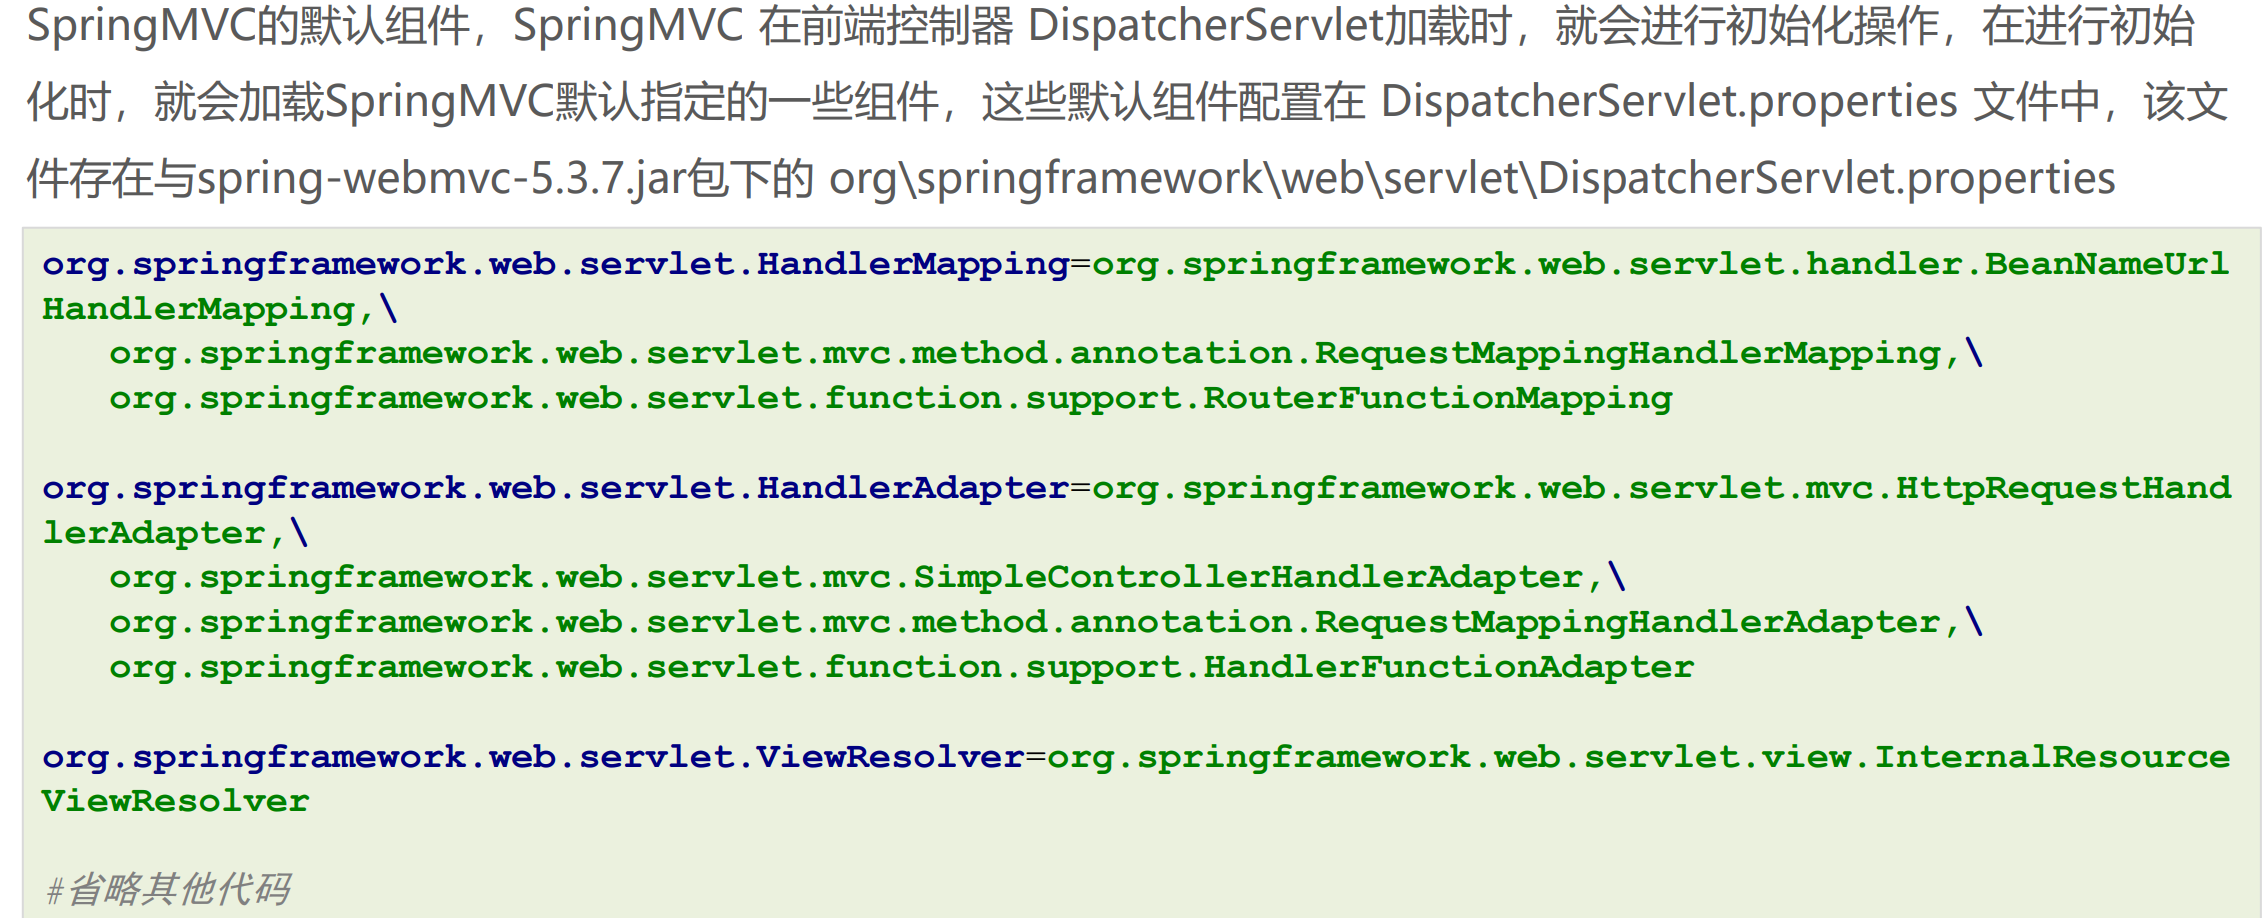
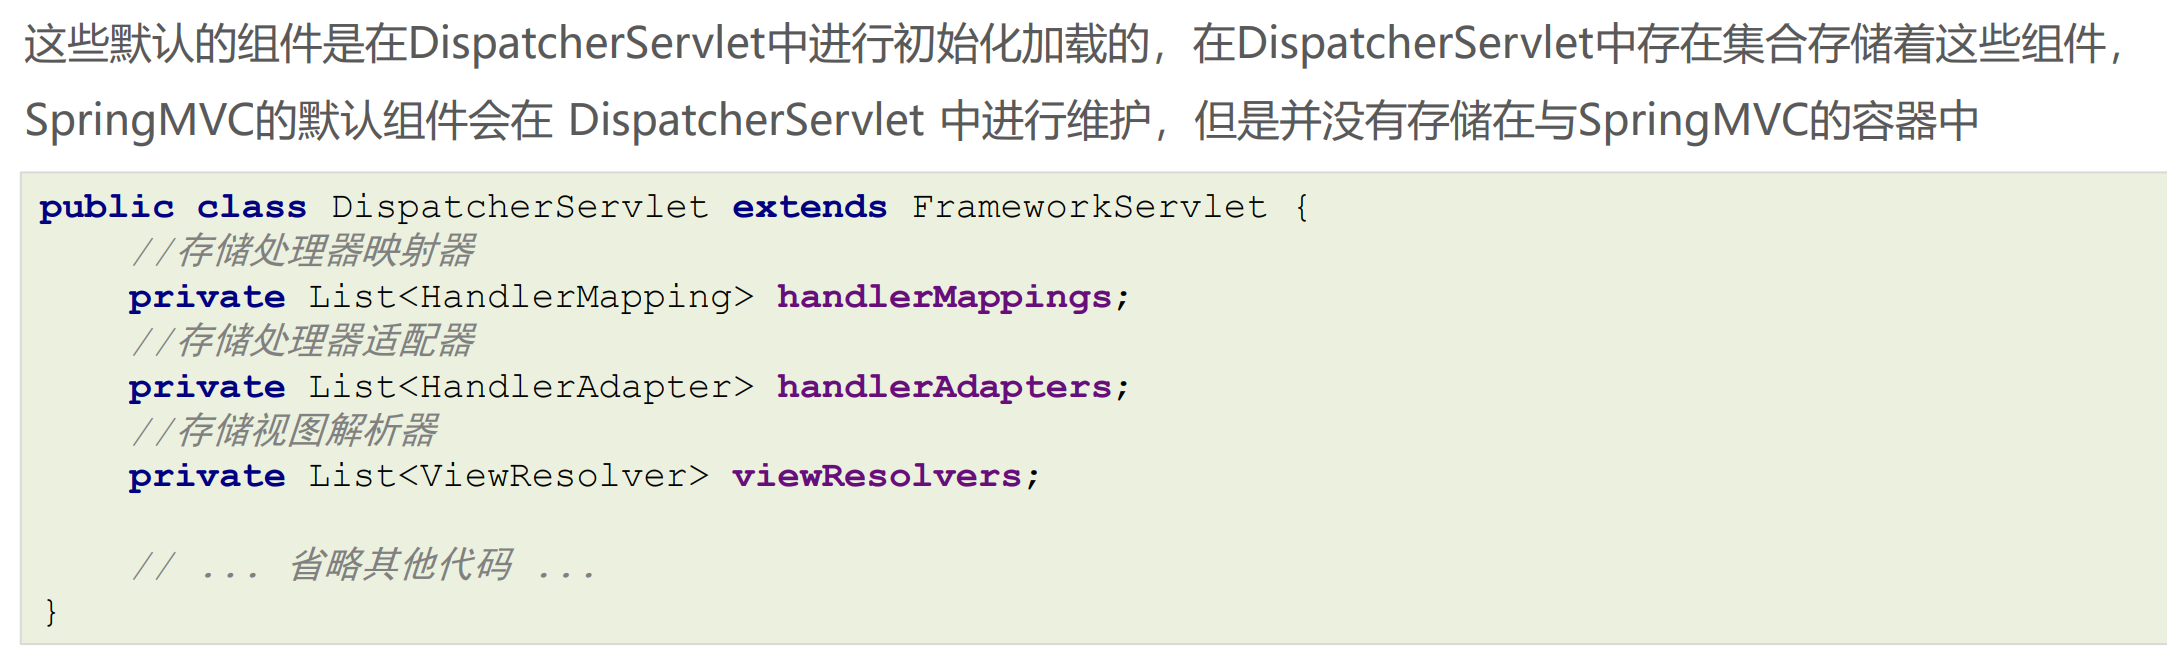
SpringMVC关键组件浅析
当请求到达服务器时,是哪个组件接收的请求,是哪个组件帮我们找到的Controller,是哪个组件 帮我们调用的方法,又是哪个组件最终解析的视图?

例如下段代码中:其中"/show"是映射路径由处理器映射器找到QuickController里的show方法,然后由处理器适配器调用show方法,最后返回的"/index1.jsp"由试图解析器来解析
@Controller
public class QuickController {

    //直接注入Service进行使用
    @Autowired
    private QuickService quickService;

    @RequestMapping("/show")
    public String show() {
        System.out.println("############kk"+quickService);
        return "/index1.jsp";
    }
}

SpringMVC的请求处理
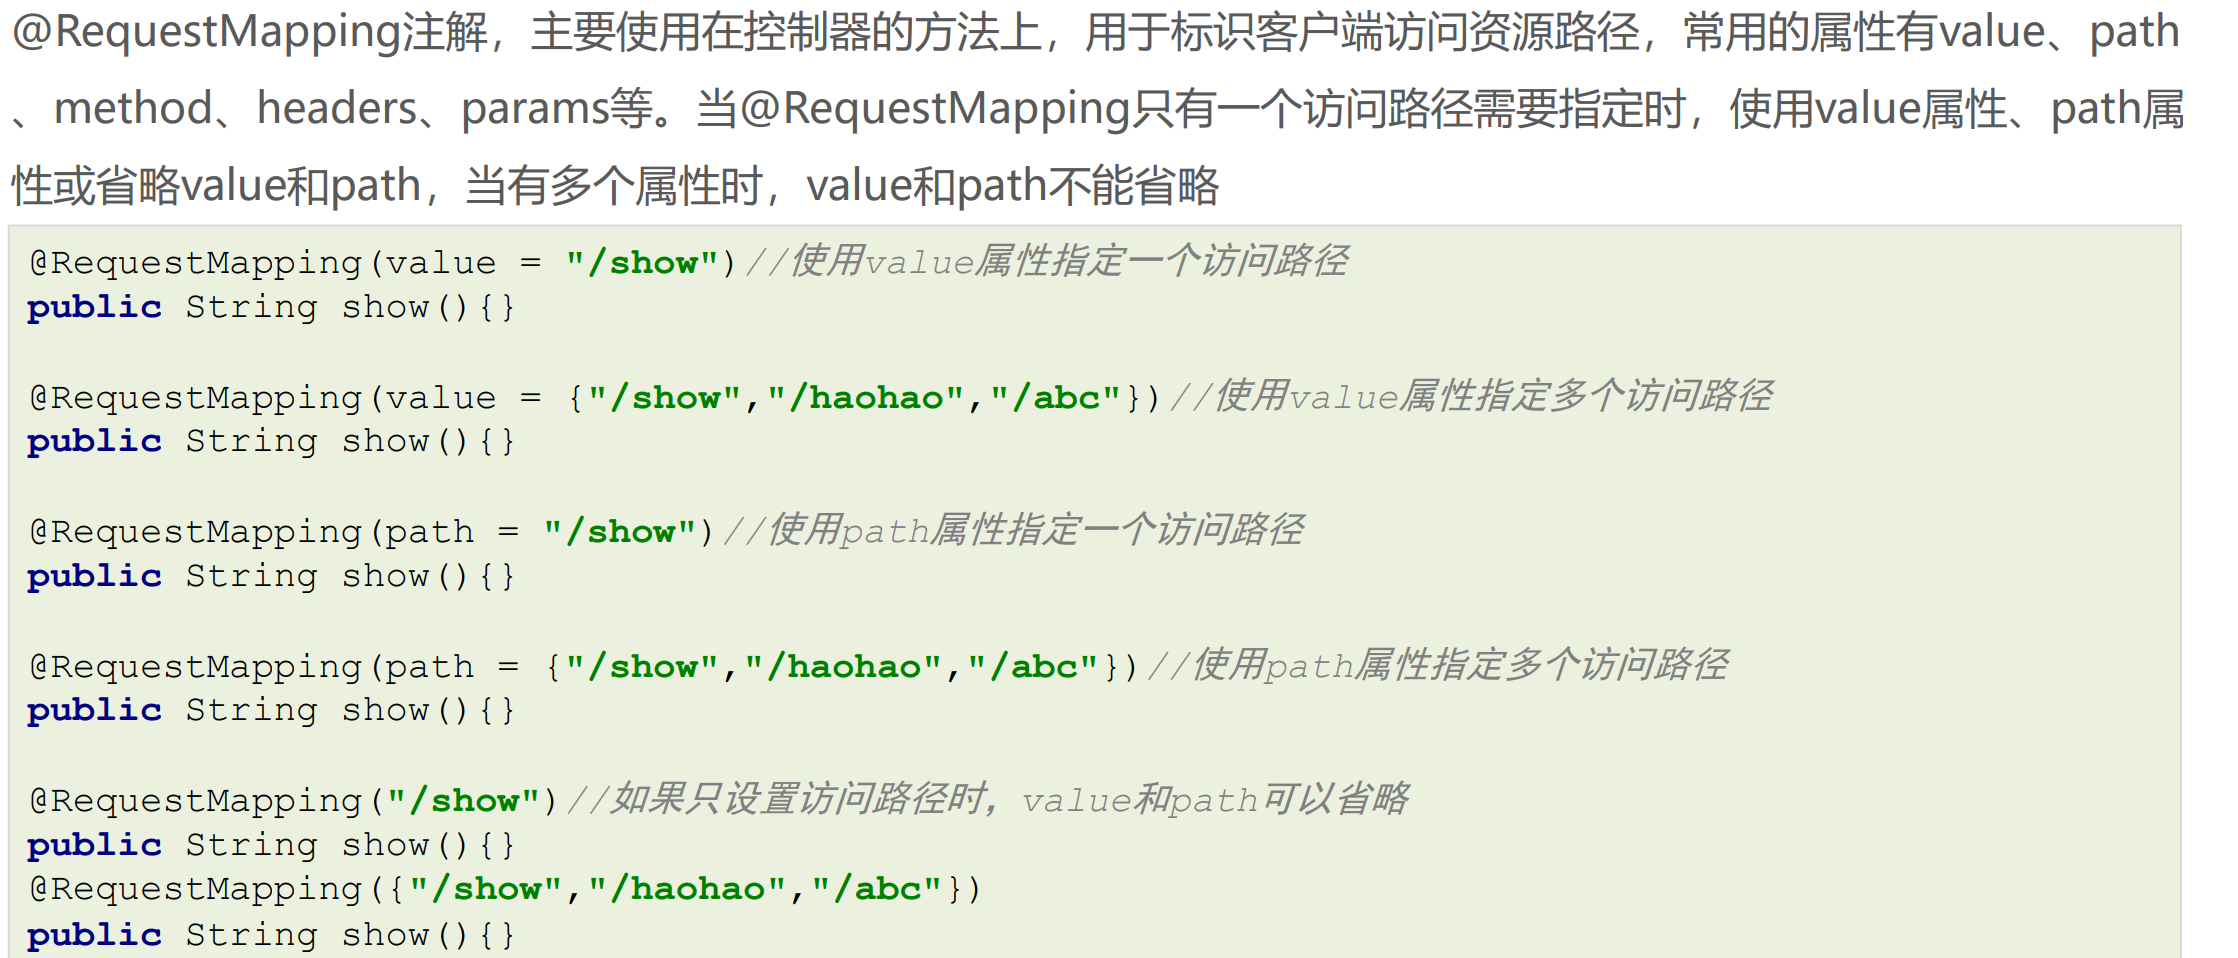
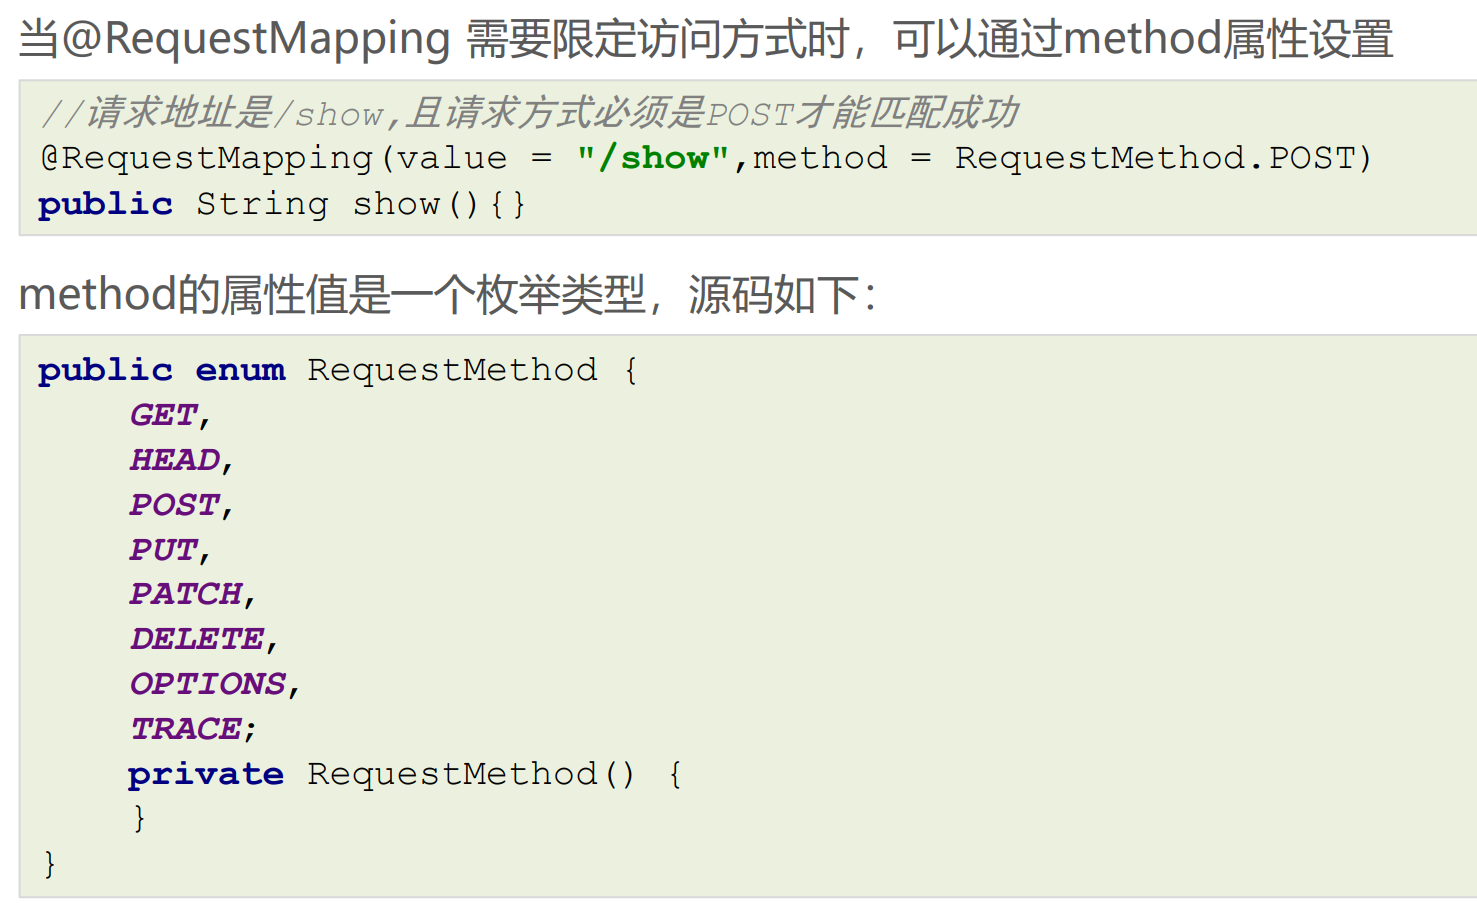
请求映射路径的配置

请求数据的接收
接收普通请求数据,当客户端提交的数据是普通键值对形式时,直接使用同名形参接收即可
username=haohao&age=35
@GetMapping("/show")
public String show(String username, int age){
    System.out.println(username+"=="+age);
    return "/index.jsp";
}
-----------------
接收普通请求数据,当请求参数有特殊格式数据,如日期时
username=haohao&age=35&birthday=1986/01/01
@GetMapping("/show")
public String show(String username,int age,Date birthday){
    System.out.println(username+"=="+age+"=="+birthday);
    return "/index.jsp";
}
Date可以正常接收,因为Spring内置的类型解析器,可以识别的日期格式是 yyyy/MM/dd,但是如果我们提交其他
格式,例如:yyyy-MM-dd 时,类型转换会报错,如下:
username=haohao&age=35&birthday=1986-01-01

解决方案,使用@DateTimeFormat 指定日期格式,修改UserController如下:
@GetMapping("/show")
public String show(String username,int age,@DateTimeFormat(pattern = "yyyy-MM-dd") Date
                   birthday){
    System.out.println(username+"=="+age+"=="+birthday);
    return "/index.jsp";
}
-----------------
接收普通请求数据,当请求参数的名称与方法参数名不一致时,可以使用@RequestParam注解进行标注
@GetMapping("/show")
username=haohao&age=35
public String show(@RequestParam(name = "username",required = true) String name, int age){
    System.out.println(name+"=="+age);
    return "/index.jsp";
}
-----------------
接收实体JavaBean属性数据,单个JavaBean数据:提交的参数名称只要与Java的属性名一致,就可以进行自动封装
public class User {
    private String username;
    private Integer age;
    private String[] hobbies;
    private Date birthday;
    private Address address;
    //... 省略get和set方法 ...
}
username=haohao&age=35&hobbies=eat&hobbies=sleep
@GetMapping("/show")
public String show(User user){
System.out.println(user);
return "/index.jsp";
}
-----------------
接收实体JavaBean属性数据,嵌套JavaBean数据:提交的参数名称用 . 去描述嵌套对象的属性关系即可
username=haohao&address.city=tianjin&address.area=jinghai
同上,JavaBean中如果有日期数据,且日期格式不符合yyyy/MM/dd时,需要通过@DateTimeFormat指定日期格式
username=haohao&birthday=1986-11-11
public class User {
    private String username;
    private Integer age;
    private String[] hobbies;
    @DateTimeFormat(pattern = "yyyy-MM-dd")
    private Date birthday;
    private Address address;
    //... 省略get和set方法 ...
}
-----------------
接收数组或集合数据,客户端传递多个同名参数时,可以使用数组接收
hobbies=eat&hobbies=sleep
@GetMapping("/show")
public String show(String[] hobbies){
    for (String hobby : hobbies) {
        System.out.println(hobby);}
    return "/index.jsp";}
接收数组或集合数据,客户端传递多个同名参数时,也可以使用单列集合接收,但是需要使用@RequestParam告知
框架传递的参数是要同名设置的,不是对象属性设置的
@GetMapping("/show")
public String show(@RequestParam List<String> hobbies){
    for (String hobby : hobbies) {
        System.out.println(hobby);}
    return "/index.jsp";}
-----------------
接收数组或集合数据,客户端传递多个不同命参数时,也可以使用Map<String,Object> 进行接收,同样需要用
@RequestParam 进行修饰
username=haohao&age=18
@PostMapping("/show")
public String show(@RequestParam Map<String,Object> params){
    params.forEach((key,value)->{
        System.out.println(key+"=="+value);
    });
    return "/index.jsp";
}
-----------------
接收Json数据格式数据,Json数据都是以请求体的方式提交的,且不是原始的键值对格式的,所以我们要使用
@RequestBody注解整体接收该数据。
{
    "username":"haohao",
    "age":18,
    "hobbies":["eat","sleep"],
    "birthday":"1986-01-01",
    "address":{
    "city":"tj",
    "area":"binhai"
}
}
@PostMapping("/show6")
public String show6(@RequestBody String body){
    System.out.println(body);
    return "/index.jsp";
}

使用Json工具( jackson )将Json格式的字符串转化为JavaBean进行操作
<dependency>
<groupId>com.fasterxml.jackson.core</groupId>
<artifactId>jackson-databind</artifactId>
<version>2.9.0</version>
</dependency>

@PostMapping("/show")
public String show(@RequestBody String body) throws IOException {
System.out.println(body);
//获得ObjectMapper
ObjectMapper objectMapper = new ObjectMapper();
//将json格式字符串转化成指定的User
User user = objectMapper.readValue(body, User.class);
System.out.println(user);
return "/index.jsp";
}

配置RequestMappingHandlerAdapter,指定消息转换器,就不用手动转换json格式字符串了
@PostMapping("/show")
public String show(@RequestBody User user){
    System.out.println(user);
    return "/index.jsp";
}
<bean
class="org.springframework.web.servlet.mvc.method.annotation.RequestMappingHandlerAdapter">
<property name="messageConverters">
<list>
<bean
class="org.springframework.http.converter.json.MappingJackson2HttpMessageConverter"/>
</list>
</property>
</bean>

-----------------
接收Json数据格式数据,使用Map接收json格式字符串
@PostMapping("/show")
public String show(@RequestBody Map map){
 System.out.println(map);
 return "/index.jsp";
}
接收Restful风格数据,Restful请求数据一般会在URL地址上携带,可以使用注解 @PathVariable(占位符参数名称)
http://localhost/user/100
@PostMapping("/user/{id}")
public String findUserById(@PathVariable("id") Integer id){
    System.out.println(id);
    return "/index.jsp";
}
请求URL资源地址包含多个参数情况
http://localhost/user/haohao/18
@PostMapping("/user/{username}/{age}")
public String findUserByUsernameAndAge(@PathVariable("username") String
                                       username,@PathVariable("age") Integer age){
    System.out.println(username+"=="+age);
    return "/index.jsp";
}
接收文件上传的数据,文件上传的表单需要一定的要求,如下:
⚫ 表单的提交方式必须是POST
⚫ 表单的enctype属性必须是multipart/form-data
⚫ 文件上传项需要有name属性
<form action="" enctype="multipart/form-data">
<input type="file" name="myFile">
</form>

服务器端,由于映射器适配器需要文件上传解析器,而该解析器默认未被注册,所以手动注册
<!--配置文件上传解析器,注意:id的名字是固定写法-->
<bean id="multipartResolver"
class="org.springframework.web.multipart.commons.CommonsMultipartResolver">
<property name="defaultEncoding" value="UTF-8"/><!--文件的编码格式 默认是ISO8859-1-->
<property name="maxUploadSizePerFile" value="1048576"/><!--上传的每个文件限制的大小 单位字节-->
<property name="maxUploadSize" value="3145728"/><!--上传文件的总大小-->
<property name="maxInMemorySize" value="1048576"/><!--上传文件的缓存大小-->
</bean>

而CommonsMultipartResolver底层使用的Apache的是Common-fileuplad等工具API进行的文件上传
<dependency>
<groupId>commons-fileupload</groupId>
<artifactId>commons-fileupload</artifactId>
<version>1.4</version>
</dependency>
<dependency>
<groupId>commons-io</groupId>
<artifactId>commons-io</artifactId>
<version>2.7</version>
</dependency>

使用MultipartFile类型接收上传文件
@PostMapping("/fileUpload")
public String fileUpload(@RequestBody MultipartFile myFile) throws IOException {
    System.out.println(myFile);
    //获得上传的文件的流对象
    InputStream inputStream = myFile.getInputStream();
    //使用commons-io存储到C:\haohao\abc.txt位置
    FileOutputStream outputStream = new
    FileOutputStream("C:\\Users\\haohao\\"+myFile.getOriginalFilename());
    IOUtils.copy(inputStream,outputStream);
    //关闭资源
    inputStream.close();
    outputStream.close();
    return "/index.jsp";
}
如果进行多文件上传的话,则使用MultipartFile数组即可
接收Http请求头数据,接收指定名称的请求头
@GetMapping("/headers")
public String headers(@RequestHeader("Accept-Encoding") String acceptEncoding){
    System.out.println("Accept-Encoding:"+acceptEncoding);
    return "/index.jsp";
}
接收所有的请求头信息
@GetMapping("/headersMap")
public String headersMap(@RequestHeader Map<String,String> map){
    map.forEach((k,v)->{
        System.out.println(k+":"+v);
    });
    return "/index.jsp";
}

获得客户端携带的Cookie数据
@GetMapping("/cookies")
public String cookies(@CookieValue(value = "JSESSIONID",defaultValue = "") String jsessionid){
    System.out.println(jsessionid);
    return "/index.jsp";
}

获得转发Request域中数据,在进行资源之间转发时,有时需要将一些参数存储到request域中携带给下一个资源
@GetMapping("/request1")
public String request1(HttpServletRequest request){
    //存储数据
    request.setAttribute("username","haohao");
    return "forward:/request2";
}
@GetMapping("/request2")
public String request2(@RequestAttribute("username") String username){
    System.out.println(username);
    return "/index.jsp";
}

请求参数乱码的解决方案,Spring已经提供好的CharacterEncodingFilter来进行编码过滤
<!--配置全局的编码过滤器-->
<filter>
<filter-name>CharacterEncodingFilter</filter-name>
<filter-class>org.springframework.web.filter.CharacterEncodingFilter</filter-class>
<init-param>
<param-name>encoding</param-name>
<param-value>UTF-8</param-value>
</init-param>
</filter>
<filter-mapping>
<filter-name>CharacterEncodingFilter</filter-name>
<url-pattern>/*</url-pattern>
</filter-mapping>
Javaweb常用对象获取
获得Javaweb常见原生对象,有时在我们的Controller方法中需要用到Javaweb的原生对象,例如:Request、Response等,我们只需要将需要的对象以形参的形式写在方法上,SpringMVC框架在调用Controller方法时,会自动传递实参:
@GetMapping("/javawebObject")
public String javawebObject(HttpServletRequest request, HttpServletResponse response,
                            HttpSession session){
    System.out.println(request);
    System.out.println(response);
    System.out.println(session);
    return "/index.jsp";
}
请求静态资源
静态资源请求失效的原因,当DispatcherServlet的映射路径配置为 / 的时候,那么就覆盖的Tomcat容器默认的缺省 Servlet,在Tomcat的config目录下有一个web.xml 是对所有的web项目的全局配置,其中有如下配置:
<servlet>
 <servlet-name>default</servlet-name>
 <servlet-class>org.apache.catalina.servlets.DefaultServlet</servlet-class>
 <load-on-startup>1</load-on-startup>
</servlet>
<servlet-mapping>
 <servlet-name>default</servlet-name>
 <url-pattern>/</url-pattern>
</servlet-mapping>
url-pattern配置为 / 的Servlet我们称其为缺省的Servlet,作用是当其他Servlet都匹配不成功时,就找缺省的Servlet ,静态资源由于没有匹配成功的Servlet,所以会找缺省的DefaultServlet,该DefaultServlet具备二次去匹配静态资源的功能。但是我们配置DispatcherServlet后就将其覆盖掉了,而DispatcherServlet会将请求的静态资源的名称当成Controller的映射路径去匹配,即静态资源访问不成功了!
静态资源请求的三种解决方案:
第一种方案,可以再次激活Tomcat的DefaultServlet,Servlet的url-pattern的匹配优先级是:精确匹配>目录匹配>
扩展名匹配>缺省匹配,所以可以指定某个目录下或某个扩展名的资源使用DefaultServlet进行解析:
<servlet-mapping>
 <servlet-name>default</servlet-name>
 <url-pattern>/img/*</url-pattern>
</servlet-mapping>
<servlet-mapping>
 <servlet-name>default</servlet-name>
 <url-pattern>*.html</url-pattern>
</servlet-mapping>

第二种方式,在spring-mvc.xml中去配置静态资源映射,匹配映射路径的请求到指定的位置去匹配资源
<!-- mapping是映射资源路径,location是对应资源所在的位置 -->
<mvc:resources mapping="/img/*" location="/img/"/>
<mvc:resources mapping="/css/*" location="/css/"/>
<mvc:resources mapping="/css/*" location="/js/"/>
<mvc:resources mapping="/html/*" location="/html/"/>

第三种方式,在spring-mvc.xml中去配置< mvc:default-servlet-handler >,该方式是注册了一个
DefaultServletHttpRequestHandler 处理器,静态资源的访问都由该处理器去处理,这也是开发中使用最多的
<mvc:default-servlet-handler/>
注解驱动标签 mvc:annotation-driven/
静态资源配置的第二第三种方式我们可以正常访问静态资源了,但是Controller又无法访问了,报错404,即找不到对应的资源
第二种方式是通过SpringMVC去解析mvc命名空间下的resources标签完成的静态资源解析,第三种方式通过 SpringMVC去解析mvc命名空间下的default-servlet-handler标签完成的静态资源解析,根据前面所学习的自定义命 名空间的解析的知识,可以发现不管是以上哪种方式,最终都会注册SimpleUrlHandlerMapping
public BeanDefinition parse(Element element, ParserContext context) {
    //创建SimpleUrlHandlerMapping类型的BeanDefinition
    RootBeanDefinition handlerMappingDef =
    new RootBeanDefinition(SimpleUrlHandlerMapping.class);
    //注册SimpleUrlHandlerMapping的BeanDefinition
    context.getRegistry().registerBeanDefinition(beanName, handlerMappingDef);
}
又结合组件浅析知识点,一旦SpringMVC容器中存在 HandlerMapping 类型的组件时,前端控制器 DispatcherServlet在进行初始化时,就会从容器中获得HandlerMapping ,不再加载dispatcherServlet.properties 中默认处理器映射器策略,那也就意味着RequestMappingHandlerMapping不会被加载到了 。手动将RequestMappingHandlerMapping也注册到SpringMVC容器中就可以了,这样DispatcherServlet在进行初始化时,就会从容器中同时获得RequestMappingHandlerMapping存储到DispatcherServlet中名为 handlerMappings的List集合中,对@RequestMapping 注解进行解析。
<bean class="org.springframework.web.servlet.mvc.method.annotation.RequestMappingHandlerMapping"/>
根据上面的讲解,可以总结一下,要想使用@RequestMapping正常映射到资源方法,同时静态资源还能正常访问, 还可以将请求json格式字符串和JavaBean之间自由转换,我们就需要在spring-mvc.xml中如下配置:
<!-- 显示配置RequestMappingHandlerMapping -->
<bean class="org.springframework.web.servlet.mvc.method.annotation.RequestMappingHandlerMapping"/>
<!-- 显示配置RequestMappingHandlerAdapter -->
<bean class="org.springframework.web.servlet.mvc.method.annotation.RequestMappingHandlerAdapter">
<property name="messageConverters">
<list>
<bean class="org.springframework.http.converter.json.MappingJackson2HttpMessageConverter"/>
</list>
</property>
</bean>
<!--配置DefaultServletHttpRequestHandler-->
<mvc:default-servlet-handler/>
Spring是个"暖男",将上述配置浓缩成了一个简单的配置标签,那就是mvc的注解驱动,该标签内部会帮我们注册RequestMappingHandlerMapping、注册RequestMappingHandlerAdapter并注入Json消息转换器等,上述配置就可以简化成如下:
<!--mvc注解驱动-->
<mvc:annotation-driven/>
<!--配置DefaultServletHttpRequestHandler-->
<mvc:default-servlet-handler/>
PS:<mvc:annotation-driven> 标签在不同的版本中,帮我们注册的组件不同,Spring 3.0.X 版本注册是
DefaultAnnotationHandlerMapping 和 AnnotationMethodHandlerAdapter,由于框架的发展,从Spring 3.1.X
开始注册组件变为 RequestMappingHandlerMapping和RequestMappingHandlerAdapter
SpringMVC的响应处理
传统同步业务数据响应
传统同步方式:准备好模型数据,在跳转到执行页面进行展示,此方式使用越来越少了
传统同步业务在数据响应时,SpringMVC又涉及如下四种形式:
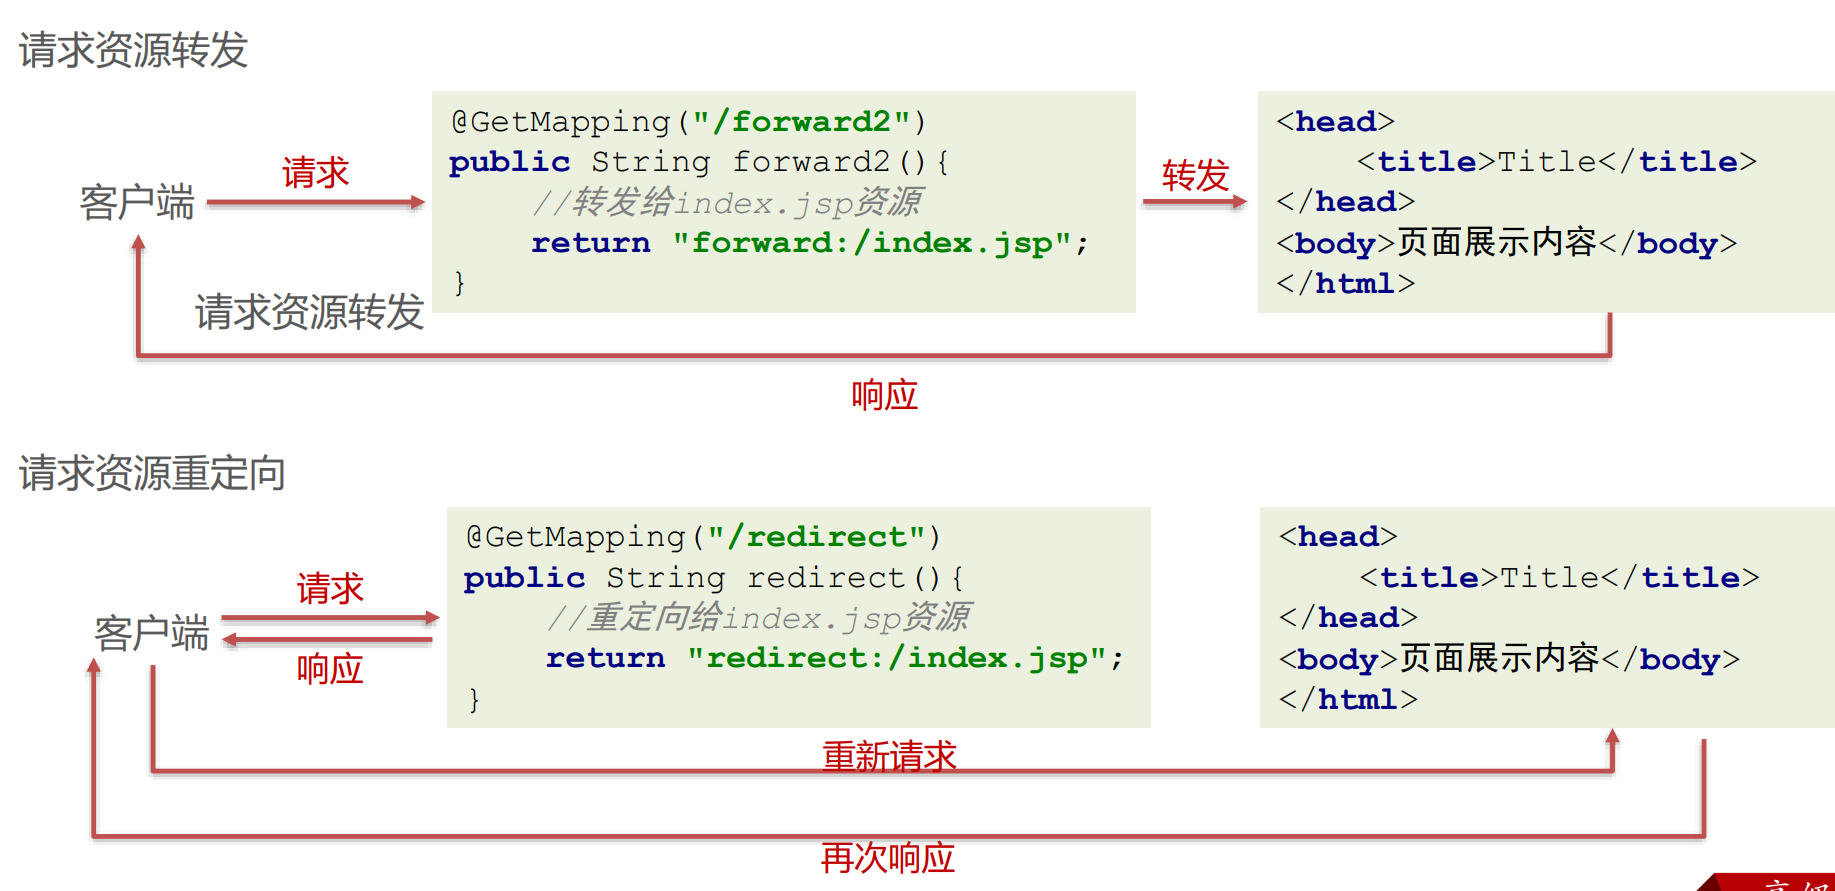
⚫ 请求资源转发;
⚫ 请求资源重定向;
⚫ 响应模型数据;
⚫ 直接回写数据给客户端
直接回写数据,直接通过方法的返回值返回给客户端的字符串,但是SpringMVC默认的方法返回值是视图,可以通过@ResponseBody 注解显示的告知此处的返回值不要进行视图处理,是要以响应体的方式处理的
响应模型数据,响应模型数据本质也是转发,在转发时可以准备模型数据
@GetMapping("/forward5")
public ModelAndView forward5(ModelAndView modelAndView){
    //准备JavaBean模型数据
    User user = new User();
    user.setUsername("haohao");
    //设置模型
    modelAndView.addObject("user",user);
    //设置视图
    modelAndView.setViewName("/index.jsp");
    return modelAndView;
}

直接回写数据,直接通过方法的返回值返回给客户端的字符串,但是SpringMVC默认的方法返回值是视图,可以通过
@ResponseBody 注解显示的告知此处的返回值不要进行视图处理,是要以响应体的方式处理的

@GetMapping("/response2")
@ResponseBody
public String response2() throws IOException {
    return "Hello haohao!";
}
前后端分离异步业务数据响应
前后端分离异步方式:前端使用Ajax技术+Restful风格与服务端进行Json格式为主的数据交互
其实此处的回写数据,跟上面回写数据给客户端的语法方式一样,只不过有如下一些区别:
⚫ 同步方式回写数据,是将数据响应给浏览器进行页面展示的,而异步方式回写数据一般是回写给Ajax引擎的,即谁访问服务器端,服务器端就将数据响应给谁
⚫ 同步方式回写的数据,一般就是一些无特定格式的字符串,而异步方式回写的数据大多是Json格式字符串
回写普通数据使用@ResponseBody标注方法,直接返回字符串即可,此处不在说明;
回写Json格式的字符串,即将直接拼接Json格式的字符串或使用工具将JavaBean转换成Json格式的字符串回写
@GetMapping("/response3")
@ResponseBody
public String response3(HttpServletResponse response) {
    return "{\"username\":\"haohao\",\"age\":18}";
}
@GetMapping("/response4")
@ResponseBody
public String response4() throws JsonProcessingException {
    //创建JavaBean
    User user = new User();
    user.setUsername("haohao");
    user.setAge(18);
    //使用Jackson转换成json格式的字符串
    String json = new ObjectMapper().writeValueAsString(user);
    return json;
}

@ResponseBody注解使用优化,在进行前后端分离开发时,Controller的每个方法都是直接回写数据的,所以每个
方法上都得写@ResponseBody,可以将@ResponseBody写到Controller上,那么该Controller中的所有方法都具备
了返回响应体数据的功能了
@Controller
@ResponseBody
public class UserController{
    @GetMapping("/response7")
    public ResultInfo response7() {
        //省略其他代码
        return info;
    }
    @GetMapping("/response5")
    public User response5() throws JsonProcessingException {
        //省略其他代码
        return user;
    }
    // ... 省略其他方法 ...
}

进一步优化,可以使用@RestController替代@Controller和@ResponseBody,@RestController内部具备的这两个
注解的功能
@RestController
public class UserController{
    @GetMapping("/response7")
    public ResultInfo response7() {
        //省略其他代码
        return info;
    }
    @GetMapping("/response5")
    public User response5() throws JsonProcessingException {
    //省略其他代码
    return user;
    }
// ... 省略其他方法 ...
}
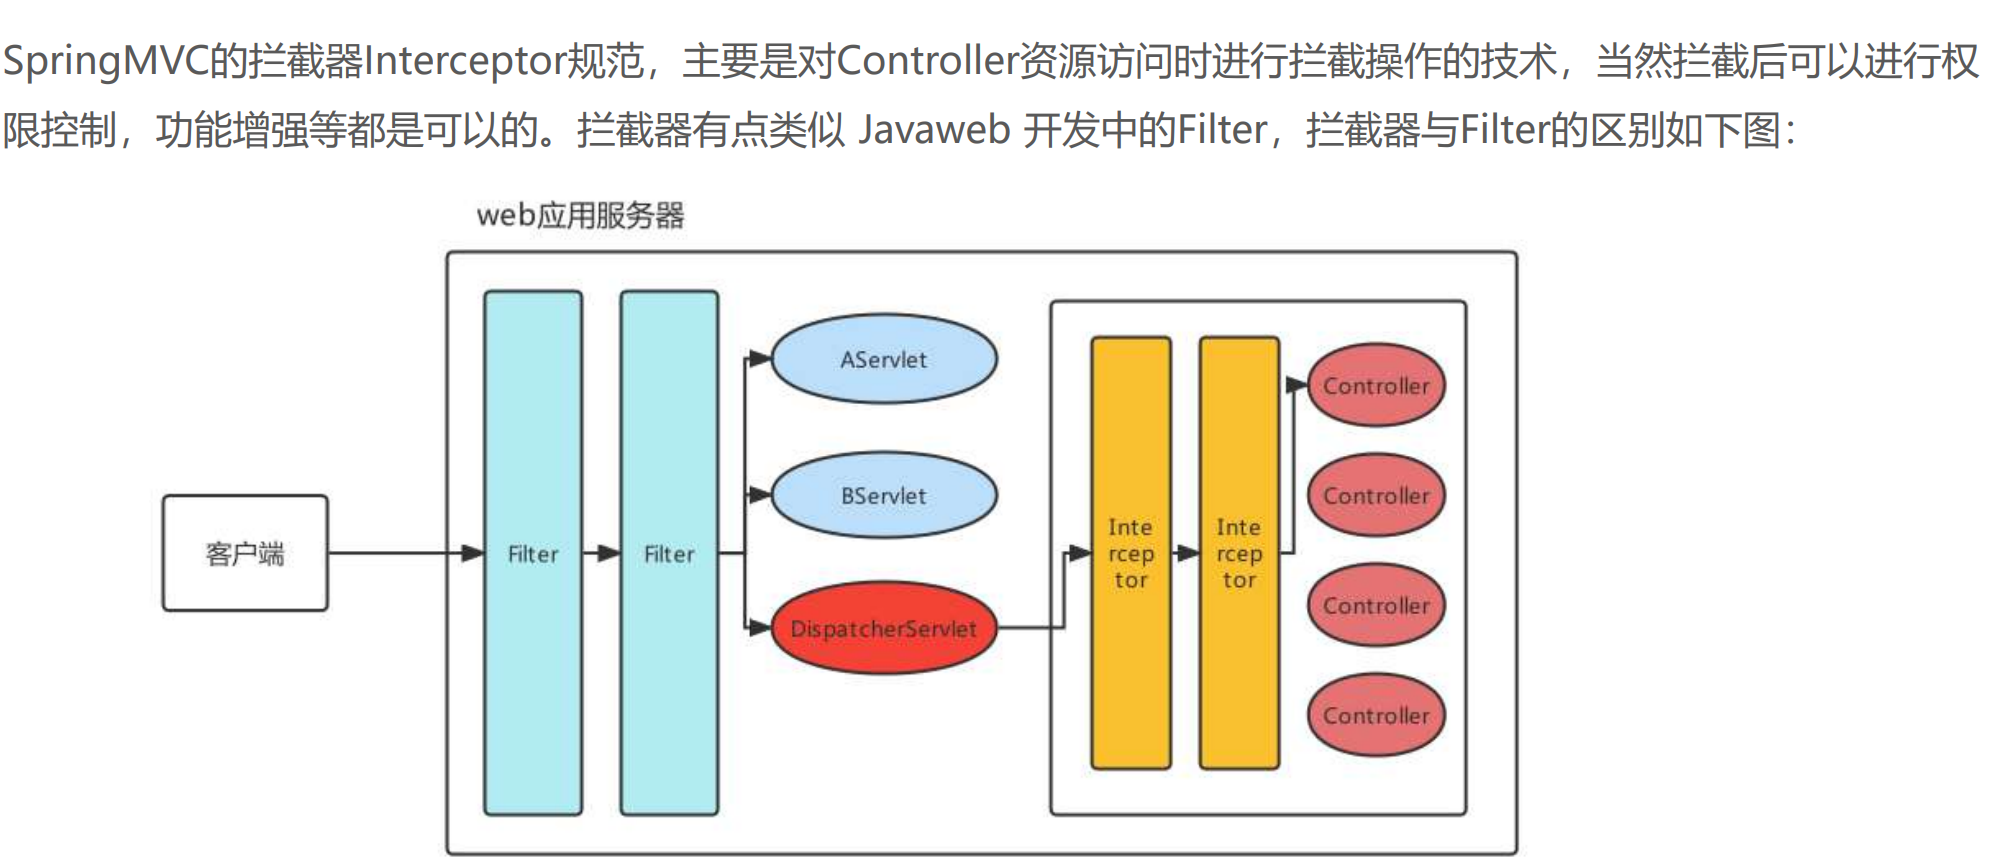
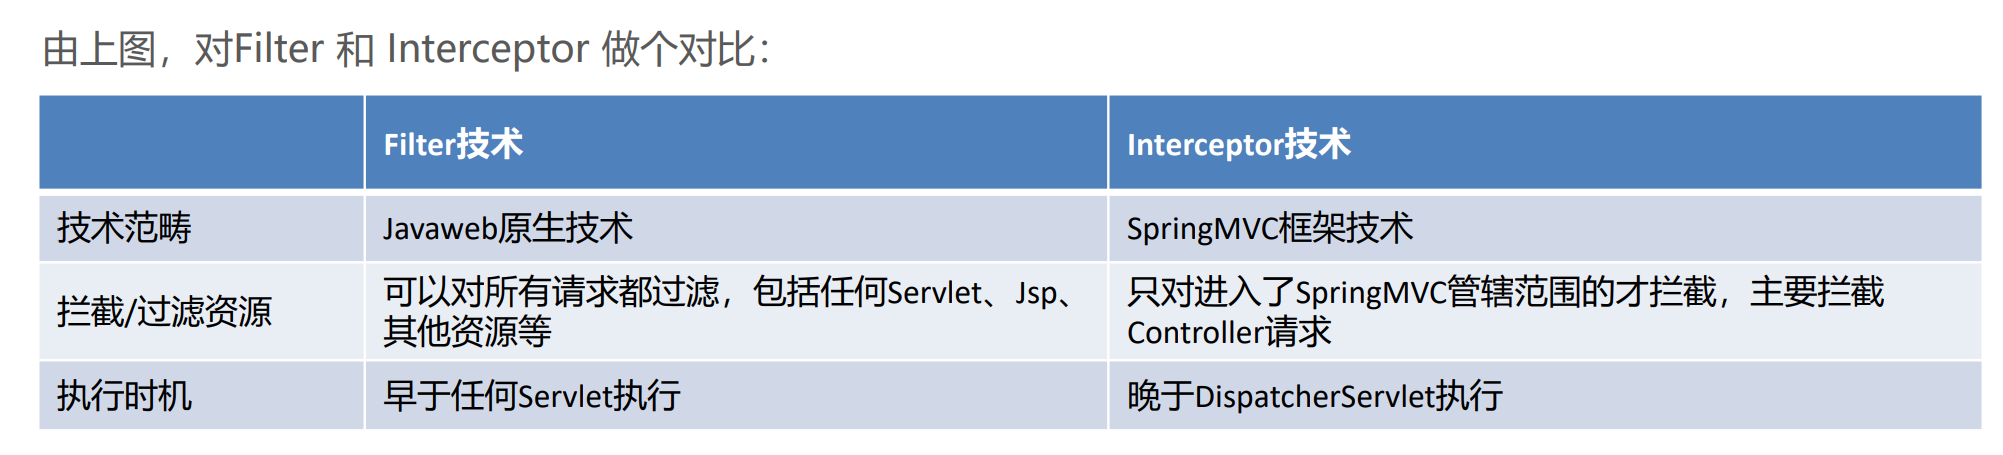
SpringMVC的拦截器
拦截器简介
@RestController
public User res3() throws JsonProcessingException {
        System.out.println("/ajax/req3 runnging...");
        User user = new User();
        user.setUsername("haohao");
        user.setAge(20);

        return user;
}

相当于这样一个方法就是一个handler
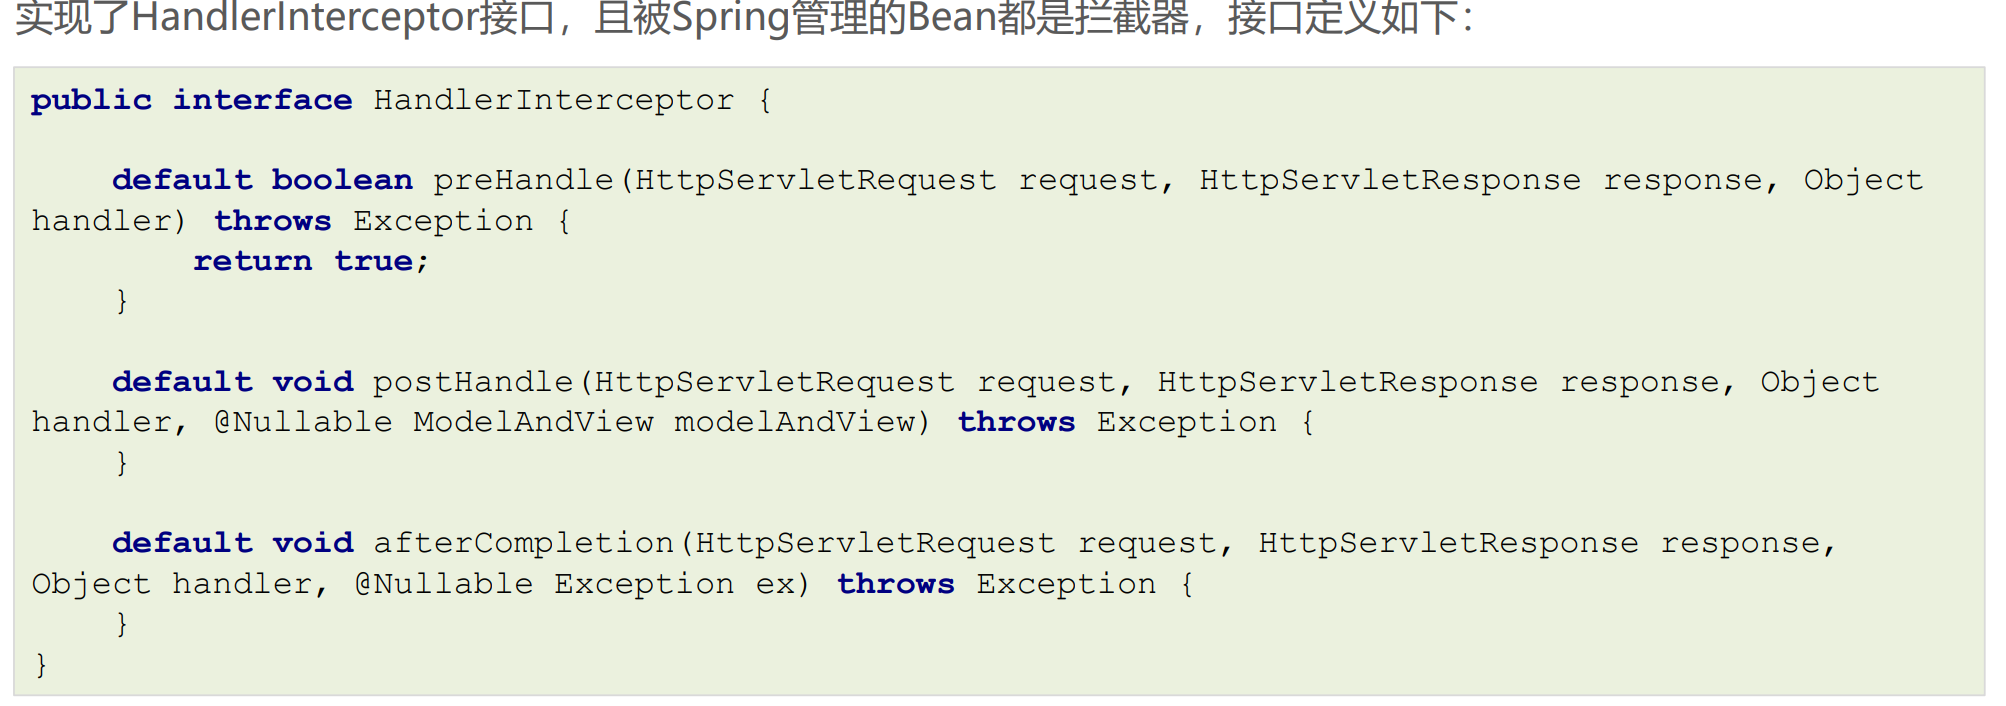
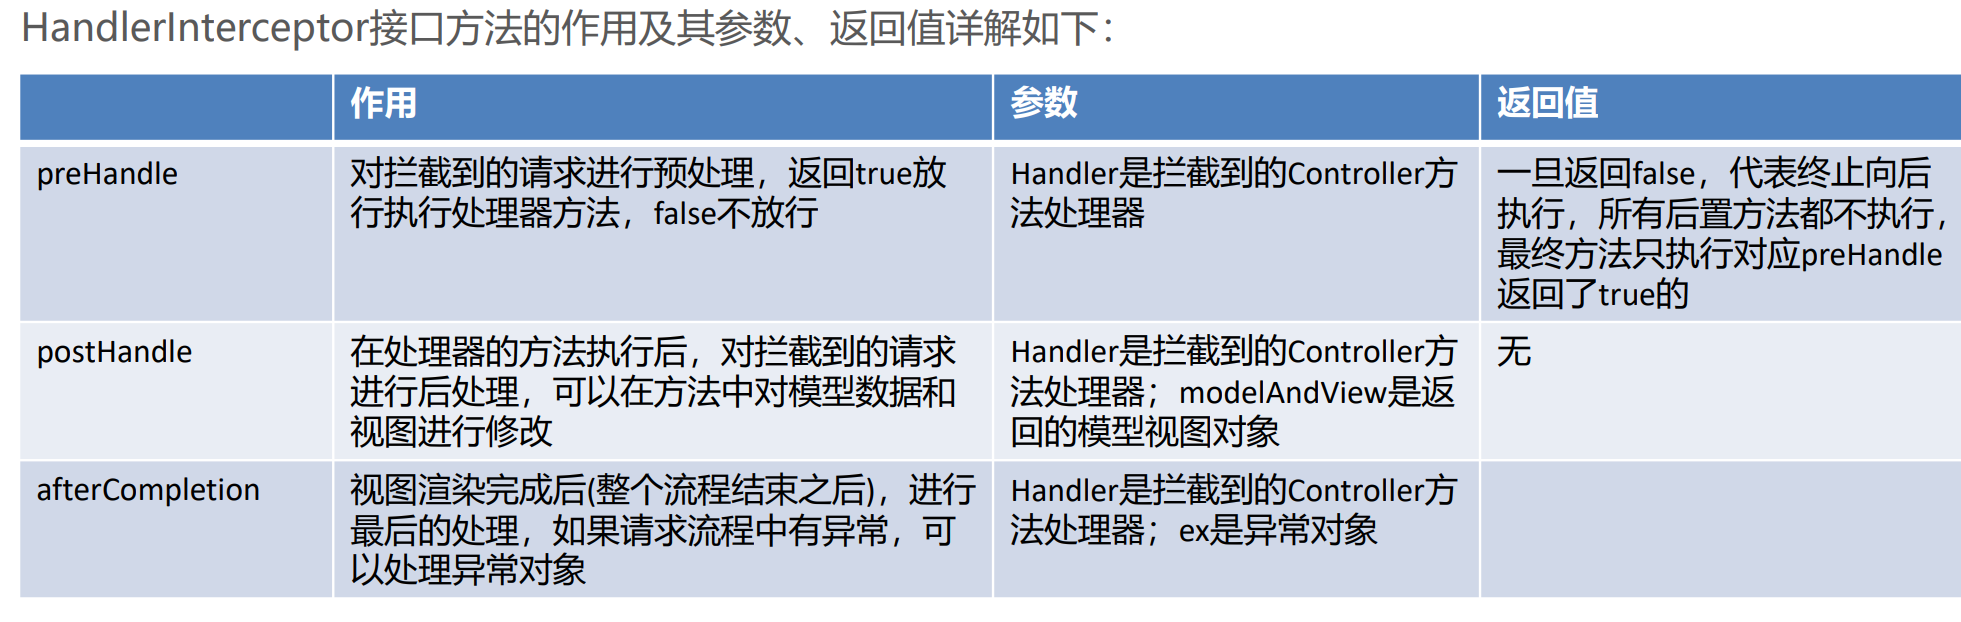
拦截器快速入门
编写MyInterceptor01实现HandlerInterceptor接口:
public class MyInterceptor01 implements HandlerInterceptor {
    @Override
    public boolean preHandle(HttpServletRequest request, HttpServletResponse response, Object
                             handler) throws Exception {
        System.out.println("Controller方法执行之前...");
        return true;//放行
    }
    @Override
    public void postHandle(HttpServletRequest request, HttpServletResponse response, Object handler,
                           ModelAndView modelAndView) throws Exception {
        System.out.println("Controller方法执行之后...");
    }
    @Override
    public void afterCompletion(HttpServletRequest request, HttpServletResponse response, Object
                                handler, Exception ex) throws Exception {
        System.out.println("渲染视图结束,整个流程完毕...");
    }
}

配置Interceptor
<!--配置拦截器-->
<mvc:interceptors>
<mvc:interceptor>
<!--配置对哪些资源进行拦截操作-->
<mvc:mapping path="/*"/>
<bean class="com.itheima.interceptor.MyInterceptor01"></bean>
</mvc:interceptor>
</mvc:interceptors>
拦截器执行顺序
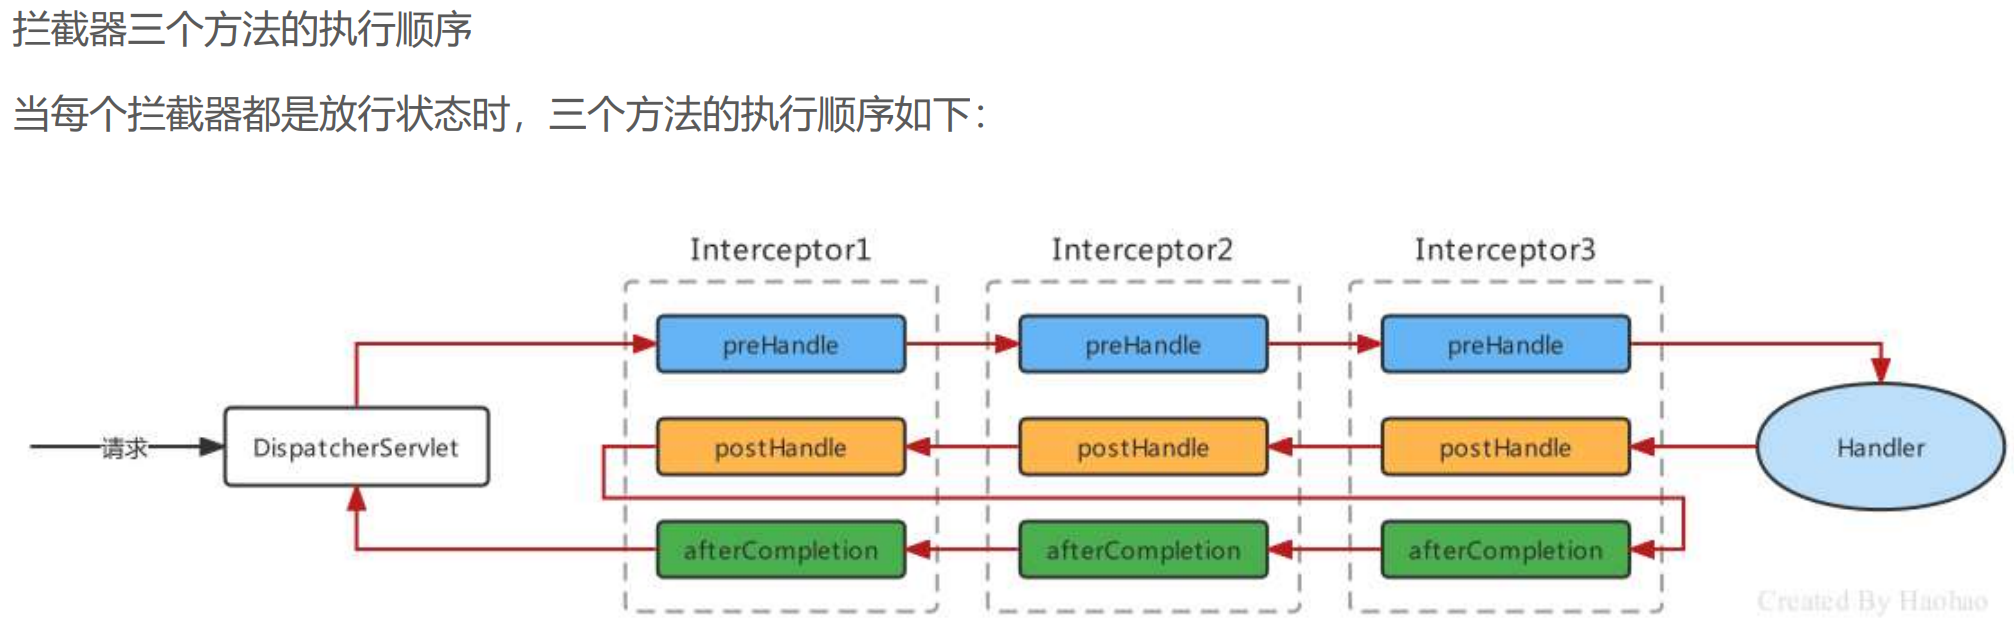
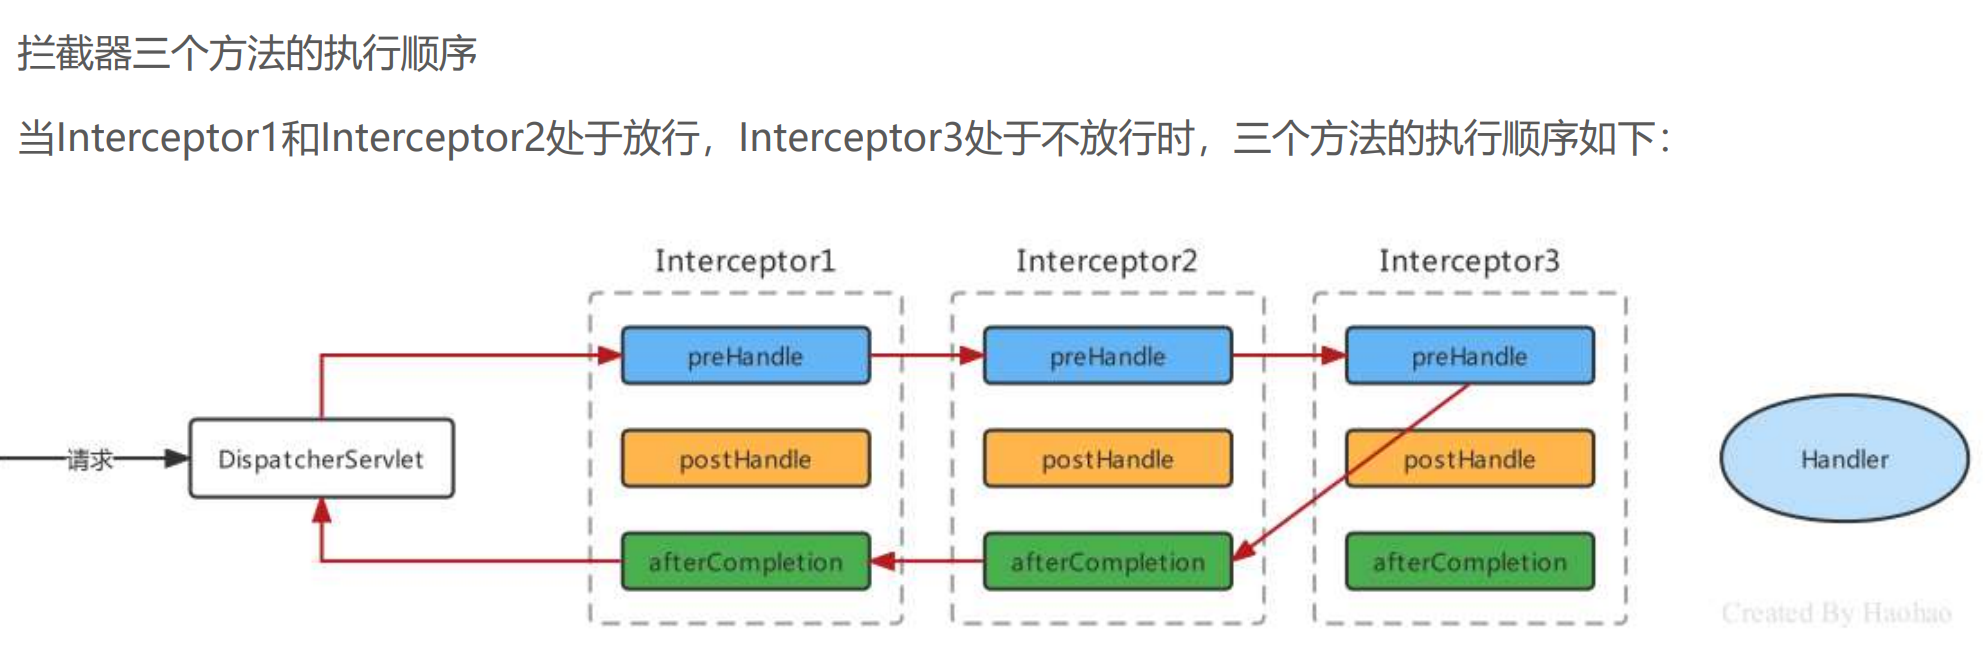
解释:由于Interptor1和Interptor2的preHandle都是true,因此他们的afterCompletion都会执行而 Interptor3的preHandle是false,因此afterCompletion不会执行;由于有一个preHandle是false,故目标方法都不执行,因此postHandle都不会执行
拦截器执行顺序取决于 interceptor 的配置顺序
<mvc:interceptors>
     <mvc:interceptor>
     <mvc:mapping path="/target"/>
     <bean class="com.itheima.interceptor.MyInterceptor02"></bean>
     </mvc:interceptor>

     <mvc:interceptor>
     <mvc:mapping path="/*"/>
     <bean class="com.itheima.interceptor.MyInterceptor01"></bean>
     </mvc:interceptor>
</mvc:interceptors>
拦截器执行原理
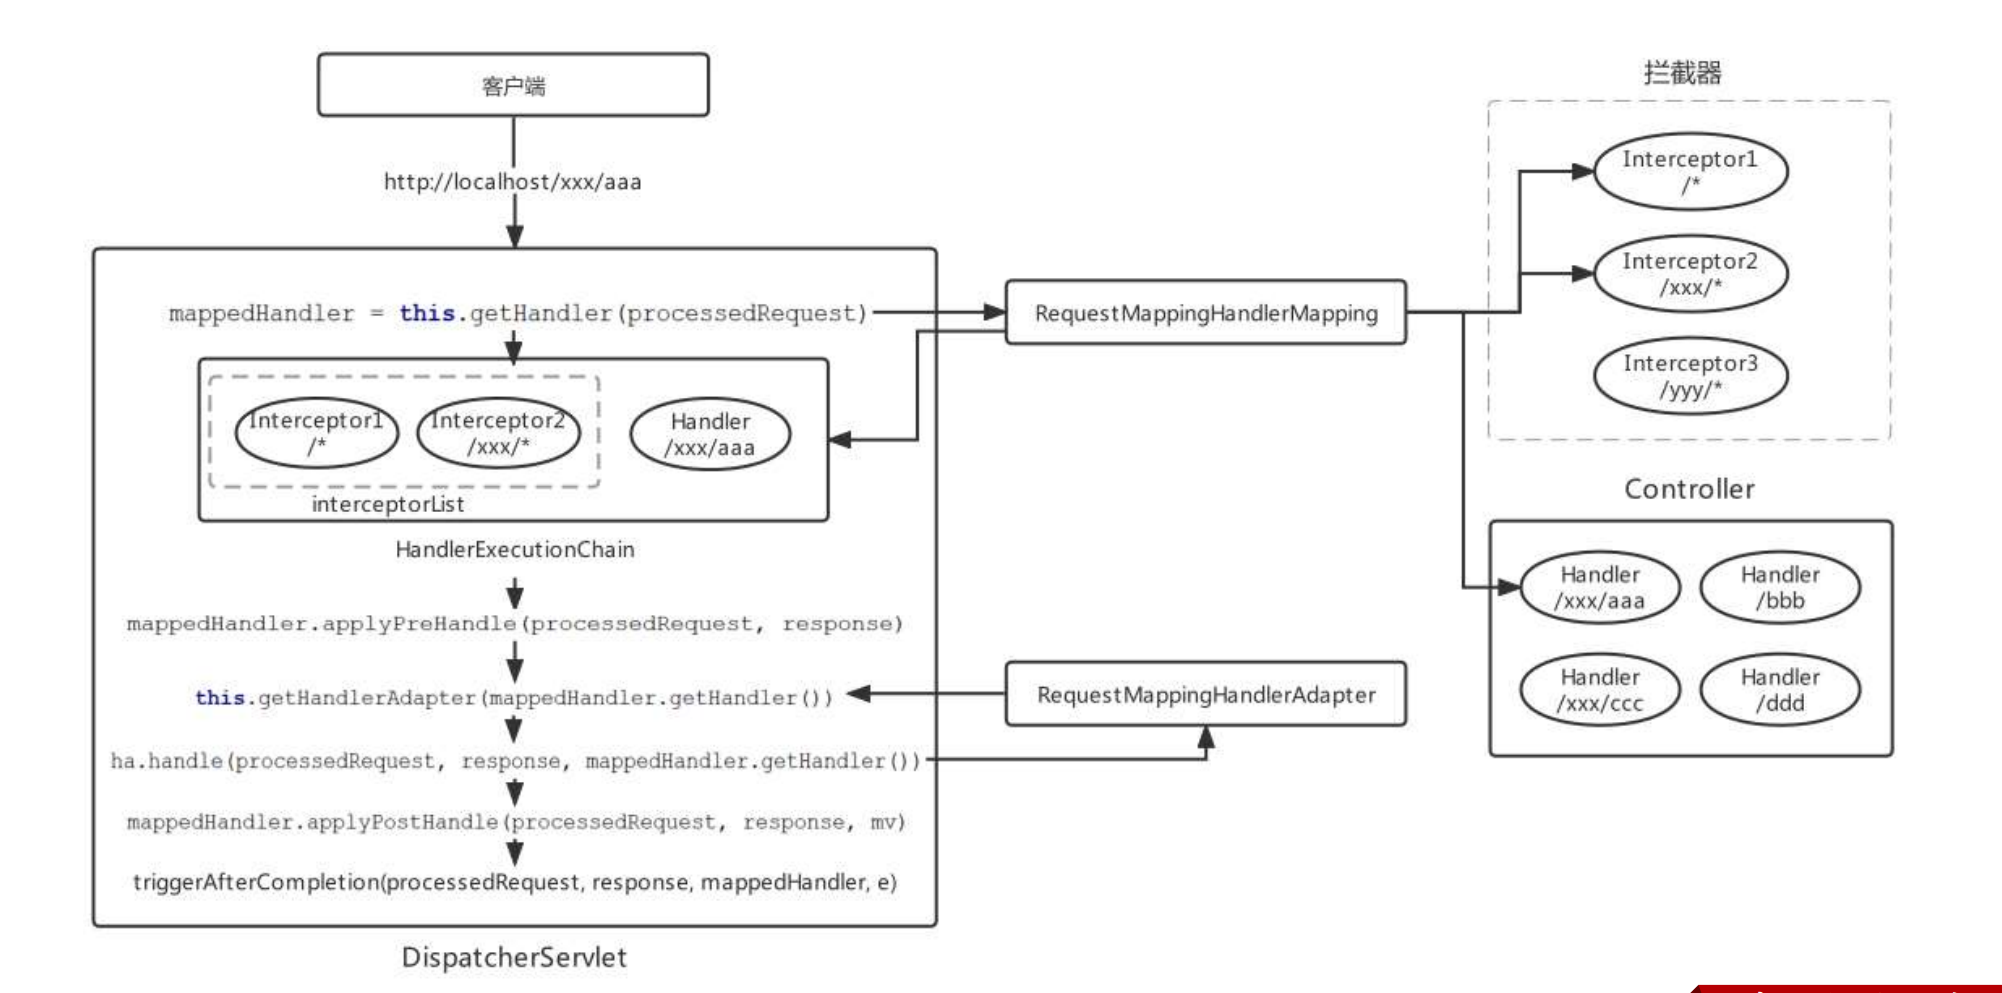
请求到来时先会使用组件HandlerMapping去匹配Controller的方法(Handler)和符合拦截路径的Interceptor, Handler和多个Interceptor被封装成一个HandlerExecutionChain的对象
HandlerExecutionChain 定义如下:
public class HandlerExecutionChain {
    //映射的Controller的方法
    private final Object handler;
    //当前Handler匹配的拦截器集合
    private final List<HandlerInterceptor> interceptorList;
    // ... 省略其他代码 ...
}

在DispatcherServlet的doDispatch方法中执行拦截器
protected void doDispatch(HttpServletRequest request, HttpServletResponse response){
    //根据请求信息获得HandlerExecutionChain
    HandlerExecutionChain mappedHandler = this.getHandler(request);
    //获得处理器适配器
    HandlerAdapter ha = this.getHandlerAdapter(mappedHandler.getHandler());
    //执行Interceptor的前置方法,前置方法如果返回false,则该流程结束
    if (!mappedHandler.applyPreHandle(request, response)) {
        return;
    }
    //执行handler,一般是HandlerMethod
    ModelAndView mv = ha.handle(processedRequest, response, mappedHandler.getHandler());
    //执行后置方法
    mappedHandler.applyPostHandle(processedRequest, response, mv);
    //执行最终方法
    this.triggerAfterCompletion(processedRequest, response, mappedHandler, e);
}

跟踪 HandlerExecutionChain的applyPreHandle方法源码:
boolean applyPreHandle(HttpServletRequest request, HttpServletResponse response) throws
Exception {
    //对interceptorList进行遍历,正向遍历,与此同时使用interceptorIndex进行计数
    for(int i = 0; i < this.interceptorList.size(); this.interceptorIndex = i++) {
        //取出每一个Interceptor对象
        HandlerInterceptor interceptor = (HandlerInterceptor)this.interceptorList.get(i);
        //调用Interceptor的preHandle方法,如果返回false,则直接执行Interceptor的最终方法
        if (!interceptor.preHandle(request, response, this.handler)) {
            //执行Interceptor的最终方法
            this.triggerAfterCompletion(request, response, (Exception)null);
            return false;
        }
    }
    return true;
}

跟踪 HandlerExecutionChain的applyPostHandle方法源码:
void applyPostHandle(HttpServletRequest request, HttpServletResponse response, @Nullable
                     ModelAndView mv) throws Exception {
    //对interceptorList进行遍历,逆向遍历
    for(int i = this.interceptorList.size() - 1; i >= 0; --i) {
        //取出每一个Interceptor
        HandlerInterceptor interceptor = (HandlerInterceptor)this.interceptorList.get(i);
        //执行Interceptor的postHandle方法
        interceptor.postHandle(request, response, this.handler, mv);
    }
}

跟踪HandlerExecutionChain的triggerAfterCompletion方法源码:
void triggerAfterCompletion(HttpServletRequest request, HttpServletResponse response, @Nullable
                            Exception ex) {
    //逆向遍历interceptorList,遍历的个数为执行的applyPreHandle次数-1
    for(int i = this.interceptorIndex; i >= 0; --i) {
        //取出每一个Interceptor
        HandlerInterceptor interceptor = (HandlerInterceptor)this.interceptorList.get(i);
        try {
            //执行Interceptor的afterCompletion方法
            interceptor.afterCompletion(request, response, this.handler, ex);
        } catch (Throwable var7) {
            logger.error("HandlerInterceptor.afterCompletion threw exception", var7);
        }
    }
}
SpringMVC的全注解开发
spring-mvc.xml 中组件转化为注解形式
<!-- 组件扫描web层 -->
<context:component-scan base-package="com.itheima.controller"/>
<!--注解驱动-->
<mvc:annotation-driven/>
<!--配置文件上传解析器-->
<bean id="multipartResolver"
class="org.springframework.web.multipart.commons.CommonsMultipartResolver"/>
<!--配置拦截器-->
<mvc:interceptors>
<mvc:interceptor>
<mvc:mapping path="/*"/>
<bean class="com.itheima.interceptor.MyInterceptor01"></bean>
</mvc:interceptor>
</mvc:interceptors>
<!--配置DefaultServletHttpRequestHandler-->
<mvc:default-servlet-handler/>
⚫ 组件扫描,可以通过@ComponentScan注解完成;
⚫ 文件上传解析器multipartResolver可以通过非自定义Bean的注解配置方式,即@Bean注解完成
@Configuration
@ComponentScan("com.itheima.controller")
public class SpringMVCConfig {
    @Bean
    public CommonsMultipartResolver multipartResolver(){
        CommonsMultipartResolver multipartResolver = new CommonsMultipartResolver();
        multipartResolver.setDefaultEncoding("UTF-8");
        multipartResolver.setMaxUploadSize(3145728);
        multipartResolver.setMaxUploadSizePerFile(1048576);
        multipartResolver.setMaxInMemorySize(1048576);
        return multipartResolver;
    }
}
mvc:default-servlet-handler/ 和 mvc:interceptors怎么办呢?SpringMVC 提供了一个注解叫做 @EnableWebMvc,我们看一下源码,内部通过@Import 导入了DelegatingWebMvcConfiguration类
@Retention(RetentionPolicy.RUNTIME)
@Target({ElementType.TYPE})
@Documented
@Import({DelegatingWebMvcConfiguration.class})
public @interface EnableWebMvc {}


@Configuration(proxyBeanMethods = false)
public class DelegatingWebMvcConfiguration extends WebMvcConfigurationSupport {
    private final WebMvcConfigurerComposite configurers = new WebMvcConfigurerComposite();
    //从容器中注入WebMvcConfigurer类型的Bean
    @Autowired(required = false)
    public void setConfigurers(List<WebMvcConfigurer> configurers) {
        if (!CollectionUtils.isEmpty(configurers)) {
            this.configurers.addWebMvcConfigurers(configurers);
        }}
    //省略其他代码}
WebMvcConfigurer类型的Bean会被注入进来,然后被自动调用,所以可以实现WebMvcConfigurer接口,完成一些 解析器、默认Servlet等的指定,WebMvcConfigurer接口定义如下:
public interface WebMvcConfigurer {
    //配置默认Servet处理器
    default void configureDefaultServletHandling(DefaultServletHandlerConfigurer configurer) { }
    //添加拦截器
    default void addInterceptors(InterceptorRegistry registry) { }
    //添加资源处理器
    default void addResourceHandlers(ResourceHandlerRegistry registry) { }
    //添加视图控制器
    default void addViewControllers(ViewControllerRegistry registry) { }
    //配置视图解析器
    default void configureViewResolvers(ViewResolverRegistry registry) { }
    //添加参数解析器
    default void addArgumentResolvers(List<HandlerMethodArgumentResolver> resolvers) { }
    //... 省略其他代码 ...
}
创建MyWebMvcConfigurer实现WebMvcConfigurer接口,实现addInterceptors 和configureDefaultServletHandling方法
@Component
public class MyWebMvcConfigurer implements WebMvcConfigurer {
    @Override
    public void configureDefaultServletHandling(DefaultServletHandlerConfigurer configurer) {
        //开启DefaultServlet,可以处理静态资源了
        configurer.enable();
    }
    @Override
    public void addInterceptors(InterceptorRegistry registry) {
        //创建拦截器对象,进行注册
        //Interceptor的执行顺序也取决于添加顺序
        registry.addInterceptor(new MyInterceptor01()).addPathPatterns("/*");
    }
}
最后,在SpringMVC核心配置类上添加@EnableWebMvc注解
@Configuration
@ComponentScan("com.itheima.controller")
@EnableWebMvc
public class SpringMVCConfig {
    @Bean
    public CommonsMultipartResolver multipartResolver(){
        CommonsMultipartResolver multipartResolver = new CommonsMultipartResolver();
        multipartResolver.setDefaultEncoding("UTF-8");
        multipartResolver.setMaxUploadSize(3145728);
        multipartResolver.setMaxUploadSizePerFile(1048576);
        multipartResolver.setMaxInMemorySize(1048576);
        return multipartResolver;
    }
}
DispatcherServlet加载核心配置类
DispatcherServlet在进行SpringMVC配置文件加载时,使用的是以下方式:
<!--配置springMVC前端控制器-->
<servlet>
<servlet-name>DispatcherServlet</servlet-name>
<servlet-class>org.springframework.web.servlet.DispatcherServlet</servlet-class>
<!--指定springMVC配置文件位置-->
<init-param>
<param-name>contextConfigLocation</param-name>
<param-value>classpath:spring-mvc.xml</param-value>
</init-param>
<!--服务器启动就创建-->
<load-on-startup>2</load-on-startup>
</servlet>
<servlet-mapping>
<servlet-name>DispatcherServlet</servlet-name>
<url-pattern>/</url-pattern>
</servlet-mapping>

现在是使用SpringMVCConfig核心配置类提替代的spring-mvc.xml,怎么加载呢?参照Spring的
ContextLoaderListener加载核心配置类的做法,定义了一个AnnotationConfigWebApplicationContext,通过
代码注册核心配置类
public class MyAnnotationConfigWebApplicationContext extends
AnnotationConfigWebApplicationContext {
    public MyAnnotationConfigWebApplicationContext(){
        //注册核心配置类
        super.register(SpringMVCConfig.class);
    }
}
<!--指定springMVC的applicationContext全限定名 -->
<init-param>
<param-name>contextClass</param-name>
<param-value>com.itheima.config.MyAnnotationConfigWebApplicationContext</param-value>
</init-param>
消除web.xml
⚫ Servlet3.0环境中,web容器提供了javax.servlet.ServletContainerInitializer接口,实现了该接口后,在对
应的类加载路径的META-INF/services 目录创建一个名为javax.servlet.ServletContainerInitializer的文件,
文件内容指定具体的ServletContainerInitializer实现类,那么,当web容器启动时就会运行这个初始化器做
一些组件内的初始化工作;
⚫ 基于这个特性,Spring就定义了一个SpringServletContainerInitializer实现了ServletContainerInitializer接
口;
⚫ 而SpringServletContainerInitializer会查找实现了WebApplicationInitializer的类,Spring又提供了一个
WebApplicationInitializer的基础实现类AbstractAnnotationConfigDispatcherServletInitializer,当我们
编写类继承AbstractAnnotationConfigDispatcherServletInitializer时,容器就会自动发现我们自己的类,
在该类中我们就可以配置Spring和SpringMVC的入口了。
按照下面的配置就可以完全省略web.xml

public class MyAnnotationConfigDispatcherServletInitializer extends
AbstractAnnotationConfigDispatcherServletInitializer {
    //返回的带有@Configuration注解的类用来配置ContextLoaderListener
    protected Class<?>[] getRootConfigClasses() {
        System.out.println("加载核心配置类创建ContextLoaderListener");
        return new Class[]{ApplicationContextConfig.class};
    }
    //返回的带有@Configuration注解的类用来配置DispatcherServlet
    protected Class<?>[] getServletConfigClasses() {
        System.out.println("加载核心配置类创建DispatcherServlet");
        return new Class[]{SpringMVCConfig.class};
    }
    //将一个或多个路径映射到DispatcherServlet上
    protected String[] getServletMappings() {
        return new String[]{"/"};
    }
}


public class MyAbstractAnnotationConfigDispatcherServletInitializer extends AbstractAnnotationConfigDispatcherServletInitializer {
    @Override
    //提供Spring容器的核心配置类
    protected Class<?>[] getRootConfigClasses() {
        return new Class[]{SpringConfig.class};
    }

    @Override
    //提供SpringMVC容器的核心配置类
    protected Class<?>[] getServletConfigClasses() {
        return new Class[]{SpringMVCConfig.class};
    }

    @Override
    //提供前端控制器的映射路径
    protected String[] getServletMappings() {
        return new String[]{"/"};
    }
}
SpringMVC的组件原理剖析
前端控制器初始化
前端控制器DispatcherServlet是SpringMVC的入口,也是SpringMVC的大脑,主流程的工作都是在此完成的,梳理一下DispatcherServlet 代码。DispatcherServlet 本质是个Servlet,当配置了 load-on-startup 时,会在服务器启动时就执行创建和执行初始化init方法,每次请求都会执行service方法DispatcherServlet 的初始化主要做了两件事:
⚫ 获得了一个 SpringMVC 的 ApplicationContext容器;
⚫ 注册了 SpringMVC的 九大组件
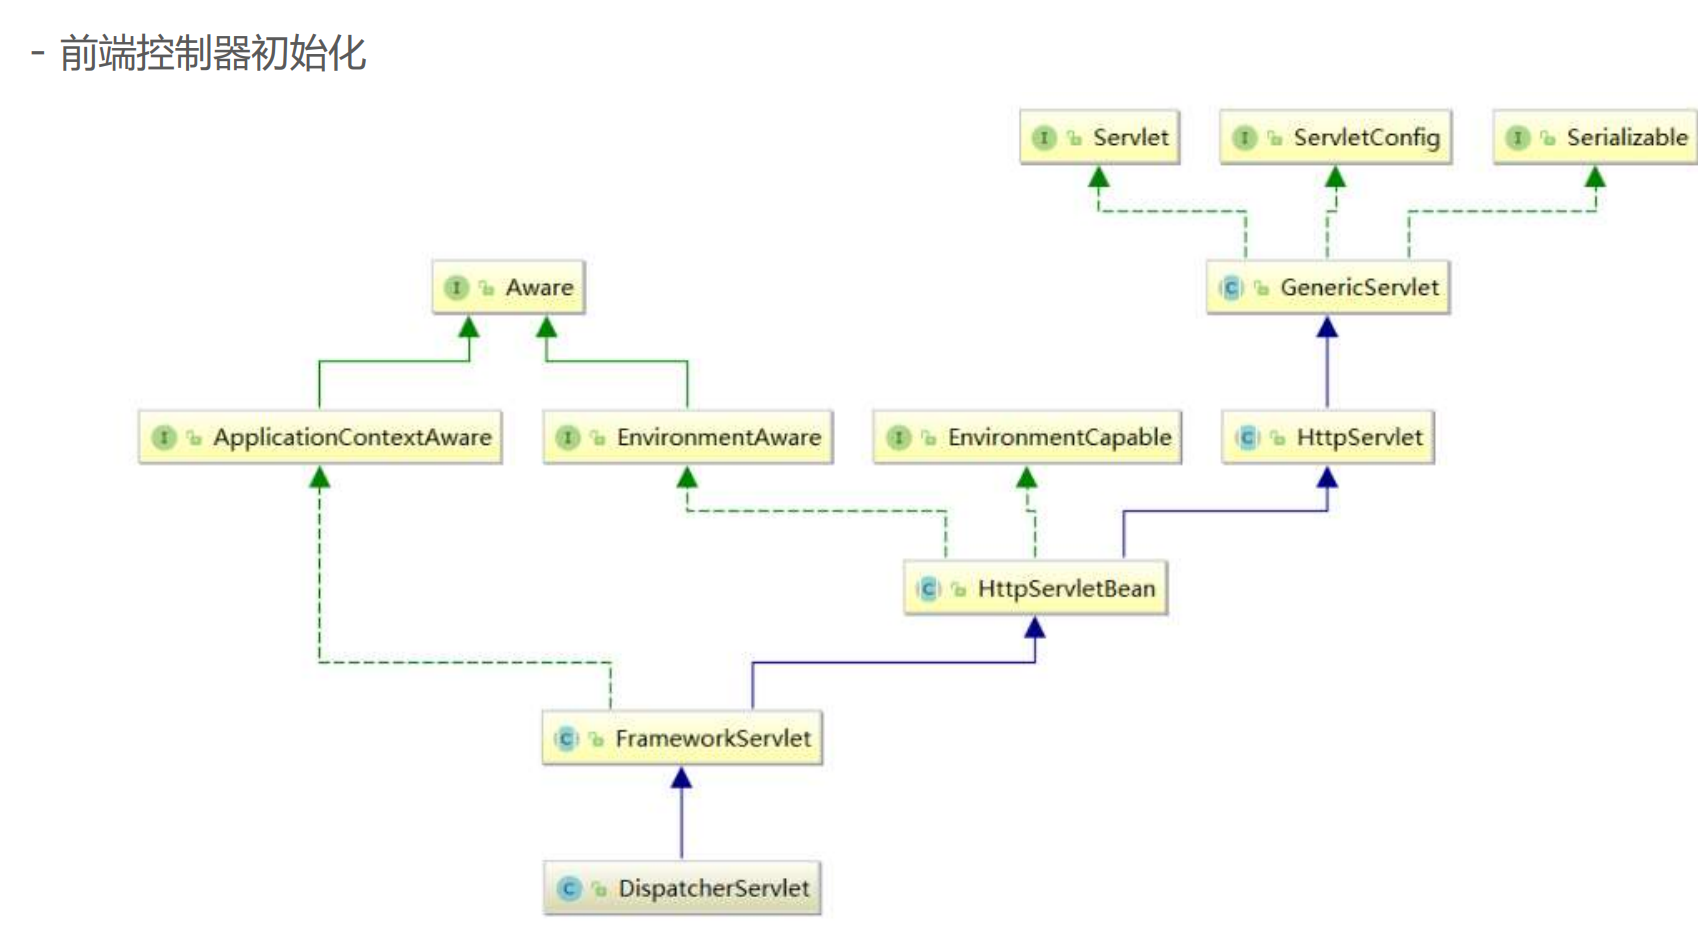
SpringMVC 的ApplicationContext容器创建时机,Servlet 规范的 init(ServletConfig config) 方法经过子类重写 ,最终会调用 FrameworkServlet 抽象类的initWebApplicationContext() 方法,该方法中最终获得 一个根 Spring容器(Spring产生的),一个子Spring容器(SpringMVC产生的)
HttpServletBean 的初始化方法
public final void init() throws ServletException {
    this.initServletBean();
}
FrameworkServlet的initServletBean方法
protected final void initServletBean() throws ServletException {
    this.webApplicationContext = this.initWebApplicationContext();//初始化ApplicationContext
    this.initFrameworkServlet();//模板设计模式,供子类覆盖实现,但是子类DispatcherServlet没做使用
}

在initWebApplicationContext方法中体现的父子容器的逻辑关系
//初始化ApplicationContext是一个及其关键的代码
protected WebApplicationContext initWebApplicationContext() {
    //获得根容器,其实就是通过ContextLoaderListener创建的ApplicationContext
    //如果配置了ContextLoaderListener则获得根容器,没配置获得的是null
    WebApplicationContext rootContext =
    WebApplicationContextUtils.getWebApplicationContext(this.getServletContext());
    //定义SpringMVC产生的ApplicationContext子容器
    WebApplicationContext wac = null;
    if (wac == null) {
        //==>创建SpringMVC的子容器,创建同时将Spring的创建的rootContext传递了过去
        wac = this.createWebApplicationContext(rootContext);
    }
    //将SpringMVC产生的ApplicationContext子容器存储到ServletContext域中
    //key名是:org.springframework.web.servlet.FrameworkServlet.CONTEXT.DispatcherServlet
    if (this.publishContext) {
        String attrName = this.getServletContextAttributeName();
        this.getServletContext().setAttribute(attrName, wac);
    }

    跟进创建子容器的源码
    protected WebApplicationContext createWebApplicationContext(@Nullable ApplicationContext
                                                                parent) {
        //实例化子容器ApplicationContext
        ConfigurableWebApplicationContext wac =
        (ConfigurableWebApplicationContext)BeanUtils.instantiateClass(contextClass);
        //设置传递过来的ContextLoaderListener的rootContext为父容器
        wac.setParent(parent);
        //获得web.xml配置的classpath:spring-mvc.xml
        String configLocation = this.getContextConfigLocation();
        if (configLocation != null) {
            //为子容器设置配置加载路径
            wac.setConfigLocation(configLocation);
        }
        //初始化子容器(就是加载spring-mvc.xml配置的Bean)
        this.configureAndRefreshWebApplicationContext(wac);
        return wac;
    }

父容器和子容器概念和关系:
⚫ 父容器:Spring 通过ContextLoaderListener为入口产生的applicationContext容器,内部主要维护的是
applicationContext.xml(或相应配置类)配置的Bean信息;
⚫ 子容器:SpringMVC通过DispatcherServlet的init() 方法产生的applicationContext容器,内部主要维护的
是spring-mvc.xml(或相应配置类)配置的Bean信息,且内部还通过parent属性维护这父容器的引用。
⚫ Bean的检索顺序:根据上面子父容器的概念,可以知道Controller存在与子容器中,而Controller中要注入
Service时,会先从子容器本身去匹配,匹配不成功时在去父容器中去匹配,于是最终从父容器中匹配到的
UserService,这样子父容器就可以进行联通了。但是父容器只能从自己容器中进行匹配,不能从子容器中进
行匹配。
注册 SpringMVC的 九大组件,在初始化容器initWebApplicationContext方法中执行了onRefresh方法,进而执
行了初始化策略initStrategies方法,注册了九个解析器组件
//DispatcherServlet初始化SpringMVC九大组件
protected void initStrategies(ApplicationContext context) {
 this.initMultipartResolver(context);//1、初始化文件上传解析器
 this.initLocaleResolver(context);//2、初始化国际化解析器
 this.initThemeResolver(context);//3、初始化模板解析器
 this.initHandlerMappings(context);//4、初始化处理器映射器
 this.initHandlerAdapters(context);//5、初始化处理器适配器
 this.initHandlerExceptionResolvers(context);//6、初始化处理器异常解析器
 this.initRequestToViewNameTranslator(context);//7、初始化请求视图转换器
 this.initViewResolvers(context);//8、初始化视图解析器
 this.initFlashMapManager(context);//9、初始化lashMapManager策略组件
}
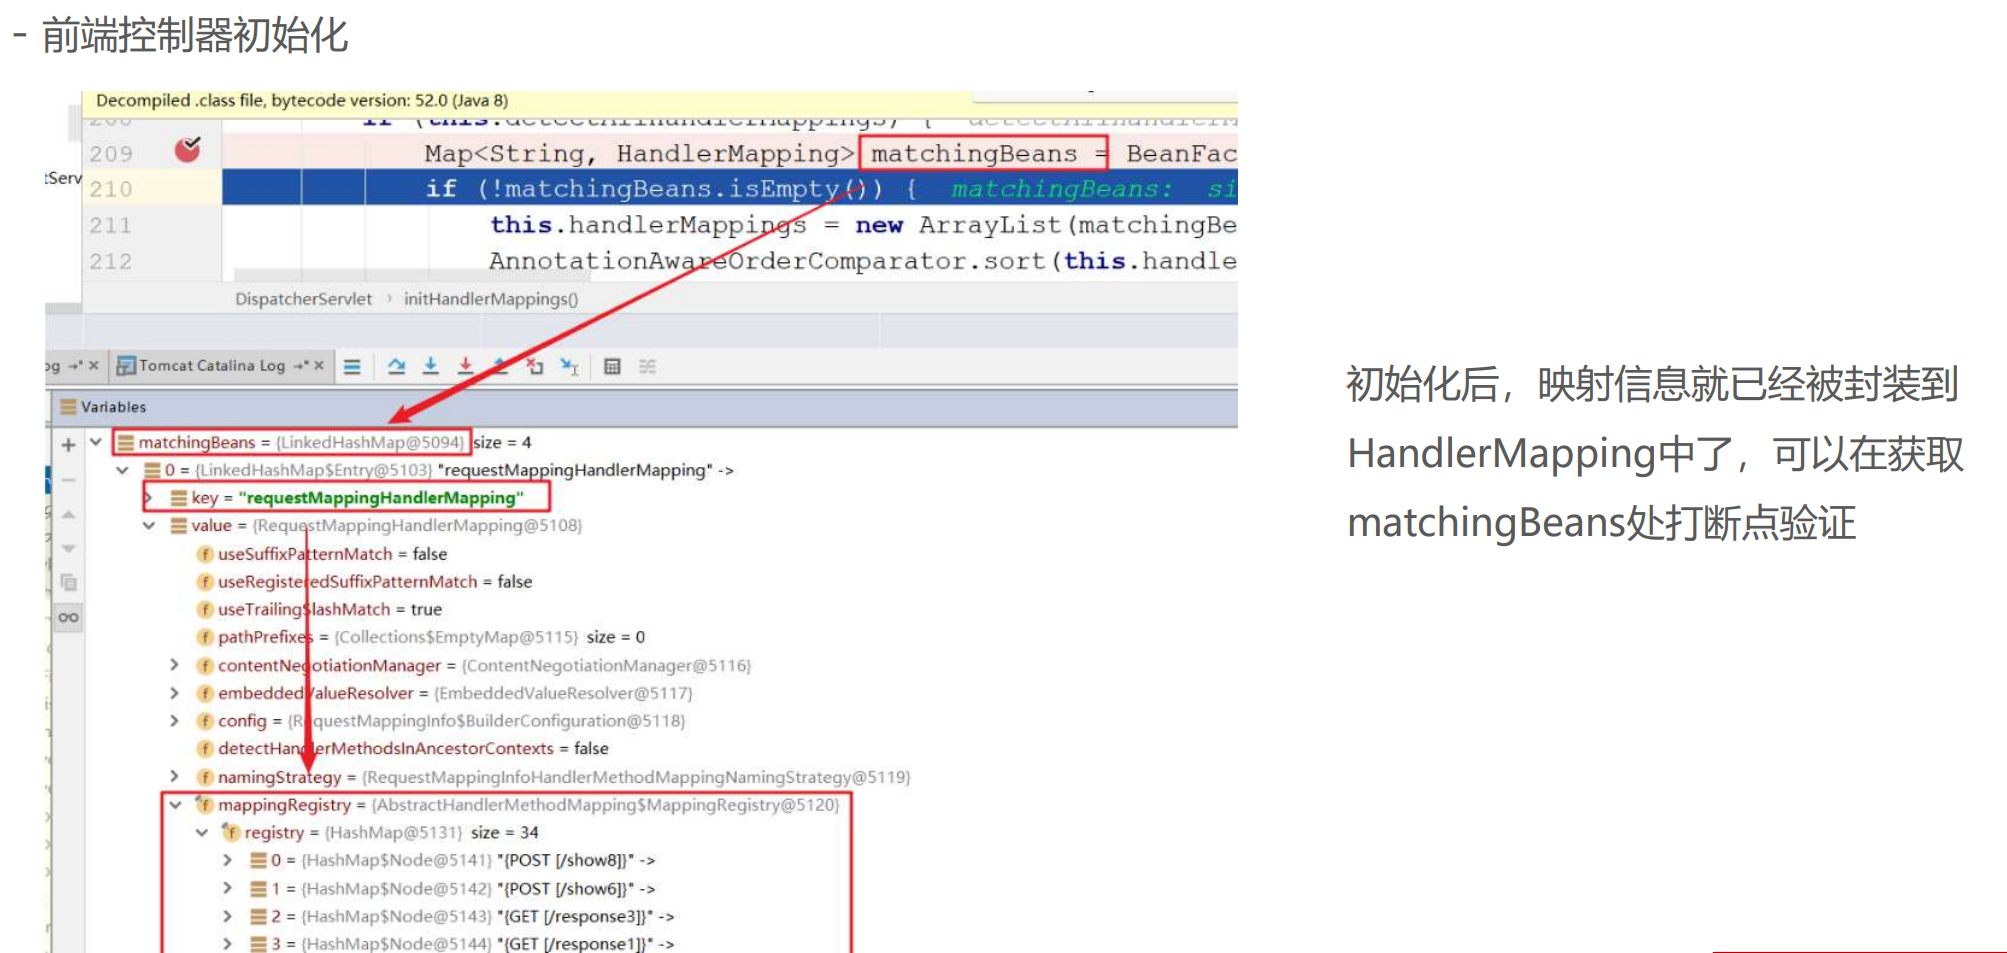
前端控制器执行主流程
当服务器启动时,DispatcherServlet 会执行初始化操作,接下来,每次访问都会执行service 方法,我们先宏观的看一下执行流程,在去研究源码和组件执行细节
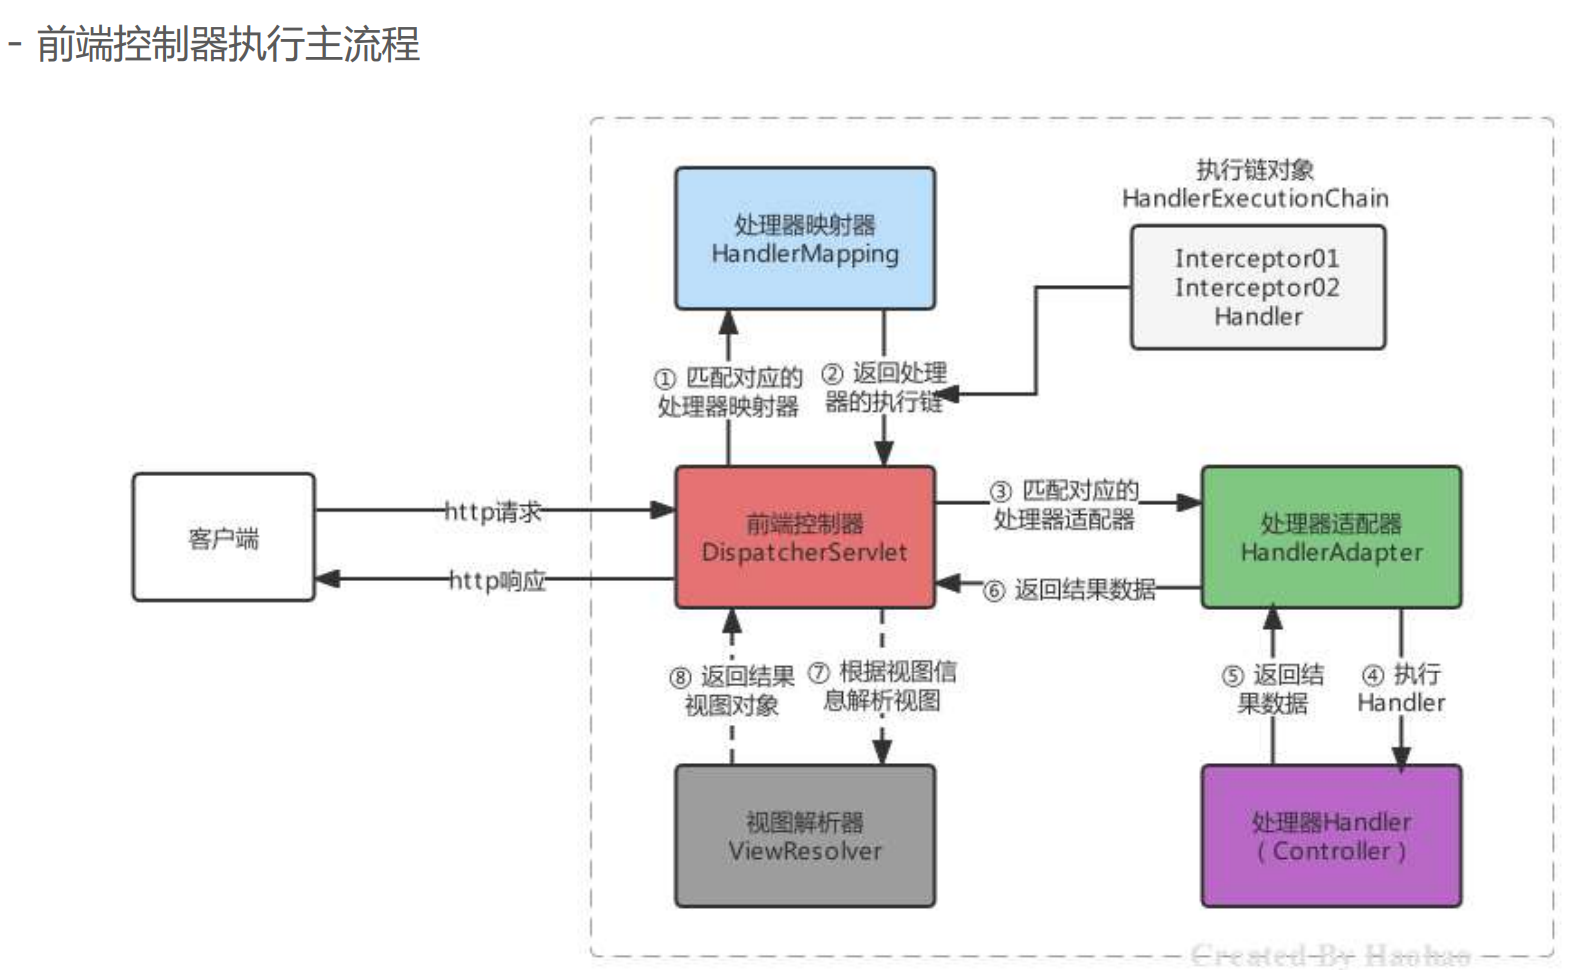
FrameworkServlet 复写了service(HttpServletRequest request, HttpServletResponse response) 、
doGet(HttpServletRequest request, HttpServletResponse response)、doPost(HttpServletRequest
request, HttpServletResponse response)等方法,这些方法都会调用processRequest方法
protected final void processRequest(HttpServletRequest request, HttpServletResponse response){
 this.doService(request, response);
}
进一步调用了doService方法,该方法内部又调用了doDispatch方法,而SpringMVC 主流程最核心的方法就是 doDispatch 方法
protected void doService(HttpServletRequest request, HttpServletResponse response) {
 this.doDispatch(request, response);
}
doDispatch方法源码
protected void doDispatch(HttpServletRequest request, HttpServletResponse response) {
    HttpServletRequest processedRequest = request;
    HandlerExecutionChain mappedHandler = null; //定义处理器执行链对象
    ModelAndView mv = null; //定义模型视图对象
    //匹配处理器映射器HandlerMapping,返回处理器执行链对象
    mappedHandler = this.getHandler(processedRequest);
    //匹配处理器适配器HandlerAdapter,返回处理器适配器对象
    HandlerAdapter ha = this.getHandlerAdapter(mappedHandler.getHandler());
    //执行Interceptor的前置方法preHandle
    mappedHandler.applyPreHandle(processedRequest, response);
    //处理器适配器执行控制器Handler,返回模型视图对象
    mv = ha.handle(processedRequest, response, mappedHandler.getHandler());
    //执行Interceptor的后置方法postHandle
    mappedHandler.applyPostHandle(processedRequest, response, mv);
    //获取视图渲染视图
    this.processDispatchResult(processedRequest, response, mappedHandler, mv,
                               (Exception)dispatchException);
}
SpringMVC的异常处理机制
SpringMVC 异常的处理流程
异常分为编译时异常和运行时异常,编译时异常我们 try-cache 进行捕获,捕获后自行处理,而运行时异常是不 可预期的,就需要规范编码来避免,在SpringMVC 中,不管是编译异常还是运行时异常,都可以最终由 SpringMVC提供的异常处理器进行统一处理,这样就避免了随时随地捕获处理的繁琐性。 当然除了繁琐之外,我们在进行前后端分离异步开发时,往往返回统一格式的结果给客户端,例如: {"code":200,"message":"","data":{"username":"haohao","age":null}},即使报异常了,也不能把状态码500直 接扔给客户端丢给用户,需要将异常转换成符合上面格式的数据响应给客户端更友好。
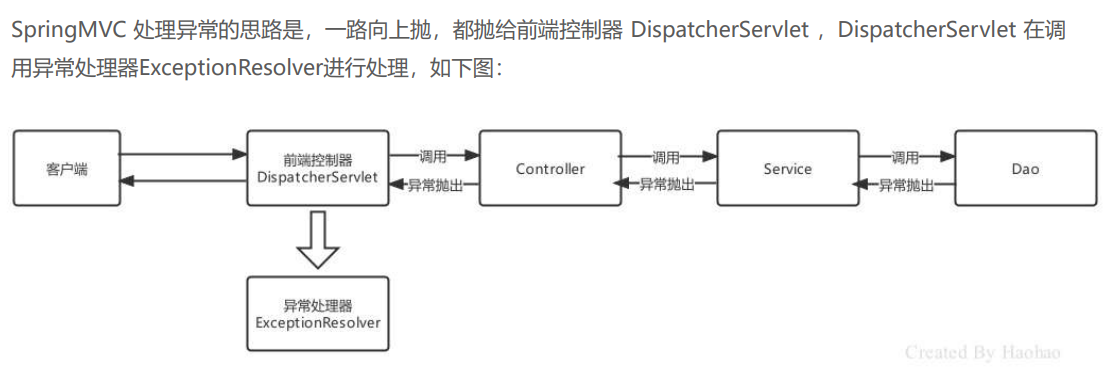
SpringMVC 的异常处理方式
SpringMVC 提供了以下三种处理异常的方式:
⚫ 简单异常处理器:使用SpringMVC 内置的异常处理器处理 SimpleMappingExceptionResolver;
⚫ 自定义异常处理器:实现HandlerExceptionResolver接口,自定义异常进行处理;
⚫ 注解方式:使用@ControllerAdvice + @ExceptionHandler 来处理。
使用SimpleMappingExceptionResolver处理一些简单异常,配置开启SimpleMappingExceptionResolver, 并指定异常捕获后的处理动作,当发生了异常后,会被 SimpleMappingExceptionResolver 处理,跳转到我们 配置的错误页面error.html给用户进行友好展示
<!--配置简单异常处理器-->
<bean class="org.springframework.web.servlet.handler.SimpleMappingExceptionResolver">
<!-- 异常捕获后动作:展示视图 -->
<property name="defaultErrorView" value="/error.html"/>
</bean>
可以在配置SimpleMappingExceptionResolver时,指定一些参数,例如:异常的类型
<bean class="org.springframework.web.servlet.handler.SimpleMappingExceptionResolver">
<property name="defaultErrorView" value="/error.html"/>
<property name="exceptionMappings">
<props>
<!-- 配置异常类型对应的展示视图 -->
<prop key="java.lang.RuntimeException">/error.html</prop>
<prop key="java.io.FileNotFoundException">/io.html</prop>
</props>
</property>
</bean>
-------
注解方式配置简单映射异常处理器
@Bean
public SimpleMappingExceptionResolver simpleMappingExceptionResolver(){
    //创建SimpleMappingExceptionResolver
    SimpleMappingExceptionResolver resolver = new SimpleMappingExceptionResolver();
    //设置默认错误展示视图
    resolver.setDefaultErrorView("/error.html");
    //定义Properties设置特殊异常对应的映射视图
    Properties properties = new Properties();
    properties.setProperty("java.lang.RuntimeException","/error.html");
    properties.setProperty("java.io.FileNotFoundException","/io.html");
    resolver.setExceptionMappings(properties);
    return resolver;
}
--------
交给Spring管理异常处理器
<bean class="com.itheima.exception.MyHandlerExceptionResolver"></bean>
自定义异常处理器,返回Json格式字符串信息
@Component
public class MyHandlerExceptionResolver implements HandlerExceptionResolver {
    @Override
    public ModelAndView resolveException(HttpServletRequest httpServletRequest,
                                         HttpServletResponse httpServletResponse, Object o, Exception e) {
        //编写要返回的json格式的字符串
        String jsonStr = "{\"code\":0,\"message\":\"error\",\"data\":\"\"}";
        try {
            httpServletResponse.getWriter().write(jsonStr);
        } catch (IOException e1) {
            e1.printStackTrace();
        }
        return null;
    }
}
使用注解 @ControllerAdvice + @ExceptionHandler 配置异常,@ControllerAdvice 注解本质是一个 @Component,也会被扫描到,与此同时,具备AOP功能,默认情况下对所有的Controller都进行拦截操作, 拦截后干什么呢?就需要在结合@ExceptionHandler、@InitBinder、@ModelAttribute 注解一起使用了,此 处我们讲解的是异常,所以是@ControllerAdvice + @ExceptionHandler的组合形式
编写全局异常处理器类,使用@ControllerAdvice标注,且@ExceptionHandler指定异常类型
@ControllerAdvice
public class GlobalExceptionHandler {
 @ExceptionHandler(RuntimeException.class)
 public ModelAndView runtimeHandleException(RuntimeException e){
 System.out.println("全局异常处理器执行...."+e);
 ModelAndView modelAndView = new ModelAndView("/error.html");
 return modelAndView;
 }
 @ExceptionHandler(IOException.class)
 @ResponseBody
 public ResultInfo ioHandleException(IOException e){
 //模拟一个ResultInfo
 ResultInfo resultInfo = new ResultInfo(0,"IOException",null);
 return resultInfo;
 }
}

如果全局异常处理器响应的数据都是Json格式的字符串的话,可以使用@RestControllerAdvice替代
@ControllerAdvice 和 @ResponseBody
@RestControllerAdvice
public class GlobalExceptionHandler {
 @ExceptionHandler(RuntimeException.class)
 public ResultInfo runtimeHandleException(RuntimeException e){
 //模拟一个ResultInfo
 ResultInfo resultInfo = new ResultInfo(0,"RuntimeException",null);
 return resultInfo;
 }
 @ExceptionHandler(IOException.class)
 public ResultInfo ioHandleException(IOException e){
 //模拟一个ResultInfo
 ResultInfo resultInfo = new ResultInfo(0,"IOException",null);
 return resultInfo;
 }
}
异常处理机制原理剖析
初始化加载的处理器异常解析器,SpringMVC 的前置控制器在进行初始化的时候,会初始化处理器异常解析器
HandlerExceptionResolver
//初始化处理器异常解析器
this.initHandlerExceptionResolvers(context);
private void initHandlerExceptionResolvers(ApplicationContext context) {
 //从容器中获得HandlerExceptionResolver的Map集合
 Map<String, HandlerExceptionResolver> matchingBeans =
BeanFactoryUtils.beansOfTypeIncludingAncestors(context, HandlerExceptionResolver.class, true,
false);
 //如果容器中没有HandlerExceptionResolver的话,则加载默认的HandlerExceptionResolver
 if (this.handlerExceptionResolvers == null) {
 //从dispatcherServlet.properties中加载
 this.handlerExceptionResolvers = this.getDefaultStrategies(context,
HandlerExceptionResolver.class);
 }
}

异常处理器加载完毕后,当发生异常时,就会进行处理,跟踪 DispatcherServlet 的 doDispatch() 方法
protected void doDispatch(HttpServletRequest request, HttpServletResponse response) {
    Object dispatchException = null;//定义异常
    try {
        // ... 省略代码 ...
    } catch (Exception e) {
        dispatchException = e;
    } catch (Throwable te) {
        dispatchException = new NestedServletException("Handler dispatch failed", te);
    }
    //视图处理、拦截器最终方法调用、异常处理都在该方法内
    this.processDispatchResult(processedRequest, response, mappedHandler, mv,
                               (Exception)dispatchException);
}


跟踪processDispatchResult方法
private void processDispatchResult(HttpServletRequest request, HttpServletResponse response,
                                   @Nullable HandlerExecutionChain mappedHandler, @Nullable ModelAndView mv, @Nullable Exception
                                   exception) throws Exception {
    boolean errorView = false;//定义错误视图标识,默认为false
    if (exception != null) {
        //判断当前捕获的异常是否是ModelAndViewDefiningException类型的异常
        if (exception instanceof ModelAndViewDefiningException) {
            //获得ModelAndViewDefiningException异常对象中的ModelAndView对象
            mv = ((ModelAndViewDefiningException)exception).getModelAndView();
        } else {
            //捕获到其他异常,获得当前发生异常的Handler对象
            Object handler = mappedHandler != null ? mappedHandler.getHandler() : null;
            //执行processHandlerException 方法
            mv = this.processHandlerException(request, response, handler, exception);
            //如果异常处理返回了ModelAndView 则修改错误视图的标识为true
            errorView = mv != null;
        }}
    // ... 省略其他代码 ...}


    跟踪processHandlerException 方法
    protected ModelAndView processHandlerException(HttpServletRequest request, HttpServletResponse response,
                                                   @Nullable Object handler, Exception ex) throws Exception {
        ModelAndView exMv = null;//定义ModelAndView
        //判断处理器异常解析器集合是否是空的
        if (this.handlerExceptionResolvers != null) {
            //遍历处理器异常解析器List集合
            Iterator var6 = this.handlerExceptionResolvers.iterator();
            while(var6.hasNext()) {
                //取出每一个异常解析器
                HandlerExceptionResolver resolver = (HandlerExceptionResolver)var6.next();
                //执行异常解析器的resolveException方法
                exMv = resolver.resolveException(request, response, handler, ex);
                //只要有一个异常处理器返回ModelAndView 则不在执行后面的异常处理器
                if (exMv != null) {
                    break;
                }
            } }
        //如果视图解析器不为null
        if (exMv != null) {return exMv;
                          } else { throw ex; } }
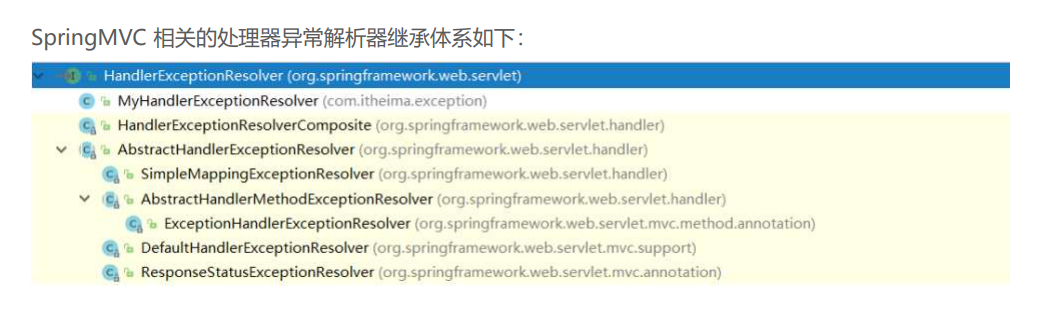
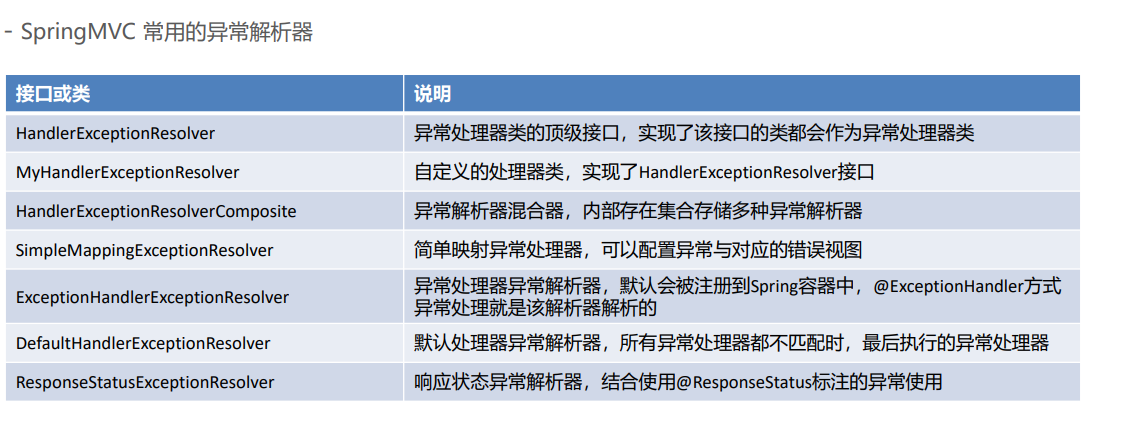

 浙公网安备 33010602011771号