SharePoint开发学习笔记4——使用aspx自定义表单的工作流(1)
此次完成的工作流任务就是一个基本的审批流程。
以前在VS2008上开发SharePoint时要使用aspx页面的自定义关联表单或者初始化表单是比较麻烦的,需要自己把SP中的母版等其它东西参照着它的页面进行手动添加,而且还需要自己来获得上一页的表单数据,以及手动建立表单数据传递到下一页面。但到了VS2010中后,一切都变得简单了,它现在可以自动生成关联表单模板和初始化表单模板,而不用再操心样式和数据传递的问题了。(如下图)
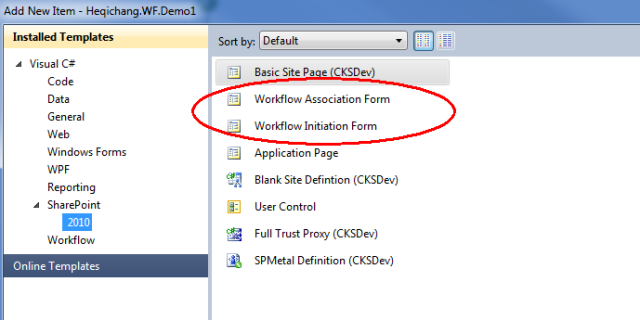
下面我们打开VS2010选择SharePoint项目模板,创建一个顺序工作流的工程;
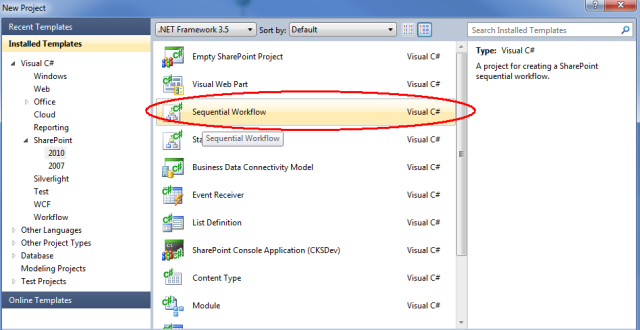
选择部署为form soluation,然后再选择为list workflow,最后关联好你调试时用的list后一直按Next就行了。
然后在工程列表上右键,添加对Layouts目录的一个映射文件夹,因为只有添加了这个文件夹才能在它下面添加新项的时候才会有关联表单或者初始化表单的模板选择。
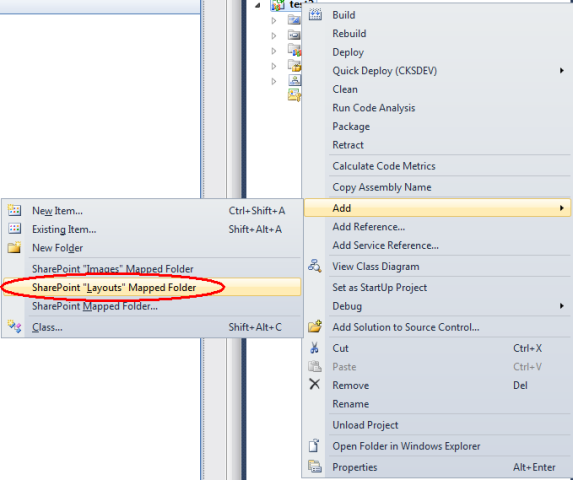
创建关联表单
这里简要说明一下什么是关联表单,我的理解就是在将WF与List或者Document等进行关联时填入一些默认的供WF初始化时自动填入的一些数据。当然,在关联表单页面还做了一些其它的操作,比如:创建一些List和WF关联信息存储、创建Task List和History List等等。
在Layouts目录下右键,点击添加新项,在SharePoint项目模板中添加关联表单的选项。
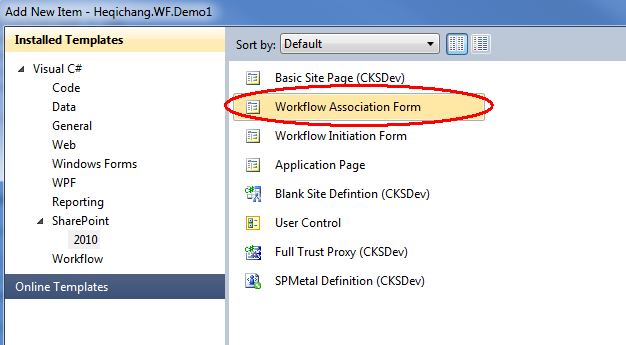
这样,关联表单就建好了。我们来看看它为我们做了些什么事。首先在页面上,已经为我们引入了需要的SP的程序集和关联好了站点中的母版页,我们主要修改的地方就是在ID为PlaceHolderMain下Content控件内部。
在设计界面时,我还注册了另外两个SP的控件,InputFormSection和InputFormControl(因为有些SP控件有.ascx文件需要你用到时自己注册进来的,而有些直接用类写的就不用注册了。)
<%@ Register TagPrefix="wssuc" TagName="InputFormSection" Src="/_controltemplates/InputFormSection.ascx" %>
<%@ Register TagPrefix="wssuc" TagName="InputFormControl" Src="/_controltemplates/InputFormControl.ascx" %>
先看下整体效果吧:
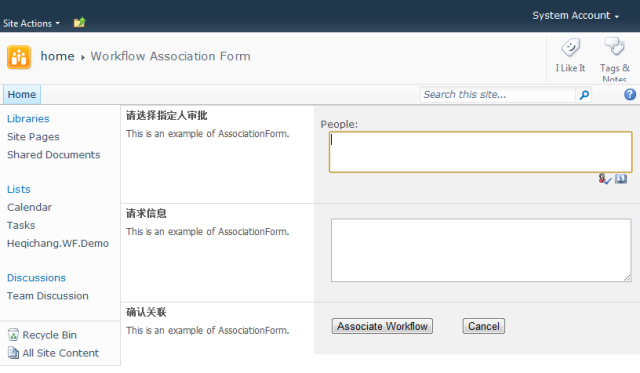
前台代码如下:(主要是PlaceHolderMain中的代码,其它地方未改动)
<asp:Content ID="Main" ContentPlaceHolderID="PlaceHolderMain" runat="server">
    <table border="0" cellspacing="0" cellpadding="0" class="ms-propertysheet" width="100%">
        <colgroup>
            <col style="width: 60%" />
            <col style="width: 40%" />
        </colgroup>
        <tr>
            <td>
                <wssuc:InputFormSection ID="InputFormSection1" runat="server" Title="请选择指定人审批" Description="This is an example of AssociationForm.">
                    <template_inputformcontrols>
					 <wssuc:InputFormControl runat="server" LabelText="People:" LabelAssociatedControlId="SP_PeoleEditor">
						<Template_Control>
							<SharePoint:PeopleEditor runat="server" ID="SP_PeoleEditor" />
						</Template_Control>
					 </wssuc:InputFormControl>
				 </template_inputformcontrols>
                </wssuc:InputFormSection>
            </td>
        </tr>
        <tr>
            <td>
                <wssuc:InputFormSection ID="InputFormSection3" runat="server" Title="请求信息" Description="This is an example of AssociationForm.">
                    <template_inputformcontrols>
					 <wssuc:InputFormControl runat="server" LabelAssociatedControlId="TextBox1">
						<Template_Control>
							<asp:TextBox ID="TextBox1" runat="server" TextMode="MultiLine" Rows="5"></asp:TextBox>
						</Template_Control>
					 </wssuc:InputFormControl>
				 </template_inputformcontrols>
                </wssuc:InputFormSection>
            </td>
        </tr>
        <tr>
            <td>
                <wssuc:InputFormSection ID="InputFormSection2" runat="server" Title="确认关联" Description="This is an example of AssociationForm.">
                    <template_inputformcontrols>
                        <wssuc:InputFormControl runat="server" LabelAssociatedControlId="Panel1">
                            <Template_Control>
<asp:Panel ID="Panel1" runat="server">
<asp:Button ID="AssociateWorkflow" runat="server" OnClick="AssociateWorkflow_Click" Text="Associate Workflow" />

    <asp:Button ID="Cancel" runat="server" Text="Cancel" OnClick="Cancel_Click" />

</asp:Panel>


                            </Template_Control>

                    </wssuc:InputFormControl>
                    </template_inputformcontrols>
                </wssuc:InputFormSection>
            </td>
        </tr>
    </table>
</asp:Content>
最后看看后台代码。展开代码可以看到VS2010也为我们自动完成了很多事情,不用我们再操心数据的传递,任务列表和历史列表的一些繁琐的事情了,主要改动的地方就是在GetAssociationData()这个方法中。
它的作用就是将XML序列化后(工作流中表单数据传递都是通过xml的形式)的数据保存进SPWorkflowAssociation中。所以还需要一个序列化的方法。
 // This method is called when the user clicks the button to associate the workflow.
        private string GetAssociationData()
        {
            ArrayList listName = SP_PeoleEditor.ResolvedEntities;
            DataModel dataModel = new DataModel();

            foreach (PickerEntity item in listName)
            {
                dataModel.Persons.Add(item.Key);
            }

            dataModel.RequestMessage = TextBox1.Text;

            String xmlResult = xmlSerialize(dataModel);

            return xmlResult;
        }

        private string xmlSerialize(DataModel dataModel)
        {
            using (MemoryStream ms = new MemoryStream())
            {
                XmlSerializer serializer = new XmlSerializer(typeof(DataModel));
                serializer.Serialize(ms, dataModel);

                byte[] bytes = new byte[ms.Length];
                ms.Position = 0;
                ms.Read(bytes, 0, bytes.Length);

                return Encoding.Default.GetString(bytes);
            }
        }
最后是DataModel,在工程中新建的一个需要传递的数据类,选择类文件创建就行了,但是要注意的一点就是类要标注序列化。
using System;
using System.Collections.Generic;
using System.Linq;
using System.Text;


namespace Heqichang.WF.Demo1
{
    [Serializable]
    public class DataModel
    {
        private List<String> persons;
        public List<String> Persons
        {
            get
            {
                if (persons==null)
                {
                    persons = new List<string>();

                }
                return persons;
            }
            set
            {
                persons = value;
            }
        }

        public String RequestMessage { get; set; }
    }
}

