Axios前后端交互实例
什么是前后端联调?
在我们开发的过程中,发送请求的ajax数据都不是后端返回的真数据,而是我们自己通过接口mock模拟的假数据,当前端的代码编写完成后,后端的接口也写好后,我们就需要把mock数据换点,尝试使用后端提供的数据,进行一个前后端的调试,我们会把这个过程叫做前后端接口联调。
真正的零基础都是从安装开始的AwA
编译器选择IDEA:附赠激活码:IntelliJ IDEA2023.2 破解 永久激活 最新版IDEA激活 亲测可用! - 爱激活网 (aijihuo.cn)
Node.js: 下载 | Node.js 中文网 (nodejs.cn)选择对应版本,安装程序除了安装地址以外其它都是默认就行
nginx:nginx: download
MySQL:超详细MySQL安装及基本使用教程 - 知乎 (zhihu.com)
先来介绍下前后端是怎么连接交互的:
一般是前端设计界面,向后端发送一些请求,而发送请求的技术选用的是Ajax,但现在流行的一般都是先转换成Json格式来交互数据的,
Ajax
先来说说什么是Ajax
异步 JavaScript 和 XML,或 Ajax 本身不是一种技术,而是一种将一些现有技术结合起来使用的方法,包括:HTML 或 XHTML、CSS、JavaScript、DOM、XML、XSLT、以及最重要的 XMLHttpRequest 对象。当使用结合了这些技术的 Ajax 模型以后,网页应用能够快速地将增量更新呈现在用户界面上,而不需要重载(刷新)整个页面。这使得程序能够更快地回应用户的操作。Ajax 最吸引人的特性是它的“异步”性质,这意味着它可以与服务器通信、交换数据并更新页面,而无需刷新页面。
尽管 Ajax 中的 X 代表 XML,但是 JSON 才是首选,因为它更加轻量,而且是用 JavaScript 编写的。在 Ajax 模型中,JSON 和 XML 都被用来包装信息
HTTP请求报文格式与参数
行: POST /s?ie=utf-8 HTTP/1.1
头: Host: hepingan.top
Cookie: a=name=hepingan
Content-type: application/x-www-form-urlencoded
User-Agent: chrome 83
空行
体 username=admin&password=admin
上面的就是一个http请求的例子,下面就是响应报文的例子
行 HTTP/1.1 200 OK
头 Content-Type: text/html;charset=utf-8
Content-length: 2048
Content-encoding: gzip
空行
体 <html>
....
</html>
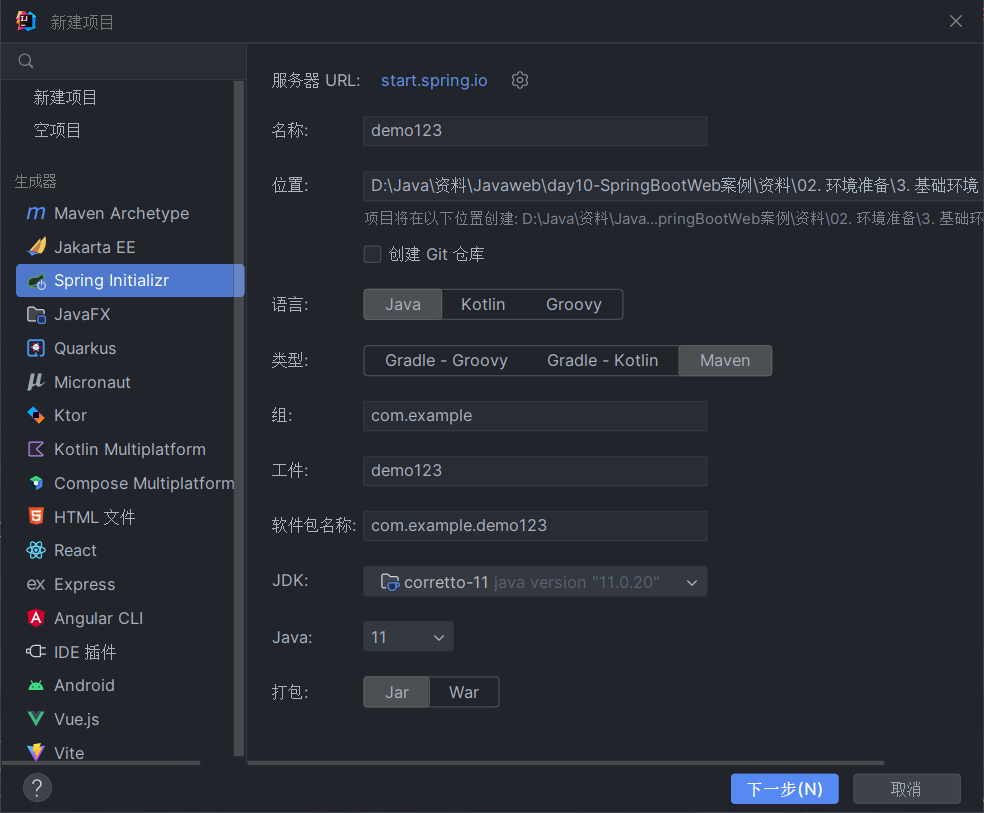
首先先搞后端,我用的是java 的springboot框架,创建时选择如下配置:


springboot的版本尽量选低点,不然不兼容出问题。jdk版本我选的是11.
打开pom.xml并在denpendences里引入mybatis的坐标:
        <dependency>
            <groupId>org.mybatis.spring.boot</groupId>
            <artifactId>mybatis-spring-boot-starter-test</artifactId>
            <version>2.3.1</version>
            <scope>test</scope>
        </dependency>
然后将application的文件格式给成yml,并输入:
server:
  port: 9090


spring:
  datasource:
    driver-class-name: com.mysql.cj.jdbc.Driver
    password: 1234
    username: root
    url: jdbc:mysql://localhost:3306/hh?useUnicode=true&characterEncoding=utf-8&
password 和url的数据库名记得换成自己的!我这里写的后端端口为9090;
引入数据库:
右边选择数据库并添加数据源,选择mysql。

username输入root,password就是你的密码。
然后创建一个表,mysql创建语句:
create table teacher
(
    id int unsigned primary key auto_increment comment '主键ID',
    name varchar(20) ,
    age  int
);
然后再在idea自带的数据库表格编辑里添加几个数据方便测试。
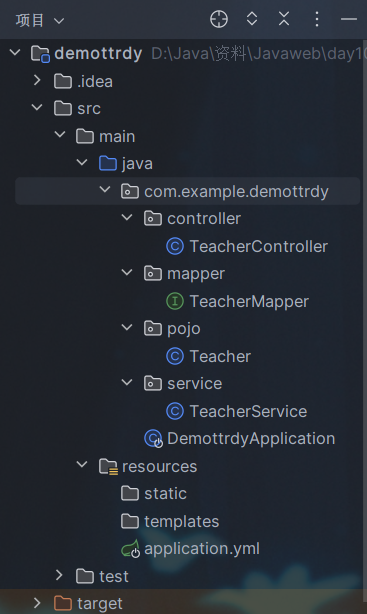
然后创建下面的包:

先编辑TeacherController:
@RestController
@RequestMapping("/teacher")
public class TeacherController {
    @Autowired
    private TeacherMapper teacherMapper;

    @GetMapping("/")
    public List<Teacher> ListTeacher(){
        List<Teacher> list = teacherMapper.ListTeacher();
        return list;
    }

    @GetMapping("/{id}")
    public Teacher getTeacher(@PathVariable("id") Long id){
        return teacherMapper.getTeacher(id);
    }
大概意思就是一个/teacher的接口里有get形式查询teacher表的请求和根据id查询的接口。
然后再在TeacherMapper里编写:
@Mapper
public interface TeacherMapper {

    @Select("select * from teacher")
    List<Teacher> ListTeacher();


    @Select("select *from teacher where id=#{id}")
    Teacher getTeacher(Long id);
然后启动项目:
![]()
然后在浏览器输入localhost:9090/teacher/和localhost:9090/teacher/1,如果有结果就说明成功了。
接下来是前端:
直接随便创建个html文件,里面就编写:
<!DOCTYPE html>
<html>
	<head>
		<meta charset="utf-8">
		<title>ajax</title>
	</head>
	<body>
		<body>
		  <div id="dataContainer"></div>
		</body>
		<script>
			var xhr = new XMLHttpRequest();
			var dataContainer = document.getElementById('dataContainer');

			xhr.onreadystatechange = function() {
			  if(xhr.readyState === 4) {
			    if(xhr.status === 200) {
			      // 请求成功,处理返回的数据
			      dataContainer.innerHTML = xhr.responseText;
			    } else {
			      // 请求失败,处理错误
			      console.error(xhr.statusText);
			    }
			  }
			};

			xhr.open('GET', 'http://localhost:9090/teacher/', true);
			xhr.send();
		</script>
	</body>
</html>记得引入axios的依赖,使用node的指令(node安装教程:【精选】Node.js和Vue的安装与配置(超详细步骤)_nodejs安装vue-CSDN博客或者我后面的文章:通过node.js部署vue项目 - 何平安 - 博客园 (cnblogs.com))在当前项目下输入npm install axios或者直接在html中输入
<script src="https://unpkg.com/axios/dist/axios.min.js"></script>然后再运行浏览器打开就可以看到成果了。


【推荐】国内首个AI IDE,深度理解中文开发场景,立即下载体验Trae
【推荐】编程新体验,更懂你的AI,立即体验豆包MarsCode编程助手
【推荐】抖音旗下AI助手豆包,你的智能百科全书,全免费不限次数
【推荐】轻量又高性能的 SSH 工具 IShell:AI 加持,快人一步
· 被坑几百块钱后,我竟然真的恢复了删除的微信聊天记录!
· 没有Manus邀请码?试试免邀请码的MGX或者开源的OpenManus吧
· 【自荐】一款简洁、开源的在线白板工具 Drawnix
· 园子的第一款AI主题卫衣上架——"HELLO! HOW CAN I ASSIST YOU TODAY
· 无需6万激活码!GitHub神秘组织3小时极速复刻Manus,手把手教你使用OpenManus搭建本