SpringMVC的拦截器
SpringMVC的拦截器:
1.首先我们需要引入jar包,这就不用说了,
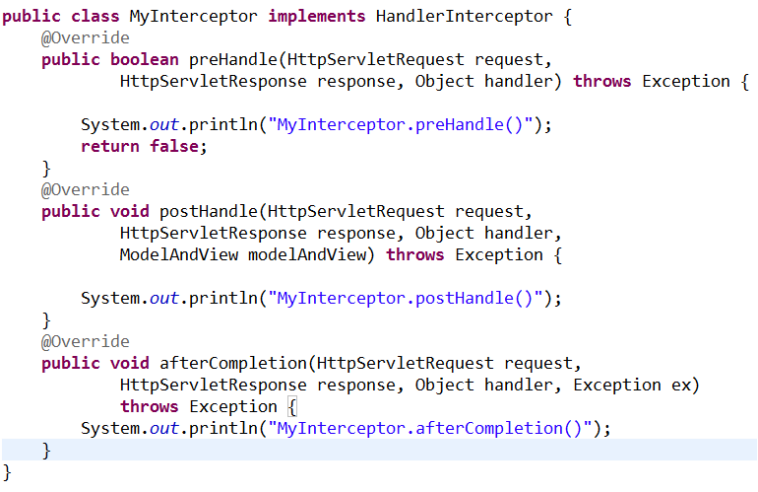
定义自己的拦截器实现HandlerInterceptor,进行方法的重写。

2.配置web.xml
|
1
2
3
4
5
6
7
8
9
10
11
12
13
14
15
16
17
|
<!--中央调度器--> <servlet> <servlet-name>springmvc</servlet-name> <servlet-class>org.springframework.web.servlet.DispatcherServlet</servlet-class> <init-param> <param-name>contextConfigLocation</param-name> <param-value>classpath:applicationContext.xml</param-value> </init-param> <!-- TOmcat启动的时候,Servlet对象就存储到内存 正整数 --> <load-on-startup>1</load-on-startup> </servlet> <servlet-mapping> <servlet-name>springmvc</servlet-name> <url-pattern>*.do</url-pattern> </servlet-mapping> |
3.配置一个处理器controller

4.定义大配置applicationContext.xml
|
1
2
3
4
5
6
7
8
9
|
<!-- 包扫描器 --><context:component-scan base-package="cn.hq.controller"></context:component-scan> <mvc:interceptors> <mvc:interceptor> <mvc:mapping path="/**"/> <bean class="cn.hq.interceptor.MyInterceptor"></bean> </mvc:interceptor> </mvc:interceptors> |
注意:现在拦截器的方法里第一个方法的返回值为false
效果演示:

请求后我们会发现控制台输出一个字段

正是因为我们设置了它的返回值类型,故请求打道回府,黯然收场,他需要我们来解封他。
当把他解封后(true),再次请求:

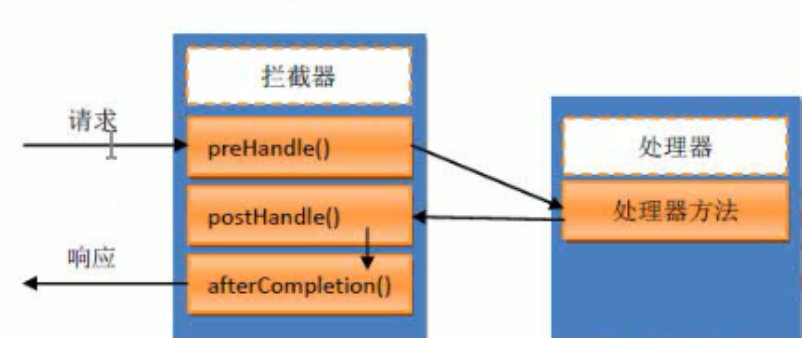
再附上一张图:

方法解析:
第一个方法preHandle尤其重要,他可以根据返回值
改变请求往下的流程,起着先导作用,第二个方法posHandle,他可以在
请求通过处理器后,紧接着做一系列的操作,最后经过最后一个方法
afterCompletion,进行客户端的响应。
多个拦截器的配置:
|
1
2
3
4
5
6
7
8
|
<!-- 定义多个拦截器 --><mvc:interceptors> <mvc:interceptor> <mvc:mapping path="/**"/> <bean class="cn.hq.interceptor.MyInterceptor2"></bean> </mvc:interceptor></mvc:interceptors> |
测试步骤,多配置一个拦截器
测试案例1,开启第一道拦截器,改为true,第二道拦截器进行false,查看请求流程:
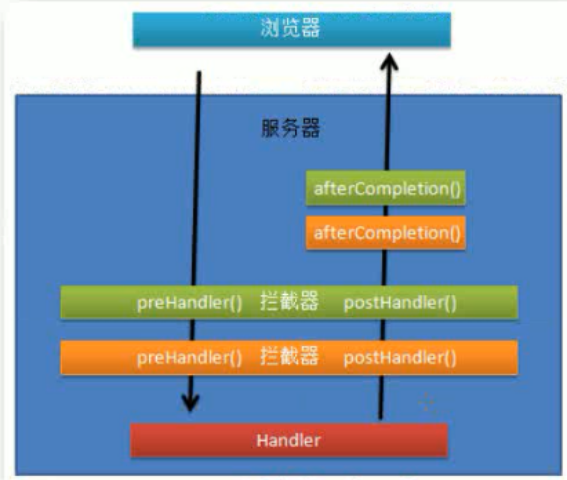
多个拦截器请求流程图:


解释:结合上述图所示,他经过第一道拦截器时,通道开放,往下继续走,当他走到第二道拦截时,发现通道关闭了,
但还是走了二道通道的第一方法,完了请求在这停止,无法通过处理器,但是第一道拦截器已经开启了其通道,
故走了最终响应的afterCompletion方法。
测试案例2,开启第一道拦截器,改为false,第二道拦截器进行true,查看请求流程:
解释:根据流程图,走完第一个方法后,停止前进。
测试案例3,两道通道全部打开,查看请求流程:


【推荐】国内首个AI IDE,深度理解中文开发场景,立即下载体验Trae
【推荐】编程新体验,更懂你的AI,立即体验豆包MarsCode编程助手
【推荐】抖音旗下AI助手豆包,你的智能百科全书,全免费不限次数
【推荐】轻量又高性能的 SSH 工具 IShell:AI 加持,快人一步
· 开发者必知的日志记录最佳实践
· SQL Server 2025 AI相关能力初探
· Linux系列:如何用 C#调用 C方法造成内存泄露
· AI与.NET技术实操系列(二):开始使用ML.NET
· 记一次.NET内存居高不下排查解决与启示
· Manus重磅发布:全球首款通用AI代理技术深度解析与实战指南
· 被坑几百块钱后,我竟然真的恢复了删除的微信聊天记录!
· 没有Manus邀请码?试试免邀请码的MGX或者开源的OpenManus吧
· 园子的第一款AI主题卫衣上架——"HELLO! HOW CAN I ASSIST YOU TODAY
· 【自荐】一款简洁、开源的在线白板工具 Drawnix