狂神说spring-boot系列二_运行原理篇
运行原理初探
我们之前写的HelloSpringBoot,到底是怎么运行的呢,Maven项目,我们一般从pom.xml文件探究起;
pom.xml
父依赖
其中它主要是依赖一个父项目,主要是管理项目的资源过滤及插件!
<parent>
    <groupId>org.springframework.boot</groupId>
    <artifactId>spring-boot-starter-parent</artifactId>
    <version>2.2.5.RELEASE</version>
    <relativePath/> <!-- lookup parent from repository -->
</parent>
点进去,发现还有一个父依赖
<parent>
    <groupId>org.springframework.boot</groupId>
    <artifactId>spring-boot-dependencies</artifactId>
    <version>2.2.5.RELEASE</version>
    <relativePath>../../spring-boot-dependencies</relativePath>
</parent>
这里才是真正管理SpringBoot应用里面所有依赖版本的地方,SpringBoot的版本控制中心;
以后我们导入依赖默认是不需要写版本;但是如果导入的包没有在依赖中管理着就需要手动配置版本了;
除此之外,静态资源导出问题也被解决了。
启动器 spring-boot-starter
<dependency>
    <groupId>org.springframework.boot</groupId>
    <artifactId>spring-boot-starter-web</artifactId>
</dependency>
springboot-boot-starter-xxx:就是spring-boot的场景启动器
spring-boot-starter-web:帮我们导入了web模块正常运行所依赖的组件;
SpringBoot将所有的功能场景都抽取出来,做成一个个的starter (启动器),只需要在项目中引入这些starter即可,所有相关的依赖都会导入进来 , 我们要用什么功能就导入什么样的场景启动器即可 ;我们未来也可以自己自定义 starter;
主启动类
分析完了 pom.xml 来看看这个启动类
启动类的源码分析图如下:

默认的主启动类
//@SpringBootApplication 来标注一个主程序类
//说明这是一个Spring Boot应用
@SpringBootApplication
public class SpringbootApplication {

   public static void main(String[] args) {
     //以为是启动了一个方法,没想到启动了一个服务
      SpringApplication.run(SpringbootApplication.class, args);
   }

}
但是一个简单的启动类并不简单!我们来分析一下这些注解都干了什么
作用:标注在某个类上说明这个类是SpringBoot的主配置类 , SpringBoot就应该运行这个类的main方法来启动SpringBoot应用;
进入这个注解:可以看到上面还有很多其他注解!
@SpringBootConfiguration
@EnableAutoConfiguration
@ComponentScan(
    excludeFilters = {@Filter(
    type = FilterType.CUSTOM,
    classes = {TypeExcludeFilter.class}
), @Filter(
    type = FilterType.CUSTOM,
    classes = {AutoConfigurationExcludeFilter.class}
)}
)
public @interface SpringBootApplication {
    // ......
}
@ComponentScan
这个注解在Spring中很重要 ,它对应XML配置中的元素。
作用:自动扫描并加载符合条件的组件或者bean , 将这个bean定义加载到IOC容器中
@SpringBootConfiguration
作用:SpringBoot的配置类 ,标注在某个类上 , 表示这是一个SpringBoot的配置类;
我们继续进去这个注解查看
// 点进去得到下面的 @Component
@Configuration
public @interface SpringBootConfiguration {}

@Component
public @interface Configuration {}
这里的 @Configuration,说明这是一个配置类 ,配置类就是对应Spring的xml 配置文件;
里面的 @Component 这就说明,启动类本身也是Spring中的一个组件而已,负责启动应用!
我们回到 SpringBootApplication 注解中继续看。
@EnableAutoConfiguration
@EnableAutoConfiguration :开启自动配置功能
以前我们需要自己配置的东西,而现在SpringBoot可以自动帮我们配置 ;@EnableAutoConfiguration告诉SpringBoot开启自动配置功能,这样自动配置才能生效;
点进注解接续查看:
@AutoConfigurationPackage :自动配置包
@Import({Registrar.class})
public @interface AutoConfigurationPackage {
}
@import :Spring底层注解@import , 给容器中导入一个组件
Registrar.class 作用:将主启动类的所在包及包下面所有子包里面的所有组件扫描到Spring容器 ;
这个分析完了,退到上一步,继续看
@Import({AutoConfigurationImportSelector.class}) :给容器导入组件 ;
AutoConfigurationImportSelector :自动配置导入选择器,那么它会导入哪些组件的选择器呢?我们点击去这个类看源码:
1、这个类中有一个这样的方法
// 获得候选的配置
protected List<String> getCandidateConfigurations(AnnotationMetadata metadata, AnnotationAttributes attributes) {
    //这里的getSpringFactoriesLoaderFactoryClass()方法
    //返回的就是我们最开始看的启动自动导入配置文件的注解类;EnableAutoConfiguration
    List<String> configurations = SpringFactoriesLoader.loadFactoryNames(this.getSpringFactoriesLoaderFactoryClass(), this.getBeanClassLoader());
    Assert.notEmpty(configurations, "No auto configuration classes found in META-INF/spring.factories. If you are using a custom packaging, make sure that file is correct.");
    return configurations;
}
2、这个方法又调用了 SpringFactoriesLoader 类的静态方法!我们进入SpringFactoriesLoader类loadFactoryNames() 方法
public static List<String> loadFactoryNames(Class<?> factoryClass, @Nullable ClassLoader classLoader) {
    String factoryClassName = factoryClass.getName();
    //这里它又调用了 loadSpringFactories 方法
    return (List)loadSpringFactories(classLoader).getOrDefault(factoryClassName, Collections.emptyList());
}
3、我们继续点击查看 loadSpringFactories 方法
private static Map<String, List<String>> loadSpringFactories(@Nullable ClassLoader classLoader) {
    //获得classLoader , 我们返回可以看到这里得到的就是EnableAutoConfiguration标注的类本身
    MultiValueMap<String, String> result = (MultiValueMap)cache.get(classLoader);
    if (result != null) {
        return result;
    } else {
        try {
            //去获取一个资源 "META-INF/spring.factories"
            Enumeration<URL> urls = classLoader != null ? classLoader.getResources("META-INF/spring.factories") : ClassLoader.getSystemResources("META-INF/spring.factories");
            LinkedMultiValueMap result = new LinkedMultiValueMap();

            //将读取到的资源遍历,封装成为一个Properties
            while(urls.hasMoreElements()) {
                URL url = (URL)urls.nextElement();
                UrlResource resource = new UrlResource(url);
                Properties properties = PropertiesLoaderUtils.loadProperties(resource);
                Iterator var6 = properties.entrySet().iterator();

                while(var6.hasNext()) {
                    Entry<?, ?> entry = (Entry)var6.next();
                    String factoryClassName = ((String)entry.getKey()).trim();
                    String[] var9 = StringUtils.commaDelimitedListToStringArray((String)entry.getValue());
                    int var10 = var9.length;

                    for(int var11 = 0; var11 < var10; ++var11) {
                        String factoryName = var9[var11];
                        result.add(factoryClassName, factoryName.trim());
                    }
                }
            }

            cache.put(classLoader, result);
            return result;
        } catch (IOException var13) {
            throw new IllegalArgumentException("Unable to load factories from location [META-INF/spring.factories]", var13);
        }
    }
}
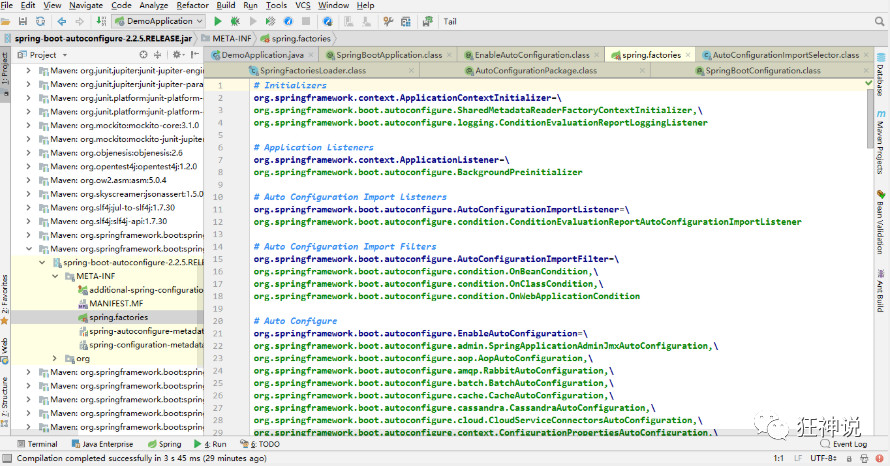
4、发现一个多次出现的文件:spring.factories,全局搜索它
spring.factories
我们根据源头打开spring.factories , 看到了很多自动配置的文件;这就是自动配置根源所在!
WebMvcAutoConfiguration
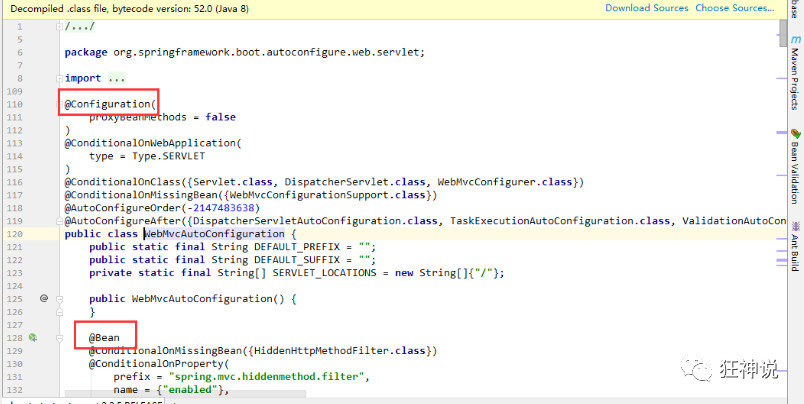
可以看到这些一个个的都是JavaConfig配置类,而且都注入了一些Bean,可以找一些自己认识的类,看着熟悉一下!
所以,自动配置真正实现是从classpath中搜寻所有的META-INF/spring.factories配置文件 ,并将其中对应的 org.springframework.boot.autoconfigure. 包下的配置项,通过反射实例化为对应标注了 @Configuration的JavaConfig形式的IOC容器配置类 , 然后将这些都汇总成为一个实例并加载到IOC容器中。
结论:
-
SpringBoot在启动的时候从类路径下的META-INF/spring.factories中获取EnableAutoConfiguration指定的值
-
将这些值作为自动配置类导入容器 , 自动配置类就生效 , 帮我们进行自动配置工作;
-
整个J2EE的整体解决方案和自动配置都在springboot-autoconfigure的jar包中;
-
它会给容器中导入非常多的自动配置类 (xxxAutoConfiguration), 就是给容器中导入这个场景需要的所有组件 , 并配置好这些组件 ;
-
有了自动配置类 , 免去了我们手动编写配置注入功能组件等的工作;
springbootApplication注解被SpringbootConfigution注解和EnableAutoConfiguration注解修饰,其中SpringbootConfigution注解被configuration注解修饰,configuration注解被component注解修饰,说明springbootApplication是一个注入到spring容器的组件,同时EnableAutoConfiguration注解则是从指定的Meta-INf/spring.factories文件下获取自动配置类,而这个文件在springboot-autoconfiguration的jar报下,根据我们需要的启动类获取自动配置类注入到容器里面,主要是通过contionalOnxxx等注解来进行判断是否是需要的配置类,就不需要手动注入配置组件。自动配置类的组件的属性值是和properties文件绑定的,我们可以修改这些默认值。
不简单的方法
我最初以为就是运行了一个main方法,没想到却开启了一个服务;
public class SpringbootApplication {public static void main(String[] args) {SpringApplication.run(SpringbootApplication.class, args);}}
SpringApplication.run分析
分析该方法主要分两部分,一部分是SpringApplication的实例化,二是run方法的执行;
SpringApplication
这个类主要做了以下四件事情:
1、推断应用的类型是普通的项目还是Web项目
2、查找并加载所有可用初始化器 , 设置到initializers属性中
3、找出所有的应用程序监听器,设置到listeners属性中
4、推断并设置main方法的定义类,找到运行的主类
查看构造器:
run方法流程分析
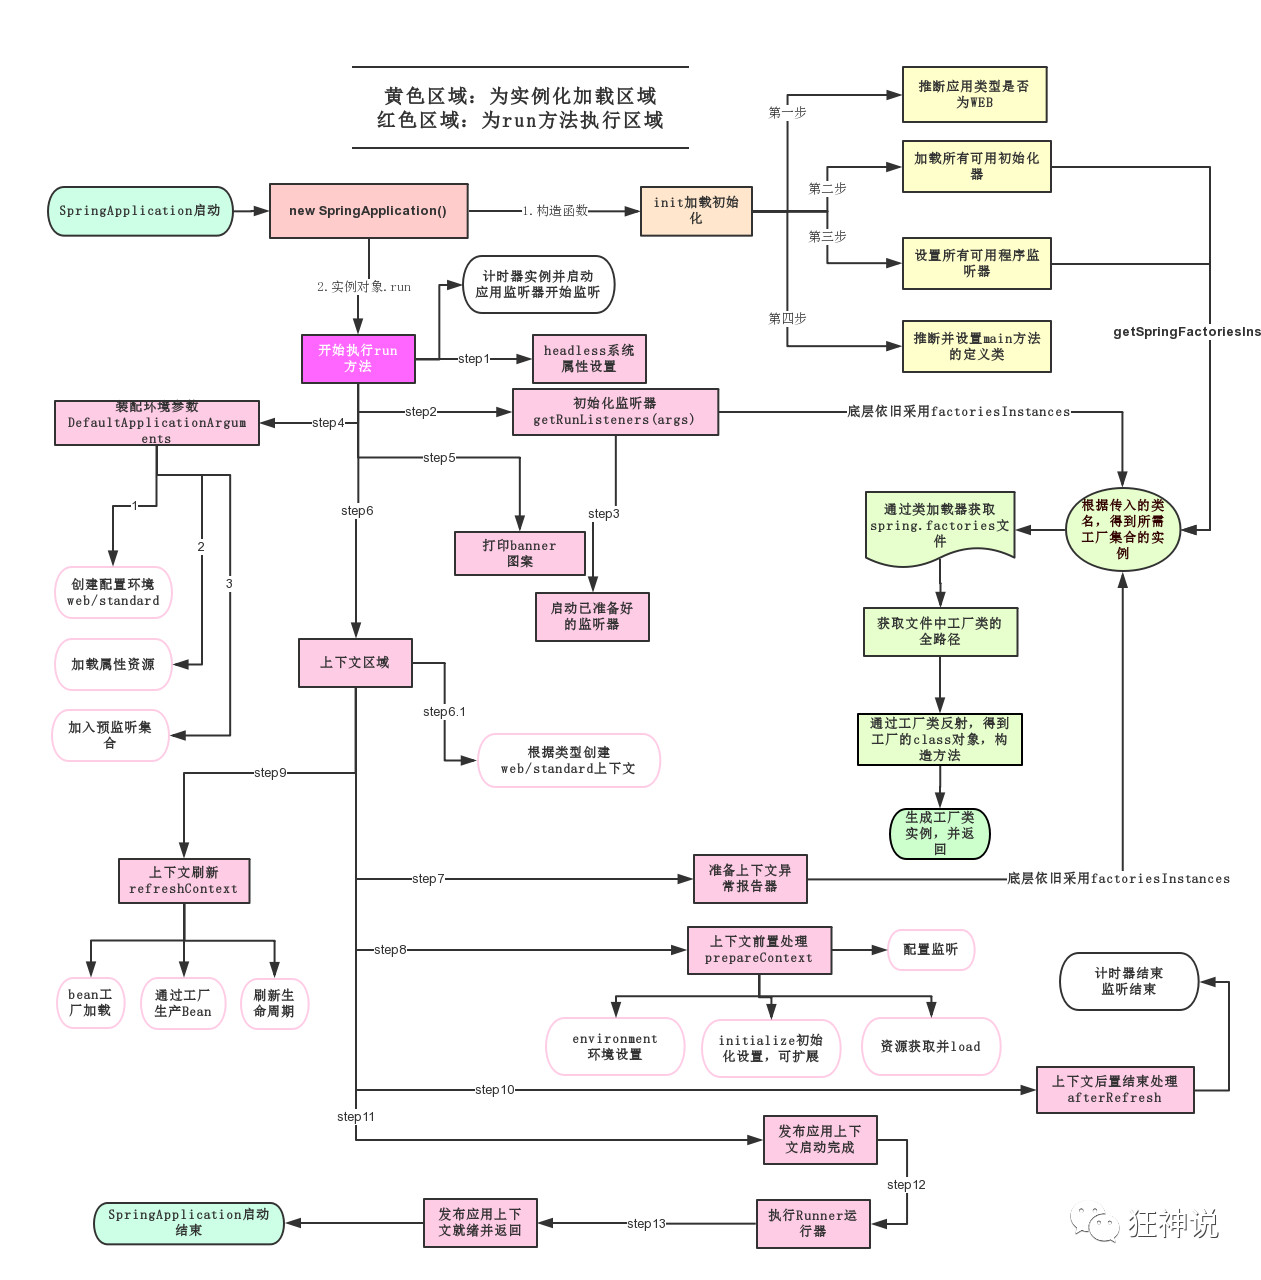
跟着源码和这幅图就可以一探究竟了!
自动配置原理
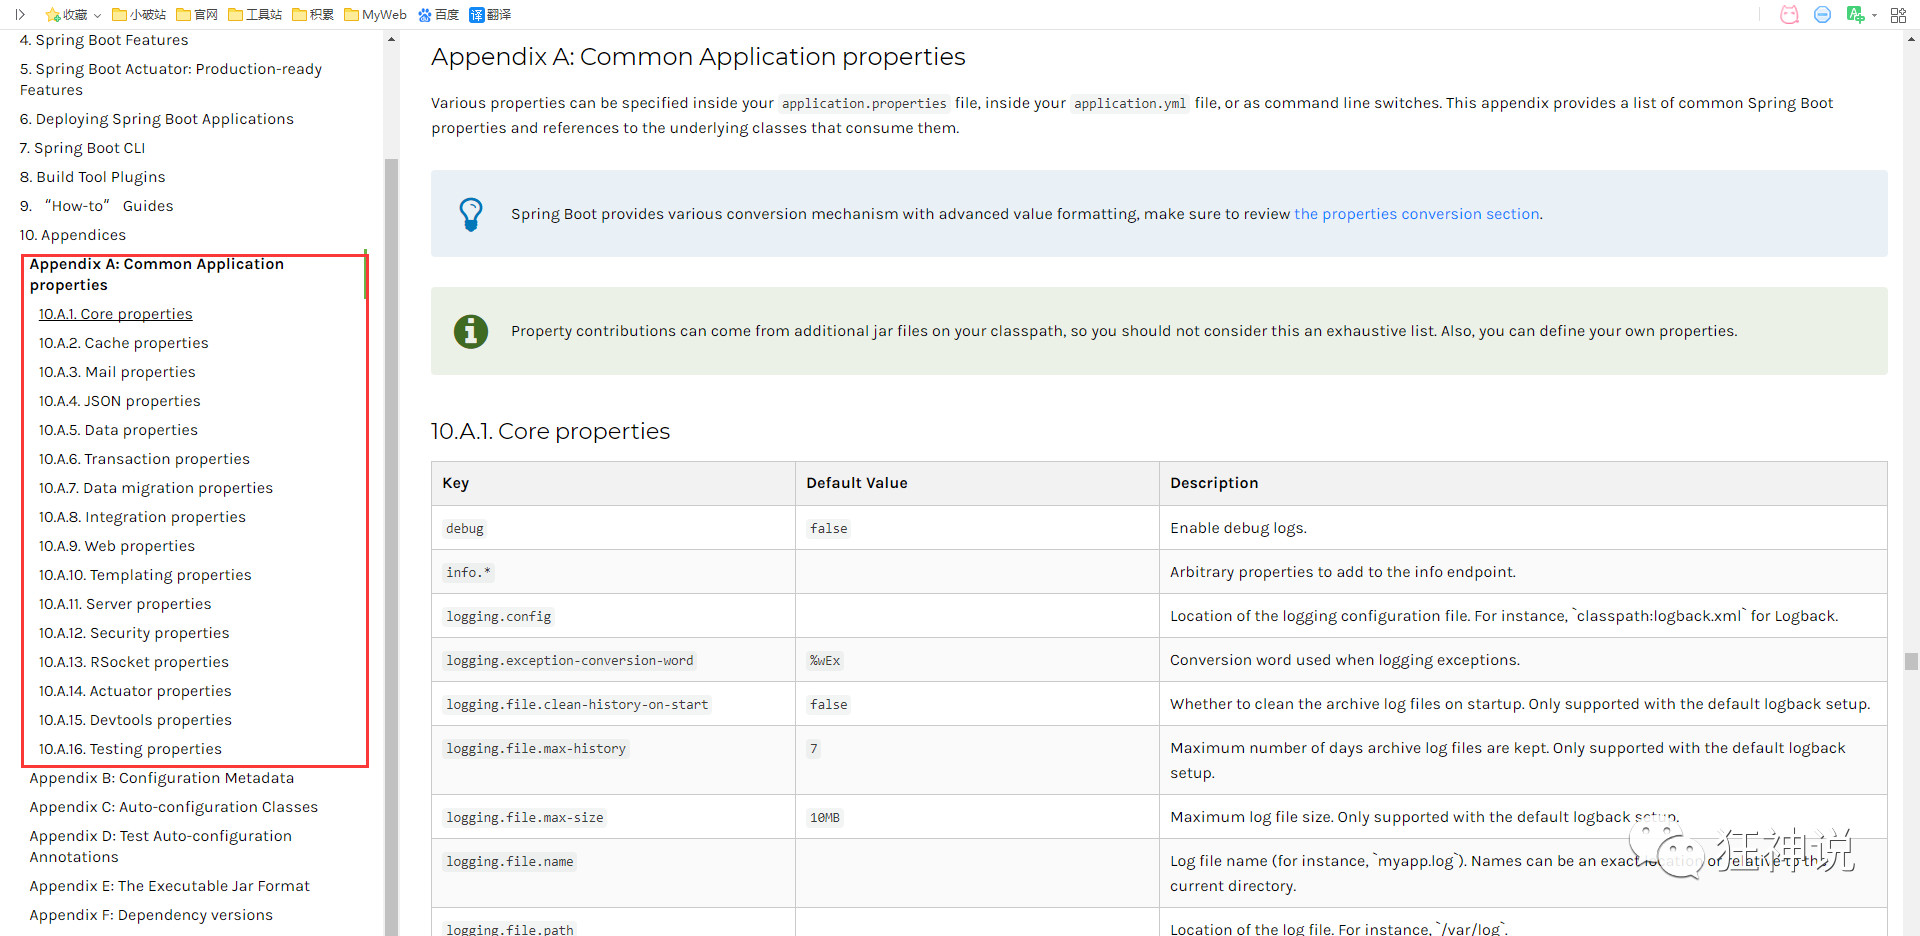
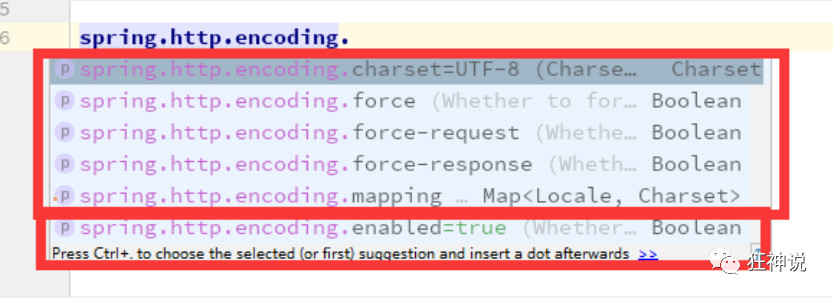
配置文件到底能写什么?怎么写?
SpringBoot官方文档中有大量的配置,我们无法全部记住
+867
分析自动配置原理
我们以HttpEncodingAutoConfiguration(Http编码自动配置)为例解释自动配置原理;
//表示这是一个配置类,和以前编写的配置文件一样,也可以给容器中添加组件;
@Configuration

//启动指定类的ConfigurationProperties功能;
  //进入这个HttpProperties查看,将配置文件中对应的值和HttpProperties绑定起来;
  //并把HttpProperties加入到ioc容器中
@EnableConfigurationProperties({HttpProperties.class})

//Spring底层@Conditional注解
  //根据不同的条件判断,如果满足指定的条件,整个配置类里面的配置就会生效;
  //这里的意思就是判断当前应用是否是web应用,如果是,当前配置类生效
@ConditionalOnWebApplication(
    type = Type.SERVLET
)

//判断当前项目有没有这个类CharacterEncodingFilter;SpringMVC中进行乱码解决的过滤器;
@ConditionalOnClass({CharacterEncodingFilter.class})

//判断配置文件中是否存在某个配置:spring.http.encoding.enabled;
  //如果不存在,判断也是成立的
  //即使我们配置文件中不配置pring.http.encoding.enabled=true,也是默认生效的;
@ConditionalOnProperty(
    prefix = "spring.http.encoding",
    value = {"enabled"},
    matchIfMissing = true
)

public class HttpEncodingAutoConfiguration {
    //他已经和SpringBoot的配置文件映射了
    private final Encoding properties;
    //只有一个有参构造器的情况下,参数的值就会从容器中拿
    public HttpEncodingAutoConfiguration(HttpProperties properties) {
        this.properties = properties.getEncoding();
    }

    //给容器中添加一个组件,这个组件的某些值需要从p+68roperties中获取
    @Bean
    @ConditionalOnMissingBean //判断容器没有这个组件?
    public CharacterEncodingFilter characterEncodingFilter() {
        CharacterEncodingFilter filter = new OrderedCharacterEncodingFilter();
        filter.setEncoding(this.properties.getCharset().name());
        filter.setForceRequestEncoding(this.properties.shouldForce(org.springframework.boot.autoconfigure.http.HttpProperties.Encoding.Type.REQUEST));
        filter.setForceResponseEncoding(this.properties.shouldForce(org.springframework.boot.autoconfigure.http.HttpProperties.Encoding.Type.RESPONSE));
        return filter;
    }
    //。。。。。。。
}
也就是说扫描的自动配置生效必须保证conditionalonxxx条件成立才可以。其中配置组件的某些值是从其绑定的properties.class文件里面获取的,这些值可以在配置文件里面我们进行修改。
一句话总结 :根据当前不同的条件判断,决定这个配置类是否生效!
-
一但这个配置类生效;这个配置类就会给容器中添加各种组件;
-
这些组件的属性是从对应的properties类中获取的,这些类里面的每一个属性又是和配置文件绑定的;
-
所有在配置文件中能配置的属性都是在xxxxProperties类中封装着;
-
配置文件能配置什么就可以参照某个功能对应的这个属性类
//从配置文件中获取指定的值和bean的属性进行绑定public class HttpProperties {// .....}
这就是自动装配的原理!
精髓
1、SpringBoot启动会加载大量的自动配置类
2、我们看我们需要的功能有没有在SpringBoot默认写好的自动配置类当中;
3、我们再来看这个自动配置类中到底配置了哪些组件;(只要我们要用的组件存在在其中,我们就不需要再手动配置了)
4、给容器中自动配置类添加组件的时候,会从properties类中获取某些属性。我们只需要在配置文件中指定这些属性的值即可
xxxxAutoConfigurartion:自动配置类;给容器中添加组件
xxxxProperties:封装配置文件中相关属性;
了解:@Conditional
了解完自动装配的原理后,我们来关注一个细节问题,自动配置类必须在一定的条件下才能生效;
@Conditional派生注解(Spring注解版原生的@Conditional作用)
作用:必须是@Conditional指定的条件成立,才给容器中添加组件,配置里面的所有内容才生效;
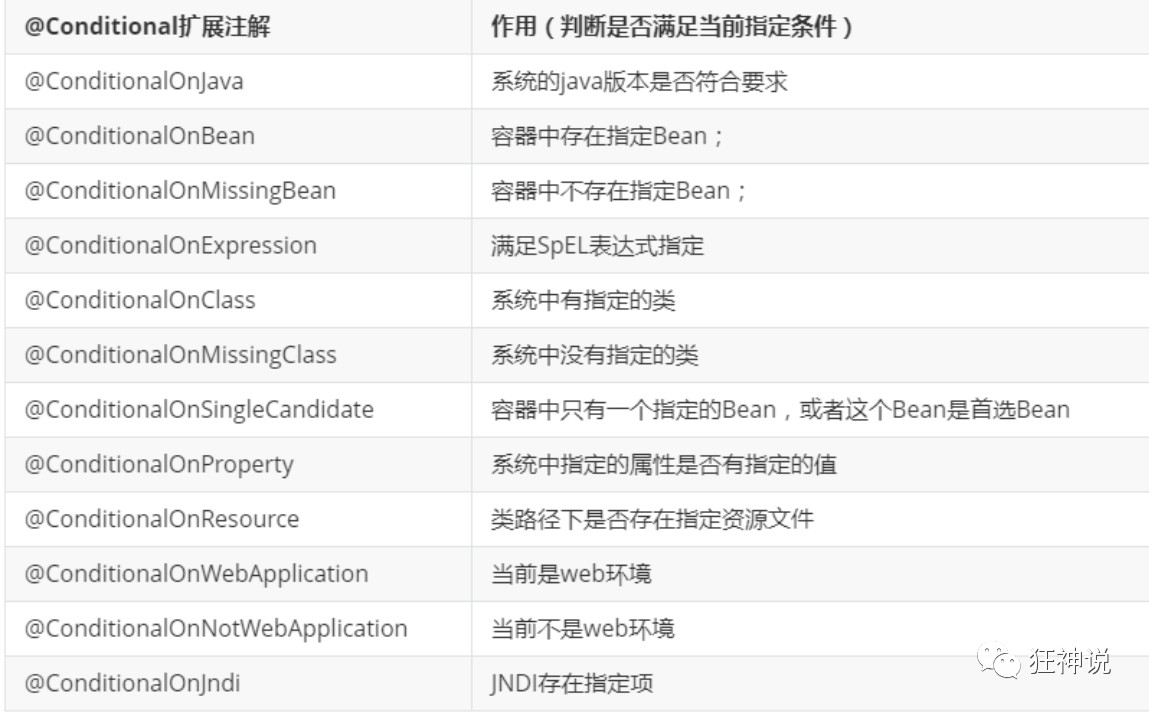
那么多的自动配置类,必须在一定的条件下才能生效;也就是说,我们加载了这么多的配置类,但不是所有的都生效了。
我们怎么知道哪些自动配置类生效?
我们可以通过启用 debug=true属性;来让控制台打印自动配置报告,这样我们就可以很方便的知道哪些自动配置类生效;
#开启springboot的调试类debug=true
Positive matches:(自动配置类启用的:正匹配)
Negative matches:(没有启动,没有匹配成功的自动配置类:负匹配)
Unconditional classes: (没有条件的类)
【演示:查看输出的日志】
掌握吸收理解原理,即可以不变应万变!
MVC自动配置原理
在进行项目编写前,我们还需要知道一个东西,就是SpringBoot对我们的SpringMVC还做了哪些配置,包括如何扩展,如何定制。
只有把这些都搞清楚了,我们在之后使用才会更加得心应手。途径一:源码分析,途径二:官方文档!
地址 :https://docs.spring.io/spring-boot/docs/2.2.5.RELEASE/reference/htmlsingle/#boot-features-spring-mvc-auto-configuration
Spring MVC Auto-configuration
// Spring Boot为Spring MVC提供了自动配置,它可以很好地与大多数应用程序一起工作。
Spring Boot provides auto-configuration for Spring MVC that works well with most applications.
// 自动配置在Spring默认设置的基础上添加了以下功能:
The auto-configuration adds the following features on top of Spring’s defaults:
// 包含视图解析器
Inclusion of ContentNegotiatingViewResolver and BeanNameViewResolver beans.
// 支持静态资源文件夹的路径,以及webjars
Support for serving static resources, including support for WebJars
// 自动注册了Converter:
// 转换器,这就是我们网页提交数据到后台自动封装成为对象的东西,比如把"1"字符串自动转换为int类型
// Formatter:【格式化器,比如页面给我们了一个2019-8-10,它会给我们自动格式化为Date对象】
Automatic registration of Converter, GenericConverter, and Formatter beans.
// HttpMessageConverters
// SpringMVC用来转换Http请求和响应的的,比如我们要把一个User对象转换为JSON字符串,可以去看官网文档解释;
Support for HttpMessageConverters (covered later in this document).
// 定义错误代码生成规则的
Automatic registration of MessageCodesResolver (covered later in this document).
// 首页定制
Static index.html support.
// 图标定制
Custom Favicon support (covered later in this document).
// 初始化数据绑定器:帮我们把请求数据绑定到JavaBean中!
Automatic use of a ConfigurableWebBindingInitializer bean (covered later in this document).

/*
如果您希望保留Spring Boot MVC功能,并且希望添加其他MVC配置(拦截器、格式化程序、视图控制器和其他功能),则可以添加自己
的@configuration类,类型为webmvcconfiguer,但不添加@EnableWebMvc。如果希望提供
RequestMappingHandlerMapping、RequestMappingHandlerAdapter或ExceptionHandlerExceptionResolver的自定义
实例,则可以声明WebMVCregistrationAdapter实例来提供此类组件。
*/
If you want to keep Spring Boot MVC features and you want to add additional MVC configuration
(interceptors, formatters, view controllers, and other features), you can add your own
@Configuration class of type WebMvcConfigurer but without @EnableWebMvc. If you wish to provide
custom instances of RequestMappingHandlerMapping, RequestMappingHandlerAdapter, or
ExceptionHandlerExceptionResolver, you can declare a WebMvcRegistrationsAdapter instance to provide such components.

// 如果您想完全控制Spring MVC,可以添加自己的@Configuration,并用@EnableWebMvc进行注释。
If you want to take complete control of Spring MVC, you can add your own @Configuration
ContentNegotiatingViewResolver 内容协商视图解析器
自动配置了ViewResolver,就是我们之前学习的SpringMVC的视图解析器;
即根据方法的返回值取得视图对象(View),然后由视图对象决定如何渲染(转发,重定向)。
我们去看看这里的源码:我们找到 WebMvcAutoConfiguration , 然后搜索ContentNegotiatingViewResolver。找到如下方法!
@Bean
@ConditionalOnBean(ViewResolver.class)
@ConditionalOnMissingBean(name = "viewResolver", value = ContentNegotiatingViewResolver.class)
public ContentNegotiatingViewResolver viewResolver(BeanFactory beanFactory) {
    ContentNegotiatingViewResolver resolver = new ContentNegotiatingViewResolver();
    resolver.setContentNegotiationManager(beanFactory.getBean(ContentNegotiationManager.class));
    // ContentNegotiatingViewResolver使用所有其他视图解析器来定位视图,因此它应该具有较高的优先级
    resolver.setOrder(Ordered.HIGHEST_PRECEDENCE);
    return resolver;
}
我们可以点进这类看看!找到对应的解析视图的代码;
@Nullable // 注解说明:@Nullable 即参数可为null
public View resolveViewName(String viewName, Locale locale) throws Exception {
    RequestAttributes attrs = RequestContextHolder.getRequestAttributes();
    Assert.state(attrs instanceof ServletRequestAttributes, "No current ServletRequestAttributes");
    List<MediaType> requestedMediaTypes = this.getMediaTypes(((ServletRequestAttributes)attrs).getRequest());
    if (requestedMediaTypes != null) {
        // 获取候选的视图对象
        List<View> candidateViews = this.getCandidateViews(viewName, locale, requestedMediaTypes);
        // 选择一个最适合的视图对象,然后把这个对象返回
        View bestView = this.getBestView(candidateViews, requestedMediaTypes, attrs);
        if (bestView != null) {
            return bestView;
        }
    }
    // ...
我们继续点进去看,他是怎么获得候选的视图的呢?
getCandidateViews中看到他是把所有的视图解析器拿来,进行while循环,挨个解析!
Iterator var5 = this.viewResolvers.iterator();所以得出结论:ContentNegotiatingViewResolver 这个视图解析器就是用来组合所有的视图解析器的
我们再去研究下他的组合逻辑,看到有个属性viewResolvers,看看它是在哪里进行赋值的!
protected void initServletContext(ServletContext servletContext) {
    // 这里它是从beanFactory工具中获取容器中的所有视图解析器
    // ViewRescolver.class 把所有的视图解析器来组合的
    Collection<ViewResolver> matchingBeans = BeanFactoryUtils.beansOfTypeIncludingAncestors(this.obtainApplicationContext(), ViewResolver.class).values();
    ViewResolver viewResolver;
    if (this.viewResolvers == null) {
        this.viewResolvers = new ArrayList(matchingBeans.size());
    }
    // ...............
}
既然它是在容器中去找视图解析器,我们是否可以猜想,我们就可以去实现一个视图解析器了呢?
我们可以自己给容器中去添加一个视图解析器;这个类就会帮我们自动的将它组合进来;我们去实现一下
1、我们在我们的主程序中去写一个视图解析器来试试;
@Bean //放到bean中
public ViewResolver myViewResolver(){
    return new MyViewResolver();
}

//我们写一个静态内部类,视图解析器就需要实现ViewResolver接口
private static class MyViewResolver implements ViewResolver{
    @Override
    public View resolveViewName(String s, Locale locale) throws Exception {
        return null;
    }
}
2、怎么看我们自己写的视图解析器有没有起作用呢?
我们给 DispatcherServlet 中的 doDispatch方法 加个断点进行调试一下,因为所有的请求都会走到这个方法中

3、我们启动我们的项目,然后随便访问一个页面,看一下Debug信息;
找到this
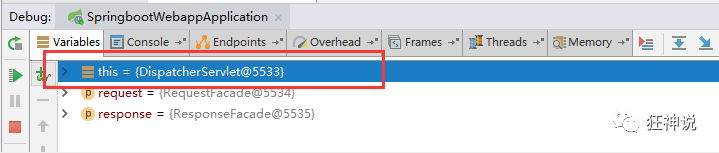
找到视图解析器,我们看到我们自己定义的就在这里了;
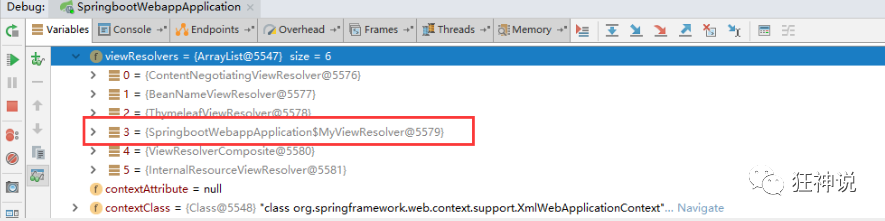
所以说,我们如果想要使用自己定制化的东西,我们只需要给容器中添加这个组件就好了!剩下的事情SpringBoot就会帮我们做了!
转换器和格式化器
找到格式化转换器
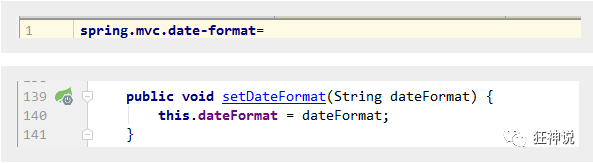
@Bean
@Override
public FormattingConversionService mvcConversionService() {
    // 拿到配置文件中的格式化规则
    WebConversionService conversionService =
        new WebConversionService(this.mvcProperties.getDateFormat());
    addFormatters(conversionService);
    return conversionService;
}
点击去:
public String getDateFormat() {
    return this.dateFormat;
}

/**
* Date format to use. For instance, `dd/MM/yyyy`. 默认的
 */
private String dateFormat;
可以看到在我们的Properties文件中,我们可以进行自动配置它!
如果配置了自己的格式化方式,就会注册到Bean中生效,我们可以在配置文件中配置日期格式化的规则:
可以看到在我们的Properties文件中,我们可以进行自动配置它!
如果配置了自己的格式化方式,就会注册到Bean中生效,我们可以在配置文件中配置日期格式化的规则:
其余的就不一一举例了,大家可以下去多研究探讨即可!
修改SpringBoot的默认配置
这么多的自动配置,原理都是一样的,通过这个WebMVC的自动配置原理分析,我们要学会一种学习方式,通过源码探究,得出结论;这个结论一定是属于自己的,而且一通百通。
SpringBoot的底层,大量用到了这些设计细节思想,所以,没事需要多阅读源码!得出结论;
SpringBoot在自动配置很多组件的时候,先看容器中有没有用户自己配置的(如果用户自己配置@bean),如果有就用用户配置的,如果没有就用自动配置的;
如果有些组件可以存在多个,比如我们的视图解析器,就将用户配置的和自己默认的组合起来!
扩展使用SpringMVC 官方文档如下:
If you want to keep Spring Boot MVC features and you want to add additional MVC configuration (interceptors, formatters, view controllers, and other features), you can add your own @Configuration class of type WebMvcConfigurer but without @EnableWebMvc. If you wish to provide custom instances of RequestMappingHandlerMapping, RequestMappingHandlerAdapter, or ExceptionHandlerExceptionResolver, you can declare a WebMvcRegistrationsAdapter instance to provide such components.
我们要做的就是编写一个@Configuration注解类,并且类型要为WebMvcConfigurer,还不能标注@EnableWebMvc注解;我们去自己写一个;我们新建一个包叫config,写一个类MyMvcConfig;
//应为类型要求为WebMvcConfigurer,所以我们实现其接口
//可以使用自定义类扩展MVC的功能
@Configuration
public class MyMvcConfig implements WebMvcConfigurer {

    @Override
    public void addViewControllers(ViewControllerRegistry registry) {
        // 浏览器发送/test , 就会跳转到test页面;
        registry.addViewController("/test").setViewName("test");
    }
}

确实也跳转过来了!所以说,我们要扩展SpringMVC,官方就推荐我们这么去使用,既保SpringBoot留所有的自动配置,也能用我们扩展的配置!
我们可以去分析一下原理:
1、WebMvcAutoConfiguration 是 SpringMVC的自动配置类,里面有一个类WebMvcAutoConfigurationAdapter
2、这个类上有一个注解,在做其他自动配置时会导入:@Import(EnableWebMvcConfiguration.class)
3、我们点进EnableWebMvcConfiguration这个类看一下,它继承了一个父类:DelegatingWebMvcConfiguration
这个父类中有这样一段代码:
public class DelegatingWebMvcConfiguration extends WebMvcConfigurationSupport {
    private final WebMvcConfigurerComposite configurers = new WebMvcConfigurerComposite();

  // 从容器中获取所有的webmvcConfigurer
    @Autowired(required = false)
    public void setConfigurers(List<WebMvcConfigurer> configurers) {
        if (!CollectionUtils.isEmpty(configurers)) {
            this.configurers.addWebMvcConfigurers(configurers);
        }
    }
}
4、我们可以在这个类中去寻找一个我们刚才设置的viewController当做参考,发现它调用了一个
protected void addViewControllers(ViewControllerRegistry registry) {
    this.configurers.addViewControllers(registry);
}
5、我们点进去看一下
public void addViewControllers(ViewControllerRegistry registry) {
    Iterator var2 = this.delegates.iterator();

    while(var2.hasNext()) {
        // 将所有的WebMvcConfigurer相关配置来一起调用!包括我们自己配置的和Spring给我们配置的
        WebMvcConfigurer delegate = (WebMvcConfigurer)var2.next();
        delegate.addViewControllers(registry);
    }

}
所以得出结论:所有的WebMvcConfiguration都会被作用,不止Spring自己的配置类,我们自己的配置类当然也会被调用;
全面接管SpringMVC
官方文档:
If you want to take complete control of Spring MVCyou can add your own
全面接管即:SpringBoot对SpringMVC的自动配置不需要了,所有都是我们自己去配置!
只需在我们的配置类中要加一个@EnableWebMvc。
我们看下如果我们全面接管了SpringMVC了,我们之前SpringBoot给我们配置的静态资源映射一定会无效,我们可以去测试一下;
不加注解之前,访问首页:
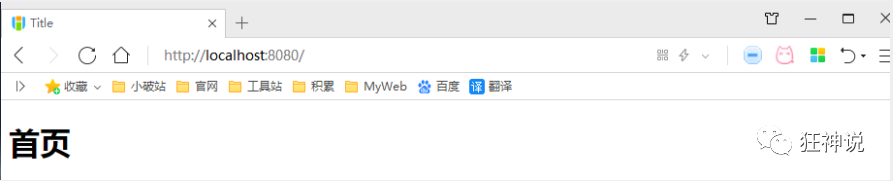
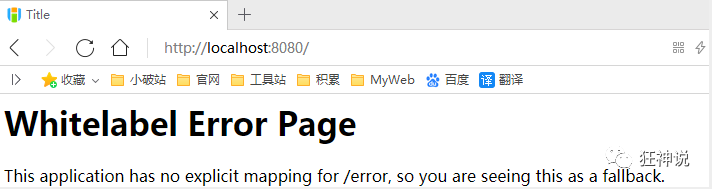
我们发现所有的SpringMVC自动配置都失效了!回归到了最初的样子;
当然,我们开发中,不推荐使用全面接管SpringMVC
思考问题?为什么加了一个注解,自动配置就失效了!我们看下源码:
1、这里发现它是导入了一个类,我们可以继续进去看
@Import({DelegatingWebMvcConfiguration.class})public @interface EnableWebMvc {}
2、它继承了一个父类 WebMvcConfigurationSupport
public class DelegatingWebMvcConfiguration extends WebMvcConfigurationSupport {// ......}
3、我们来回顾一下Webmvc自动配置类
@Configuration(proxyBeanMethods = false)
@ConditionalOnWebApplication(type = Type.SERVLET)
@ConditionalOnClass({ Servlet.class, DispatcherServlet.class, WebMvcConfigurer.class })
// 这个注解的意思就是:容器中没有这个组件的时候,这个自动配置类才生效
@ConditionalOnMissingBean(WebMvcConfigurationSupport.class)
@AutoConfigureOrder(Ordered.HIGHEST_PRECEDENCE + 10)
@AutoConfigureAfter({ DispatcherServletAutoConfiguration.class, TaskExecutionAutoConfiguration.class,
    ValidationAutoConfiguration.class })
public class WebMvcAutoConfiguration {

}
而导入的WebMvcConfigurationSupport只是SpringMVC最基本的功能!
在SpringBoot中会有非常多的扩展配置,只要看见了这个,我们就应该多留心注意~

 浙公网安备 33010602011771号