pytorch部分知识点笔记
pytorch------cpu与gpu load时相互转化 torch.load(map_location=)
 1 假设我们只保存了模型的参数(model.state_dict())到文件名为modelparameters.pth, model = Net()
 2 1. cpu -> cpu或者gpu -> gpu:
 3 checkpoint = torch.load('modelparameters.pth')
 4 model.load_state_dict(checkpoint)
 5 2. cpu -> gpu 1
 6 torch.load('modelparameters.pth', map_location=lambda storage, loc: storage.cuda(1))
 7 3. gpu 1 -> gpu 0
 8 torch.load('modelparameters.pth', map_location={'cuda:1':'cuda:0'})
 9 4. gpu -> cpu
10 torch.load('modelparameters.pth', map_location=lambda storage, loc: storage)
 1 '''
 2 图像相关层学习
 3 cv2 读进来的bgr 格式,plt 显示是以rgb 格式,所以颜色就反着了。plt 之前,先将图片转为rgb 即可。
 4 cv2.cvtColor(img,cv2.COLOR_BGR2RGB)
 5 '''
 6 from PIL import Image
 7 from torchvision.transforms import ToTensor, ToPILImage
 8 import cv2
 9 import numpy as np
10 import torch
11 from torch import nn
12 from torch.autograd import Variable as V
13
14 to_tensor = ToTensor()
15 to_pil = ToPILImage()
16 lena = Image.open('image/lena1.jpg')
17 lena1 = cv2.imread('image/lena1.jpg',0)
18 print(lena.size)
19 print(to_tensor(lena).shape)
20 lena2 = to_tensor(lena).unsqueeze(0)#batchsize,c,h,w
21 print(lena2.shape)
22 '''
23 print(lena.size)#w,h
24 print(to_tensor(lena).shape)#c,h,w
25 print(lena2.shape)
26 lena3 = np.array(lena).astype(np.float32).shape#lena--->lena1
27 print(lena3)#h,w,c
28 '''
29 #锐化卷积核
30 kernel = torch.ones(3,3)/-9
31 kernel[1][1] = 1
32 conv = nn.Conv2d(1,1,(3,3),1,bias=False)
33 conv.weight.data = kernel.view(1,1,3,3)#初始化权重
34 out = conv(V(lena2))
35 Image._show(to_pil(out.data.squeeze(0)))#该卷积层对图像进行了锐化处理,处理后的图像转成Image图像展示出来。
36 #池化层
37 pool = nn.AvgPool2d(2,2)
38 print(list(pool.parameters()))#池化层没有可学习的参数
39 out = pool(V(lena2))
40 #Image._show(to_pil(out.data.squeeze(0)))#下采样
nn.functional 和 nn.Module模块的区别
 1 '''
 2 nn.functional 和 nn.Module模块的区别
 3 nn.Module实现的layers是一个特殊的类,都是由class layer(nn.module)定义,会自动提取学习的参数,而nn.functional更像一个纯函数
 4 对有模型可以学习的参数,最好用nn.moudle,如conv层和linear层,对于没有参数额激励层和池化层推荐使用nn.functional
 5 '''
 6 import warnings
 7 warnings.filterwarnings("ignore")
 8 from torch.autograd import variable as V
 9 from torch.nn import functional as F
10 import torch.nn as nn
11 import torch
12 input = V(torch.randn(2,3))
13 model = nn.Linear(3,4)
14 output1 = model(input)
15 output2 = F.linear(input,model.weight,model.bias)
16 print(output1 == output2)
17 b = F.relu(input)
18 b2 = nn.ReLU()(input)
19 print(b == b2)
20
21 class Net(nn.Module):
22     def __init__(self):
23         super(Net,self).__init__()
24         self.conv1 = nn.Conv2d(3,6,5)
25         self.conv2 = nn.Conv2d(6,16,5)
26         self.fc1 = nn.Linear(16*5*5,120)
27         self.fc2 = nn.Linear(120,84)
28         self.fc3 = nn.Linear(84,10)
29     def forward(self, x):
30         x = F.max_pool2d(F.relu(self.conv1(x)),(2,2))
31         x = F.max_pool2d(F.relu(self.conv2(x)),(2,2))
32         x = x.view(-1,16*5*5)
33         x = F.relu(self.fc1(x))
34         x = F.relu(self.fc2(x))
35         x = F.relu(self.fc3(x))
36         return x
37 net = Net()
38 print(net(V(torch.randn(3,3,53,53))))
39 #不具备可以学习的参数的层(激励层,池化层等),也可以用nn.module,但是需要自定义手动实现
40 class MyLinear(nn.Module):
41     def __init__(self):
42         super(MyLinear,self).__init__()
43         self.weight = nn.parameter(torch.randn(3,4))
44         self.bias = nn.parameter(torch.zeros(3))
45         def forward(self,input,weight,bias):
46             return F.linear(input,weight,bias)
网络权重的初始化除了使用module的自学习的参数外,还可以自己去定义
 1 '''
 2 自定义初始化
 3 在深度学习中nn.module已经有了比较好的初始化策略,一般不用我们考虑,但是也可以自定义进行初始化
 4 '''
 5 from torch.nn import init
 6 import torch.nn as nn
 7 import torch
 8 import warnings
 9 import math
10 warnings.filterwarnings("ignore")
11 linear = nn.Linear(3,4)
12 torch.manual_seed(1) #种子,进行随机初始化
13 init.xavier_normal(linear.weight) # 对权重进行初始化
14 print(linear.weight)
15 std = math.sqrt(2)/math.sqrt(7)
16 linear.weight.data.normal_(0,std) #指明了均值和方差
17 print(linear.weight)
保存模型,使用GPU,并行计算
 1 '''
 2 保存模型
 3 '''
 4 torch.save(net.state_dict(),"net.pth")#加载
 5 net2.load_state_dict(torch.load("net.pth"))#保存
 6 '''
 7 moudle放在GPU上分为两步,一个是模型放在GPU上,另一个是数据放在GPU上
 8 '''
 9 model = model.cuda()
10 input = input.cuda()
11 '''
12 并行计算,使用多个GPU
13 '''
14 #method 1
15 new_net = nn.DataParallel(net,device_ids=[0,1])
16 output = new_net(input)
17 #method 2
18 output = nn.parallel.data_parallel(net,input,device_ids=[0,1])
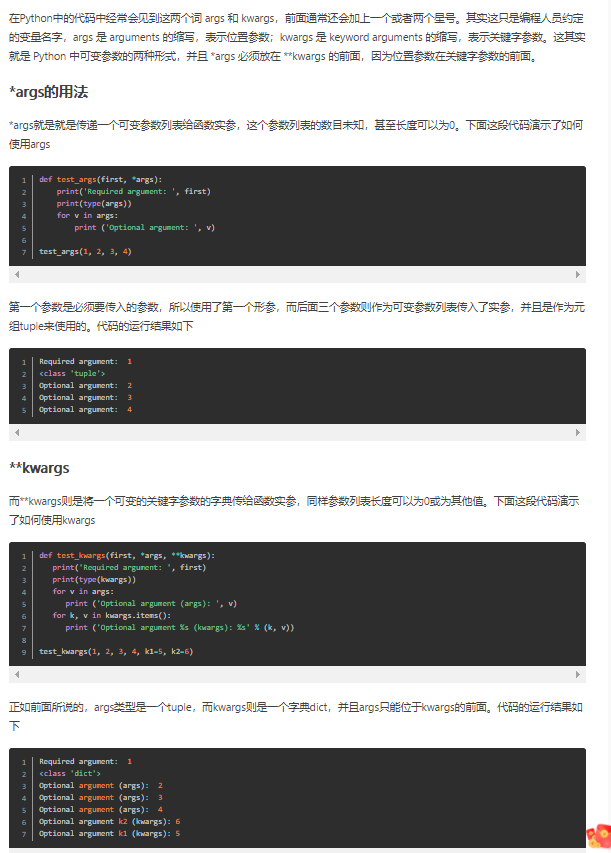
Python中的*args和**kwargs
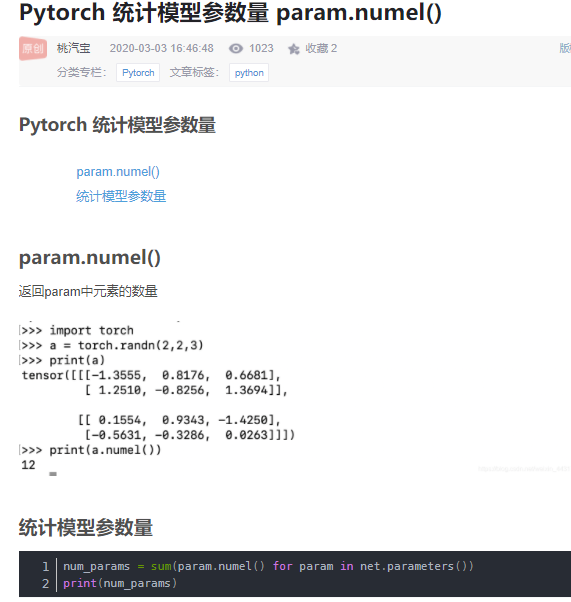
统计参数量
def print_network(net):  #统计模型参数量
    num_params = 0
    for param in net.parameters():
        num_params += param.numel()
    print(net)
    print('Total number of parameters: %d' % num_params)
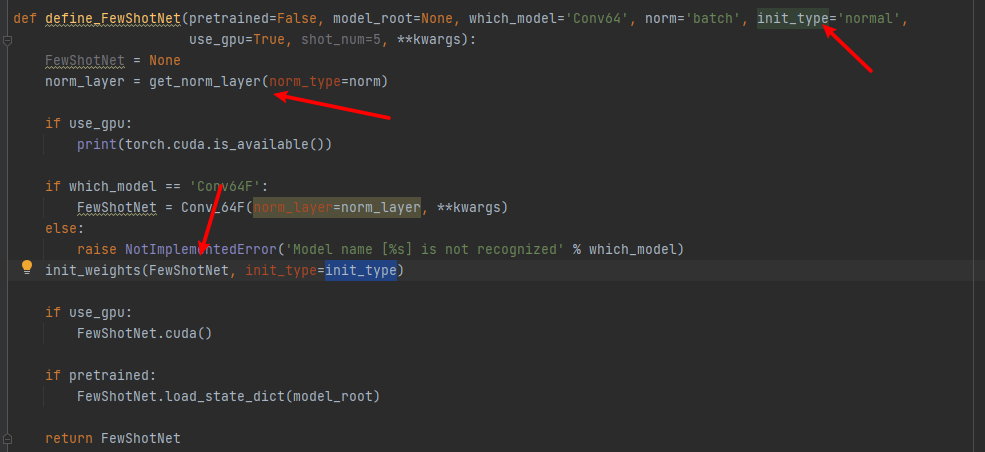
网络初始化
def define_FewShotNet(pretrained=False, model_root=None, which_model='Conv64', norm='batch', init_type='normal',
                      use_gpu=True, shot_num=5, **kwargs):
    FewShotNet = None
    norm_layer = get_norm_layer(norm_type=norm)

    if use_gpu:
        print(torch.cuda.is_available())

    if which_model == 'Conv64F':
        FewShotNet = Conv_64F(norm_layer=norm_layer, **kwargs)
    else:
        raise NotImplementedError('Model name [%s] is not recognized' % which_model)
    init_weights(FewShotNet, init_type=init_type)

    if use_gpu:
        FewShotNet.cuda()

    if pretrained:
        FewShotNet.load_state_dict(model_root)

    return FewShotNet
确定使用的正则化方法
def get_norm_layer(norm_type='instance'): #确定使用的正则化方法
    if norm_type == 'batch':
        norm_layer = functools.partial(nn.BatchNorm2d, affine=True)
    elif norm_type == 'instance':
        norm_layer = functools.partial(nn.InstanceNorm2d, affine=False)
    elif norm_type == 'none':
        norm_layer = None
    else:
        raise NotImplementedError('normalization layer [%s] is not found' % norm_type)
    return norm_layer
权重初始化
def weights_init_normal(m):
    classname = m.__class__.__name__
    # print(classname)
    if classname.find('Conv2d') != -1:
        init.normal_(m.weight.data, 0.0, 0.02)
    elif classname.find('Linear') != -1:
        init.normal_(m.weight.data, 0.0, 0.02)
    elif classname.find('BatchNorm2d') != -1:
        init.normal_(m.weight.data, 1.0, 0.02)
        init.constant_(m.bias.data, 0.0)


def weights_init_xavier(m):
    classname = m.__class__.__name__
    # print(classname)
    if classname.find('Conv') != -1:
        init.xavier_normal_(m.weight.data, gain=0.02)
    elif classname.find('Linear') != -1:
        init.xavier_normal_(m.weight.data, gain=0.02)
    elif classname.find('BatchNorm2d') != -1:
        init.normal_(m.weight.data, 1.0, 0.02)
        init.constant_(m.bias.data, 0.0)


def weights_init_kaiming(m):
    classname = m.__class__.__name__
    # print(classname)
    if classname.find('Conv') != -1:
        init.kaiming_normal_(m.weight.data, a=0, mode='fan_in')
    elif classname.find('Linear') != -1:
        init.kaiming_normal_(m.weight.data, a=0, mode='fan_in')
    elif classname.find('BatchNorm2d') != -1:
        init.normal_(m.weight.data, 1.0, 0.02)
        init.constant_(m.bias.data, 0.0)


def weights_init_orthogonal(m):
    classname = m.__class__.__name__
    print(classname)
    if classname.find('Conv') != -1:
        init.orthogonal_(m.weight.data, gain=1)
    elif classname.find('Linear') != -1:
        init.orthogonal_(m.weight.data, gain=1)
    elif classname.find('BatchNorm2d') != -1:
        init.normal_(m.weight.data, 1.0, 0.02)
        init.constant_(m.bias.data, 0.0)


def init_weights(net, init_type='normal'):   #权重的初始化部分
    print('initialization method [%s]' % init_type)
    if init_type == 'normal':
        net.apply(weights_init_normal)
    elif init_type == 'xavier':
        net.apply(weights_init_xavier)
    elif init_type == 'kaiming':
        net.apply(weights_init_kaiming)
    elif init_type == 'orthogonal':
        net.apply(weights_init_orthogonal)
    else:
        raise NotImplementedError('initialization method [%s] is not implemented' % init_type)
使用
作者:你的雷哥
本文版权归作者和博客园共有,欢迎转载,但未经作者同意必须在文章页面给出原文连接,否则保留追究法律责任的权利。

 浙公网安备 33010602011771号