项目管理(一)——创建后端环境与测试接口
一、创建项目
(1)新建工程
在创建spring boot或者spring cloud项目时,idea默认使用https://start.spring.io作为脚手架,创建完成后手动去添加相关的jar包组合。
通过https://start.aliyun.com 可以直接勾选ali相关的jar包,快速的引入集成。
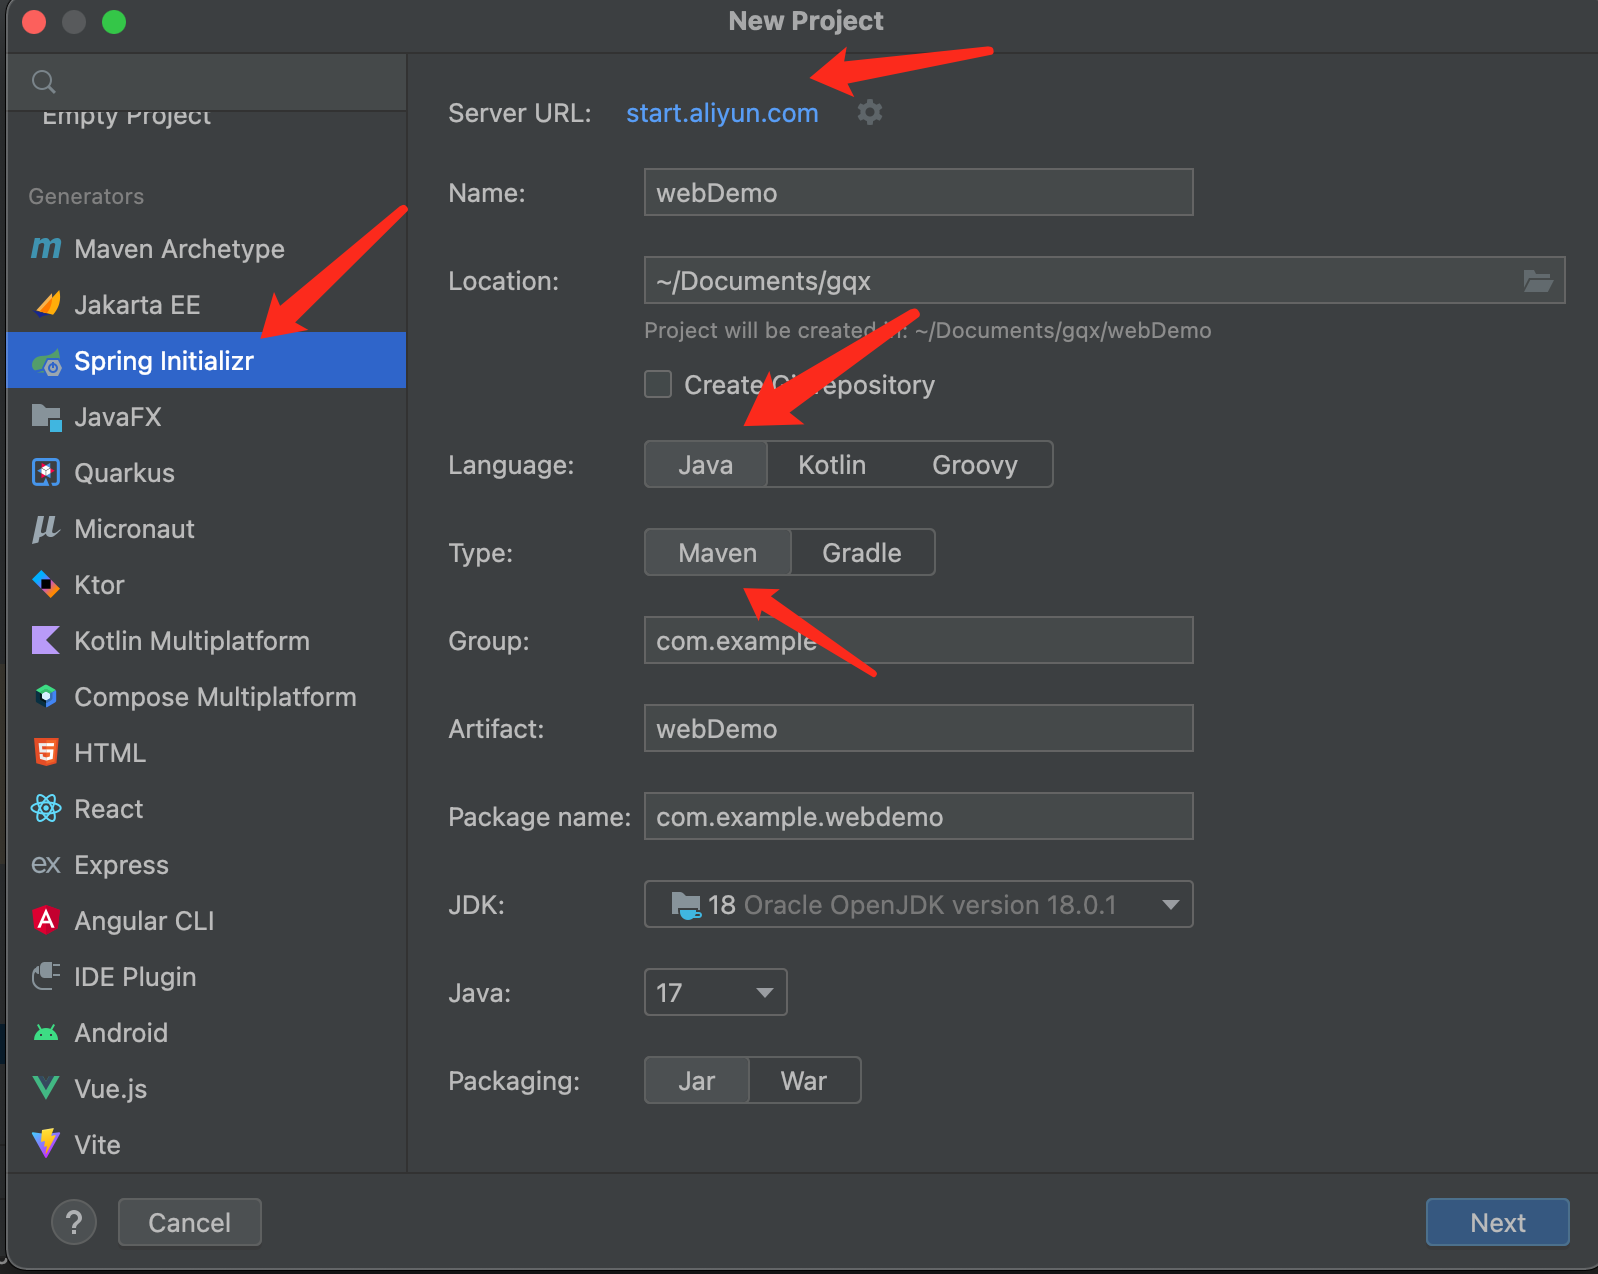
下一步,在依赖中选择Web中的Spring Web

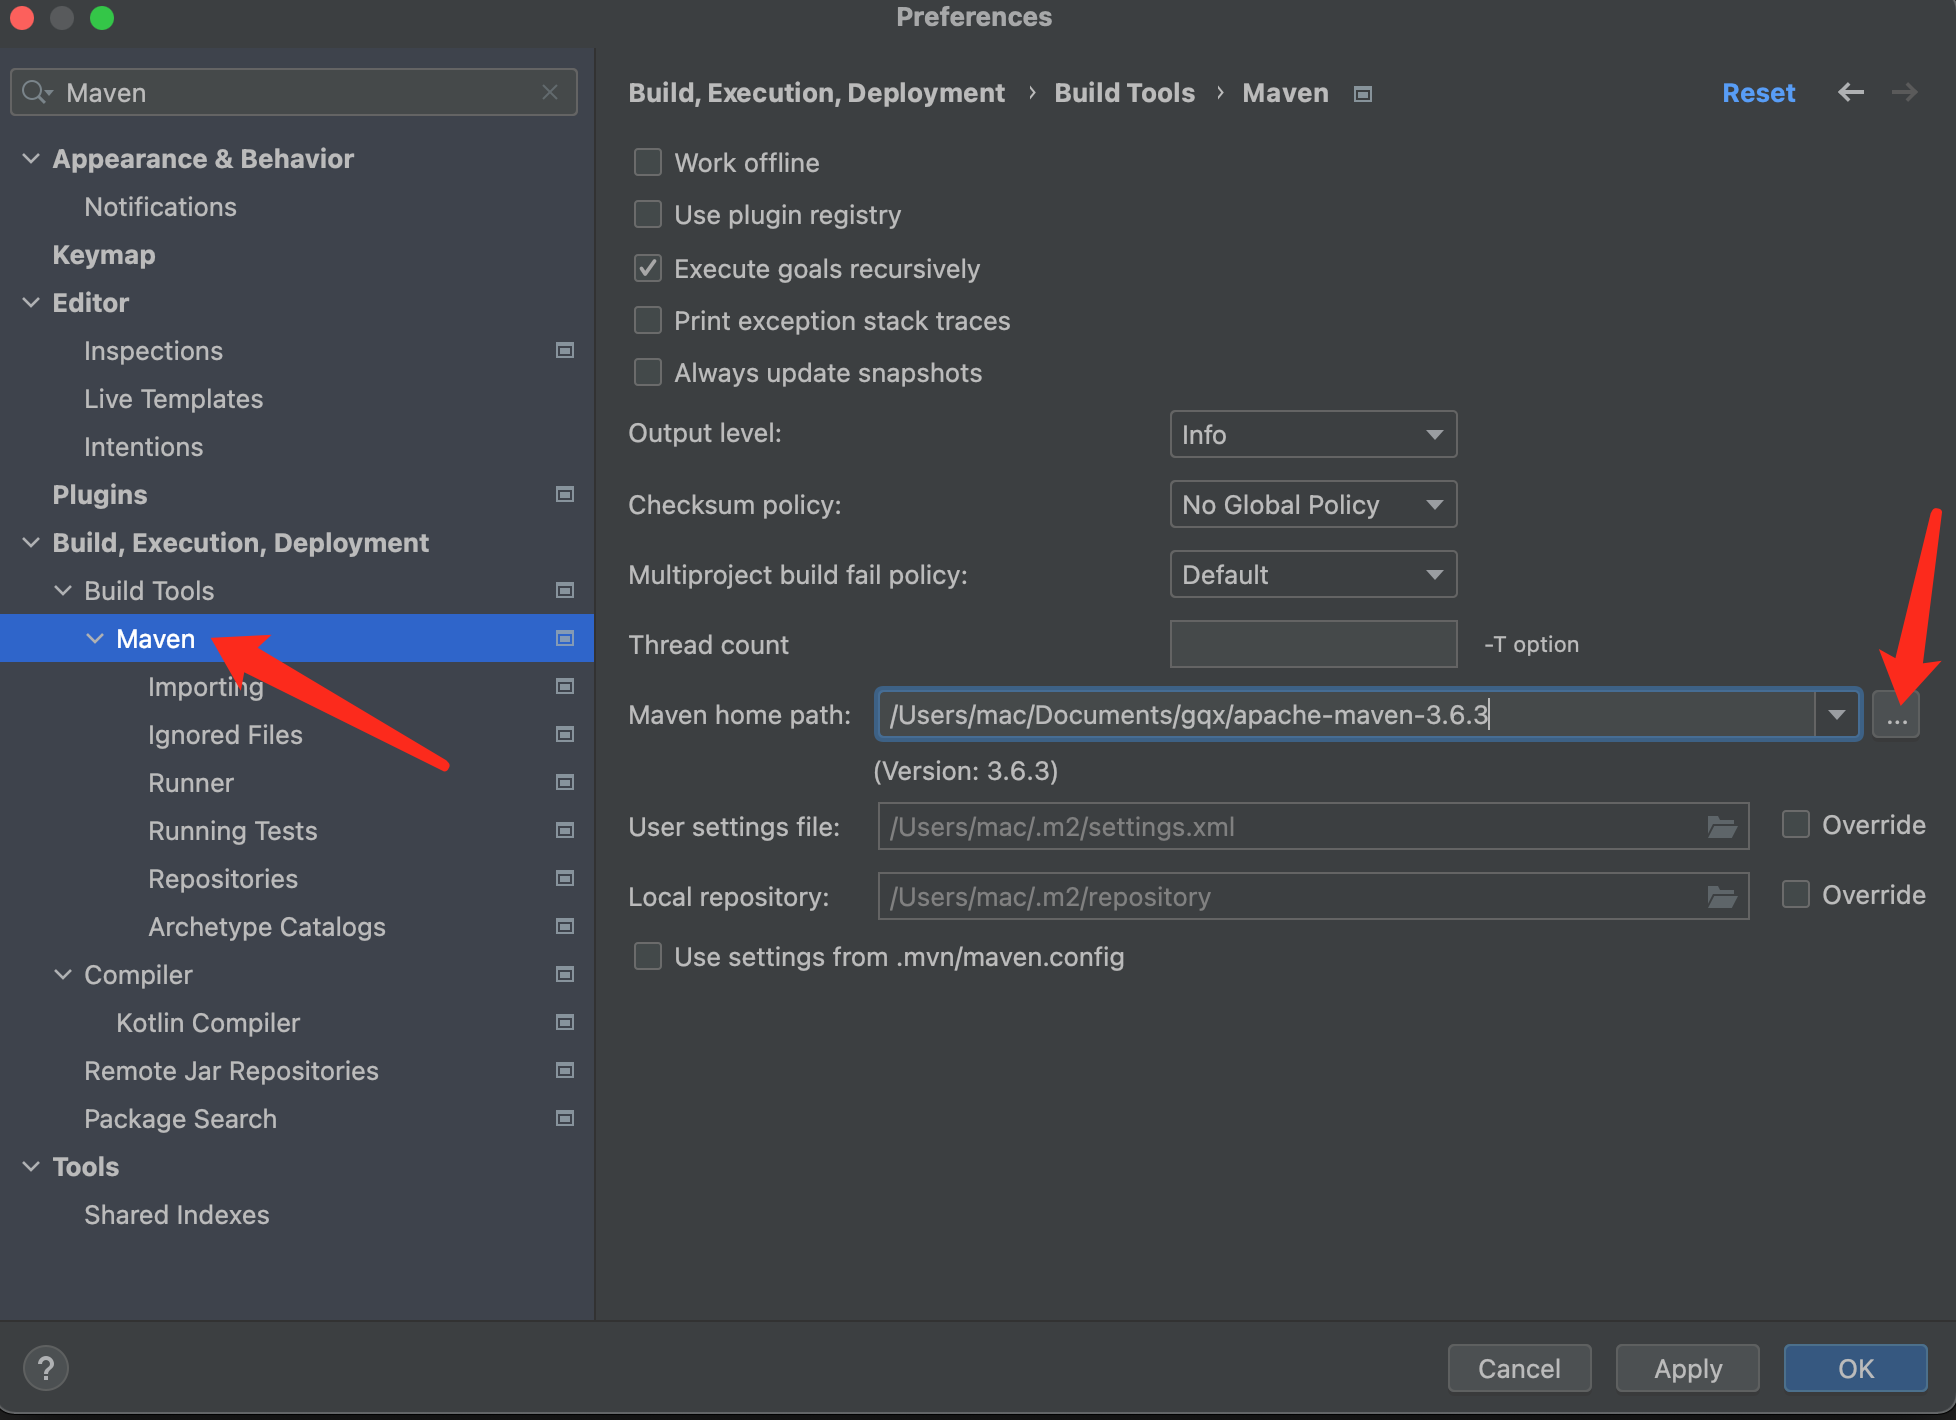
(2)配置maven,使用国内镜像下载jar包。
配置pom,倒入jar包
    <properties>
        <java.version>1.8</java.version>
        <project.build.sourceEncoding>UTF-8</project.build.sourceEncoding>
        <project.reporting.outputEncoding>UTF-8</project.reporting.outputEncoding>
        <spring-boot.version>2.6.13</spring-boot.version>
    </properties>

    <dependencies>
        <dependency>
            <groupId>org.springframework.boot</groupId>
            <artifactId>spring-boot-starter-web</artifactId>
        </dependency>

        <!--mybatis依赖-->
<!--        <dependency>-->
<!--            <groupId>org.mybatis.spring.boot</groupId>-->
<!--            <artifactId>mybatis-spring-boot-starter</artifactId>-->
<!--            <version>1.1.1</version>-->
<!--        </dependency>-->

        <dependency>
            <groupId>org.springframework.boot</groupId>
            <artifactId>spring-boot-starter-test</artifactId>
            <scope>test</scope>
        </dependency>

        <!-- MySql驱动 -->
        <dependency>
            <groupId>mysql</groupId>
            <artifactId>mysql-connector-java</artifactId>
            <version>8.0.11</version>
        </dependency>

        <!-- Lombok工具 -->
        <dependency>
            <groupId>org.projectlombok</groupId>
            <artifactId>lombok</artifactId>
            <version>1.18.12</version>
            <scope>provided</scope>
        </dependency>


    </dependencies>
二、创建数据库
以用户登入为例测试
CREATE DATABASE IF NOT EXISTS myProject;
use myProject;
create table user(
    id int primary key auto_increment,
    name varchar(20) not null,
    age int not null,
		sex TINYINT(1) not null,
		phone VARCHAR(11) not null,
		password VARCHAR(300) not null
);
insert into user values(null,'Bob',20, 0,  '12345678900','sdgfsagsagsewadscs');
三、创建springboot+mybatis程序
(1)SpringBoot默认配置文件
SpringBoot使用默认的全局的配置文件:application.properties/application.yml
配置文件名固定是:application
- application.properties
使用的语法结构: key=value
- application.yml
语法结构: key:空格 value
其实application.yml的功能和application.properties是一样的,不过因为yml文件是树状结构,写起来有更好的层次感,更易于理解,所以很多人都选择了yml文件。
server:
  port: 8090
spring:
  datasource:
    driver-class-name: com.mysql.cj.jdbc.Driver
    url: jdbc:mysql://127.0.0.1:3306/myProject?useUnicode=true&characterEncoding=UTF-8&useSSL=false&serverTimezone=GMT%2b8&allowPublicKeyRetrieval=true
    username: root
    password: 123456
mybatis:
  mapper-locations: classpath:mapper/*Mapper.xml
  type-aliases-package: com.example.entity
  configuration:
    map-underscore-to-camel-case: true
(2)创建实体对象
package com.example.entity;

import lombok.AllArgsConstructor;
import lombok.Data;
import lombok.NoArgsConstructor;

@Data
@AllArgsConstructor
@NoArgsConstructor
public class User {
    private Integer id;

    private Integer age;

    private Integer sex;

    private String name;

    private String phone;

    private String password;


}
(3)创建数据库操作层接口文件(Mapper)
创建Dao层对应的接口,注意加上注解
import com.example.entity.User;
import org.springframework.stereotype.Repository;

@Repository
public interface UserDao{

    public User findUserById(Integer id);
}
创建对应mapper文件(UserMapper.xml)
<?xml version="1.0" encoding="utf-8" ?>
<!DOCTYPE mapper
        PUBLIC "-//mybatis.org//DTD Mapper 3.0//EN"
        "http://mybatis.org/dtd/mybatis-3-mapper.dtd">
<mapper namespace="com.example.dao.UserDao">
    <!--namespace一定要指定到对应的接口位置 -->
    <!--根据id查询图书信息 -->
    <select id="findUserById" parameterType="Integer"
            resultType="com.example.entity.User">
        select * from user where id = #{id}
    </select>
</mapper>
(4)创建业务逻辑层代码
import com.example.entity.User;

public interface UserService {
    public User findUserById(Integer id);
}
接口对应的实现类如下:
@Service
public class UserServiceImpl implements UserService {
    @Autowired
    private UserDao userDao;

    @Override
    public User findUserById(Integer id) {
        return userDao.findUserById(id);
    }
}
(5)创建Controller层代码
@Controller
public class UserController {

    @Resource
    private UserService userService;

    // http://127.0.0.1:8080/user/getInfo?id=1
    @RequestMapping("/user/getInfo")
    @ResponseBody
    public String getUserInfo(@RequestParam(name = "id") String id) {
        User user = userService.findUserById(Integer.parseInt(id));
        return user.toString();
    }

}
(6)创建springboot启动程序
@SpringBootApplication
@MapperScan("com.example.dao")
public class WebDemoApplication {

    public static void main(String[] args) {
        SpringApplication.run(WebDemoApplication.class, args);
    }

}
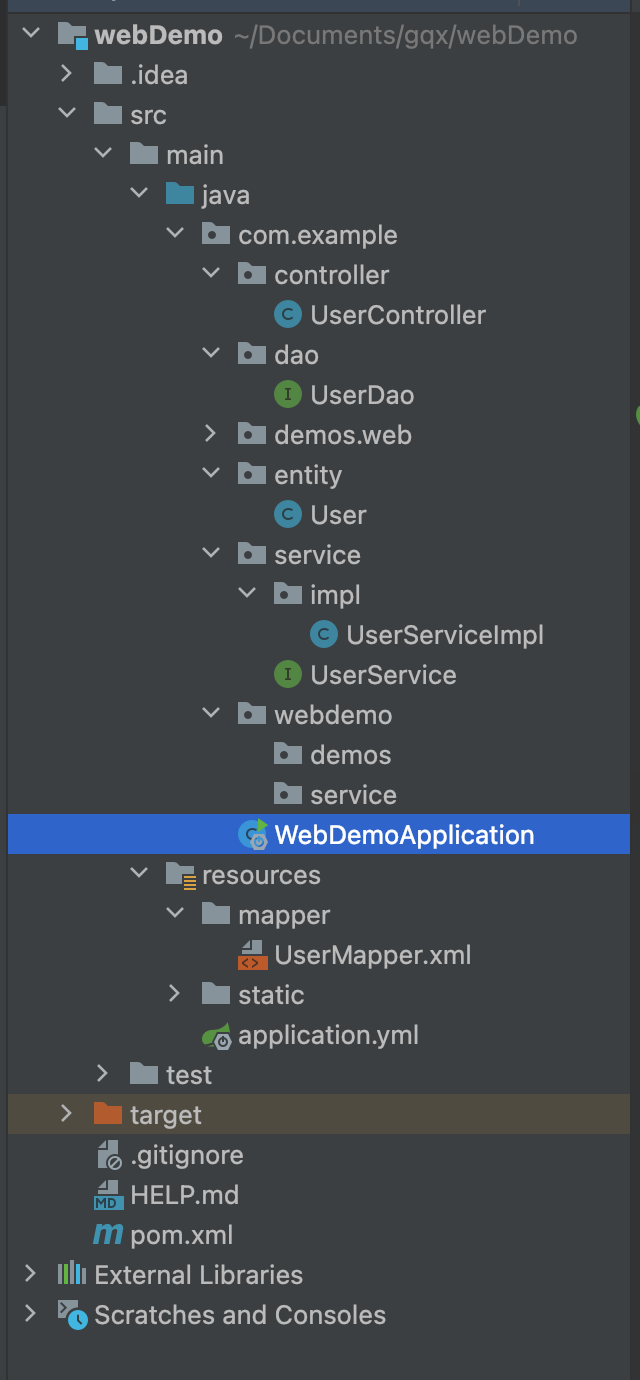
三、项目的总体结构如下
四、实现验证码图片
画出验证码的类
public class DrawCheckCodeUtil {

    private String checkCode;

    public String getCheckCode() {
        return checkCode;
    }

    public void setCheckCode(String checkCode) {
        this.checkCode = checkCode;
    }

    //随机产生颜色
    public Color getColor() {
        Random random = new Random();
        //获取0-255随机值
        int r = random.nextInt(256);
        int g = random.nextInt(256);
        int b = random.nextInt(256);
        return new Color(r, g, b);
    }

    //产生验证码值
    public String getNum() {
        //原来是0-8999,+1000后变成1000-9999
        int ran = (int) (Math.random() * 9000) + 1000;
        return String.valueOf(ran);
    }

    public BufferedImage doDraw() {
        //绘制验证码
        //参数:长,宽,图片类型
        BufferedImage image = new BufferedImage(60, 30, BufferedImage.TYPE_INT_RGB);
        //画笔
        Graphics graphics = image.getGraphics();
        //画长方形,坐标从0,0,到80,30
        graphics.fillRect(0, 0, 60, 30);
        //绘制50条干扰条
        for (int i = 0; i < 50; i++) {
            Random random = new Random();
            int xBegin = random.nextInt(65);
            int yBegin = random.nextInt(30);
            int xEnd = random.nextInt(xBegin + 10);
            int yEnd = random.nextInt(yBegin + 10);
            //画笔颜色,随机
            graphics.setColor(getColor());
            //绘制线条
            graphics.drawLine(xBegin, yBegin, xEnd, yEnd);
        }
        //绘制验证码
        //字体加粗,变大
        graphics.setFont(new Font("seif", Font.BOLD, 20));
        //画笔颜色
        graphics.setColor(Color.BLACK);
        //得到随机取得的数字
        String code = getNum();
        this.checkCode = code;
        for (int i = 0; i < code.length(); i++) {
            graphics.drawString(String.valueOf(code.charAt(i)), 1 + 14 * i,  16 + new Random().nextInt(16));
        }
        return image;
    }

}
在请求中返回验证码,将验证码的值保存在session中,以便校验
    @RequestMapping(method = {RequestMethod.GET}, value = "/getCode")
    public void drawCode(HttpServletResponse response, HttpServletRequest request) throws IOException {
        //画验证码
        DrawCheckCodeUtil drawCheckCode = new DrawCheckCodeUtil();
        BufferedImage image = drawCheckCode.doDraw();

        //设置响应头,防止缓存
        response.setHeader("Pragma","no-cache");
        response.setHeader("Cache-Control","no-cache");
        response.setHeader("Expires","0");
        //将验证码的值保存在session中,以便校验
        request.getSession().setAttribute("CHECK_CODE", drawCheckCode.getCheckCode());
        ServletOutputStream outputStream = response.getOutputStream();
        ImageIO.write(image,"jpeg",outputStream);
        outputStream.flush();   //清空缓冲区数据
        outputStream.close();   //关闭流
    }
很希望自己是一棵树,守静、向光、安然,敏感的神经末梢,触着流云和微风,窃窃的欢喜。脚下踩着最卑贱的泥,很踏实。还有,每一天都在隐秘成长。

 浙公网安备 33010602011771号