Grpc在C#中的用法
Grpc:引用官网中的一句话
A high-performance, open-source universal RPC framework
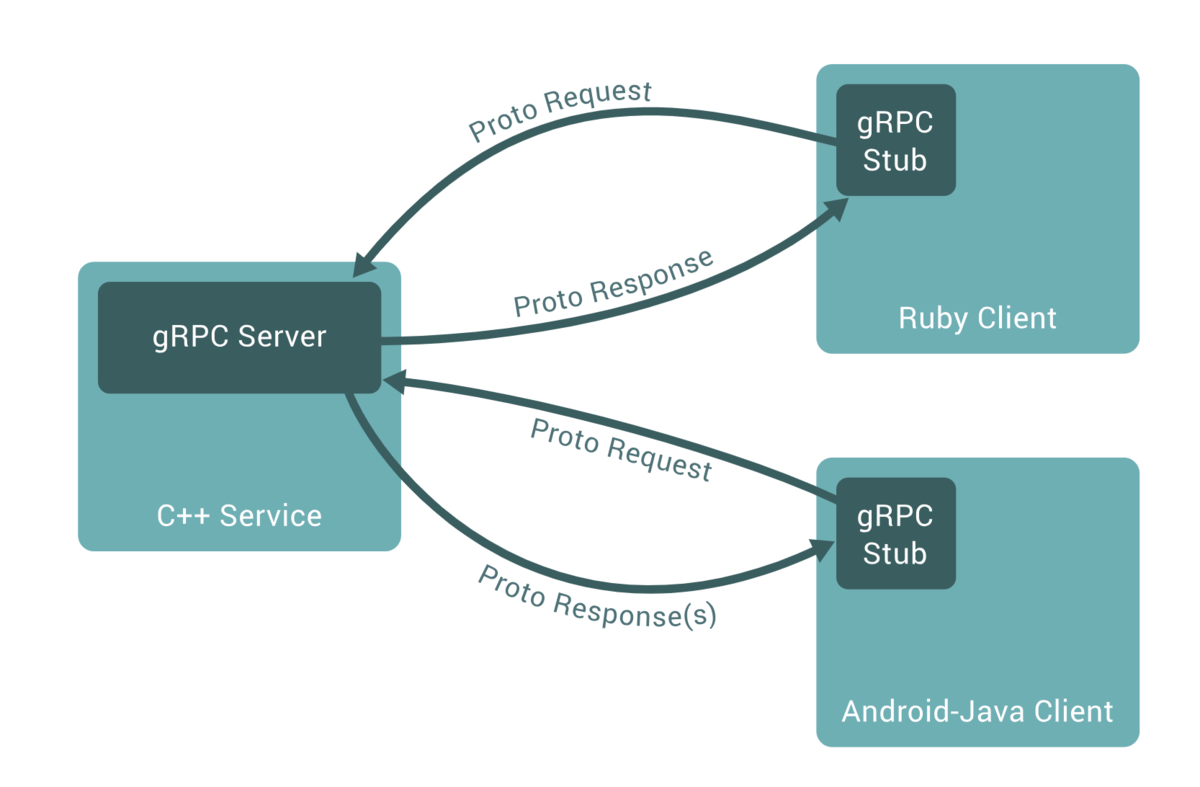
所谓RPC(remote procedure call 远程过程调用)框架实际是提供了一套机制,使得应用程序之间可以进行通信,而且也遵从server/client模型。使用的时候客户端调用server端提供的接口就像是调用本地的函数一样。如下图所示就是一个典型的RPC结构图。
架构图:

下面用demo展示Grpc的基本用法,其中包括普通流模式,客户端流模式,服务端流模式,双向流模式
一.Server
1. 首先新建工程,添加Grpc.AspNetCore包,新建protos文件夹,新建protobuffer文件,文件都是以proto作为后缀,我这里是student.proto
syntax = "proto3"; //指定版本
// 定义命名空间
option csharp_namespace = "Grpc.Server.Demo";
// 指定包名,避免冲突
package user;
// 定义Student 的 message类型
message Student {
  string UserName = 1;
  int32 Age=2;
  string addr = 3;
}
// 公共返回类型
message CommonResponse{
    int32 code =1;
    string msg=2;
}
// 添加学生时传递的类型
message AddStudentRequest{
    Student student=1;

}

// 查询全部学生,没有条件,但也需要一个空的message
message QueryAllStudentRequest
{
}
// 上传图片
message UploadImgRequest{
    bytes data = 1;
}

// 查询学生时传递的类型
message QueryStudentRequest
{
    string UserName=1;
}
message StudentResponse {
  Student student =1;
}

message TokenRequest{
    string UserName=1;
    string UserPwd=2;
}
message TokenResponse{
    string Token =1;
}
// 约定需要提供的服务方法
service StudentService{
    rpc GetToken(TokenRequest) returns (TokenResponse);
    // 简单模式,查询
    rpc GetStudentByUserName(QueryStudentRequest) returns (StudentResponse);
    // 服务端流模式
    rpc GetAllStudent(QueryAllStudentRequest) returns (stream StudentResponse);
    // 客户端流模式
    rpc UploadImg(stream UploadImgRequest) returns (CommonResponse);
    // 双向流模式
    rpc AddManyStudents(stream AddStudentRequest) returns (stream StudentResponse);
}
2.这个时候需要右键项目->编辑项目文件,增加ItemGroup,这里很重要,不然后面增加服务class时会提示找不到服务接口
  <ItemGroup>
    <Protobuf Include="Protos\student.proto" GrpcServices="Server" />
    <Protobuf Include="Protos\greet.proto" GrpcServices="Server" />
    <Protobuf Include="Protos\Teachers.proto" GrpcServices="Server"/>
  </ItemGroup>
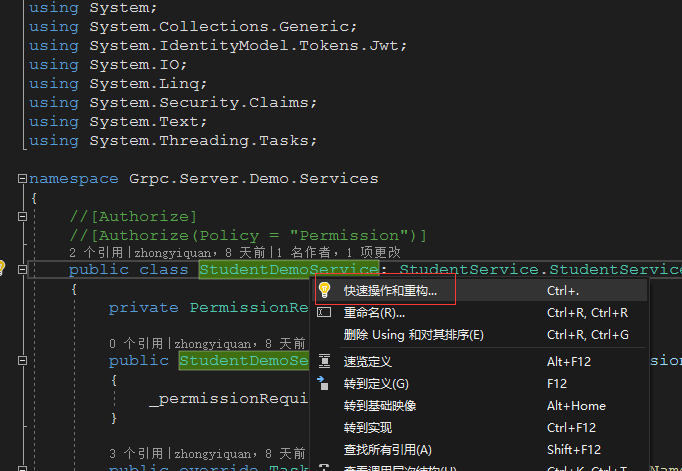
3.新建StudentDemoService类,继承StudentService.StudentServiceBase,其中StudentService是student.proto文件中定义的类名,StudentServiceBase是默认的,即StudentService+Base,然后右键StudentDemoService->快速操作和重构->生成重写,选择需要重构的方法


using Grpc.Core;
using Grpc.Server.Demo.Permission;
using Microsoft.AspNetCore.Authentication.JwtBearer;
using Microsoft.AspNetCore.Authorization;
using Microsoft.IdentityModel.Tokens;
using System;
using System.Collections.Generic;
using System.IdentityModel.Tokens.Jwt;
using System.IO;
using System.Linq;
using System.Security.Claims;
using System.Text;
using System.Threading.Tasks;

namespace Grpc.Server.Demo.Services
{
    //[Authorize]
    //[Authorize(Policy = "Permission")]
    public class StudentDemoService: StudentService.StudentServiceBase
    {
        private PermissionRequirement _permissionRequirement;

        public StudentDemoService(PermissionRequirement permissionRequirement)
        {
            _permissionRequirement = permissionRequirement;
        }

        public override Task<StudentResponse> GetStudentByUserName(QueryStudentRequest request, ServerCallContext context)
        {
            var res = Data.Students.Where(s => s.UserName == request.UserName).FirstOrDefault();
            if (res == null)
            {
                return Task.FromResult(new StudentResponse { });
            }
            var studentRes = new StudentResponse
            {
                Student = res
            };
            return Task.FromResult(studentRes);
        }
        public override async Task GetAllStudent(QueryAllStudentRequest request,
            IServerStreamWriter<StudentResponse> responseStream,
            ServerCallContext context)
        {
            // 之前整体传过去,现在可以模拟一个一个的传
            foreach(var student in Data.Students)
            {
                await responseStream.WriteAsync(new StudentResponse { Student = student });
            }
        }

        public override async Task<CommonResponse> UploadImg(IAsyncStreamReader<UploadImgRequest> requestStream,
            ServerCallContext context)
        {
            try
            {
                var tempData = new List<byte>();
                while (await requestStream.MoveNext())
                {
                    tempData.AddRange(requestStream.Current.Data);
                }
                Console.WriteLine($"接收到文件大小:{tempData.Count}bytes");

                using FileStream fs = new FileStream("test.jpg", FileMode.Create);
                fs.Write(tempData.ToArray(), 0, tempData.ToArray().Length);

                return new CommonResponse { Code = 0, Msg = "接收成功" };
            }
            catch (Exception ex)
            {
                return new CommonResponse { Code = -1, Msg = "接收失败" };
            }
        }

        public override async Task AddManyStudents(IAsyncStreamReader<AddStudentRequest> requestStream, IServerStreamWriter<StudentResponse> responseStream, ServerCallContext context)
        {
            while(await requestStream.MoveNext())
            {
                var student = requestStream.Current.Student;
                Data.Students.Add(student);

                await responseStream.WriteAsync(new StudentResponse
                {
                    Student = student
                }) ;
            }

        }
        [AllowAnonymous]
        public override Task<TokenResponse> GetToken(TokenRequest request, ServerCallContext context)
        {
            // 模拟登陆验证
            if(request.UserName!="Code综艺圈"||request.UserPwd!="admin123")
            {
                return Task.FromResult(new TokenResponse { Token = string.Empty });
            }
            // 这里可以根据需要将其权限放在Redis中,每次登陆时都重新存,即登陆获取最新权限
            // 这里模拟通过userId从数据库中获取分配的接口权限信息,这里存在内存中
            _permissionRequirement.Permissions = new List<PermissionData> {
                new PermissionData{ UserId="UserId123456",Url="/user.studentservice/getallstudent" },

                new PermissionData{ UserId="UserId123456",Url="/user.studentservice/addmanystudents" }
            };

            // 当登陆验证通过之后才获取对应的token
            string token = GenerateToken("UserId123456", request.UserName);
            // 返回效应结果
            return Task.FromResult(new TokenResponse { Token=token});
        }

        private string GenerateToken(string userId, string userName)
        {
            // 秘钥,这是生成Token需要秘钥,和Startup中用到的一致
            string secret = "TestSecretTestSecretTestSecretTestSecret";
            // 签发者,是由谁颁发的,和Startup中用到的一致
            string issuer = "TestgRPCIssuer";
            // 接受者,是给谁用的,和Startup中用到的一致
            string audience = "TestgRPCAudience";
            // 指定秘钥
            var securityKey = new SymmetricSecurityKey(Encoding.ASCII.GetBytes(secret));
            // 签名凭据,指定对应的签名算法,结合理论那块看哦~~~
            var sigingCredentials = new SigningCredentials(securityKey, SecurityAlgorithms.HmacSha256);
            // 自定义payload信息,每一个claim代表一个属性键值对,就类似身份证上的姓名,出生年月一样
            var claims = new Claim[] { new Claim("userId", userId),
                new Claim("userName", userName),
                // claims中添加角色属性,这里的键一定要用微软封装好的ClaimTypes.Role
                new Claim(ClaimTypes.Role,"Admin"),
                new Claim(ClaimTypes.Role,"Maintain")
            };

            // 组装生成Token的数据
            SecurityToken securityToken = new JwtSecurityToken(
                    issuer: issuer,// 颁发者
                    audience: audience,// 接受者
                    claims: claims,//自定义的payload信息
                    signingCredentials: sigingCredentials,// 凭据
                    expires: DateTime.Now.AddMinutes(30) // 设置超时时间,30分钟之后过期
                );
            // 生成Token
            return new JwtSecurityTokenHandler().WriteToken(securityToken);
        }
    }
}
二.Client
1.新建工程添加Google.Protobuf,Grpc.Net.Client,Grpc.Tools包

把刚才服务端新建的student.proto文件复制过来
调用方式:
 using var channel = GrpcChannel.ForAddress("https://localhost:5001");
            var grpcClient = new StudentService.StudentServiceClient(channel);

            //2、客户端一次请求,多次返回
            using var respStreamingCall = grpcClient.GetAllStudent(new QueryAllStudentRequest());
客户端完整的调用方式如下:
using Google.Protobuf;
using Grpc.Core;
using Grpc.Net.Client;
using Grpc.Server.Demo;
using System;
using System.Collections.Generic;
using System.ComponentModel;
using System.Data;
using System.Drawing;
using System.IO;
using System.Linq;
using System.Text;
using System.Threading;
using System.Threading.Tasks;
using System.Windows.Forms;

namespace WinFormsGrpc.Client.Demo
{
    public partial class Form1 : Form
    {
        public Form1()
        {
            InitializeComponent();
        }

        private void Form1_Load(object sender, EventArgs e)
        {
            // 允许多线程更新UI
            Control.CheckForIllegalCrossThreadCalls = false;
        }

        #region 简单模式
        private void btn_sample_Click(object sender, EventArgs e)
        {
            //1、创建grpc客户端
            using var channel = GrpcChannel.ForAddress("https://localhost:5001");
            var grpcClient = new StudentService.StudentServiceClient(channel);
            //2、发起请求
            var resp = grpcClient.GetStudentByUserName(new QueryStudentRequest
            {
                UserName = txt_condition.Text.Trim()
            });
            //3、处理响应结果,将其显示在文本框中
            this.txt_result.Text = $"姓名:{resp?.Student?.UserName},年龄:{resp?.Student?.Age},地址:{resp?.Student?.Addr}";
        }
        #endregion

        #region 服务端流模式
        private async void btn_server_Click(object sender, EventArgs e)
        {
            //用于多线程通知
            CancellationTokenSource cts = new CancellationTokenSource();
            //1、创建grpc客户端
            using var channel = GrpcChannel.ForAddress("https://localhost:5001");
            var grpcClient = new StudentService.StudentServiceClient(channel);

            //2、客户端一次请求,多次返回
            using var respStreamingCall = grpcClient.GetAllStudent(new QueryAllStudentRequest());
            //3、获取响应流
            var respStreaming = respStreamingCall.ResponseStream;
            //4、循环读取响应流,直到读完为止
            while (await respStreaming.MoveNext(cts.Token))
            {
                //5、取得每次返回的信息,并显示在文本框中
                var student = respStreaming.Current.Student;
                this.txt_result.Text += $"姓名:{student.UserName},年龄:{student.Age},地址:{student.Addr}\r\n";
            }
        }
        #endregion

        private async void btn_client_Click(object sender, EventArgs e)
        {
            // 用于存放选择的文件路径
            string filePath = string.Empty;
            // 打开文件选择对话框
            if (this.openFileDialog1.ShowDialog() == DialogResult.OK)
            {
                filePath = this.openFileDialog1.FileName;
            }
            if (string.IsNullOrEmpty(filePath))
            {
                this.txt_result.Text = "请选择文件";
                return;
            }
            //1、创建grpc客户端
            using var channel = GrpcChannel.ForAddress("https://localhost:5001");
            var grpcClient = new StudentService.StudentServiceClient(channel);
            //2、读取选择的文件
            FileStream fileStream = File.OpenRead(filePath);
            //3、通过客户端请求流将文件流发送的服务端
            using var call = grpcClient.UploadImg();
            var clientStream = call.RequestStream;
            //4、循环发送,指定发送完文件
            while (true)
            {
                // 一次最多发送1024字节
                byte[] buffer = new byte[1024];
                int nRead = await fileStream.ReadAsync(buffer, 0, buffer.Length);
                // 直到读不到数据为止,即文件已经发送完成,即退出发送
                if (nRead == 0)
                {
                    break;
                }
                // 5、将每次读取到的文件流通过客户端流发送到服务端
                await clientStream.WriteAsync(new UploadImgRequest { Data = ByteString.CopyFrom(buffer) });
            }
            // 6、发送完成之后,告诉服务端发送完成
            await clientStream.CompleteAsync();
            // 7、接收返回结果,并显示在文本框中
            var res = await call.ResponseAsync;
            this.txt_result.Text = $"上传返回Code:{res.Code},Msg:{res.Msg}";
        }

        private async void btn_double_Click(object sender, EventArgs e)
        {
            //用于多线程通知
            CancellationTokenSource cts = new CancellationTokenSource();
            //模拟通过请求流方式保存多个Student,同时通过响应流的方式返回存储结果
            List<Student> students = new List<Student> {
                new Student{ UserName="Code综艺圈1", Age=20, Addr="关注我一块学" },
                new Student{ UserName="综艺圈好酷", Age=18, Addr="关注Code综艺圈和我一块学" }
            };
            //1、创建grpc客户端
            using var channel = GrpcChannel.ForAddress("https://localhost:5001");
            var grpcClient = new StudentService.StudentServiceClient(channel);
            //2、分别取得请求流和响应流
            using var call = grpcClient.AddManyStudents();
            var requestStream = call.RequestStream;
            var responseStream = call.ResponseStream;
            //3、开启一个线程专门用来接收响应流
            var taskResp = Task.Run(async () =>
            {
                while (await responseStream.MoveNext(cts.Token))
                {
                    var student = responseStream.Current.Student;
                    // 将接收到结果在文本框中显示 ,多线程更新UI简单处理一下:Control.CheckForIllegalCrossThreadCalls = false;
                    this.txt_result.Text += $"保存成功,姓名:{student.UserName},年龄:{student.Age},地址:{student.Addr}\r\n";
                }
            });
            //4、通过请求流的方式将多条数据依次传到服务端
            foreach (var student in students)
            {
                // 每次发送一个学生请求
                await requestStream.WriteAsync(new AddStudentRequest
                {
                    Student = student
                });
            }
            //5、传送完毕
            await requestStream.CompleteAsync();
            await taskResp;
        }

        private async Task<string> GetToken()
        {
            //1、创建grpc客户端
            using var channel = GrpcChannel.ForAddress("https://localhost:5001");
            var grpcClient = new StudentService.StudentServiceClient(channel);
            //2、发起请求
            var resp = await grpcClient.GetTokenAsync(new TokenRequest
            {
                UserName = "Code综艺圈",
                UserPwd = "admin123"
            });
            return resp.Token;
        }

        private async void btn_server_token_Click(object sender, EventArgs e)
        {
            //用于多线程通知
            CancellationTokenSource cts = new CancellationTokenSource();
            //1、创建grpc客户端
            using var channel = GrpcChannel.ForAddress("https://localhost:5001");
            var grpcClient = new StudentService.StudentServiceClient(channel);

            // 获取Token
            var token = await GetToken();
            // 将Token封装为Metadat和请求一起发送过去
            var headers = new Metadata
            {
                {"Authorization",$"Bearer {token}"}
            };

            //2、客户端一次请求,多次返回
            using var respStreamingCall = grpcClient.GetAllStudent(new QueryAllStudentRequest(), headers);
            //3、获取响应流
            var respStreaming = respStreamingCall.ResponseStream;
            //4、循环读取响应流,直到读完为止
            while (await respStreaming.MoveNext(cts.Token))
            {
                //5、取得每次返回的信息,并显示在文本框中
                var student = respStreaming.Current.Student;
                this.txt_result.Text += $"姓名:{student.UserName},年龄:{student.Age},地址:{student.Addr}\r\n";
            }
        }


    }
}
本文来自博客园,作者:可乐加冰-Mr-Wang,转载请注明原文链接:https://www.cnblogs.com/helloworld-wang/p/15035652.html


 浙公网安备 33010602011771号