细读Spring源码(一)---refresh()方法概览
看了一星期的Spring源码,把refresh()方法从头至尾梳理了一遍,在看的过程中想记录一些关键点,但是需要记录的东西太多,有种无从下手的感觉。因为我在看源码的过程中遇到了很多的疑惑,这些疑惑有时候是一个零散的点,比如动态代理(jdk动态代理和cglib动态代理)、设计模式,有时候是一个很长的链,比如一个完整的bean的创建过程,即bean的生命周期,有时候又是一个很广的面,比如IOC和AOP的原理,发现、思考和解决种种疑惑的过程中,我对Spring有了一个全新的认知。说实话,让我感觉以前的开发真的只是停留在了“用”的层面,因为Spring它真的强大到95%的开发中都不需要开发人员知道它的设计原理,只要进行黑盒开发即可,在看源码的过程中就会发现平时自己一个小小的举动,在源码中都可以追溯到它的前世今生,真的会感知到并惊叹程序设计之美!在写之前我纠结过一些问题,是先补充一些看源码的前置知识点,还是在遇到需要知道的前置知识时再补充,这就有点像单例模式的饿汉式和懒汉式了,我纠结的点在于:如果用饿汉式,就很难举例子说明其在spring中的应用,比如设计模式;如果用懒汉式,又显得逻辑跳来跳去,容易让思想陷入死循环,就像看源码时看一个方法的实现,如果对每一个方法的所有细节都刨根问底,见到方法就点进去,看着看着就会陷入无限循环中,从而失去最初的兴趣,鉴于这两种纠结,我决定将两种方式结合起来,出一个渗透spring源码的系列博客,先梳理整体情况,再说明前置知识点,最后跟源码,在源码解析中用到的知识点,以链接的形式加入,在前置知识点中可能提及的源码,也以链接的形式加入,而不是在当前文章中另起段落,这就有点像循环引用了,哈哈~
本系列博客的规划如下:
-
细读Spring源码(一)---refresh()方法概览
-
细读Spring源码(二)---关于Spring中用到的设计模式
-
细读Spring源码(三)---深度剖析动态代理底层实现
-
细读Spring源码(四)---什么是IOC?
-
细读Spring源码(五)---AOP从实战到源码
-
细读Spring源码(六)---关于源码设计架构
-
细读Spring源码(七)---关于Spring中的核心接口
-
细读Spring源码(八)---prepareRefresh()
-
细读Spring源码(九)---obtainFreshBeanFactory()
-
细读Spring源码(十)---prepareBeanFactory(beanFactory)
-
细读Spring源码(十一)---postProcessBeanFactory(beanFactory)
-
细读Spring源码(十二)---invokeBeanFactoryPostProcessors(beanFactory)
-
细读Spring源码(十三)---registerBeanPostProcessors(beanFactory)
-
细读Spring源码(十四)---beanPostProcess.end()
-
细读Spring源码(十五)---initMessageSource()
-
细读Spring源码(十六)---initApplicationEventMulticaster()
-
细读Spring源码(十七)---onRefresh()
-
细读Spring源码(十八)---registerListeners()
-
细读Spring源码(十九)---finishBeanFactoryInitialization(beanFactory)
-
细读Spring源码(二十)---ffinishRefresh()
阅读Spring的源码,可以通过下面的方式开启调试:
1  public static void main(String[] args) {
2         ClassPathXmlApplicationContext context = new ClassPathXmlApplicationContext("classpath:spring.xml");
3         UserVo userVo = context.getBean(UserVo.class);
4         EnterpriseVo enterpriseVo = context.getBean(EnterpriseVo.class);
5         System.out.println("userVo=" + userVo);
6         System.out.println("enterpriseVo=" + enterpriseVo);
7         context.close();
8     }
主要是上面的第2行开始,进入该方法会进入下面的方法:
1    public ClassPathXmlApplicationContext(String[] configLocations, boolean refresh, @Nullable ApplicationContext parent) throws BeansException {
2         super(parent);
3         this.setConfigLocations(configLocations);
4         if (refresh) {
5             this.refresh();
6         }
7
8     }
第3行是设置配置文件,即为传递的classpath:spring.xml
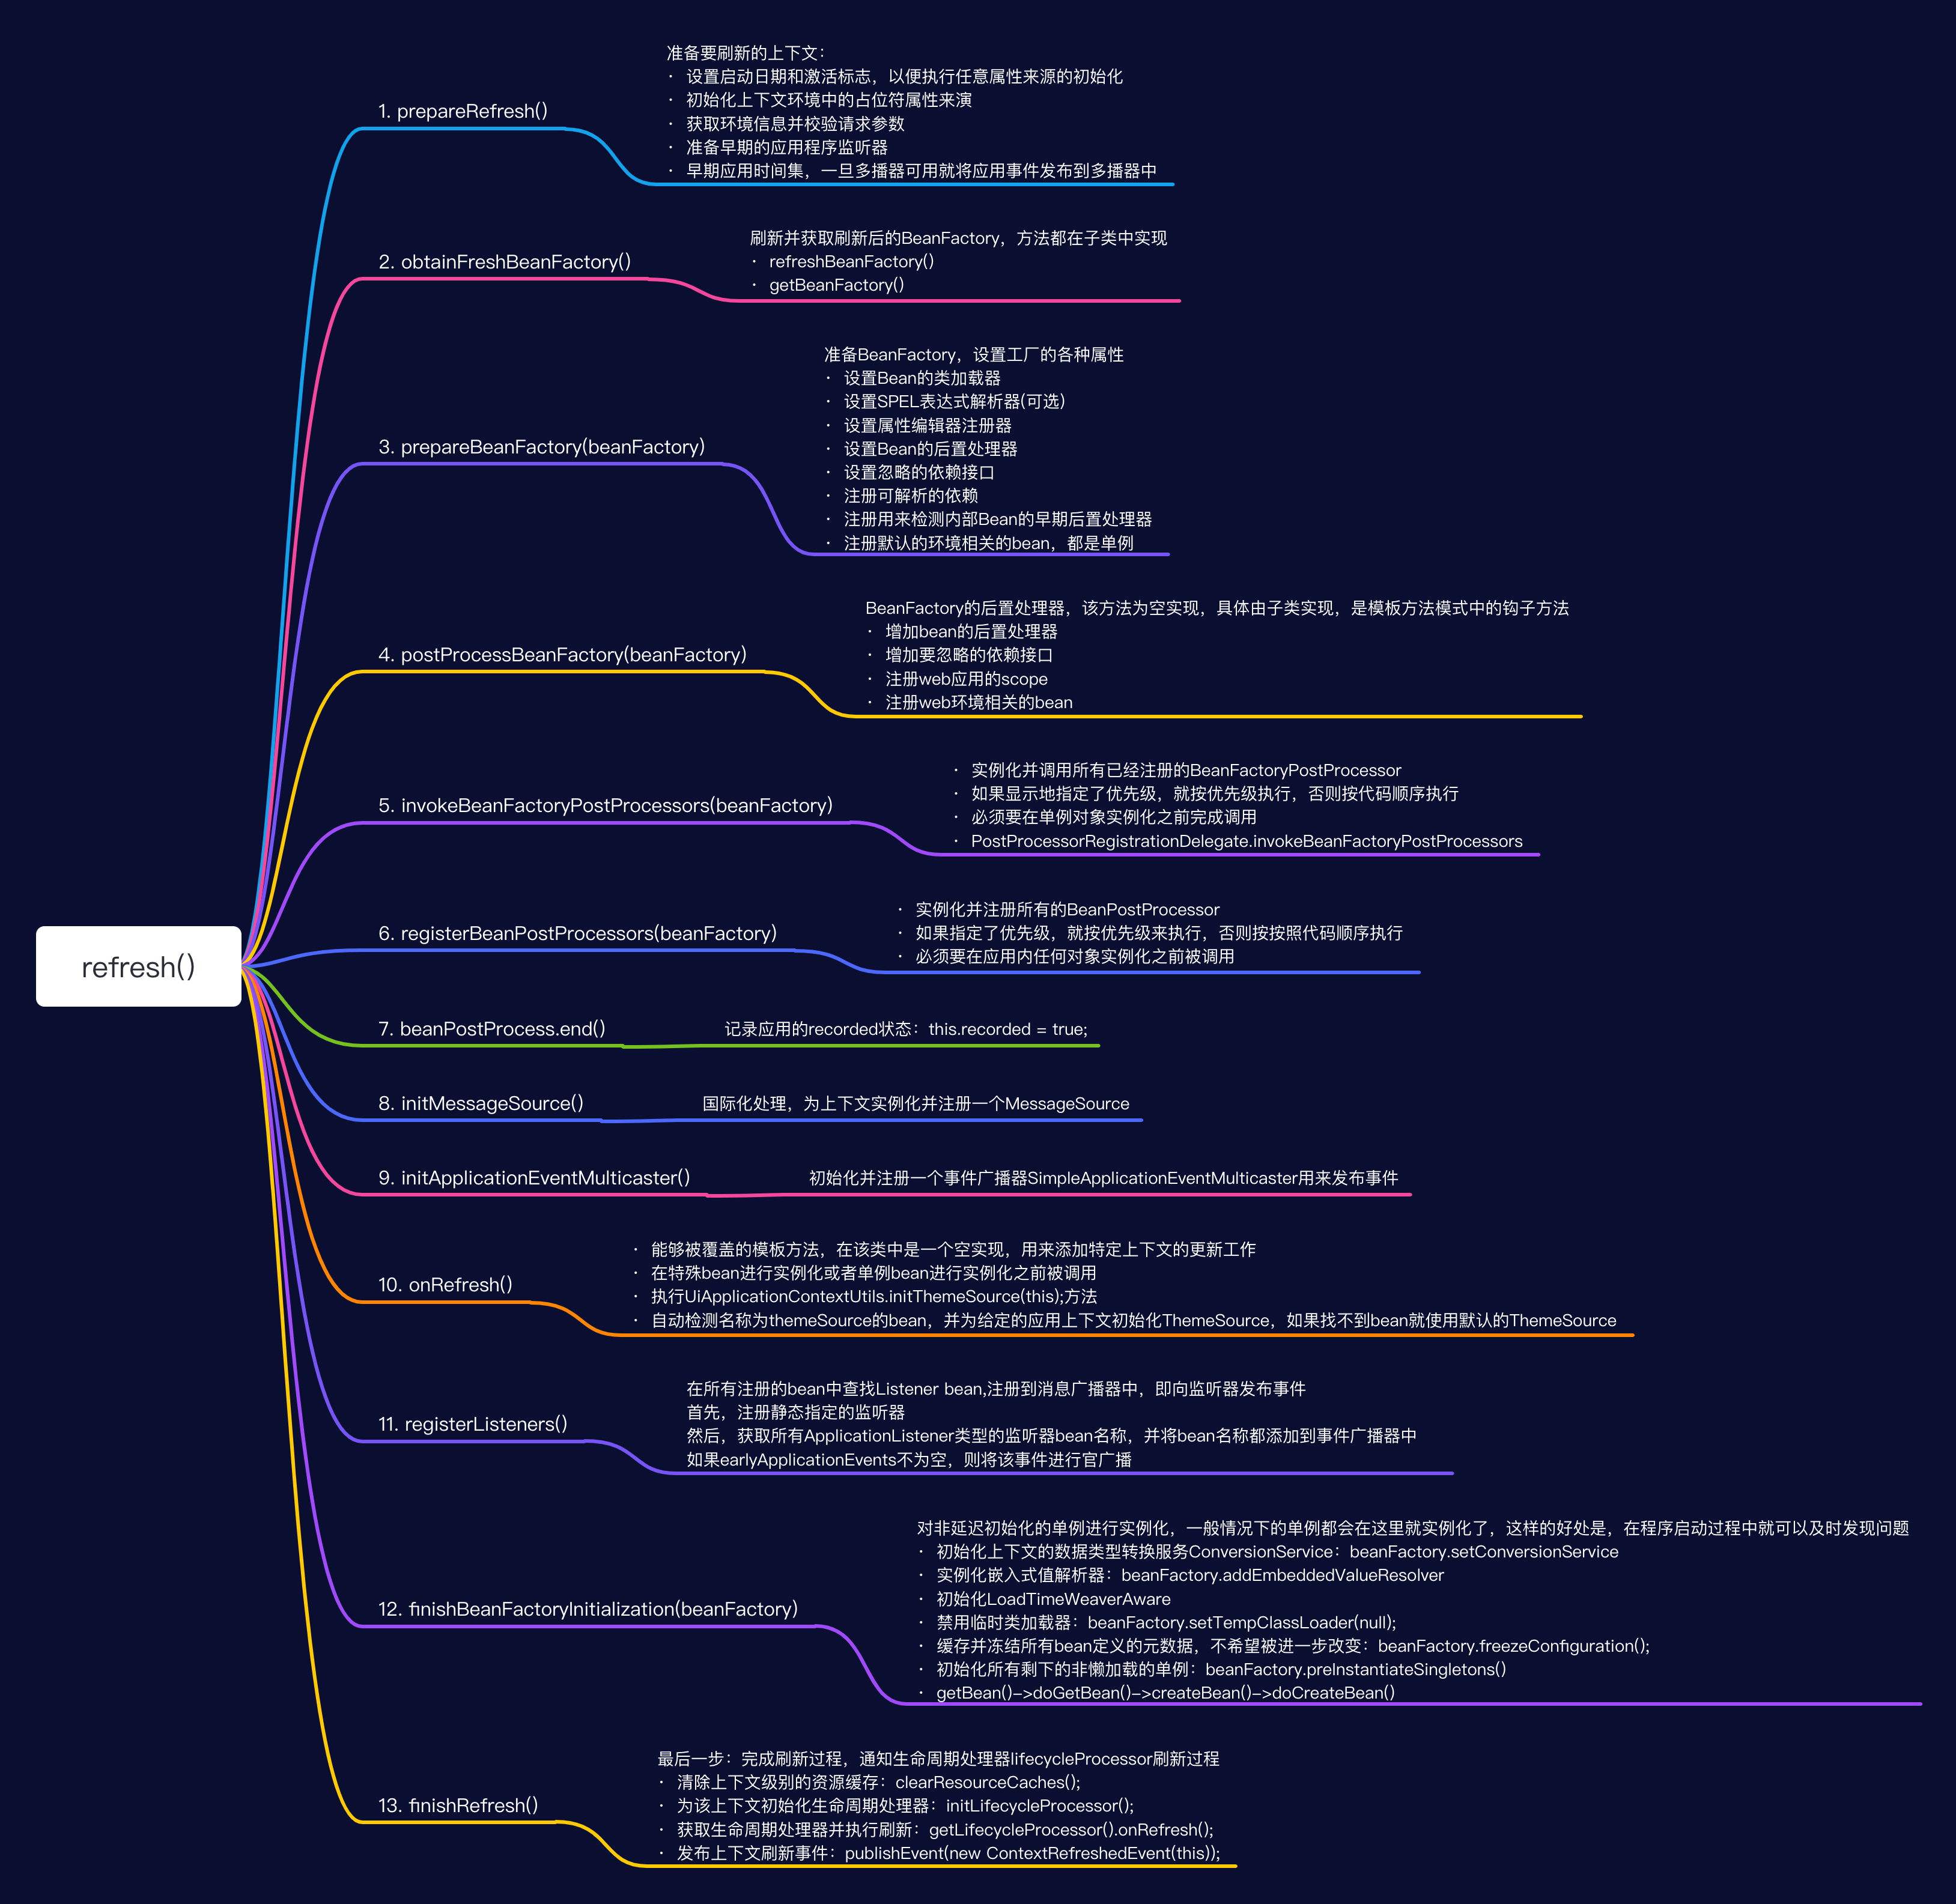
第5行就是今天要说的refresh()方法,这是spring容器启动的入口所在,因为该方法中总共有13个子方法,所以今天只是看一下概览,后续对每个方法进行跟进

通过一张思维导图说明每个方法主要完成的事情:

下面是源码中的添加的注释:
 1 public void refresh() throws BeansException, IllegalStateException {
 2         synchronized (this.startupShutdownMonitor) {
 3             StartupStep contextRefresh = this.applicationStartup.start("spring.context.refresh");
 4
 5             // Prepare this context for refreshing.
 6             /*准备要刷新的上下文:
 7             设置启动日期和激活标志,以便执行任意属性来源的初始化
 8             初始化上下文环境中的占位符属性来演
 9             获取环境信息并校验必传参数
10             准备早期的应用程序监听器
11             准备早期应用监听事件,一旦多播器可用就将早期的应用事件发布到多播器中*/
12             prepareRefresh();
13
14             // Tell the subclass to refresh the internal bean factory.
15             //让子类刷内置的bean工厂,返回的是ConfigurableListableBeanFactory的子类对象DefaultListableBeanFactory
16             //注意:BeanFactory和ApplicationContext的区别:前者在加载文件时不创建对象,后者在加载文件时就创建好bean对象
17             ConfigurableListableBeanFactory beanFactory = obtainFreshBeanFactory();
18
19             // Prepare the bean factory for use in this context.
20             //准备在上下文中使用的bean工厂
21             prepareBeanFactory(beanFactory);
22
23             try {
24                 // Allows post-processing of the bean factory in context subclasses.
25                 postProcessBeanFactory(beanFactory);
26
27                 StartupStep beanPostProcess = this.applicationStartup.start("spring.context.beans.post-process");
28                 // Invoke factory processors registered as beans in the context.
29                 //开始调用BeanFactory的后置处理器
30                 invokeBeanFactoryPostProcessors(beanFactory);
31
32                 // Register bean processors that intercept bean creation.
33                 //注册bean的后置处理器
34                 registerBeanPostProcessors(beanFactory);
35                 //后置处理器结束
36                 beanPostProcess.end();
37
38                 // Initialize message source for this context.
39                 //国际化处理,为上下文初始化Message源,即不同语语言的消息体
40                 initMessageSource();
41
42                 // Initialize event multicaster for this context.
43                 //初始化上下文的事件广播器
44                 initApplicationEventMulticaster();
45
46                 /*Initialize other special beans in specific context subclasses.
47                 能够被覆盖的模板方法,用来添加特定上下文的更新工作,在特殊bean进行初始化或者单例bean进行实例化时被调用,在该类中是一个空实现
48                 三个子类中都是调用UiApplicationContextUtils.initThemeSource(this)方法*/
49                 onRefresh();
50
51                 // Check for listener beans and register them.
52                 //在所有注册的bean中查找Listener bean,注册到消息广播器中,即向监听器发布事件
53                 registerListeners();
54                 //-----------------------------------------正餐开始,前方高能预警-------------------------------------------
55                 // Instantiate all remaining (non-lazy-init) singletons.
56                 //对非延迟初始化的单例进行实例化,一般情况下的单例都会在这里就实例化了,这样的好处是,在程序启动过程中就可以及时发现问题
57                 finishBeanFactoryInitialization(beanFactory);
58
59                 // Last step: publish corresponding event.
60                 //最后一步:完成刷新过程,通知生命周期处理器lifecycleProcessor刷新过程
61                 finishRefresh();
62             } catch (BeansException ex) {
63                 if (logger.isWarnEnabled()) {
64                     logger.warn("Exception encountered during context initialization - " +
65                             "cancelling refresh attempt: " + ex);
66                 }
67
68                 // Destroy already created singletons to avoid dangling resources.
69                 //当发生异常时销毁已经创建的单例
70                 destroyBeans();
71
72                 // Reset 'active' flag.
73                 //重置active标识为false
74                 cancelRefresh(ex);
75
76                 // Propagate exception to caller.
77                 throw ex;
78             } finally {
79                 // Reset common introspection caches in Spring's core, since we
80                 // might not ever need metadata for singleton beans anymore...
81                 //清空所有的缓存,因为单例bean是在容器启动时初始化完毕,所以不需要保留它们的元数据信息
82                 resetCommonCaches();
83                 contextRefresh.end();
84             }
85         }
86     }
下一篇:细读Spring源码(二)---关于Spring中用到的设计模式
持续更新中........
本文来自博客园,作者:bug改了我,转载请注明原文链接:https://www.cnblogs.com/hellowhy/p/15618896.html


 浙公网安备 33010602011771号