[iOS 多线程 & 网络 - 1.3] - NSOperation
A.NSOperation的基本使用
1.NSOperation的作用
配合使用NSOperation和NSOperationQueue也能实现多线程编程
NSOperation和NSOperationQueue实现多线程的具体步骤
先将需要执行的操作封装到一个NSOperation对象中
然后将NSOperation对象添加到NSOperationQueue中
系统会自动将NSOperationQueue中的NSOperation取出来
将取出的NSOperation封装的操作放到一条新线程中执行
NSOperation和NSOperationQueue实现多线程的具体步骤
先将需要执行的操作封装到一个NSOperation对象中
然后将NSOperation对象添加到NSOperationQueue中
系统会自动将NSOperationQueue中的NSOperation取出来
将取出的NSOperation封装的操作放到一条新线程中执行
2.NSOperation的子类
NSOperation是个抽象类,并不具备封装操作的能力,必须使用它的子类
使用NSOperation子类的方式有3种
NSInvocationOperation
NSBlockOperation
自定义子类继承NSOperation,实现内部相应的方法
使用NSOperation子类的方式有3种
NSInvocationOperation
NSBlockOperation
自定义子类继承NSOperation,实现内部相应的方法
3.NSInvocationOperation
创建NSInvocationOperation对象
- (id)initWithTarget:(id)target selector:(SEL)sel object:(id)arg;
调用start方法开始执行操作
- (void)start;
一旦执行操作,就会调用target的sel方法
注意
默认情况下,调用了start方法后并不会开一条新线程去执行操作,而是在当前线程同步执行操作
只有将NSOperation放到一个NSOperationQueue中,才会异步执行操作
- (id)initWithTarget:(id)target selector:(SEL)sel object:(id)arg;
调用start方法开始执行操作
- (void)start;
一旦执行操作,就会调用target的sel方法
注意
默认情况下,调用了start方法后并不会开一条新线程去执行操作,而是在当前线程同步执行操作
只有将NSOperation放到一个NSOperationQueue中,才会异步执行操作
4.NSBlockOperation
创建NSBlockOperation对象
+ (id)blockOperationWithBlock:(void (^)(void))block;
通过addExecutionBlock:方法添加更多的操作
- (void)addExecutionBlock:(void (^)(void))block;
注意:只要NSBlockOperation封装的操作数 > 1,就会异步执行操作
+ (id)blockOperationWithBlock:(void (^)(void))block;
通过addExecutionBlock:方法添加更多的操作
- (void)addExecutionBlock:(void (^)(void))block;
注意:只要NSBlockOperation封装的操作数 > 1,就会异步执行操作
5.NSOperationQueue
NSOperationQueue的作用
NSOperation可以调用start方法来执行任务,但默认是同步执行的
如果将NSOperation添加到NSOperationQueue(操作队列)中,系统会自动异步执行NSOperation中的操作
添加操作到NSOperationQueue中
- (void)addOperation:(NSOperation *)op;
- (void)addOperationWithBlock:(void (^)(void))block;
NSOperation可以调用start方法来执行任务,但默认是同步执行的
如果将NSOperation添加到NSOperationQueue(操作队列)中,系统会自动异步执行NSOperation中的操作
添加操作到NSOperationQueue中
- (void)addOperation:(NSOperation *)op;
- (void)addOperationWithBlock:(void (^)(void))block;
6.最大并发数
什么是并发数
同时执行的任务数
比如,同时开3个线程执行3个任务,并发数就是3
最大并发数的相关方法
- (NSInteger)maxConcurrentOperationCount;
- (void)setMaxConcurrentOperationCount:(NSInteger)cnt;
同时执行的任务数
比如,同时开3个线程执行3个任务,并发数就是3
最大并发数的相关方法
- (NSInteger)maxConcurrentOperationCount;
- (void)setMaxConcurrentOperationCount:(NSInteger)cnt;
7.队列的取消、暂停和恢复
取消队列的所有操作
- (void)cancelAllOperations;
提示:也可以调用NSOperation的- (void)cancel方法取消单个操作
暂停和恢复队列
- (void)setSuspended:(BOOL)b; // YES代表暂停队列,NO代表恢复队列
- (BOOL)isSuspended;
- (void)cancelAllOperations;
提示:也可以调用NSOperation的- (void)cancel方法取消单个操作
暂停和恢复队列
- (void)setSuspended:(BOOL)b; // YES代表暂停队列,NO代表恢复队列
- (BOOL)isSuspended;
8.操作优先级
设置NSOperation在queue中的优先级,可以改变操作的执行优先级
- (NSOperationQueuePriority)queuePriority;
- (void)setQueuePriority:(NSOperationQueuePriority)p;
优先级的取值
NSOperationQueuePriorityVeryLow = -8L,
NSOperationQueuePriorityLow = -4L,
NSOperationQueuePriorityNormal = 0,
NSOperationQueuePriorityHigh = 4,
NSOperationQueuePriorityVeryHigh = 8
- (NSOperationQueuePriority)queuePriority;
- (void)setQueuePriority:(NSOperationQueuePriority)p;
优先级的取值
NSOperationQueuePriorityVeryLow = -8L,
NSOperationQueuePriorityLow = -4L,
NSOperationQueuePriorityNormal = 0,
NSOperationQueuePriorityHigh = 4,
NSOperationQueuePriorityVeryHigh = 8
9.操作依赖
NSOperation之间可以设置依赖来保证执行顺序
比如一定要让操作A执行完后,才能执行操作B,可以这么写
[operationB addDependency:operationA]; // 操作B依赖于操作A
可以在不同queue的NSOperation之间创建依赖关系
比如一定要让操作A执行完后,才能执行操作B,可以这么写
[operationB addDependency:operationA]; // 操作B依赖于操作A
可以在不同queue的NSOperation之间创建依赖关系
10.操作监听
可以监听一个操作的执行完毕
- (void (^)(void))completionBlock;
- (void)setCompletionBlock:(void (^)(void))block;
- (void (^)(void))completionBlock;
- (void)setCompletionBlock:(void (^)(void))block;
11.自定义NSOperation
自定义NSOperation的步骤很简单
重写- (void)main方法,在里面实现想执行的任务
重写- (void)main方法的注意点
自己创建自动释放池(因为如果是异步操作,无法访问主线程的自动释放池)
经常通过- (BOOL)isCancelled方法检测操作是否被取消,对取消做出响应
重写- (void)main方法,在里面实现想执行的任务
重写- (void)main方法的注意点
自己创建自动释放池(因为如果是异步操作,无法访问主线程的自动释放池)
经常通过- (BOOL)isCancelled方法检测操作是否被取消,对取消做出响应
B.使用自定义NSOperation后台下载图片
code source: https://github.com/hellovoidworld/ConcurrentDownloadImageDemo
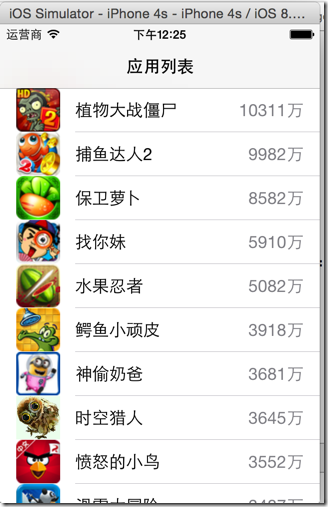
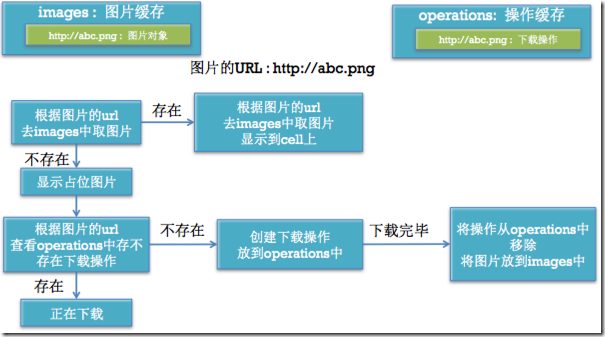
1.思路
2.实现步骤
(1)自定义一个继承NSOperation的类,实现main方法,在main方法中编写任务事件
 1 //
 2 //  HVWDownloadImageOperation.h
 3 //  ConcurrentDownloadImageDemo
 4 //
 5 //  Created by hellovoidworld on 15/1/22.
 6 //  Copyright (c) 2015年 hellovoidworld. All rights reserved.
 7 //
 8
 9 #import <Foundation/Foundation.h>
10
11 @class HVWDownloadImageOperation;
12
13 @protocol HVWDownloadImageOperationDelegate <NSObject>
14
15 /** 代理方法,下载完成之后 */
16 @optional
17 - (void) downloadImageOperation:(HVWDownloadImageOperation *) operation didFinishedDownloadWithImage:(UIImage *) image;
18
19 @end
20
21 @interface HVWDownloadImageOperation : NSOperation
22
23 /** 存储每个图片的url */
24 @property(nonatomic, strong) NSString *url;
25
26 /** 要显示的cell的index */
27 @property(nonatomic, strong) NSIndexPath *indexPath;
28
29 /** 代理 */
30 @property(nonatomic, weak) id<HVWDownloadImageOperationDelegate> delegate;
31
32 @end
 1 //
 2 //  HVWDownloadImageOperation.m
 3 //  ConcurrentDownloadImageDemo
 4 //
 5 //  Created by hellovoidworld on 15/1/22.
 6 //  Copyright (c) 2015年 hellovoidworld. All rights reserved.
 7 //
 8
 9 #import <UIKit/UIKit.h>
10 #import "HVWDownloadImageOperation.h"
11
12
13 @implementation HVWDownloadImageOperation
14
15 - (void)main {
16     NSLog(@"====下载图片======%@", [NSThread currentThread]);
17
18     NSURL *url = [NSURL URLWithString:self.url];
19     NSData *data;
20     for (int i=0; i<1; i++) {
21         data = [NSData dataWithContentsOfURL:url];
22     }
23
24     UIImage *image = [UIImage imageWithData:data];
25
26     /** 调用代理方法,通知代理下载完成 */
27     if ([self.delegate respondsToSelector:@selector(downloadImageOperation:didFinishedDownloadWithImage:)]) {
28         [self.delegate downloadImageOperation:self didFinishedDownloadWithImage:image];
29     }
30 }
31
32 @end
(2)新建一个模型类,用来存储每个cell的数据
 1 //
 2 //  HVWApp.h
 3 //  ConcurrentDownloadImageDemo
 4 //
 5 //  Created by hellovoidworld on 15/1/22.
 6 //  Copyright (c) 2015年 hellovoidworld. All rights reserved.
 7 //
 8
 9 #import <Foundation/Foundation.h>
10
11 @interface HVWApp : NSObject
12
13 /** app名字 */
14 @property(nonatomic, strong) NSString *name;
15 /** app图标url */
16 @property(nonatomic, strong) NSString *icon;
17 /** app的副标题--下载量 */
18 @property(nonatomic, strong) NSString *download;
19
20 - (instancetype) initWithDictionary:(NSDictionary *) dict;
21 + (instancetype) appWithDictionary:(NSDictionary *) dict;
22
23 @end
(3)在控制器中编写调用任务、队列进行多线程并发后台下载图片的操作
  1 //
  2 //  ViewController.m
  3 //  ConcurrentDownloadImageDemo
  4 //
  5 //  Created by hellovoidworld on 15/1/22.
  6 //  Copyright (c) 2015年 hellovoidworld. All rights reserved.
  7 //
  8
  9 #import "ViewController.h"
 10 #import "HVWApp.h"
 11 #import "HVWDownloadImageOperation.h"
 12
 13 @interface ViewController () <UITableViewDataSource, UITableViewDelegate, HVWDownloadImageOperationDelegate>
 14
 15 /** 所有app数据 */
 16 @property(nonatomic, strong) NSArray *apps;
 17
 18 /** 任务队列 */
 19 @property(nonatomic, strong) NSOperationQueue *queue;
 20
 21 /** 所有任务 */
 22 @property(nonatomic, strong) NSMutableDictionary *operations;
 23
 24 /** 所有图片 */
 25 @property(nonatomic, strong) NSMutableDictionary *images;
 26
 27 @end
 28
 29 @implementation ViewController
 30
 31 /** 加载plist文件,读取数据到模型,存储到数组中 */
 32 - (NSArray *)apps {
 33     if (nil == _apps) {
 34         NSArray *dictArray = [NSArray arrayWithContentsOfFile:[[NSBundle mainBundle] pathForResource:@"apps.plist" ofType:nil]];
 35
 36         NSMutableArray *appArray = [NSMutableArray array];
 37         for (NSDictionary *dict in dictArray) {
 38             HVWApp *app = [HVWApp appWithDictionary:dict];
 39             [appArray addObject:app];
 40         }
 41         _apps = appArray;
 42     }
 43     return _apps;
 44 }
 45
 46 - (NSOperationQueue *)queue {
 47     if (_queue == nil ) {
 48         _queue = [[NSOperationQueue alloc] init];
 49         _queue.maxConcurrentOperationCount = 3;
 50     }
 51     return _queue;
 52 }
 53
 54 - (NSMutableDictionary *)operations {
 55     if (nil == _operations) {
 56         _operations = [NSMutableDictionary dictionary];
 57     }
 58     return _operations;
 59 }
 60
 61 - (NSMutableDictionary *)images {
 62     if (nil == _images) {
 63         _images = [NSMutableDictionary dictionary];
 64     }
 65     return _images;
 66 }
 67
 68 - (void)viewDidLoad {
 69     [super viewDidLoad];
 70     // Do any additional setup after loading the view, typically from a nib.
 71 }
 72
 73 - (void)didReceiveMemoryWarning {
 74     [super didReceiveMemoryWarning];
 75     // Dispose of any resources that can be recreated.
 76 }
 77
 78 #pragma mark - tableViewDatasource
 79 - (NSInteger)numberOfSectionsInTableView:(UITableView *)tableView {
 80     return 1;
 81 }
 82
 83 - (NSInteger)tableView:(UITableView *)tableView numberOfRowsInSection:(NSInteger)section {
 84     return self.apps.count;
 85 }
 86
 87 - (UITableViewCell *)tableView:(UITableView *)tableView cellForRowAtIndexPath:(NSIndexPath *)indexPath {
 88     static NSString *ID = @"AppCell";
 89     UITableViewCell *cell = [tableView dequeueReusableCellWithIdentifier:ID];
 90
 91     if (nil == cell) {
 92         cell = [[UITableViewCell alloc] initWithStyle:UITableViewCellStyleValue1 reuseIdentifier:ID];
 93     }
 94
 95     HVWApp *app = self.apps[indexPath.row];
 96     cell.textLabel.text = app.name;
 97     cell.detailTextLabel.text = app.download;
 98
 99     // 占位图片
100     cell.imageView.image = [UIImage imageNamed:@"a9ec8a13632762d0092abc3ca2ec08fa513dc619"];
101
102     // 如果没有图片,准备开启线程下载图片
103     UIImage *image = self.images[app.icon];
104
105     if (image) {
106         // 如果图片存在,不需要重复下载,直接设置图片
107         cell.imageView.image = image;
108     } else {
109
110         // 如果图片不存在,看看是不是正在下载
111         HVWDownloadImageOperation *operation = self.operations[app.icon];
112
113         if (operation) {
114             // 如果图片正在下载,不必要开启线的线程再进行下载
115         } else {
116
117             // 没有在下载,创建一个新的任务进行下载
118             operation = [[HVWDownloadImageOperation alloc] init];
119             // 设置代理
120             operation.delegate = self;
121             // 传送url
122             operation.url = app.icon;
123             // 记录indexPath
124             operation.indexPath = indexPath;
125
126             [self.queue addOperation:operation];
127
128             // 记录正在下载的任务
129             [self.operations setObject:operation forKey:operation.url];
130         }
131     }
132
133     return cell;
134 }
135
136 #pragma mark - HVWDownloadImageOperationDelegate
137 /** 代理方法,图片下载完成后,显示到cell上 */
138 - (void)downloadImageOperation:(HVWDownloadImageOperation *)operation didFinishedDownloadWithImage:(UIImage *)image {
139     UITableViewCell *cell = [self.tableView cellForRowAtIndexPath:operation.indexPath];
140     cell.imageView.image = image;
141     [self.tableView reloadRowsAtIndexPaths:@[operation.indexPath] withRowAnimation:UITableViewRowAnimationNone];
142
143     // 存储图片到内存
144     if (image) {
145         [self.images setObject:image forKey:operation.url];
146     }
147
148     NSLog(@"已经下载的图片数==========>%d", self.images.count);
149 }
150
151 @end


 浙公网安备 33010602011771号