linux ssh 免密码登录和别名设置
linux 系统中, SSH免密登录的配置.
- ssh-keygen
- ssh-copy-id
一. 安装ssh-keygen前查看~/.ssh目录.
1 grok@ubuntu:~$ cd ~/.ssh
2 grok@ubuntu:~/.ssh$ ls -lha
3 总用量 12K
4 drwx------  2 grok grok 4.0K Mar  4 09:46 .
5 drwxr-xr-x 18 grok grok 4.0K Mar  4 11:00 ..
6 -rw-r--r--  1 grok grok  222 Mar  4 09:46 known_hosts
7 grok@ubuntu:~/.ssh$
安装 ssh-keygen 直接三次下一步.安装过程如下图.
 1 grok@ubuntu:~/.ssh$ ssh-keygen
 2 Generating public/private rsa key pair.
 3 Enter file in which to save the key (/home/grok/.ssh/id_rsa):
 4 Enter passphrase (empty for no passphrase):
 5 Enter same passphrase again:
 6 Your identification has been saved in /home/grok/.ssh/id_rsa
 7 Your public key has been saved in /home/grok/.ssh/id_rsa.pub
 8 The key fingerprint is:
 9 SHA256:Qm5jZjS07O2E3AZUSXvmcp+qeh95Ty5+OVINlBV/X20 grok@ubuntu
10 The key's randomart image is:
11 +---[RSA 3072]----+
12 |      ooo.     +o|
13 |     + ...    o o|
14 |      B . o  .  E|
15 |     * * +    ..+|
16 |      % S o    o.|
17 |     = * o o .. .|
18 |        . o +... |
19 |        .  +o++  |
20 |      .o.oo..+o. |
21 +----[SHA256]-----+
22 grok@ubuntu:~/.ssh$
安装后, 我们查看 ~/.ssh目录内容,发现出现id_rsa 和id_rsa.pub ,表示安装成功.
1 grok@ubuntu:~/.ssh$ ls -lha
2 总用量 20K
3 drwx------  2 grok grok 4.0K Mar  5 16:18 .
4 drwxr-xr-x 18 grok grok 4.0K Mar  4 11:00 ..
5 -rw-------  1 grok grok 2.6K Mar  5 16:18 id_rsa
6 -rw-r--r--  1 grok grok  565 Mar  5 16:18 id_rsa.pub
7 -rw-r--r--  1 grok grok  222 Mar  4 09:46 known_hosts
其中id_rsa和id_rsa.pub 被称为私钥和公钥, 此种加密称为非对称加密.
二. 现在需要将密钥分发给需要被登录的计算机.我们使用ssh-copy-id命令
1 grok@ubuntu:~/.ssh$ ssh-copy-id grok@192.168.80.131
2 /usr/bin/ssh-copy-id: INFO: attempting to log in with the new key(s), to filter out any that are already installed
3 /usr/bin/ssh-copy-id: INFO: 1 key(s) remain to be installed -- if you are prompted now it is to install the new keys
4 grok@192.168.80.131's password:
5
6 Number of key(s) added: 1
7
8 Now try logging into the machine, with:   "ssh 'grok@192.168.80.131'"
9 and check to make sure that only the key(s) you wanted were added.
现在可以用ssh grok@192.168.80.131 测试登录了
1 grok@ubuntu:~/.ssh$ ssh grok@192.168.80.131
2 Activate the web console with: systemctl enable --now cockpit.socket
3
4 Last login: Fri Mar  5 11:00:18 2021
5 [grok@localhost ~]$
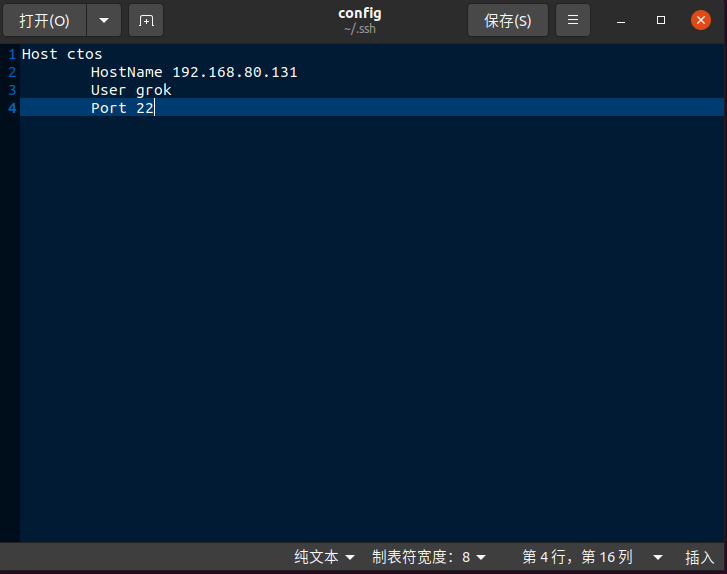
使用ssh命令登录的时候 , ssh -p 22 grok@ip 需要每次输入端口,用户名,和ip.设置别名,可以简化这些输入.
Host ctos
HostName 192.168.80.131
User grok
Port 22
建立文件 config, 编辑文件config 后保存.
1 grok@ubuntu:~/.ssh$ touch config
2 grok@ubuntu:~/.ssh$ gedit config

测试登录成功
1 grok@ubuntu:~/.ssh$ ssh ctos
2 Activate the web console with: systemctl enable --now cockpit.socket
3
4 Last login: Fri Mar  5 17:08:50 2021 from 192.168.80.133
5 [grok@localhost ~]$


【推荐】国内首个AI IDE,深度理解中文开发场景,立即下载体验Trae
【推荐】编程新体验,更懂你的AI,立即体验豆包MarsCode编程助手
【推荐】抖音旗下AI助手豆包,你的智能百科全书,全免费不限次数
【推荐】轻量又高性能的 SSH 工具 IShell:AI 加持,快人一步
· 开发者必知的日志记录最佳实践
· SQL Server 2025 AI相关能力初探
· Linux系列:如何用 C#调用 C方法造成内存泄露
· AI与.NET技术实操系列(二):开始使用ML.NET
· 记一次.NET内存居高不下排查解决与启示
· 阿里最新开源QwQ-32B,效果媲美deepseek-r1满血版,部署成本又又又降低了!
· 开源Multi-agent AI智能体框架aevatar.ai,欢迎大家贡献代码
· Manus重磅发布:全球首款通用AI代理技术深度解析与实战指南
· 被坑几百块钱后,我竟然真的恢复了删除的微信聊天记录!
· AI技术革命,工作效率10个最佳AI工具