『计算机视觉』YOLO系列总结
网络细节资料很多,不做赘述,主要总结演化思路和解决问题。
一、YOLO
1、网络简介
YOLO网络结构由24个卷积层与2个全连接层构成,网络入口为448x448(v2为416x416),图片进入网络先经过resize,输出格式为:

其中,S为划分网格数,B为每个网格负责目标个数,C为类别个数。B表示每个小格对应B组可能的框,5表示每个框的四个坐标和一个置信度,C表示类别,同时也说明B个框只能隶属于同一个类别。
2、损失函数
损失函数有四部分组成,
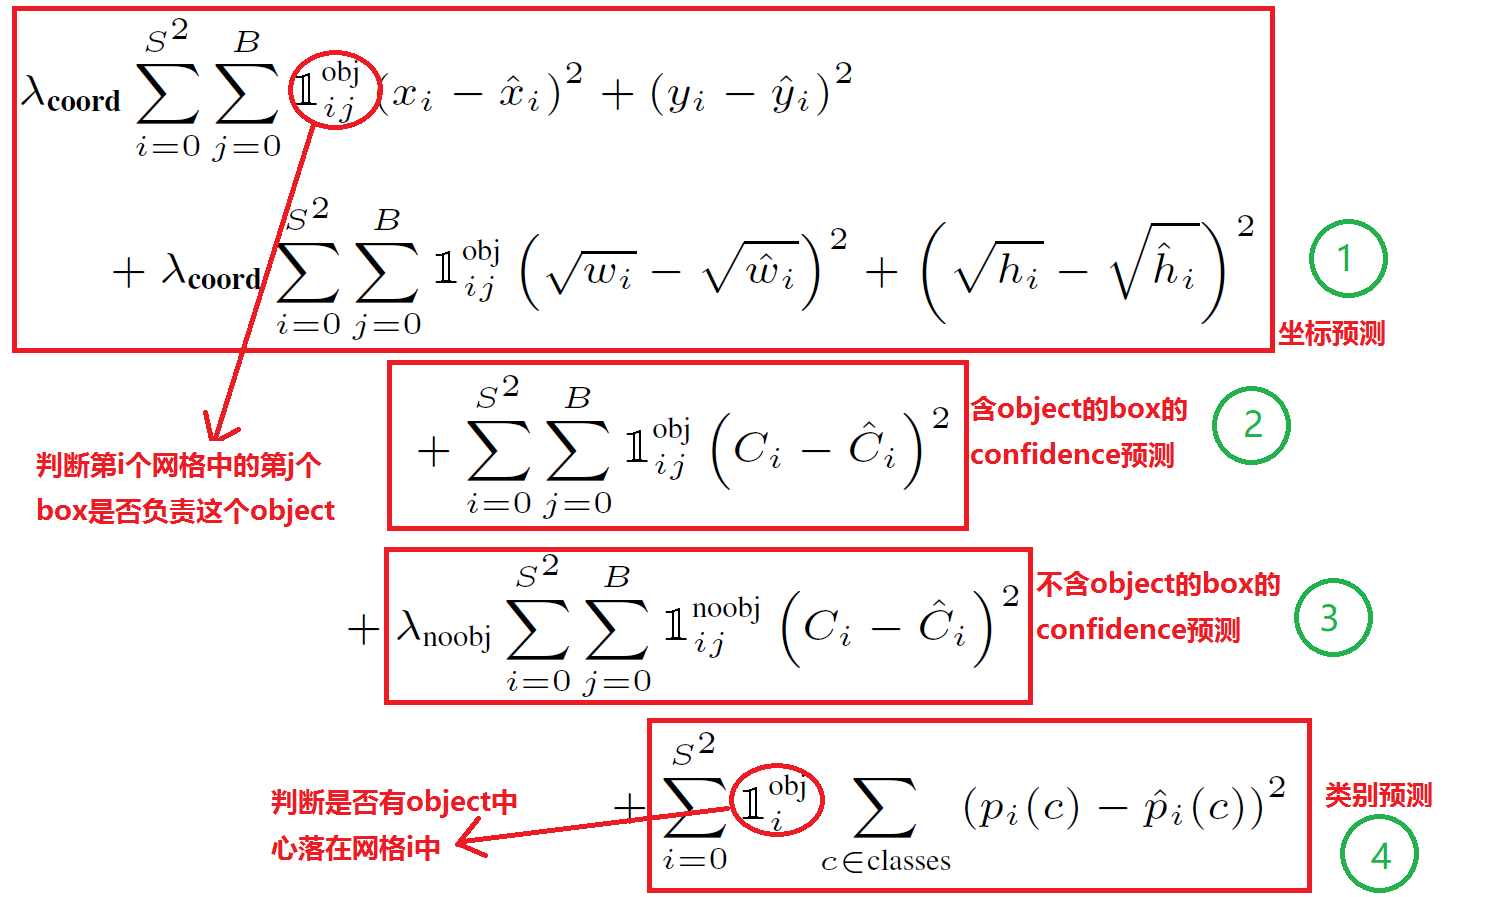
上文中的红圈符号表示是否开关,比如第一个符号表示i号格子j号坐标框中如果含有obj则为1,否则为0
损失函数第一部分的宽高计算加根号,这是因为:一个同样将一个100x100的目标与一个10x10的目标都预测大了10个像素,预测框为110 x 110与20 x 20。显然第一种情况我们还可以失道接受,但第二种情况相当于把边界框预测大了一倍,但如果不使用根号函数,那么损失相同,都为200,如果使用根号则可以表示出两者的差异。
Ci表示第i个框含有物体的置信度,类似于RCNN中的二分类部分思想,由于大部分框中没有物体,为平衡损失函数,本部分的权重取小为0.5
 中c为正确类别则值为1,否则为0
3、网络不足
1) 对小物体及邻近特征检测效果差:当一个小格中出现多于两个小物体或者一个小格中出现多个不同物体时效果欠佳。原因:B表示每个小格预测边界框数,而YOLO默认同格子里所有边界框为同种类物体。
(2) 图片进入网络前会先进行resize为448 x 448,降低检测速度(it takes about 10ms in 25ms),如果直接训练对应尺寸会有加速空间。
(3) 基础网络计算量较大
二、YOLO_v2
v2没有一个明确的主线创新,就是把各种奇技淫巧融入v1中,等到更好的网络。
使用聚类算法确定 anchor
作者并没有手动设定 anchor,而是在训练集的 b-box 上用了 k-means 聚类来自动找到 anchor。距离度量如果使用标准的欧氏距离,大盒子会比小盒子产生更多的错误。例 。因此这里使用其他的距离度量公式。聚类的目的是anchor boxes和临近的ground truth有更大的IOU值,这和anchor box的尺寸没有直接关系。自定义的距离度量公式:

到聚类中心的距离越小越好,但IOU值是越大越好,所以使用 1 - IOU,这样就保证距离越小,IOU值越大。
使用的聚类原始数据是只有标注框的检测数据集,YOLOv2、v3都会生成一个包含标注框位置和类别的TXT文件,其中每行都包含
,即ground truth boxes相对于原图的坐标,
是框的中心点,
是框的宽和高,N是所有标注框的个数;
首先给定k个聚类中心点
,这里的
是anchor boxes的宽和高尺寸,由于anchor boxes位置不固定,所以没有(x,y)的坐标,只有宽和高;
计算每个标注框和每个聚类中心点的距离 d=1-IOU(标注框,聚类中心),计算时每个标注框的中心点都与聚类中心重合,这样才能计算IOU值,即
。将标注框分配给“距离”最近的聚类中心;
所有标注框分配完毕以后,对每个簇重新计算聚类中心点,计算方式为
,
是第i个簇的标注框个数,就是求该簇中所有标注框的宽和高的平均值。
重复第3、4步,直到聚类中心改变量很小。
作者对 k-means 算法取了各种k值,并且画了一个曲线图:
最终选择了k=5,这是在模型复杂度和高召回率之间取了一个折中。
from os import listdir
from os.path import isfile, join
import argparse
#import cv2
import numpy as np
import sys
import os
import shutil
import random
import math

def IOU(x,centroids):
    '''
    :param x: 某一个ground truth的w,h
    :param centroids:  anchor的w,h的集合[(w,h),(),...],共k个
    :return: 单个ground truth box与所有k个anchor box的IoU值集合
    '''
    IoUs = []
    w, h = x  # ground truth的w,h
    for centroid in centroids:
        c_w,c_h = centroid   #anchor的w,h
        if c_w>=w and c_h>=h:   #anchor包围ground truth
            iou = w*h/(c_w*c_h)
        elif c_w>=w and c_h<=h:    #anchor宽矮
            iou = w*c_h/(w*h + (c_w-w)*c_h)
        elif c_w<=w and c_h>=h:    #anchor瘦长
            iou = c_w*h/(w*h + c_w*(c_h-h))
        else: #ground truth包围anchor     means both w,h are bigger than c_w and c_h respectively
            iou = (c_w*c_h)/(w*h)
        IoUs.append(iou) # will become (k,) shape
    return np.array(IoUs)

def avg_IOU(X,centroids):
    '''
    :param X: ground truth的w,h的集合[(w,h),(),...]
    :param centroids: anchor的w,h的集合[(w,h),(),...],共k个
    '''
    n,d = X.shape
    sum = 0.
    for i in range(X.shape[0]):
        sum+= max(IOU(X[i],centroids))  #返回一个ground truth与所有anchor的IoU中的最大值
    return sum/n    #对所有ground truth求平均

def write_anchors_to_file(centroids,X,anchor_file,input_shape,yolo_version):
    '''
    :param centroids: anchor的w,h的集合[(w,h),(),...],共k个
    :param X: ground truth的w,h的集合[(w,h),(),...]
    :param anchor_file: anchor和平均IoU的输出路径
    '''
    f = open(anchor_file,'w')

    anchors = centroids.copy()
    print(anchors.shape)

    if yolo_version=='yolov2':
        for i in range(anchors.shape[0]):
            #yolo中对图片的缩放倍数为32倍,所以这里除以32,
            # 如果网络架构有改变,根据实际的缩放倍数来
            #求出anchor相对于缩放32倍以后的特征图的实际大小(yolov2)
            anchors[i][0]*=input_shape/32.
            anchors[i][1]*=input_shape/32.
    elif yolo_version=='yolov3':
        for i in range(anchors.shape[0]):
            #求出yolov3相对于原图的实际大小
            anchors[i][0]*=input_shape
            anchors[i][1]*=input_shape
    else:
        print("the yolo version is not right!")
        exit(-1)

    widths = anchors[:,0]
    sorted_indices = np.argsort(widths)

    print('Anchors = ', anchors[sorted_indices])

    for i in sorted_indices[:-1]:
        f.write('%0.2f,%0.2f, '%(anchors[i,0],anchors[i,1]))

    #there should not be comma after last anchor, that's why
    f.write('%0.2f,%0.2f\n'%(anchors[sorted_indices[-1:],0],anchors[sorted_indices[-1:],1]))

    f.write('%f\n'%(avg_IOU(X,centroids)))
    print()

def kmeans(X,centroids,eps,anchor_file,input_shape,yolo_version):

    N = X.shape[0] #ground truth的个数
    iterations = 0
    print("centroids.shape",centroids)
    k,dim = centroids.shape  #anchor的个数k以及w,h两维,dim默认等于2
    prev_assignments = np.ones(N)*(-1)    #对每个ground truth分配初始标签
    iter = 0
    old_D = np.zeros((N,k))  #初始化每个ground truth对每个anchor的IoU

    while True:
        D = []
        iter+=1
        for i in range(N):
            d = 1 - IOU(X[i],centroids)
            D.append(d)
        D = np.array(D) # D.shape = (N,k)  得到每个ground truth对每个anchor的IoU

        print("iter {}: dists = {}".format(iter,np.sum(np.abs(old_D-D))))  #计算每次迭代和前一次IoU的变化值

        #assign samples to centroids
        assignments = np.argmin(D,axis=1)  #将每个ground truth分配给距离d最小的anchor序号

        if (assignments == prev_assignments).all() :  #如果前一次分配的结果和这次的结果相同,就输出anchor以及平均IoU
            print("Centroids = ",centroids)
            write_anchors_to_file(centroids,X,anchor_file,input_shape,yolo_version)
            return

        #calculate new centroids
        centroid_sums=np.zeros((k,dim),np.float)   #初始化以便对每个簇的w,h求和
        for i in range(N):
            centroid_sums[assignments[i]]+=X[i]         #将每个簇中的ground truth的w和h分别累加
        for j in range(k):            #对簇中的w,h求平均
            centroids[j] = centroid_sums[j]/(np.sum(assignments==j)+1)

        prev_assignments = assignments.copy()
        old_D = D.copy()

def main(argv):
    parser = argparse.ArgumentParser()
    parser.add_argument('-filelist', default = r'E:\BaiduNetdiskDownload\darknetHG8245\scripts\train.txt',
                        help='path to filelist\n' )
    parser.add_argument('-output_dir', default = r'E:\BaiduNetdiskDownload\darknetHG8245', type = str,
                        help='Output anchor directory\n' )
    parser.add_argument('-num_clusters', default = 0, type = int,
                        help='number of clusters\n' )
    '''
    需要注意的是yolov2输出的值比较小是相对特征图来说的,
    yolov3输出值较大是相对原图来说的,
    所以yolov2和yolov3的输出是有区别的
    '''
    parser.add_argument('-yolo_version', default='yolov2', type=str,
                        help='yolov2 or yolov3\n')
    parser.add_argument('-yolo_input_shape', default=416, type=int,
                        help='input images shape,multiples of 32. etc. 416*416\n')
    args = parser.parse_args()

    if not os.path.exists(args.output_dir):
        os.mkdir(args.output_dir)

    f = open(args.filelist)

    lines = [line.rstrip('\n') for line in f.readlines()]

    annotation_dims = []

    for line in lines:
        line = line.replace('JPEGImages','labels')
        line = line.replace('.jpg','.txt')
        line = line.replace('.png','.txt')
        print(line)
        f2 = open(line)
        for line in f2.readlines():
            line = line.rstrip('\n')
            w,h = line.split(' ')[3:]
            #print(w,h)
            annotation_dims.append((float(w),float(h)))
    annotation_dims = np.array(annotation_dims) #保存所有ground truth框的(w,h)

    eps = 0.005

    if args.num_clusters == 0:
        for num_clusters in range(1,11): #we make 1 through 10 clusters
            anchor_file = join( args.output_dir,'anchors%d.txt'%(num_clusters))

            indices = [ random.randrange(annotation_dims.shape[0]) for i in range(num_clusters)]
            centroids = annotation_dims[indices]
            kmeans(annotation_dims,centroids,eps,anchor_file,args.yolo_input_shape,args.yolo_version)
            print('centroids.shape', centroids.shape)
    else:
        anchor_file = join( args.output_dir,'anchors%d.txt'%(args.num_clusters))
        indices = [ random.randrange(annotation_dims.shape[0]) for i in range(args.num_clusters)]
        centroids = annotation_dims[indices]
        kmeans(annotation_dims,centroids,eps,anchor_file,args.yolo_input_shape,args.yolo_version)
        print('centroids.shape', centroids.shape)

if __name__=="__main__":
    main(sys.argv)
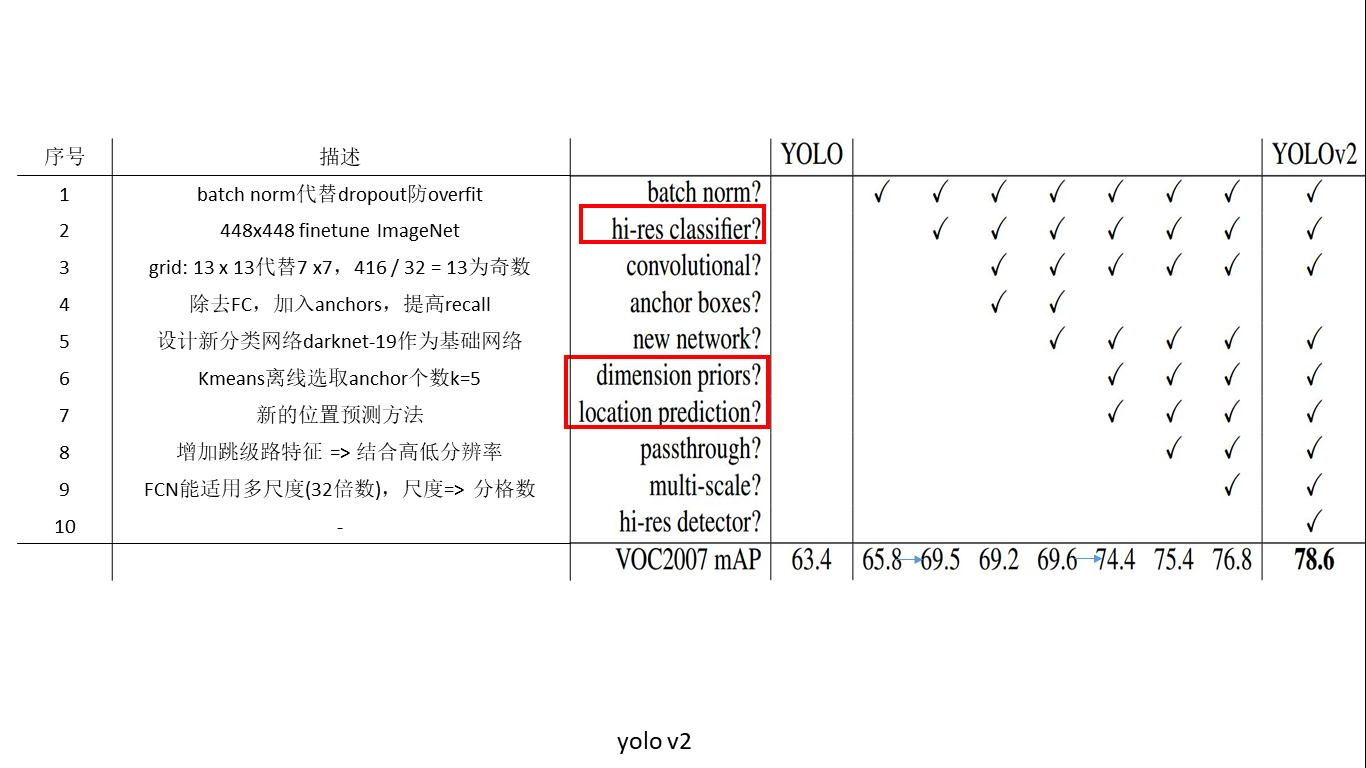
创新点简述
- 关于BN作用,YOLOv2在加入BN层之后mAP上升2%
- yolov1也在Image-Net预训练模型上进行fine-tune,但是预训练时网络入口为224 x 224,而fine-tune时为448 x 448,这会带来预训练网络与实际训练网络识别图像尺寸的不兼容。yolov2直接使用448 x 448的网络入口进行预训练,然后在检测任务上进行训练,效果得到3.7%的提升。
- yolov2为了提升小物体检测效果,减少网络中pooling层数目,使最终特征图尺寸更大,如输入为416 x 416,则输出为13 x 13 x 125,其中13 x 13为最终特征图,即原图分格的个数,125为每个格子中的边界框构成(5 x (classes + 5))。需要注意的是,特征图尺寸取决于原图尺寸,但特征图尺寸必须为奇数,以此保存中间有一个位置能看到原图中心处的目标。
- 通过预测偏移量而不是坐标值能够简化问题,让神经网络学习起来更容易,及anchor的设置是有其优越性的,至于每个格子中设置多少个anchor(即k等于几),作者使用了k-means算法离线对voc及coco数据集中目标的形状及尺度进行了计算。发现当k = 5时并且选取固定5比例值的时,anchors形状及尺度最接近voc与coco中目标的形状。(引入anchors和采用k_means确定anchors的个数、形状是两个创新)
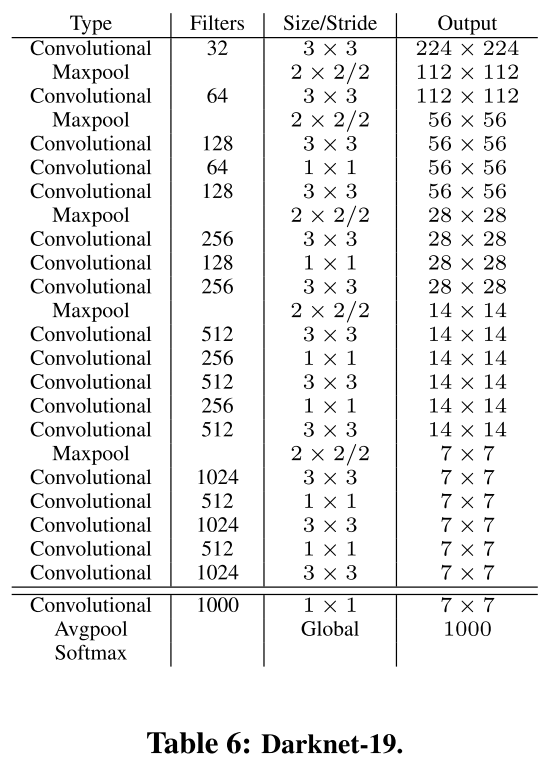
- 新的主干网络:模型的mAP值没有显著提升,但计算量减少了:
- 对细粒度特征做了加强,个人理解就是resnet的跳层
- YOLOv2中使用的Darknet-19网络结构中只有卷积层和池化层,所以其对输入图片的大小没有限制。YOLOv2采用多尺度输入的方式训练,在训练过程中每隔10个batches,重新随机选择输入图片的尺寸,由于Darknet-19下采样总步长为32,输入图片的尺寸一般选择32的倍数{320,352,…,608}。采用Multi-Scale Training, 可以适应不同大小的图片输入,当采用低分辨率的图片输入时,mAP值略有下降,但速度更快,当采用高分辨率的图片输入时,能得到较高mAP值,但速度有所下降。
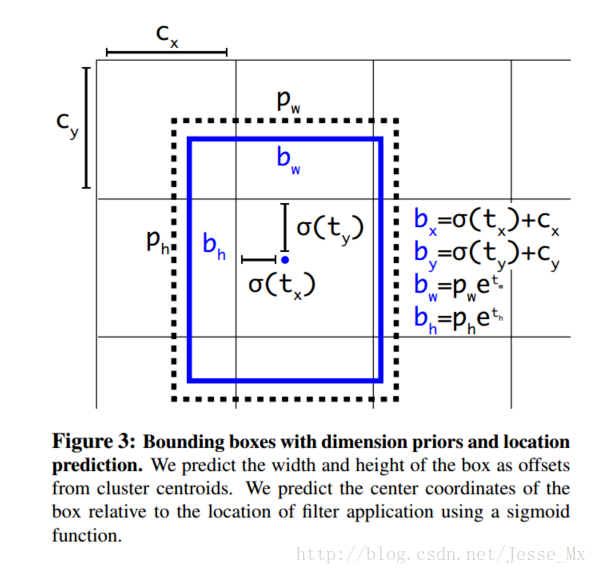
- 本文对anchors的回归提出了更好的算法,这部分比较麻烦,贴出一篇讲解很透彻的文章,其思想就是Fast RCNN的anchor回归值没有限制,可能出现anchor检测出很远的目标box的情况,效率比较低,作者觉得应该是每一个anchor只负责检测周围正负一个单位以内的目标box。
除此之外,YOLO_v2的实例YOLO9000在超多类分类(9000类)也做出了实践性质的创新,感兴趣的可以看一看。
二、YOLO_v3
贴上两个项目地址:
https://github.com/qqwweee/keras-yolo3
https://github.com/wizyoung/YOLOv3_TensorFlow
延续了v2的思路,继续修修补补:
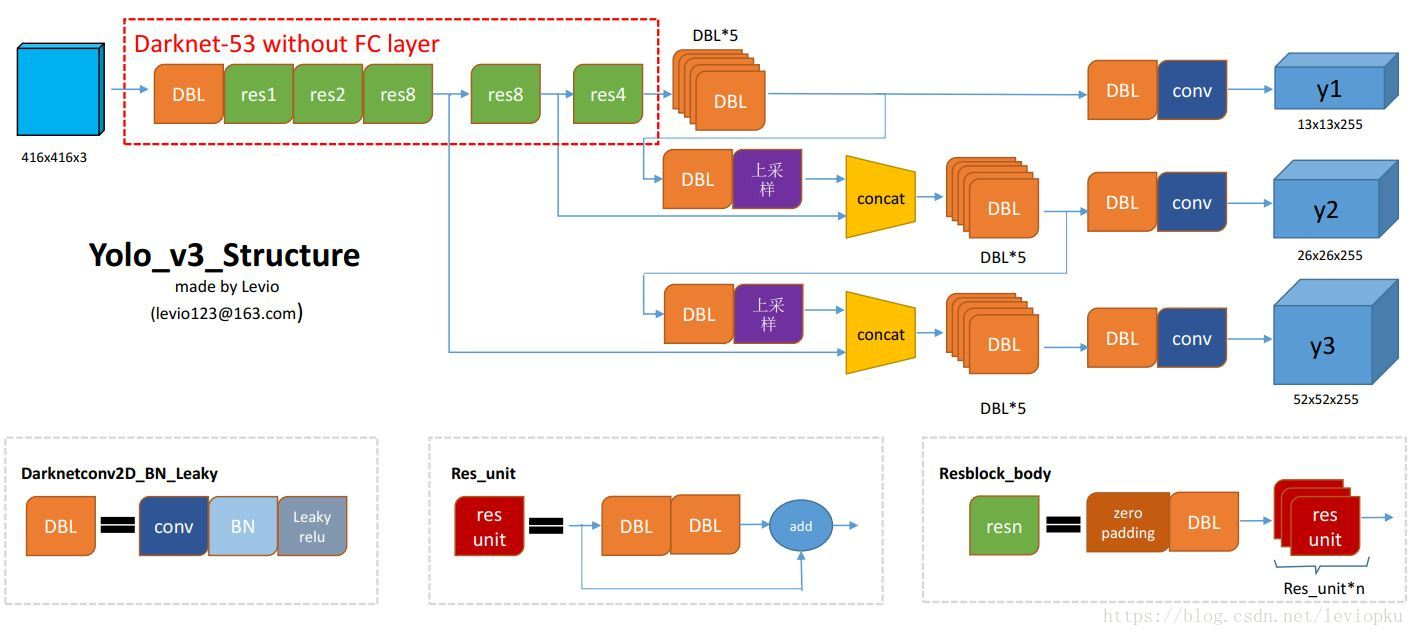
简单说一下网络结构:yolo_v3也和v2一样,backbone都会将输出特征图缩小到输入的1/32,通常都要求输入图片是32的倍数。这点可以对比v2和v3的backbone看看:(DarkNet-19 与 DarkNet-53)
y1,y2和y3的深度都是255,边长的规律是13:26:52,对于COCO类别而言,有80个种类,所以每个box应该对每个种类都输出一个概率,yolo v3设定的是每个网格单元预测3个box,所以每个box需要有(x, y, w, h, confidence)五个基本参数,然后还要有80个类别的概率。所以3*(5 + 80) = 255。
9是作者聚类得到的预测框数目建议,在使用搭用tiny-darknet的情况时更改为6。
损失函数
xy_loss = object_mask * box_loss_scale * K.binary_crossentropy(raw_true_xy, raw_pred[..., 0:2], from_logits=True)
wh_loss = object_mask * box_loss_scale * 0.5 * K.square(raw_true_wh - raw_pred[..., 2:4])
confidence_loss = object_mask * K.binary_crossentropy(object_mask, raw_pred[..., 4:5],
                                 from_logits=True) + \ (1 - object_mask) * K.binary_crossentropy(object_mask, raw_pred[..., 4:5],
                                                                        from_logits=True) * ignore_mask
class_loss = object_mask * K.binary_crossentropy(true_class_probs, raw_pred[..., 5:], from_logits=True)
xy_loss = K.sum(xy_loss) / mf
wh_loss = K.sum(wh_loss) / mf
confidence_loss = K.sum(confidence_loss) / mf
class_loss = K.sum(class_loss) / mf
loss += xy_loss + wh_loss + confidence_loss + class_loss
v3部分参考:https://blog.csdn.net/leviopku/article/details/82660381
S




 浙公网安备 33010602011771号