NFS(Network Files System)即网络文件系统,NFS文件系统协议允许网络中的主机通过TCP/IP协议进行资源共享,NFS客户端可以像使用本地资源一样读写远端NFS服务端的资料,需要注意NFS服务依赖于RPC服务与外部通信,所以必需保证RPC服务能够正常注册服务的端口信息才能正常使用NFS服务。
1、安装NFS服务

本次的实验需要两台Linux主机
服务端 192.168.10.100
客户端 192.168.10.200
2、创建NFS服务端的共享目录
[root@liuxuanke-hbza ~]# mkdir /nfsfile
写入一个文件,用于NFS客户端读取:
[root@liuxuanke-hbza ~]# echo "welcome to linuxprobe.com" > /nfsfile/readme
NFS服务端配置文件是”/etc/exports”,用于定义要共享的目录以及相应权限。
[root@liuxuanke-hbza ~]# vim /etc/exports
//格式为:共享目录的绝对路径 允许访问NFS资源的客户端(权限参数)
/nfsfile 192.168.10.* (rw,sync,root_squash)
NFS配置共享的参数有:
|
参数 |
作用 |
|
ro |
只读默认 |
|
rw |
读写模式 |
|
root_squash |
当NFS客户端使用root用户访问时,映射为NFS服务端的匿名用户。 |
|
no_root_squash |
当NFS客户端使用root用户访问时,映射为NFS服务端的root用户。 |
|
all_squash |
不论NFS客户端使用任何帐户,均映射为NFS服务端的匿名用户。 |
|
sync |
同时将数据写入到内存与硬盘中,保证不丢失数据。 |
|
async |
优先将数据保存到内存,然后再写入硬盘,效率更高,但可能造成数据丢失。 |


2、启动NFS服务
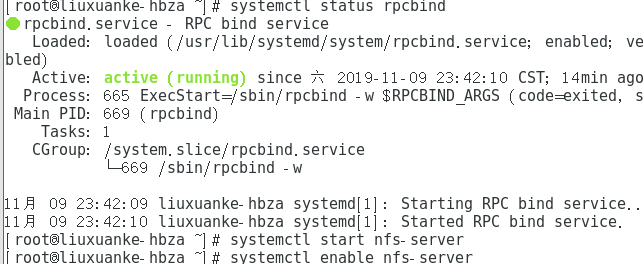
# systemctl status rpcbind
启动nfs-server程序:
# systemctl start nfs-server
设置NFS服务端为开机启动:
# systemctl enable nfs-serve

3、配置NFS客户端
查询远程NFS服务端中可用的共享资源:
[root@linuxprobe ~]# showmount -e 192.168.10.100

创建本地挂载目录:
[root@liuxuanke-hbza ~]# mkdir /nfsfile
[root@liuxuanke-hbza ~]# mount -t nfs 192.168.10.10:/nfsfile /nfsfile
顺利查看到刚刚写入文件内容:
[root@linuxprobe ~]# cat /nfsfile/readme
welcome to centos.com

如果希望开机后自动将NFS资源挂载到本地,那么就可以通过修改fstab文件来实现:
[root@linuxprobe ~]# vim /etc/fstab
192.168.10.100:/nfsfile /nfsfile nfs defaults 0 0


 posted on
