
Android 常用包的基本使用 - glide okhttp retrofit gson
准备工作
国内仓库设置
https://developer.aliyun.com/mirror/
https://jitpack.io/
入口配置文件-build.gradle

buildscript {
    repositories {
....
maven { url 'https://maven.aliyun.com/repository/public' }
        maven { url 'https://maven.aliyun.com/repository/central' }
        maven { url 'https://maven.aliyun.com/repository/gradle-plugin' }
        maven { url 'https://maven.aliyun.com/repository/google' }
        maven { url 'https://jitpack.io' }

....


....
allprojects {
    repositories {
        maven { url 'https://maven.aliyun.com/repository/public' }
        maven { url 'https://maven.aliyun.com/repository/central' }
        maven { url 'https://maven.aliyun.com/repository/gradle-plugin' }
        maven { url 'https://maven.aliyun.com/repository/google' }
        maven { url 'https://jitpack.io' }

        google()
        mavenCentral()
        jcenter() // Warning: this repository is going to shut down soon

    }
}

...


setting.gradle 注释一下
//dependencyResolutionManagement {
//    repositoriesMode.set(RepositoriesMode.FAIL_ON_PROJECT_REPOS)
//    repositories {
//        google()
//        mavenCentral()
//        jcenter() // Warning: this repository is going to shut down soon
//    }
//}
依赖添加
    //glide
    implementation 'com.github.bumptech.glide:glide:4.12.0'
    annotationProcessor 'com.github.bumptech.glide:compiler:4.12.0'//注解注入模块

    //http 请求
    implementation("com.squareup.okhttp3:okhttp:4.9.2")

    //retrofit
    implementation 'com.squareup.retrofit2:retrofit:2.9.0'

    //json 解析
    implementation 'com.google.code.gson:gson:2.8.8'
权限申请
<uses-permission android:name="android.permission.INTERNET" />
http请求的特殊设置
res/xml/config.xml
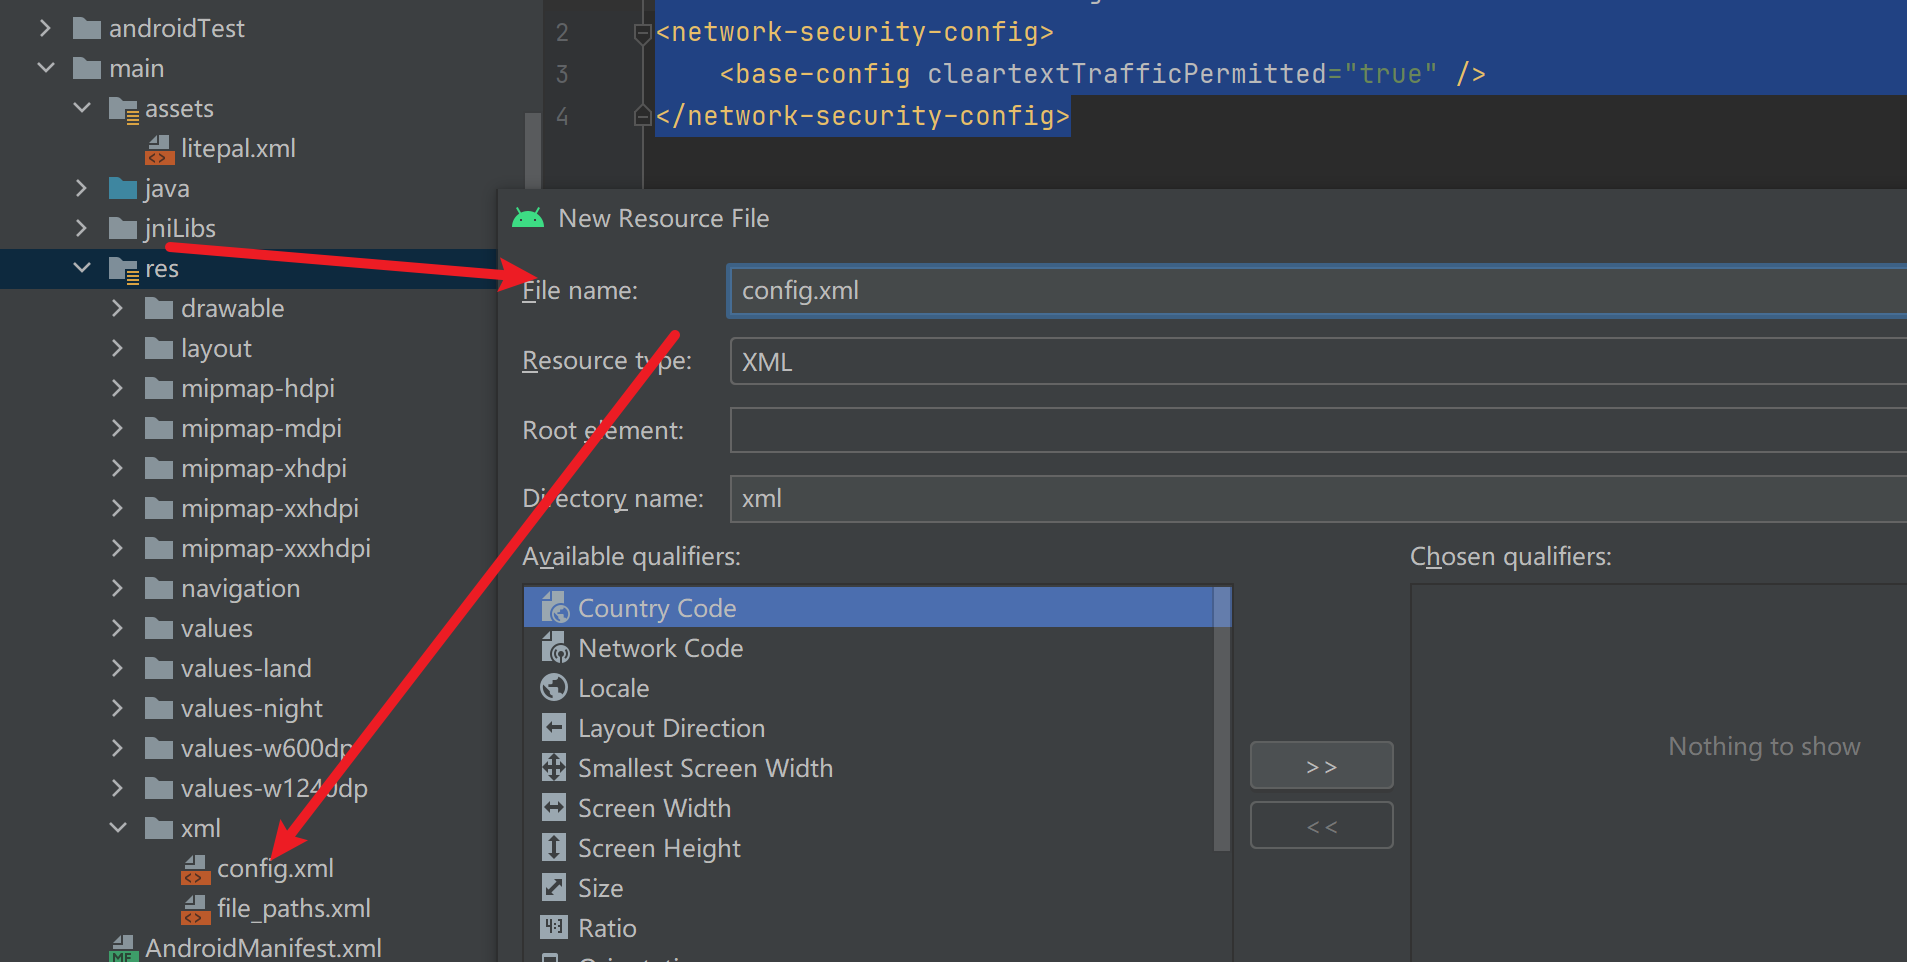
<?xml version="1.0" encoding="utf-8"?>
<network-security-config>
    <base-config cleartextTrafficPermitted="true" />
</network-security-config>

.....
<application
    android:allowBackup="true"
    android:icon="@mipmap/ic_launcher"
    android:label="@string/app_name"
    android:networkSecurityConfig="@xml/config"
....
Glide
官网
图片资源 https://huaban.com/
demo效果

xml布局


xml 代码

<?xml version="1.0" encoding="utf-8"?>
<LinearLayout xmlns:android="http://schemas.android.com/apk/res/android"
    xmlns:app="http://schemas.android.com/apk/res-auto"
    xmlns:tools="http://schemas.android.com/tools"
    android:layout_width="match_parent"
    android:layout_height="match_parent"
    android:orientation="vertical">

    <LinearLayout
        android:layout_width="match_parent"
        android:layout_height="wrap_content"
        android:orientation="horizontal">

        <ImageView
            android:id="@+id/iv1"
            android:layout_width="200dp"
            android:layout_height="200dp"
            android:background="#F44336" />

        <ImageView
            android:id="@+id/iv2"
            android:layout_width="200dp"
            android:layout_height="200dp"
            android:background="#4CAF50" />


    </LinearLayout>

    <LinearLayout
        android:layout_width="match_parent"
        android:layout_height="wrap_content"
        android:layout_marginTop="20dp"
        android:orientation="horizontal">

        <ImageView
            android:id="@+id/iv3"
            android:layout_width="200dp"
            android:layout_height="200dp"
            android:background="#2196F3" />

        <ImageView
            android:id="@+id/iv4"
            android:layout_width="200dp"
            android:layout_height="200dp"
            android:background="#FFC107" />

    </LinearLayout>


</LinearLayout>
Act-java
java

----


@Override
    protected void onCreate(Bundle savedInstanceState) {
        super.onCreate(savedInstanceState);
        setContentView(R.layout.activity_glide);

        //基本使用
        ImageView iv1 = findViewById(R.id.iv1);
        String ImgUrl1 = "https://hbimg.huabanimg.com/dcc3f25f9834681095d5c1ac52c4918a0fdf497a34ef9-JU0zF9_fw658/format/webp";
        Glide.with(this)//当前环境 context fragment view
                .load(ImgUrl1)//图片地址
                .centerCrop()//缩放居中显示
                .into(iv1);//显示图片的组件对象


        //占位符 - 加载前 ,加载异常,加载资源异常的一个图片占位
        ImageView iv2 = findViewById(R.id.iv2);
        String ImgUrl2 = "https://hbimg.huabanimg.com/5ff2935963b42de42d838ab221fe55ad5c3d8eaa4a313-v6XTjn_fw658/format/webp";
        //一个 null 的个人资料 url 可能暗示这个用户没有设置头像,因此应该使用默认头像。
        // 然而,null 也可能表明这个元数据根本就是不合法的,或者取不到。 默认情况下Glide将 null 作为错误处理,所以可以接受 null 的应用应当显式地设置一个 fallback Drawable
        // Glide.with(this)//当前环境 context fragment view
        //         .load(ImgUrl2)//图片地址
        //         .placeholder(R.mipmap.ic_launcher)//加载前
        //         .error(new ColorDrawable(Color.RED))//加载资源失败
        //         .fallback(new ColorDrawable(Color.GREEN))//加载 资源为null
        //         .into(iv2);//显示图片的组件对象

        // ImgUrl2 = null;//fallback

        //可以 把系统同 设置放到 until里面,返回一个通用配置对象
        RequestOptions requestOptions = new RequestOptions();
        requestOptions
                .placeholder(R.mipmap.ic_launcher)//加载前
                .error(new ColorDrawable(Color.RED))//加载资源失败
                .fallback(new ColorDrawable(Color.BLUE))//加载 资源为null
                .centerCrop();//缩放

        Glide.with(this)//当前环境 context fragment view
                .load(ImgUrl2)//图片地址
                .apply(requestOptions)//加载前
                .into(iv2);//显示图片的组件对象


        //过渡效果 - transition listView 少用消耗性能
        ImageView iv3 = findViewById(R.id.iv3);
        String ImgUrl3 = "https://hbimg.huabanimg.com/55b2ac82ab62732fb70f09715b90aac11e58648c23bd9-yratri_fw658/format/webp";
        DrawableCrossFadeFactory factory =
                new DrawableCrossFadeFactory
                        .Builder(3000)//时间
                        .setCrossFadeEnabled(true)
                        .build();

        //变换效果 - transform 改变图片大小,角度
        Glide.with(this)
                // .asBitmap()// - BitmapTransitionOptions
                .load(ImgUrl3)
                .placeholder(R.mipmap.ic_launcher)
                //bitmap写法
                // .transition(BitmapTransitionOptions.withCrossFade(factory))
                //---- 普通写法
                // .transition(DrawableTransitionOptions.withCrossFade(factory))
                .transition(withCrossFade(factory))
                // ---- 单独设置
                // .transform(new CenterCrop())//缩放
                // .transform(new CircleCrop())//圆角
                // .transform(new RoundedCorners(40))//指定角度 的圆角
                // .transform(new GranularRoundedCorners(0, 20, 100, 200))//指定四个角度 的圆角
                // .transform(new Rotate(40))//指定角度 旋转
                //多重变换
                // .transform(new MultiTransformation(new CircleCrop(), new Rotate(40)))
                .transform(new CenterCrop(), new CircleCrop(), new Rotate(40))//简写
                .into(iv3);


        //在 Application 模块中的使用 - 简写
        // 创建moudle 然后build,在通过 GlideApp
        // GlideExtension + GlideOption 拓展方法的形式封装 多个方法 - 然后build
        ImageView iv4 = findViewById(R.id.iv4);
        String ImgUrl4 = "https://hbimg.huabanimg.com/8260d6ca8b6550d4aefb195e8ad92cb311ce222737276-4PQrrW_fw658/format/webp";
        GlideApp.with(this)
                .load(ImgUrl4)
                .myPlaceholder()//拓展方法
                // .miniThumb(400)//拓展方法
                .into(iv4);


    }
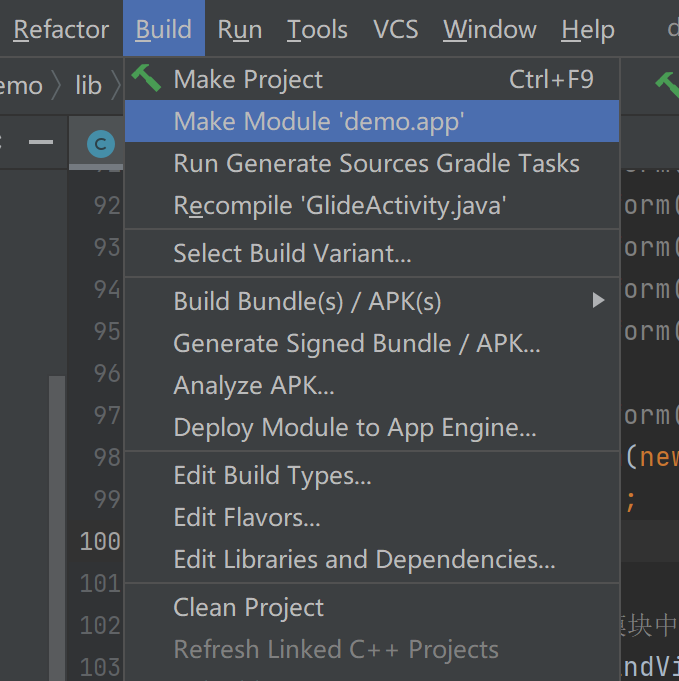
拓展Module
Glide v4 : Generated API (muyangmin.github.io)
App拓展 - MyAppGlideMoudle.java

import com.bumptech.glide.annotation.GlideModule;
import com.bumptech.glide.module.AppGlideModule;

@GlideModule
public class MyAppGlideMoudle extends AppGlideModule {

}


GlideExtension 拓展 -MyAppGlideExtension.java


import android.graphics.Color;
import android.graphics.drawable.ColorDrawable;

import androidx.annotation.NonNull;

import com.bumptech.glide.annotation.GlideExtension;
import com.bumptech.glide.annotation.GlideOption;
import com.bumptech.glide.request.BaseRequestOptions;
import com.hw.demo.R;

@GlideExtension
public class MyAppGlideExtension {

    // Size of mini thumb in pixels.
    // private static final int MINI_THUMB_SIZE = 100;

    private MyAppGlideExtension() {
    } // utility class

    @NonNull
    @GlideOption
    public static BaseRequestOptions<?> miniThumb(BaseRequestOptions<?> options, int size) {

        return options
                .fitCenter()
                .override(size);
    }

    @NonNull
    @GlideOption
    public static BaseRequestOptions<?> myPlaceholder(BaseRequestOptions<?> options) {

        return options
                .centerCrop()
                .placeholder(R.mipmap.ic_launcher)
                .error(new ColorDrawable(Color.RED))
                .error(new ColorDrawable(Color.BLUE));
    }
}
一定要build
build - make module
使用注意:
图片类型 - png jpeg
列表 使用 https://muyangmin.github.io/glide-docs-cn/doc/getting-started.html#%E5%9C%A8-listview-%E5%92%8C-recyclerview-%E4%B8%AD%E7%9A%84%E4%BD%BF%E7%94%A8
Okhttp3
官网
https://github.com/square/okhttp
测试资源网址
https://httpbin.org
https://www.wanandroid.com/blog/show/2
基本使用
xml布局
<?xml version="1.0" encoding="utf-8"?>
<LinearLayout xmlns:android="http://schemas.android.com/apk/res/android"
    xmlns:app="http://schemas.android.com/apk/res-auto"
    xmlns:tools="http://schemas.android.com/tools"
    android:layout_width="match_parent"
    android:layout_height="match_parent"
    android:orientation="vertical" android:gravity="center">

    <Button
        android:layout_width="wrap_content"
        android:layout_height="wrap_content"
        android:onClick="getSync"
        android:text="同步 Get" />

    <Button
        android:layout_width="wrap_content"
        android:layout_height="wrap_content"
        android:onClick="getAsync"
        android:text="异步 Get" />

    <Button
        android:layout_width="wrap_content"
        android:layout_height="wrap_content"
        android:onClick="postSync"
        android:text="同步 Post" />

    <Button
        android:layout_width="wrap_content"
        android:layout_height="wrap_content"
        android:onClick="postAsyc"
        android:text="异步 Post" />
</LinearLayout>
java代码
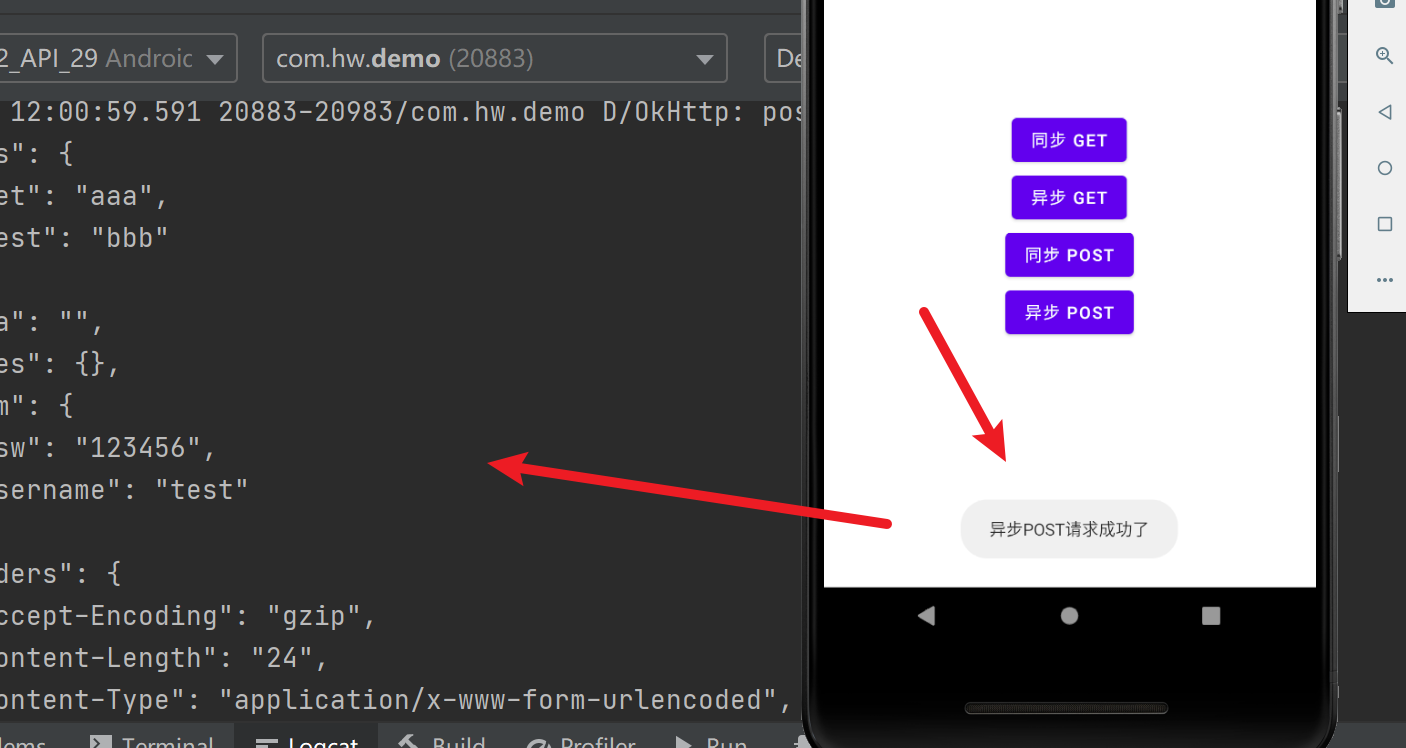
private static final String TAG = "OkHttp";

    public void getSync(View view) {
        //请求客户端对象
        //request 对象
        //call 对象
        //response 对象
        new Thread(new Runnable() {//Android 网络请求需要放到 子线程中
            @Override
            public void run() {

                OkHttpClient okHttpClient = new OkHttpClient();

                Request request = new Request.Builder()
                        .url("https://www.httpbin.org/get?a=1&b=2")
                        .build();

                Call call = okHttpClient.newCall(request);

                try {
                    Response response = call.execute();
                    Log.d(TAG, "getSync: " + response.body().string());//这里是 string 不是toString
                } catch (IOException exception) {
                    exception.printStackTrace();
                }

            }
        }).start();
    }

    public void getAsync(View view) {

        OkHttpClient okHttpClient = new OkHttpClient();

        Request request = new Request.Builder()
                .url("https://www.httpbin.org/get?a=1&b=2")
                .build();

        Call call = okHttpClient.newCall(request);

        //异步使用 - enqueue
        call.enqueue(new Callback() {
            @Override
            public void onFailure(@NonNull Call call, @NonNull IOException e) {
                Log.d(TAG, "getSync: " + e.getMessage());
            }

            @Override
            public void onResponse(@NonNull Call call, @NonNull Response response) throws IOException {

                if (response.isSuccessful()) {//判断http 请求成功
                    Log.d(TAG, "getAsync: " + response.body().string());//这里是 string 不是toString

                    //注意这里是子线程 不能更新UI操作
                    //通过handerl bus looper 可以到主线程更新UI
                    Looper.prepare();//启动 -准备发送消息到主线程
                    Toast.makeText(getApplicationContext(), "异步GET请求成功了".toString(), Toast.LENGTH_SHORT).show();
                    Looper.loop();//循环
                }

            }
        });


    }

    public void postSync(View view) {

        //请求客户端 client
        //请求对象 request + 请求体 requestBody
        //call 对象
        //response对象
        new Thread(new Runnable() {
            @Override
            public void run() {
                OkHttpClient okHttpClient = new OkHttpClient();

                FormBody formBody = new FormBody.Builder()
                        .add("username", "test")
                        .add("psw", "123456")
                        .build();

                Request request = new Request.Builder()
                        .url("https://httpbin.org/post?get=aaa&test=bbb")
                        .post(formBody)
                        .build();

                Call call = okHttpClient.newCall(request);

                try {
                    Response response = call.execute();
                    Log.d(TAG, "postSync: " + response.body().string());
                } catch (IOException exception) {
                    exception.printStackTrace();
                }
            }
        }).start();
    }

    public void postAsyc(View view) {

        OkHttpClient okHttpClient = new OkHttpClient();

        FormBody formBody = new FormBody.Builder()
                .add("username", "test")
                .add("psw", "123456")
                .build();

        Request request = new Request.Builder()
                .url("https://httpbin.org/post?get=aaa&test=bbb")
                .post(formBody)
                .build();

        Call call = okHttpClient.newCall(request);
        call.enqueue(new Callback() {
            @Override
            public void onFailure(@NonNull Call call, @NonNull IOException e) {
                Log.d(TAG, "postAsyc: " + e.getMessage());
            }

            @Override
            public void onResponse(@NonNull Call call, @NonNull Response response) throws IOException {
                Log.d(TAG, "postAsyc: " + response.body().string());

                //注意这里是子线程 不能更新UI操作
                //通过handerl bus looper 可以到主线程更新UI
                Looper.prepare();//启动 -准备发送消息到主线程
                Toast.makeText(getApplicationContext(), "异步POST请求成功了".toString(), Toast.LENGTH_SHORT).show();
                Looper.loop();//循环
            }
        });

    }
client 构造器 使用拦截器,缓存信息
多种请求体:文件上传,json提交
retrofit

