Android(java)学习笔记51:ScrollView用法
1. 理论部分
(1)ScrollView和HorizontalScrollView是为控件或者布局添加滚动条
(2)上述两个控件只能有一个孩子,但是它并不是传统意义上的容器
(3)上述两个控件可以互相嵌套
(4)滚动条的位置现在的实验结果是:可以由layout_width和layout_height设定
(5)ScrollView用于设置垂直滚动条,HorizontalScrollView用于设置水平滚动条:需要注意的是,有一个属性是 scrollbars 可以设置滚动条的方向:但是ScrollView设置成horizontal是和设置成none是效果同,HorizontalScrollView设置成vertical和none的效果同。
代码实践:
 1 <?xml version="1.0" encoding="utf-8"?>
 2 <ScrollView xmlns:android="http://schemas.android.com/apk/res/android"
 3     android:id="@+id/mScrollView"
 4     android:layout_width="fill_parent"
 5     android:layout_height="wrap_content"
 6     android:scrollbars="vertical" >
 7
 8     <LinearLayout
 9         android:layout_width="fill_parent"
10         android:layout_height="wrap_content"
11         android:orientation="vertical" >
12
13         <LinearLayout
14             android:layout_width="fill_parent"
15             android:layout_height="fill_parent"
16             android:orientation="horizontal" >
17
18             <Button
19                 android:id="@+id/openNetCard"
20                 android:layout_width="wrap_content"
21                 android:layout_height="wrap_content"
22                 android:layout_weight="1"
23                 android:text="打开无线网卡" />
24
25             <Button
26                 android:id="@+id/closeNetCard"
27                 android:layout_width="wrap_content"
28                 android:layout_height="wrap_content"
29                 android:layout_weight="1"
30                 android:text="关闭无线网卡" />
31
32             <Button
33                 android:id="@+id/checkNetCardState"
34                 android:layout_width="wrap_content"
35                 android:layout_height="wrap_content"
36                 android:layout_weight="1"
37                 android:text="检查网卡状态" />
38         </LinearLayout>
39
40         <LinearLayout
41             android:layout_width="fill_parent"
42             android:layout_height="fill_parent"
43             android:orientation="horizontal" >
44
45             <Button
46                 android:id="@+id/scan"
47                 android:layout_width="wrap_content"
48                 android:layout_height="wrap_content"
49                 android:layout_weight="1"
50                 android:text="扫描网络" />
51
52             <Button
53                 android:id="@+id/getScanResult"
54                 android:layout_width="wrap_content"
55                 android:layout_height="wrap_content"
56                 android:layout_weight="1"
57                 android:text="扫描结果" />
58         </LinearLayout>
59
60         <LinearLayout
61             android:layout_width="fill_parent"
62             android:layout_height="fill_parent"
63             android:orientation="horizontal" >
64
65             <Button
66                 android:id="@+id/connect"
67                 android:layout_width="wrap_content"
68                 android:layout_height="wrap_content"
69                 android:layout_weight="1"
70                 android:text="连接Wifi" />
71
72             <Button
73                 android:id="@+id/disconnect"
74                 android:layout_width="wrap_content"
75                 android:layout_height="wrap_content"
76                 android:layout_weight="1"
77                 android:text="断开Wifi" />
78
79             <Button
80                 android:id="@+id/checkNetWorkState"
81                 android:layout_width="wrap_content"
82                 android:layout_height="wrap_content"
83                 android:layout_weight="1"
84                 android:text="Wifi连接状态" />
85         </LinearLayout>
86
87         <TextView
88             android:id="@+id/scanResult"
89             android:layout_width="fill_parent"
90             android:layout_height="wrap_content" />
91     </LinearLayout>
92
93 </ScrollView>
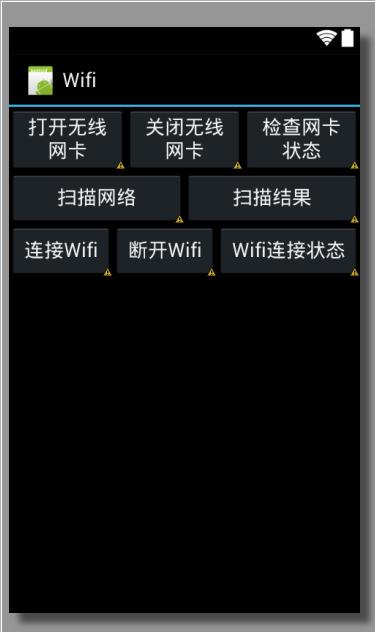
布局图如下:

……
public void onCreate(Bundle savedInstanceState) {
super.onCreate(savedInstanceState);
setContentView(R.layout.main);
}
……


