第12章 摄像头的使用
第十二章 摄像头的使用
1. K230的摄像头架构
在立创·庐山派-K230-CanMV开发板中,Sensor模块的主要作用是负责获取图像数据。这个模块将光信号转化为数字信号,供后续图像处理算法使用。
K230的Sensor模块API提供了对这些硬件的底层控制,模块负责图像采集与数据处理。该模块提供了一套高级 API,开发者可以利用这些接口轻松获取不同格式与尺寸的图像,而无需了解底层硬件的具体实现。其架构如下图所示:
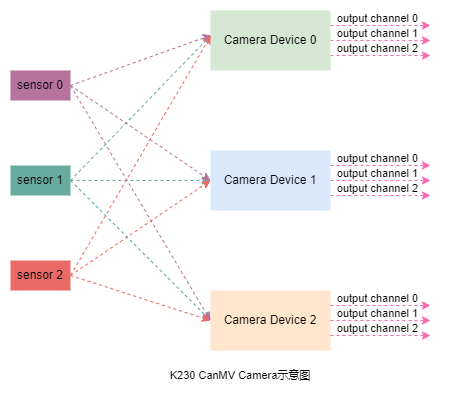
图中,sensor 0、sensor 1 和 sensor 2 分别代表三个图像输入传感器设备;这些传感器主要用于将环境中的光信号转化为数字图像信号。在实际系统中,这些传感器可以安装在不同的位置,用来捕获来自不同视角或者区域的图像数据。比如说三路摄像头场景,车辆前后摄像检测各一路+驾驶仓内一路。也可以将CSI0+CSI1转接成一个4lane的接口用来接更高清的摄像头。
Camera Device 0、Camera Device 1 和 Camera Device 2 是用于处理传感器输入数据的核心单元。每个 Camera Device 可以独立完成图像数据捕获,格式转换及预处理等。传感器和Camera Device之间是多对多的关系,也就是说多个传感器输入可以灵活映射到不同的Camera Device。
每个Camera Device支持 3个输出通道(output channel 0、output channel 1 和 output channel 2)。这些输出通道的主要功能是将处理后的图像数据并行传输到后续的算法模块或显示设备,同时也支持多种数据格式和尺寸。这样的架构设计,让K230能够支持多路图像数据的高效并行处理,非常适合实时性要求较高的AI视觉任务。
K230 的 sensor 模块最多支持三路图像传感器的同时接入,每一路均可独立完成图像数据的采集、捕获和处理。此外,每个视频通道可并行输出三路图像数据供后端模块进行进一步处理。实际应用中,具体支持的传感器数量、输入分辨率和输出通道数将受限于开发板的硬件配置和内存大小,因此需根据项目需求进行综合评估。
2. 摄像头模块基础配置
2.1 导入模块
要使用 摄像头 sensor,首先需要导入该模块:
from media.sensor import *
2.2 构造函数
在图像处理应用中,用户通常需要首先创建一个 Sensor 对象。CanMV K230 软件可以自动检测内置的图像传感器,无需用户手动指定具体型号,只需设置传感器的最大输出分辨率和帧率。
sensor = Sensor(id, [width, height, fps])
2.2.1 参数
| 参数名称 | 描述 | 输入/输出 | 说明 |
|---|---|---|---|
| id | csi 端口,支持 0,1,2 |
输入 | 可选,庐山派开发板默认摄像头为CSI2 |
| width | sensor 最大输出图像宽度 |
输入 | 可选,默认 1920 |
| height | sensor 最大输出图像高度 |
输入 | 可选,默认 1080 |
| fps | sensor 最大输出图像帧率 |
输入 | 可选,默认 30 |
2.2.2 返回值
| 返回值 | 描述 |
|---|---|
| Sensor 对象 | 传感器对象 |
2.2.3 示例
sensor = Sensor(id=0)
sensor = Sensor(id=0, width=1280, height=720, fps=60)
sensor = Sensor(id=0, width=640, height=480)
庐山派开发板的默认摄像头接口为CSI2,如果Sensor默认内不指定id,则默认为id=2.
也就是说以下两条语句是等效的:
sensor = Sensor()
sensor = Sensor(id=2)
2.3 sensor.reset
复位 sensor 对象。在构造 Sensor 对象后,必须调用此函数以继续执行其他操作。
sensor.reset()
2.4 sensor.set_framesize
设置指定通道的输出图像尺寸。用户可以通过 framesize 参数或直接指定 width 和 height 来配置输出图像尺寸。宽度会自动对齐到 16 像素宽。
sensor.set_framesize(framesize=FRAME_SIZE_INVALID, chn=CAM_CHN_ID_0, alignment=0, **kwargs)
kwargs是关键词参数(keyword argument)的缩写,目前可以输入的参数有width和height,这两个参数和framesize所设置的分辨率是一个东西,所以是互斥的,只能二选一。
2.4.1 参数
| 参数名称 | 描述 | 输入/输出 |
|---|---|---|
| framesize | sensor 输出图像尺寸 | 输入 |
| width【**kwargs】 | 输出图像宽度,kw_arg | 输入 |
| height 【**kwargs】 | 输出图像高度,kw_arg | 输入 |
| chn | sensor 输出通道号 | 输入 |
2.4.2 示例
# 配置 sensor 设备,输出通道 0,输出图尺寸为 640x480
sensor.set_framesize(chn=CAM_CHN_ID_0, width=640, height=480)

# 配置 sensor 设备,输出通道 1,输出图尺寸为 320x240
sensor.set_framesize(chn=CAM_CHN_ID_1, width=320, height=240)

# 配置 sensor 设备,输出通道 3,输出图尺寸为 640x480
sensor.set_framesize(chn=CAM_CHN_ID_3, framesize = sensor.VGA)
2.5 sensor.set_pixformat
配置指定通道的图像传感器输出图像格式。
sensor.set_pixformat(pix_format, chn=CAM_CHN_ID_0)
2.5.1 参数
| 参数名称 | 描述 | 输入/输出 |
|---|---|---|
| pix_format | 输出图像格式(像素格式) | 输入 |
| chn | sensor 输出通道号 | 输入 |
Sensor.RGB565 |
16 位 RGB 格式 |
|---|---|
Sensor.RGB888 |
24 位 RGB 格式 |
Sensor.RGBP888 |
分离的 24 位 RGB |
Sensor.YUV420SP |
半平面 YUV |
Sensor.GRAYSCALE |
灰度图 |
2.5.2 示例
# 配置 sensor 设备 0,输出通道 0,输出 NV12 格式
sensor.set_pixformat(Sensor.YUV420SP, chn=CAM_CHN_ID_0)

# 配置 sensor 设备 0,输出通道 1,输出 RGB888 格式
sensor.set_pixformat(Sensor.RGB888, chn=CAM_CHN_ID_1)
2.6 sensor.set_hmirror
配置图像传感器是否进行水平镜像。
sensor.set_hmirror(enable)
2.6.1 参数
| 参数名称 | 描述 | 输入/输出 |
|---|---|---|
| enable | True 开启水平镜像功能False 关闭水平镜像功能 |
输入 |
2.7 sensor.set_vflip
配置图像传感器是否进行垂直翻转。
sensor.set_vflip(enable)
2.7.1 参数
| 参数名称 | 描述 | 输入/输出 |
|---|---|---|
| enable | True 开启垂直翻转功能False 关闭垂直翻转功能 |
输入 |
2.8 sensor.run
启动图像传感器的输出。必须在调用 MediaManager.init() 之前执行此操作。
sensor.run()
- 当同时使用多个传感器(最多 3 个)时,仅需其中一个执行
run即可。
2.9 sensor.stop
停止图像传感器输出。必须在 MediaManager.deinit() 之前调用此方法。
sensor.stop()
- 如果同时使用多个图像传感器(最多 3 个),每个传感器都需单独调用
stop。
2.10 sensor.snapshot
从指定输出通道中捕获一帧图像数据。
sensor.snapshot(chn=CAM_CHN_ID_0)
2.10.1 参数
| 参数名称 | 描述 | 输入/输出 |
|---|---|---|
| chn | sensor 输出通道号 | 输入 |
2.10.2 返回值
| 返回值 | 描述 |
|---|---|
| image 对象 | 捕获的图像数据 |
| 其他 | 捕获失败 |
3. 摄像头基础使用示例
3.1 获取默认摄像头的图像
我们先来将默认摄像头CSI2接口上接的摄像头获取到的图像显示到IDE的帧缓冲区。首先需要将摄像头连接好,再上电并运行下面的程序:
import time, os, sys
from media.sensor import *
from media.display import *
from media.media import *

# 设备id
sensor_id = 2
sensor = None

try:
    sensor = Sensor(id=sensor_id)  # 创建一个摄像头对象,使用摄像头2
    sensor.reset()  # 先复位
    # 设置通道0的输出尺寸为1920x1080
    sensor.set_framesize(sensor.FHD, chn=CAM_CHN_ID_0)
    # 设置像素格式为RGB888
    sensor.set_pixformat(sensor.RGB888, chn=CAM_CHN_ID_0)
    # 使用K230的IDE帧缓冲区作为显示输出
    Display.init(Display.VIRT, width=1920, height=1080, to_ide=True)
    MediaManager.init()  # 初始化媒体管理器
    sensor.run()  # 启动摄像头

    while True:
        # 捕获通道0的图像
        img = sensor.snapshot(chn=CAM_CHN_ID_0)
        Display.show_image(img)  # 显示图像

except KeyboardInterrupt as e:
    print('Interrupted')
except BaseException as e:
    print(f'Error: {str(e)}')
finally:
    # 停止传感器运行
    if isinstance(sensor, Sensor):
        sensor.stop()
    # 反初始化
    Display.deinit()
    os.exitpoint(os.EXITPOINT_ENABLE_SLEEP)  # 进入低功耗模式
    time.sleep_ms(100)
    MediaManager.deinit()
3.2 打印当前帧率
import time, os, sys
import utime
from media.sensor import *
from media.display import *
from media.media import *

# 设备id
sensor_id = 2
sensor = None

try:
    sensor = Sensor(id=sensor_id)  # 创建一个摄像头对象,使用摄像头2
    sensor.reset()  # 先复位
    # 设置通道0的输出尺寸为1920x1080
    sensor.set_framesize(sensor.FHD, chn=CAM_CHN_ID_0)
    # 设置像素格式为RGB888
    sensor.set_pixformat(sensor.RGB888, chn=CAM_CHN_ID_0)
    # 使用K230的IDE帧缓冲区作为显示输出
    Display.init(Display.VIRT, width=1920, height=1080, to_ide=True)
    MediaManager.init()  # 初始化媒体管理器
    sensor.run()  # 启动摄像头
    clock = utime.clock()

    while True:
        clock.tick() # 更新当前时间
        # 捕获通道0的图像
        img = sensor.snapshot(chn=CAM_CHN_ID_0)
        Display.show_image(img)  # 显示图像
        print(f"fps = {clock.fps()}") # 打印帧率

except KeyboardInterrupt as e:
    print('Interrupted')
except BaseException as e:
    print(f'Error: {str(e)}')
finally:
    # 停止传感器运行
    if isinstance(sensor, Sensor):
        sensor.stop()
    # 反初始化
    Display.deinit()
    os.exitpoint(os.EXITPOINT_ENABLE_SLEEP)  # 进入低功耗模式
    time.sleep_ms(100)
    MediaManager.deinit()
3.3 按键将图片保存至TF卡
import time, os, sys
import image
from machine import Pin, FPIOA
from media.sensor import Sensor, CAM_CHN_ID_0  # 注意修改这里
from media.display import Display
from media.media import MediaManager

sensor_id = 2

gpio = FPIOA()
gpio.set_function(62, FPIOA.GPIO62)
gpio.set_function(20, FPIOA.GPIO20)
gpio.set_function(63, FPIOA.GPIO63)
gpio.set_function(53, FPIOA.GPIO53)

# LED模块配置
R = Pin(62, Pin.OUT, pull=Pin.PULL_NONE, drive=15)
G = Pin(20, Pin.OUT, pull=Pin.PULL_NONE, drive=15)
B = Pin(63, Pin.OUT, pull=Pin.PULL_NONE, drive=15)
R.high()
G.high()
B.high()
led_color = B

# 按键模块配置
button = Pin(53, Pin.IN, Pin.PULL_DOWN)
button_delay = 200  # 消抖时间
last_press_time = 0
button_last_state = 0

# 显示模式配置
Sensor_Mode = "LCD"
if Sensor_Mode == "VIRT":
    DISPLAY_WIDTH = 1920
    DISPLAY_HEIGHT = 1080
    FPS = 30
elif Sensor_Mode == "LCD":
    DISPLAY_WIDTH = 800
    DISPLAY_HEIGHT = 480
    FPS = 60
elif Sensor_Mode == "HDMI":
    DISPLAY_WIDTH = 1920
    DISPLAY_HEIGHT = 1080
    FPS = 30
else:
    raise Exception("Invalid Sensor Mode")


# 压缩并保存图像文件
def save_ipg(img, filename, quality=95):
    compressed = img.compress(quality=quality)
    with open(filename, 'wb') as f:
        f.write(compressed)
    print(f"[INFO] 使用save_ipg() 保存:{filename}")


# 创建图片文件夹,计算图片数量
image_folder = "/sdcard/images"
try:
    os.stat(image_folder)  # 先获取图像文件夹
except OSError:
    os.mkdir(image_folder)  # 创建文件夹

image_count = 0
existing_images = [fname for fname in os.listdir(image_folder)
                   if fname.startswith("lckfb_") and fname.endswith(".jpg")]

if existing_images:
    numbers = []
    for fname in existing_images:
        try:
            num_part = fname[6:11]
            numbers.append(int(num_part))
        except:
            pass
    if numbers:
        image_count = max(numbers)


# 摄像头配置
try:
    print("[INFO] 初始化摄像头")
    sensor = Sensor(id=sensor_id)
    sensor.reset()
    sensor.set_framesize(width=DISPLAY_WIDTH, height=DISPLAY_HEIGHT, chn=CAM_CHN_ID_0)
    sensor.set_pixformat(Sensor.RGB565, chn=CAM_CHN_ID_0)  # 修改为 CAM_CHN_ID_0

    if Sensor_Mode == "VIRT":
        Display.init(Display.VIRT, width=DISPLAY_WIDTH, height=DISPLAY_HEIGHT, fps=FPS)
    elif Sensor_Mode == "LCD":
        Display.init(Display.ST7701, width=DISPLAY_WIDTH, height=DISPLAY_HEIGHT, to_ide=True)
    elif Sensor_Mode == "HDMI":
        Display.init(Display.LT9611, width=DISPLAY_WIDTH, height=DISPLAY_HEIGHT, to_ide=True)

    MediaManager.init()
    sensor.run()
    print("[INFO] 摄像头已启动")

    fps = time.ticks_ms()  # 使用 ticks_ms()

    while True:
        current_time = time.ticks_ms()
        img = sensor.snapshot(chn=CAM_CHN_ID_0)
        button_state = button.value()

        # 判断按键是否按下
        if button_state == 1 and button_last_state == 0:
            if current_time - last_press_time > button_delay:
                led_color.low()
                time.sleep_ms(20)
                led_color.high()
                # 拍照并保存
                image_count += 1
                filename = f"{image_folder}/lckfb_{image_count:05d}_{img.width()}x{img.height()}.jpg"
                print(f"[INFO] 照片保存在 -> {filename}")
                save_ipg(img, filename, quality=95)
                last_press_time = current_time

        button_last_state = button_state

        # 绘制图片信息
        img.draw_string_advanced(0, 0, 32, str(image_count), color=(255, 0, 0))  # 使用 str(image_count)
        img.draw_string_advanced(0, DISPLAY_HEIGHT - 32, 32, str(fps), color=(255, 0, 0))

        Display.show_image(img)

except KeyboardInterrupt:
    print("[INFO] 用户停止")
except BaseException as e:
    print(f"[ERROR] 出现异常: {e}")
finally:
    if 'sensor' in locals() and isinstance(sensor, Sensor):
        sensor.stop()
    Display.deinit()
    os.exitpoint(os.EXITPOINT_ENABLE_SLEEP)
    time.sleep_ms(100)
    MediaManager.deinit()

 浙公网安备 33010602011771号