
第27章 WIFI实验-手机控制LED
第二十七章 WIFI实验-手机控制LED
1. 导入
前面我们已经学习了 ESP32 的 WIFI 常用通信方法, 要实现远程控制, 可使用 MQTT 通信与云端连接进行数据传输, 然后远端设备同样连接到云端收发 ESP32数据。 但有的场景需要在局域内实现无线控制, 比如利用 WIFI 连接控制小车或家居内智能设备等, 此时可使用 Socket 通信。 本实验就使用 Socket 通信让手机或电脑控制 ESP32 开发板上 LED。
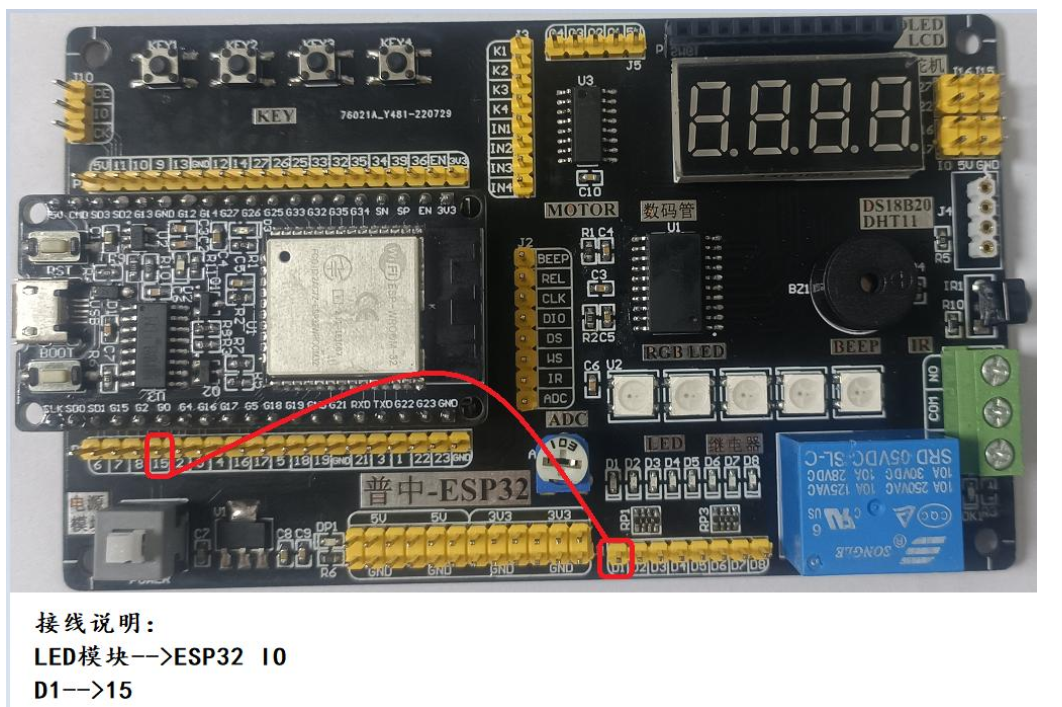
2. 硬件设计
由于 ESP32 内置 WIFI 功能, 所以直接在开发板上使用即可, 无需额外连接。
3. 软件设计
3.1 MicroPython函数使用
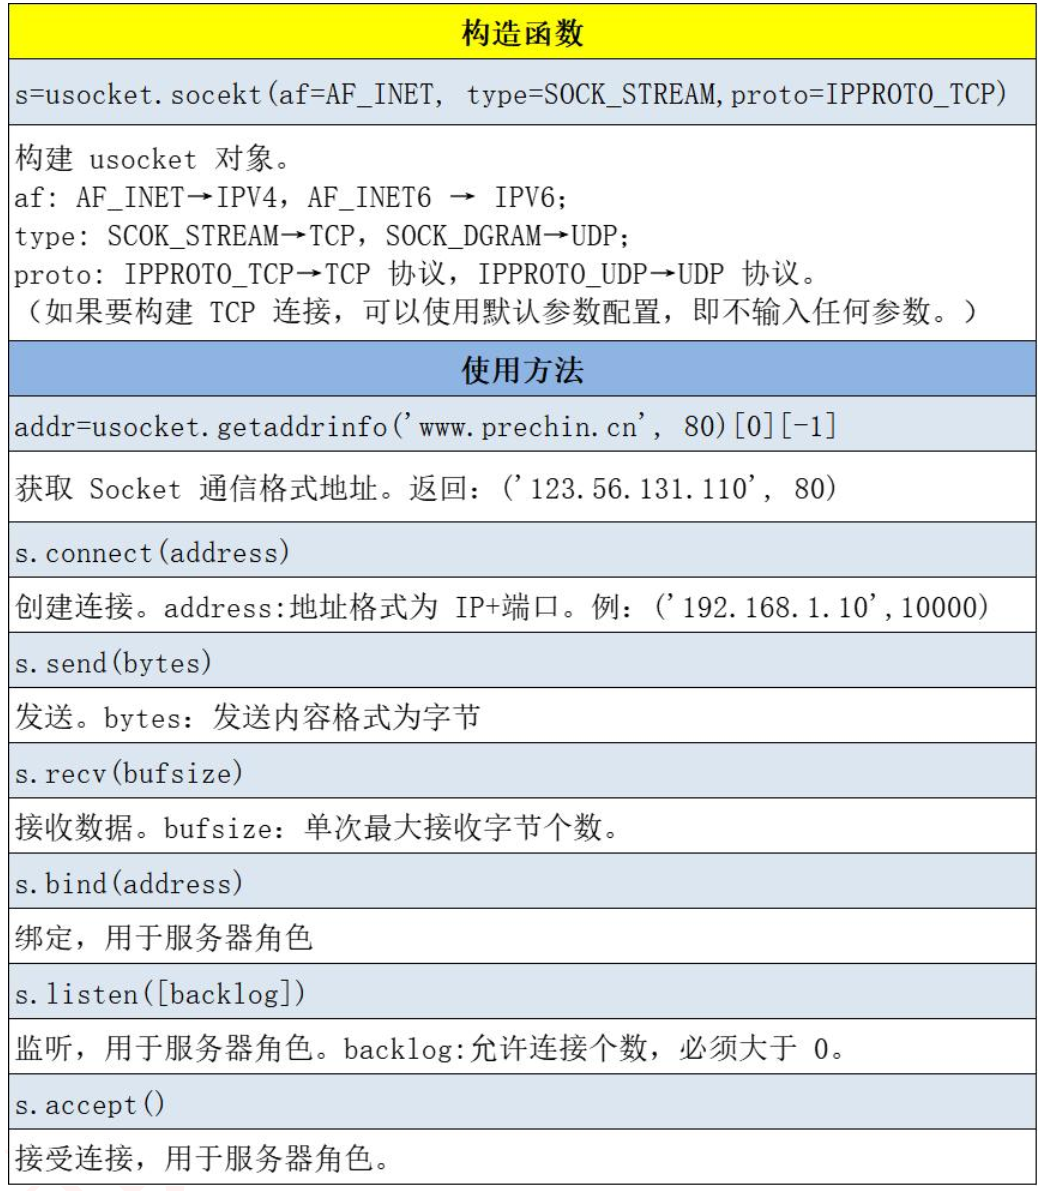
MicroPython 已经封装好相关模块 usocket,它与传统的 socket 大部分兼容, 两者均可使用, 本实验使用 usocket, 对象如下介绍:
3.2 代码分析
#导入Pin模块
from machine import Pin
import time
import network
import socket

#定义LED控制对象
led1=Pin(15,Pin.OUT,Pin.PULL_DOWN)

#连接的WIFI账号和密码
ssid = "ssid"
password = "12345678"

#WIFI连接
def wifi_connect():
    wlan=network.WLAN(network.STA_IF)  #STA模式
    wlan.active(True)  #激活

    if not wlan.isconnected():
        print("conneting to network...")
        wlan.connect(ssid,password)  #输入 WIFI 账号密码

        while not wlan.isconnected():
            led1.value(1)
            time.sleep_ms(300)
            led1.value(0)
            time.sleep_ms(300)
        led1.value(0)
        return False
    else:
        led1.value(0)
        print("network information:", wlan.ifconfig())
        return True

#网页数据
def web_page():
    if led1.value() == 0:
        gpio_state="OFF"
    else:
        gpio_state="ON"

    html = """<html><head> <title>ESP32 LED control</title> <meta name="viewport" content="width=device-width, initial-scale=1">
        <link rel="icon" href="data:,"> <style>html{font-family: Helvetica; display:inline-block; margin: 0px auto; text-align: center;}
        h1{color: #0F3376; padding: 2vh;}p{font-size: 1.5rem;}.button{display: inline-block; background-color: #e7bd3b; border: none;
        border-radius: 4px; color: white; padding: 16px 40px; text-decoration: none; font-size: 30px; margin: 2px; cursor: pointer;}
        .button2{background-color: #4286f4;}</style></head><body> <h1>ESP32 LED control</h1>
        <p>GPIO state: <strong>""" + gpio_state + """</strong></p><p><a href="/?led=on"><button class="button">ON</button></a></p>
        <p><a href="/?led=off"><button class="button button2">OFF</button></a></p></body></html>"""
    return html

#程序入口
if __name__=="__main__":

    if wifi_connect():
        #SOCK_STREAM表示的是TCP协议,SOCK_DGRAM表示的是UDP协议
        my_socket=socket.socket(socket.AF_INET, socket.SOCK_STREAM)  #创建socket连接
        # 将socket对象绑定ip地址和端口号
        my_socket.bind(('', 80))
        # 相当于电话的开机 括号里的参数表示可以同时接收5个请求
        my_socket.listen(5)

        while True:
            # 进入监听状态,等待别人链接过来,有两个返回值,
            #一个是对方的socket对象,一个是对方的ip以及端口
            client, addr = my_socket.accept()
            print('Got a connection from %s' % str(addr))
            # recv表示接收,括号里是最大接收字节
            request = client.recv(1024)
            request = str(request)
            print('Content = %s' % request)
            led_on = request.find('/?led=on')
            led_off = request.find('/?led=off')
            if led_on == 6:
                print('LED ON')
                led1.value(1)
            if led_off == 6:
                print('LED OFF')
                led1.value(0)
            response = web_page()
            client.send('HTTP/1.1 200 OK\n')
            client.send('Content-Type: text/html\n')
            client.send('Connection: close\n\n')
            client.sendall(response)
            client.close()
2024.8.24 第一次修订,后期不再维护
本文作者:hazy1k
本文链接:https://www.cnblogs.com/hazy1k/p/18377411
版权声明:本作品采用知识共享署名-非商业性使用-禁止演绎 2.5 中国大陆许可协议进行许可。


【推荐】国内首个AI IDE,深度理解中文开发场景,立即下载体验Trae
【推荐】编程新体验,更懂你的AI,立即体验豆包MarsCode编程助手
【推荐】抖音旗下AI助手豆包,你的智能百科全书,全免费不限次数
【推荐】轻量又高性能的 SSH 工具 IShell:AI 加持,快人一步