(2-2)SpringCloud-服务注册到Eureka Server集群并消费
服务注册到Eureka Server集群
在(2-1)SpringCloue-Eureka实现高可用注册中心中我们搭建好了高可用的Eureka注册中心,下面我们要把服务注册到Eureka Server 的集群中。
步骤一、修改(1-1)SpringCloud-Eureka:服务的注册与发现中 “服务注册与服务发现---注册服务提供者” 中的配置文件
eureka.client.serviceUrl.defaultZone=http://peer2:8752/eureka,http://peer2:8751/eureka
server.port=8877
spring.application.name=service-ha-hello
步骤二、启动集群注册中心
java -jar eureka-server-1.0.0.jar --spring.profiles.active=peer1
java -jar eureka-server-1.0.0.jar --spring.profiles.active=peer2
步骤三、启动服务提供者
java -jar eureka-server-ha-service-1.0.0.jar --server.port=8877
java -jar eureka-server-ha-service-1.0.0.jar --server.port=8878
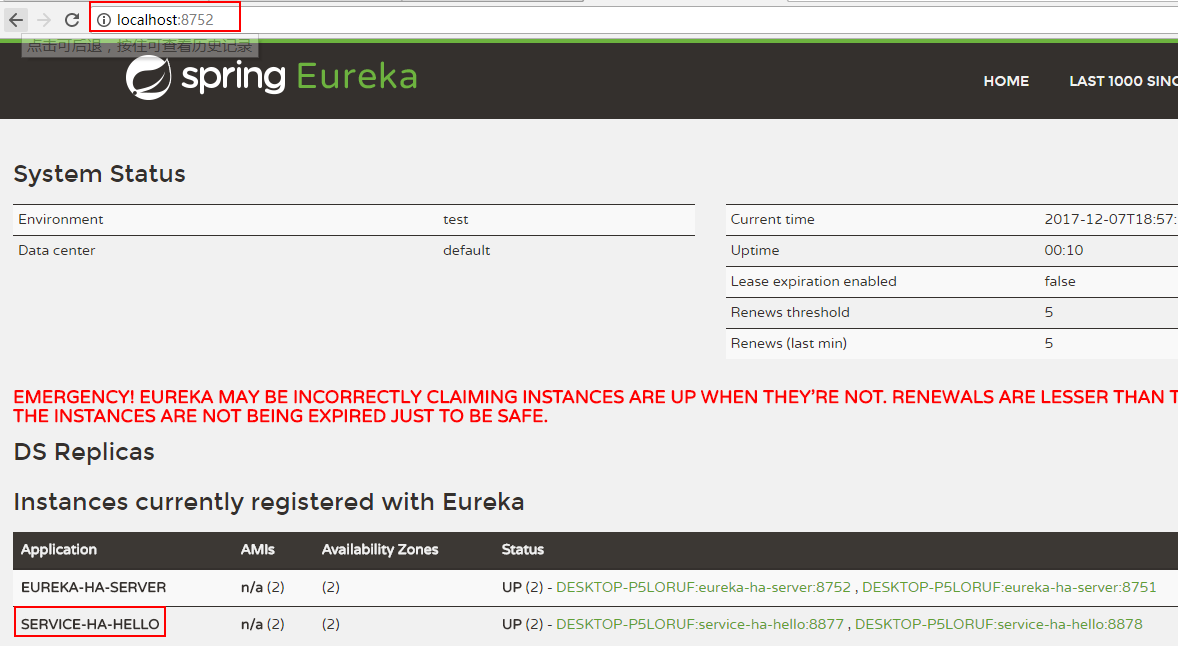
然后我们看到注册中心控制台已经有两个服务提供者了。说明注册成功了


https://gitee.com/huayicompany/springcloud-learn/tree/master/lesson2/eureka-server-ha-service
Ribbon负载均衡服务消费者实现:
根据 (1-2)SpringCloud:服务的消费者rest+ribbon 中的例子修改。
步骤一、修改ServiceRibbonApplication中的restTemplate()
package org.hope;

import org.springframework.boot.SpringApplication;
import org.springframework.boot.autoconfigure.SpringBootApplication;
import org.springframework.cloud.client.discovery.EnableDiscoveryClient;
import org.springframework.cloud.client.loadbalancer.LoadBalanced;
import org.springframework.context.annotation.Bean;
import org.springframework.web.client.RestTemplate;

@SpringBootApplication
@EnableDiscoveryClient
public class ServiceRibbonApplication {

    public static void main(String[] args) {
        SpringApplication.run(ServiceRibbonApplication.class, args);
    }

    @Bean
    @LoadBalanced//添加了这个注解
    RestTemplate restTemplate() {
        return new RestTemplate();
    }

}
步骤二、修改HelloService中的restTemplate
package org.hope.service;


import org.springframework.beans.factory.annotation.Autowired;
import org.springframework.stereotype.Service;
import org.springframework.web.client.RestTemplate;

@Service
public class HelloService {

    @Autowired
    RestTemplate restTemplate;

    public String hiService(String name) {
        //这里不能用这个localhost,否则调用不成功
//        return restTemplate.getForEntity("http://localhost:8877/hello?name=" + name, String.class).getBody();
        return restTemplate.getForEntity("http://service-ha-hello/hello?name=" + name, String.class).getBody();
    }

}
步骤三、浏览器中输入http://localhost:8764/hello?name=zhangsan

尝试多请求几次,看两个eureka-server-ha-service的控制台,可以看到两个控制台交替的打印日志。
https://gitee.com/huayicompany/springcloud-learn/tree/master/lesson2/service-ha-ribbon
参考:
[1] 《SpringCloud微服务实战》,电子工业出版社,翟永超


