一、享元模式定义
以共享的方式高效的支持大量的细粒度对象。通过复用内存中已存在的对象,降低系统创建对象实例的性能消耗。
享元的英文是Flyweight,是一个来自体育方面的专业用语,在拳击、摔跤和举重比赛中特指最轻量的级别。把这个单词移植到软件工程中,也是用来表示特别小的对象,即细粒度的对象。至于为什么把Flyweight翻译为“享元”,可以理解为共享元对象,也就是共享细粒度对象。
在面向对象中,大量细粒度对象的创建、销毁及存储所造成的资源和性能上的损耗,可能会在系统运行时形成瓶颈。那么该如何避免产生大量的细粒度对象,同时又不影响系统使用面向对象的方式进行操作呢?享元模式提供了一个比较好的解决方案。
二、享元模式的角色
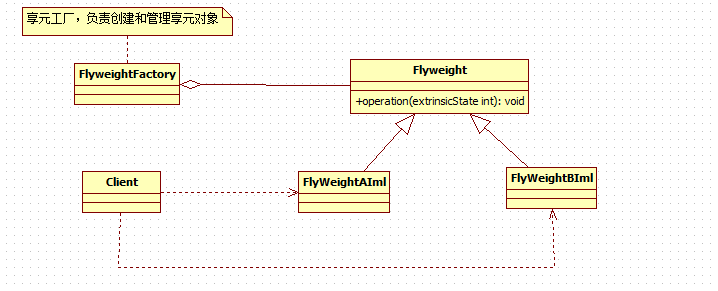
抽象享元类(Flyweight)
它是所有具体享元类的超类。为这些类规定出需要实现的公共接口,那些需要外蕴状态(Exte的操作可以通过方法的参数传入。抽象享元的接口使得享元变得可能,但是并不强制子类实行共享,因此并非所有的享元对象都是可以共享的。
具体享元类(FlyWeightAIml,FlyWeightBIml)
具体享元类实现了抽象享元类所规定的接口。如果有内蕴状态的话,必须负责为内蕴状态提供存储空间。享元对象的内蕴状态必须与对象所处的周围环境无关,从而使得享元对象可以在系统内共享。有时候具体享元类又称为单纯具体享元类,因为复合享元类是由单纯具体享元角色通过复合而成的。
享元工厂类(FlyweightFactoiy)
享元工厂类负责创建和管理享元对象。当一个客户端对象请求一个享元对象的时候,享元工厂需要检查系统中是否已经有一个符合要求的享元对象,如果已经有了,享元工厂角色就应当提供这个已有的享元对象;如果系统中没有适当的享元对象的话,享元工厂角色就应当创建一个新的合适的享元对象。
客户类(Client)
客户类需要自行存储所有享元对象的外蕴状态。
通用类图如下:
首先是享元抽象类:
package com.ssy.wlj.flyweight;

/**
 * FlyWeight 享元抽象类
 * @author Administrator
 * @since 2019/05/23
 *
 */
public abstract class FlyWeight {
    protected String charStr = "";
    protected int fontSize;
    protected abstract void operator(int fontSize);
    // 显示方法
    protected abstract void displayCharator();
}
享元工厂类:
package com.ssy.wlj.flyweight;

import java.util.Hashtable;

/**
 * CharactorFactory 工厂
 *
 * @author Administrator
 * @since 2019/05/23
 *
 */
public class CharactorFactory {
    private Hashtable<String, FlyWeight> charactors = new Hashtable<String, FlyWeight>();

    // 构造函数
    public CharactorFactory() {
        charactors.put("A", new FlyWeightAIml());
        charactors.put("B", new FlyWeightBIml());
    }

    // 获得指定字符实例
    public FlyWeight getCharactor(String key) {
        FlyWeight charactor = (FlyWeight) charactors.get(key);
        if (charactor == null) {
            if (key.equals("A")) {
                charactor = new FlyWeightAIml();
            } else if (key.equals("B")) {
                charactor = new FlyWeightBIml();
            }
            charactors.put(key, charactor);
        }
        return charactor;
    }
}
具体实现类:
package com.ssy.wlj.flyweight;

public class FlyWeightAIml extends FlyWeight {

    public FlyWeightAIml() {
        this.charStr = "A";
        this.fontSize=12;
    }

    @Override
    protected void operator(int fontSize) {
        this.fontSize=fontSize;

    }

    @Override
    protected void displayCharator() {
        System.out.println("字符:" + this.charStr + ",大小:" + fontSize);
    }

}
package com.ssy.wlj.flyweight;

public class FlyWeightBIml extends FlyWeight {

    public FlyWeightBIml() {
        this.charStr = "B";
        this.fontSize = 12;
    }

    @Override
    protected void operator(int fontSize) {
        this.fontSize = fontSize;
    }

    @Override
    protected void displayCharator() {
        System.out.println("字符:" + this.charStr + ",大小:" + fontSize);
    }

}
最后编写测试类:
package com.ssy.wlj.flyweight;

public class Client {
    public static void main(String[] args) {
        //flyweith();
        flyweith2();
    }

    // 设置字符的大小
    public static void display(FlyWeight objChar, int nSize) {
        try {
            System.out.println("字符:" + objChar.charStr + ",大小:" + nSize);
        } catch (Exception err) {
        }
    }

    public static void flyweith() {
        FlyWeightAIml a = new FlyWeightAIml();
        FlyWeightBIml b = new FlyWeightBIml();
        // 显示字符A
        display(a, 12);
        // 显示字符B
        display(b, 14);
    }

    public static void flyweith2() {
        FlyWeightAIml a = new FlyWeightAIml();
        FlyWeightBIml b = new FlyWeightBIml();
        // 设置字符A的大小
        a.operator(12);
        // 显示字符B
        a.displayCharator();
        // 设置字符B的大小
        b.operator(14);
        // 显示字符B
        b.displayCharator();
    }
}
运行效果:
字符:A,大小:12
字符:B,大小:14
三、享元模式实例展示
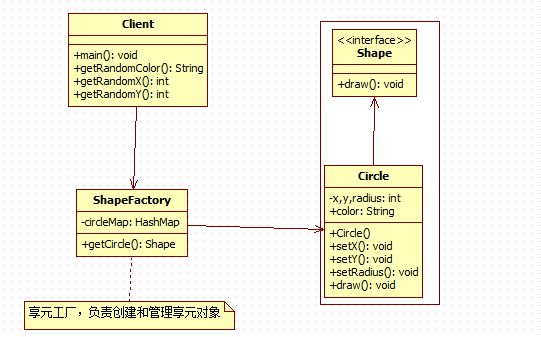
我们将创建一个 Shape 接口和实现了 Shape 接口的实体类 Circle。下一步是定义工厂类 ShapeFactory。
ShapeFactory 有一个 Circle 的 HashMap,其中键名为 Circle 对象的颜色。无论何时接收到请求,都会创建一个特定颜色的圆。ShapeFactory 检查它的 HashMap 中的 circle 对象,如果找到 Circle 对象,则返回该对象,否则将创建一个存储在 hashmap 中以备后续使用的新对象,并把该对象返回到客户端。
FlyWeightPatternDemo,我们的演示类使用 ShapeFactory 来获取 Shape 对象。它将向 ShapeFactory 传递信息(red / green / blue/ black / white),以便获取它所需对象的颜色。
类图如下:
步骤 1
创建一个接口。
package com.ssy.wlj.flyweight2;

/**
 *   享元接口
 * @author Administrator
 * @since 2019/05/23
 *
 */
public interface Shape {
    void draw();
}
步骤 2
创建实现接口的实体类。
package com.ssy.wlj.flyweight2;

public class Circle implements Shape {
    private String color;
    private int x;
    private int y;
    private int radius;

    public Circle(String color) {
        this.color = color;
    }

    public void setX(int x) {
        this.x = x;
    }

    public void setY(int y) {
        this.y = y;
    }

    public void setRadius(int radius) {
        this.radius = radius;
    }

    @Override
    public void draw() {
        System.out.println("Circle: Draw() [Color : " + color + ", x : " + x + ", y :" + y + ", radius :" + radius);
    }
}
步骤 3
创建一个工厂,生成基于给定信息的实体类的对象。
package com.ssy.wlj.flyweight2;

import java.util.HashMap;

public class ShapeFactory {
    private static final HashMap<String, Shape> circleMap = new HashMap<>();

    public static Shape getCircle(String color) {
        Circle circle = (Circle) circleMap.get(color);

        if (circle == null) {
            circle = new Circle(color);
            circleMap.put(color, circle);
            System.out.println("Creating circle of color : " + color);
        }
        return circle;
    }
}
步骤 4
使用该工厂,通过传递颜色信息来获取实体类的对象。
package com.ssy.wlj.flyweight2;

public class Client {
    private static final String colors[] = { "Red", "Green", "Blue", "White", "Black" };

    public static void main(String[] args) {

        for (int i = 0; i < 20; ++i) {
            Circle circle = (Circle) ShapeFactory.getCircle(getRandomColor());
            circle.setX(getRandomX());
            circle.setY(getRandomY());
            circle.setRadius(100);
            circle.draw();
        }
    }

    private static String getRandomColor() {
        return colors[(int) (Math.random() * colors.length)];
    }

    private static int getRandomX() {
        return (int) (Math.random() * 100);
    }

    private static int getRandomY() {
        return (int) (Math.random() * 100);
    }
}
步骤 5
执行程序,输出结果:
Creating circle of color : Black
Circle: Draw() [Color : Black, x : 36, y :71, radius :100
Creating circle of color : Green
Circle: Draw() [Color : Green, x : 27, y :27, radius :100
Creating circle of color : White
Circle: Draw() [Color : White, x : 64, y :10, radius :100
Creating circle of color : Red
Circle: Draw() [Color : Red, x : 15, y :44, radius :100
Circle: Draw() [Color : Green, x : 19, y :10, radius :100
Circle: Draw() [Color : Green, x : 94, y :32, radius :100
Circle: Draw() [Color : White, x : 69, y :98, radius :100
Creating circle of color : Blue
Circle: Draw() [Color : Blue, x : 13, y :4, radius :100
Circle: Draw() [Color : Green, x : 21, y :21, radius :100
Circle: Draw() [Color : Blue, x : 55, y :86, radius :100
Circle: Draw() [Color : White, x : 90, y :70, radius :100
Circle: Draw() [Color : Green, x : 78, y :3, radius :100
Circle: Draw() [Color : Green, x : 64, y :89, radius :100
Circle: Draw() [Color : Blue, x : 3, y :91, radius :100
Circle: Draw() [Color : Blue, x : 62, y :82, radius :100
Circle: Draw() [Color : Green, x : 97, y :61, radius :100
Circle: Draw() [Color : Green, x : 86, y :12, radius :100
Circle: Draw() [Color : Green, x : 38, y :93, radius :100
Circle: Draw() [Color : Red, x : 76, y :82, radius :100
Circle: Draw() [Color : Blue, x : 95, y :82, radius :100

 浙公网安备 33010602011771号