spring boot学习
每一次的加载都会去扫描spring.factories文件里面的类并且放入ioc中
注解
@Async,@EnableAsync
前者告诉spring这是一个异步任务,后者在启动类上表示开启这个功能
@ResponseBody
@ResponseBody并不是以json返回。不加@ResponseBody,是将方法返回的值作为视图名称,并自动匹配视图去显示,而加上@ResponseBody就仅仅是将方法返回值当作内容直接返回到客户端,并且会自适应响应头的content-type,返回的字符串符合json,那么content-type就是application/json,如果是普通字符串,就是text/plain,但是加上注解属性produces=application/json,那么不管内容是什么格式,响应头的content-type就一直是application/json,不再去做自适应,至于内容是不是json都不重要了
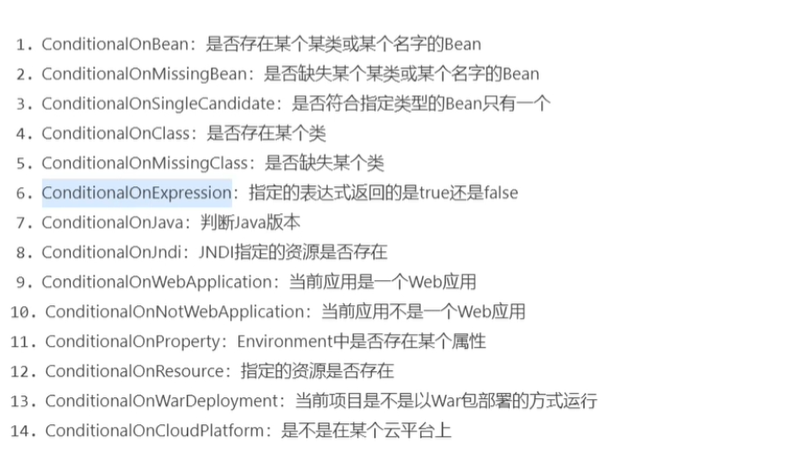
@ConditionalOnBean与@ConditionalOnMissBean
@ConditionalOnBean(value=类.class)作用与bean上,表示需要value的bean以及存在于ioc容器当中前提条件。
@ConditionalOnMissBean表示是否缺失某个bean,如果不,满足条件,就报错。
其余的小结
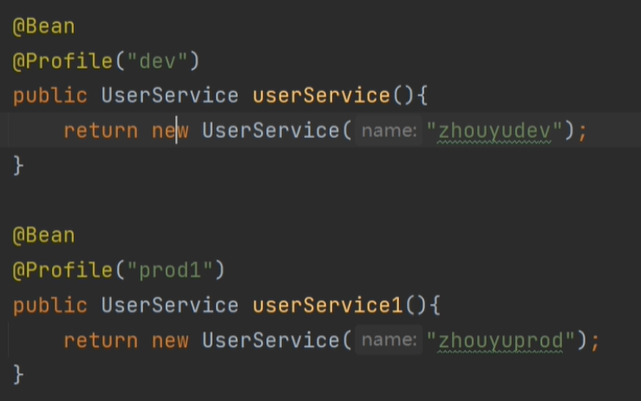
@Profiles
可以根据环境决定是否创造bean
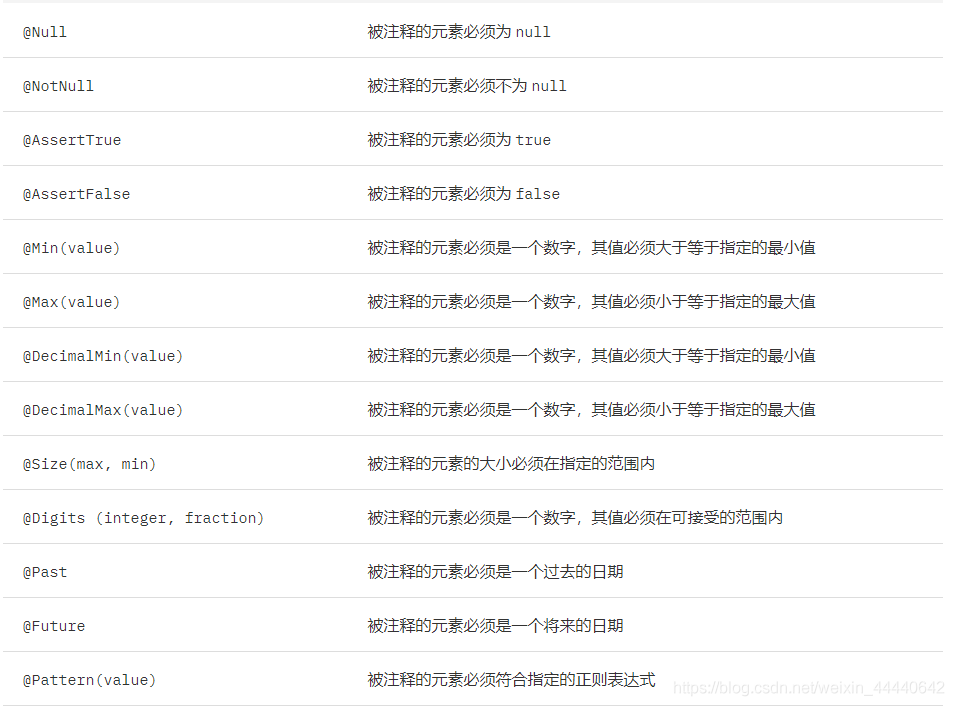
jsr-303校验格式
集成Durid
导入依赖
<!-- https://mvnrepository.com/artifact/com.alibaba/druid -->
<dependency>
    <groupId>com.alibaba</groupId>
    <artifactId>druid</artifactId>
    <version>1.1.21</version>
</dependency>
配置yaml文件
spring:
  datasource:
    username: root
    password: 123456
    #?serverTimezone=UTC解决时区的报错
    url: jdbc:mysql://localhost:3306/springboot?serverTimezone=UTC&useUnicode=true&characterEncoding=utf-8
    driver-class-name: com.mysql.cj.jdbc.Driver
    type: com.alibaba.druid.pool.DruidDataSource

    #Spring Boot 默认是不注入这些属性值的,需要自己绑定
    #druid 数据源专有配置
    initialSize: 5
    minIdle: 5
    maxActive: 20
    maxWait: 60000
    timeBetweenEvictionRunsMillis: 60000
    minEvictableIdleTimeMillis: 300000
    validationQuery: SELECT 1 FROM DUAL
    testWhileIdle: true
    testOnBorrow: false
    testOnReturn: false
    poolPreparedStatements: true

    #配置监控统计拦截的filters,stat:监控统计、log4j:日志记录、wall:防御sql注入
    #如果允许时报错  java.lang.ClassNotFoundException: org.apache.log4j.Priority
    #则导入 log4j 依赖即可,Maven 地址:https://mvnrepository.com/artifact/log4j/log4j
    filters: stat,wall,log4j
    maxPoolPreparedStatementPerConnectionSize: 20
    useGlobalDataSourceStat: true
    connectionProperties: druid.stat.mergeSql=true;druid.stat.slowSqlMillis=500
绑定yaml配置参数,并且作为bean注入到IOC容器当中
@Configuration
public class DruidConfig {

    /*
       将自定义的 Druid数据源添加到容器中,不再让 Spring Boot 自动创建
       绑定全局配置文件中的 druid 数据源属性到 com.alibaba.druid.pool.DruidDataSource从而让它们生效
       @ConfigurationProperties(prefix = "spring.datasource"):作用就是将 全局配置文件中
       前缀为 spring.datasource的属性值注入到 com.alibaba.druid.pool.DruidDataSource 的同名参数中
     */
    @ConfigurationProperties(prefix = "spring.datasource")
    @Bean
    public DataSource druidDataSource() {
        return new DruidDataSource();
    }

}
配置druid数据源监控
//配置 Druid 监控管理后台的Servlet;
//内置 Servlet 容器时没有web.xml文件,所以使用 Spring Boot 的注册 Servlet 方式
@Bean
public ServletRegistrationBean statViewServlet() {
  //默认配置,url表示通过路径进入后台管理界面
    ServletRegistrationBean bean = new ServletRegistrationBean(new StatViewServlet(), "/druid/*");

    // 这些参数可以在 com.alibaba.druid.support.http.StatViewServlet
    // 的父类 com.alibaba.druid.support.http.ResourceServlet 中找到
    Map<String, String> initParams = new HashMap<>();
    initParams.put("loginUsername", "admin"); //后台管理界面的登录账号
    initParams.put("loginPassword", "123456"); //后台管理界面的登录密码

    //后台允许谁可以访问
    //initParams.put("allow", "localhost"):表示只有本机可以访问
    //initParams.put("allow", ""):为空或者为null时,表示允许所有访问
    initParams.put("allow", "");
    //deny:Druid 后台拒绝谁访问
    //initParams.put("kuangshen", "192.168.1.20");表示禁止此ip访问

    //设置初始化参数
    bean.setInitParameters(initParams);
    return bean;
}
配置druid web 监控filter过滤器
//配置 Druid 监控 之  web 监控的 filter
//WebStatFilter:用于配置Web和Druid数据源之间的管理关联监控统计
@Bean
public FilterRegistrationBean webStatFilter() {
    FilterRegistrationBean bean = new FilterRegistrationBean();
    bean.setFilter(new WebStatFilter());

    //exclusions:设置哪些请求进行过滤排除掉,从而不进行统计
    Map<String, String> initParams = new HashMap<>();
    initParams.put("exclusions", "*.js,*.css,/druid/*,/jdbc/*");
    bean.setInitParameters(initParams);

    //"/*" 表示过滤所有请求
    bean.setUrlPatterns(Arrays.asList("/*"));
    return bean;
}
整合mybatis
导入依赖
<!-- mybatis啟動器 -->
        <dependency>
            <groupId>org.mybatis.spring.boot</groupId>
            <artifactId>mybatis-spring-boot-starter</artifactId>
            <version>2.2.2</version>
        </dependency>
数据库连接信息(不变)
spring:
  datasource:
    username: root
    password: 123456
    #?serverTimezone=UTC解决时区的报错
    url: jdbc:mysql://localhost:3306/springboot?serverTimezone=UTC&useUnicode=true&characterEncoding=utf-8
    driver-class-name: com.mysql.cj.jdbc.Driver
    type: com.alibaba.druid.pool.DruidDataSource

    #Spring Boot 默认是不注入这些属性值的,需要自己绑定
    #druid 数据源专有配置
    initialSize: 5
    minIdle: 5
    maxActive: 20
    maxWait: 60000
    timeBetweenEvictionRunsMillis: 60000
    minEvictableIdleTimeMillis: 300000
    validationQuery: SELECT 1 FROM DUAL
    testWhileIdle: true
    testOnBorrow: false
    testOnReturn: false
    poolPreparedStatements: true

    #配置监控统计拦截的filters,stat:监控统计、log4j:日志记录、wall:防御sql注入
    #如果允许时报错  java.lang.ClassNotFoundException: org.apache.log4j.Priority
    #则导入 log4j 依赖即可,Maven 地址:https://mvnrepository.com/artifact/log4j/log4j
    filters: stat,wall,log4j
    maxPoolPreparedStatementPerConnectionSize: 20
    useGlobalDataSourceStat: true
    connectionProperties: druid.stat.mergeSql=true;druid.stat.slowSqlMillis=500
创建实体类pojo
创建mapper接口
接口上面添加注解:
@Repository,@Mapper : 表示本类是一个 MyBatis 的 Mapper
对应的xml配置文件
<?xml version="1.0" encoding="UTF-8" ?>
<!DOCTYPE mapper
        PUBLIC "-//mybatis.org//DTD Mapper 3.0//EN"
        "http://mybatis.org/dtd/mybatis-3-mapper.dtd">

<mapper namespace="comsmu.mapper.UserMapper">

</mapper>
将xml文件的地址配置到yaml文件中
#整合mybatis
mybatis:
  type-aliases-package: comsmu.pojo
  #mapper-locations: classpath: mybatis/mapper/UserMapper.xml
  mapper-locations: classpath:mybatis/mapper/UserMapper.xml
需要执行查询的时候注入mapper接口
@RestController
public class UserController {

    @Autowired
    private UserMapper userMapper;
    @RequestMapping("user")
    public List<User> selectAll(){
        return userMapper.selectAll();
    }
}
集成swagger
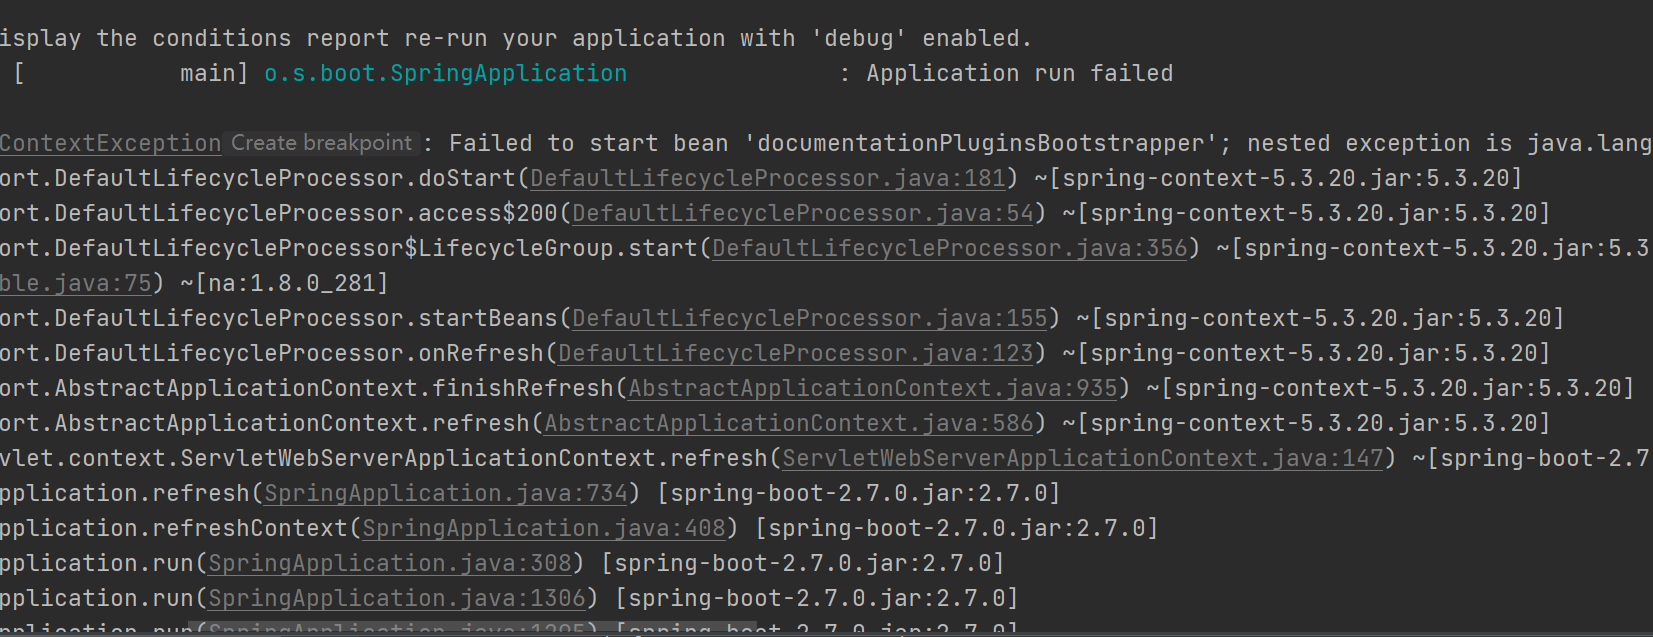
如果出现如下报错信息,一般是版本不匹配造成的
解决方案如下
- 降低spring boot的版本
- 在yaml文件添加如下配置:spring.mvc.pathmatch.matching-strategy=ant_path_matcher(推荐)
导入Contact的包不要导错
-
import springfox.documentation.service.Contact;
添加依赖
<!-- https://mvnrepository.com/artifact/io.springfox/springfox-swagger2 -->
<dependency>
   <groupId>io.springfox</groupId>
   <artifactId>springfox-swagger2</artifactId>
   <version>2.9.2</version>
</dependency>
<!-- https://mvnrepository.com/artifact/io.springfox/springfox-swagger-ui -->
<dependency>
   <groupId>io.springfox</groupId>
   <artifactId>springfox-swagger-ui</artifactId>
   <version>2.9.2</version>
</dependency>
配置swagger的配置类
docket是swagger的实例bean,只需要配置docket就可以了
import org.springframework.context.annotation.Bean;
import org.springframework.context.annotation.Configuration;
import springfox.documentation.builders.ApiInfoBuilder;
import springfox.documentation.builders.RequestHandlerSelectors;
import springfox.documentation.service.ApiInfo;
import springfox.documentation.service.Contact;
import springfox.documentation.spi.DocumentationType;
import springfox.documentation.spring.web.plugins.Docket;
import springfox.documentation.swagger2.annotations.EnableSwagger2;

@Configuration
@EnableSwagger2
public class SwaggerConfig {
    //Swagger实例Bean是Docket,所以通过配置Docket实例来配置Swagger
    @Bean
    public Docket docket(){
        return new Docket(DocumentationType.SWAGGER_2)
                .apiInfo(apiInfo())
                .select()//构建Docket时通过select()方法配置怎么扫描接口。
                //RequestHandlerSelectors配置扫描哪里的接口
                .apis(RequestHandlerSelectors.basePackage("comsmu.controller"))
                .build();
    }
    //可以通过apiInfo()属性配置文档信息
    private ApiInfo apiInfo() {
        Contact contact = new Contact("happy", "http://localhost:8080", "3209692614@qq.com");
//        return new ApiInfo(
//                "Swagger学习", // 标题
//                "学习演示如何配置Swagger", // 描述
//                "v1.0", // 版本
//                "http://terms.service.url/组织链接", // 组织链接
//                contact, // 联系人信息
//                "Apach 2.0 许可", // 许可
//                "许可链接", // 许可连接
//                new ArrayList<>()// 扩展
//        );
        return new ApiInfoBuilder().title("happy study swagger").contact(contact)
                .version("1.0").description("这个是描述信息").build();
    }
}
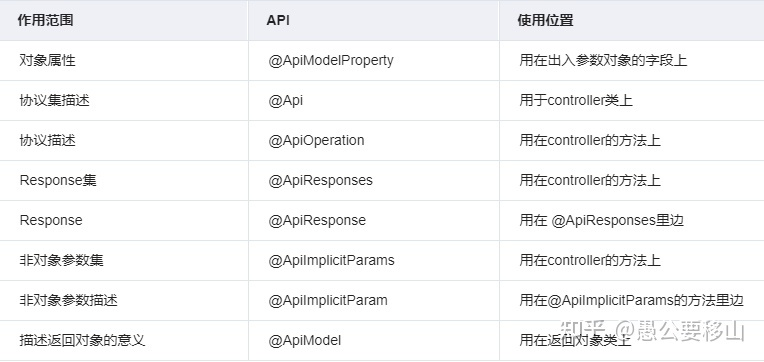
关于swagger的注解使用
Spring Boot配置绑定
首先应该将类注入ioc容器当中
@ConfigurationProperties(prefix = "person")
告诉spring boot告诉 SpringBoot 将本类中的所有属性和配置文件中相关的配置进行绑定
@Value 与 @ConfigurationProperties 对比
@Value 和 @ConfigurationProperties 注解都能读取配置文件中的属性值并绑定到 JavaBean 中,但两者存在以下不同。
1. 使用位置不同
- @ConfigurationProperties:标注在 JavaBean 的类名上;
- @Value:标注在 JavaBean 的属性上。
2. 功能不同
- @ConfigurationProperties:用于批量绑定配置文件中的配置;
- @Value:只能一个一个的指定需要绑定的配置。
3. 松散绑定支持不同
@ConfigurationProperties:支持松散绑定(松散语法),例如实体类 Person 中有一个属性为 firstName,那么配置文件中的属性名支持以下写法:
- person.firstName
- person.first-name
- person.first_name
- PERSON_FIRST_NAME
@Vaule:不支持松散绑定。
4. SpEL 支持不同
- @ConfigurationProperties:不支持 SpEL 表达式;
- @Value:支持 SpEL 表达式。
5. 复杂类型封装
- @ConfigurationProperties:支持所有类型数据的封装,例如 Map、List、Set、以及对象等;
- @Value:只支持基本数据类型的封装,例如字符串、布尔值、整数等类型。
6. 应用场景不同
@Value 和 @ConfigurationProperties 两个注解之间,并没有明显的优劣之分,它们只是适合的应用场景不同而已。
- 若只是获取配置文件中的某项值,则推荐使用 @Value 注解;
- 若专门编写了一个 JavaBean 来和配置文件进行映射,则建议使用 @ConfigurationProperties 注解。
@PropertySource
如果将所有的配置都集中到 application.properties 或 application.yml 中,那么这个配置文件会十分的臃肿且难以维护,因此我们通常会将与 Spring Boot 无关的配置(例如自定义配置)提取出来,写在一个单独的配置文件中,并在对应的 JavaBean 上使用 @PropertySource 注解指向该配置文件。
以 helloworld 为例,将与 person 相关的自定义配置移动到 src/main/resources 下的 person.properties 中(注意,必须把 application.properties 或 application.yml 中的相关配置删除)
@PropertySource(value = "classpath:person.properties")//指向对应的配置文件
导入spring配置
@ImportResource 导入 Spring 配置文件
在主启动类上使用 @ImportResource 注解可以导入一个或多个 Spring 配置文件,并使其中的内容生效。
多环境
server:
  port: 8081
#选择要激活那个环境块
spring:
  profiles:
    active: prod

---
server:
  port: 8083
spring:
  profiles: dev #配置环境的名称


---

server:
  port: 8084
spring:
  profiles: prod  #配置环境的名称
注意:如果yml和properties同时都配置了端口,并且没有激活其他环境 , 默认会使用properties配置文件的!
springboot 启动会扫描以下位置的application.properties或者application.yml文件作为Spring boot的默认配置文件:
优先级1:项目路径下的config文件夹配置文件
优先级2:项目路径下配置文件
优先级3:资源路径下的config文件夹配置文件
优先级4:资源路径下配置文件
优先级由高到底,高优先级的配置会覆盖低优先级的配置;
SpringBoot会从这四个位置全部加载主配置文件;互补配置;
Spring Factories 机制
Spring Boot 的自动配置是基于 Spring Factories 机制实现的。
Spring Factories 机制是 Spring Boot 中的一种服务发现机制,这种扩展机制与 Java SPI 机制十分相似。Spring Boot 会自动扫描所有 Jar 包类路径下 META-INF/spring.factories 文件,并读取其中的内容,进行实例化,这种机制也是 Spring Boot Starter 的基础。

