helm基本使用
一、helm概述
1、helm是什么
Helm是Kubernetes的包管理器,类似于Python的pip centos的yum,主要用来管理 Charts。
Helm Chart是用来封装Kubernetes原生应用程序的一系列YAML文件。可以在你部署应用的时候自定义应用程序的一些Metadata,以便于应用程序的分发。对于应用发布者而言,可以通过Helm打包应用、管理应用依赖关系、管理应用版本并发布应用到软件仓库。
官方文档:https://helm.sh/zh/docs/topics/charts/
https://docs.helm.sh/zh/docs/helm/helm_repo_index/
2、helm解决了什么
在kubernetes中部署一个可以使用的应用,需要涉及到很多的kubernetes资源的共同协作。
部署一个服务,会一些kubernetes的资源对象,包括deployment用于部署应用,service提供服务发现,secret配置服务的密码,ingress用于集群外部访问,有可能需要pv和pvc来提供持久恶化服务。会涉及到一些依赖,数据库或其他服务启动。这些资源过于分散,不方便管理,直接提供kubectl来管理一个应用,让人头疼。
在部署一个应用,会遇到哪些问题:
- 如何统一管理、配置和更新这些分散的k8s的应用资源文件
- 如何分发和复用应用模板
- 如何将应用的一系列资源当做一个软件包管理
3、helm2与helm3的区别
由于Helm v2 Tiller服务端在社区一直存在已知的安全问题,攻击者可以通过tiller在集群内安装未经授权的应用,因此推荐您升级至Helm v3版本。
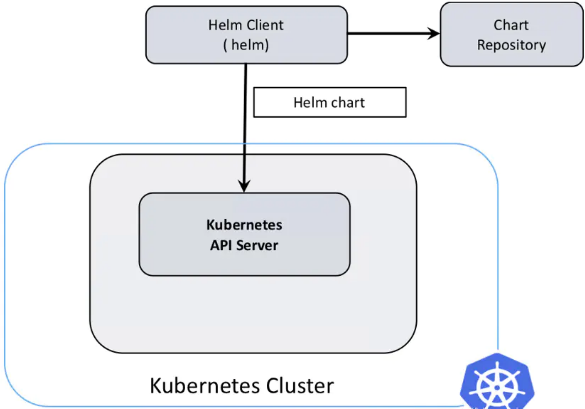
helm3是直接与k8s api互通 无需再helm init 创建服务端,比较大的改动是,移除 Tiller(Helm 2 是一种 Client-Server 结构,客户端称为 Helm,服务器称为 Tiller)。Helm 3 只有客户端结构,客户端仍称为 Helm。如下图所示,它的操作类似于 Helm 2 客户端,但客户端直接与 Kubernetes API 服务器交互
helm3的特性:
- 移除了tiller
- 支持分布式helm hub, 有了它就可以在很多时候不需要手动添加非官方repo了,例如helm3 search hub <package name>
- 为chart输入值进行json schema验证。
- 可以给helm charts添加test了,通过helm test <release>就能针对部署的应用跑一些tests。
- 部署的时候release name必须指定了,helm2的时候不指定会自动生成一个。
- Helm3中release的相关信息保存在应用自己对应的命名空间下,所以此时可以在不同的命名空间下使用相同的release名称,而且不会相互干扰
- 删除的时候不需要--purge了,删了就是删了。
4、基本概念
- Helm 是一个命令行下的客户端工具。主要用于 Kubernetes 应用程序 Chart 的创建、打包、发布以及创建和管理本地和远程的 Chart 仓库。
- Chart:一个 Helm 包,,采用 TAR 格式。其中包含了运行一个应用所需要的镜像、依赖和资源定义等,还可能包含 Kubernetes 集群中的服务定义,类似 Homebrew 中的 formula、APT 的 dpkg 或者 Yum 的 rpm 文件。
- Release:在 Kubernetes 集群上运行的 Chart 的一个实例。在同一个集群上,一个 Chart 可以安装很多次。每次安装都会创建一个新的 release。例如一个 MySQL Chart,如果想在服务器上运行两个数据库,就可以把这个 Chart 安装两次。每次安装都会生成自己的 Release,会有自己的 Release 名称。
- Repository:用于发布和存储 Chart 的存储库。
5、helm3的架构(下面所有的都是helm3)
二、helm的安装及使用
1、helm3的安装
1)二进制安装
从GitHub下载 https://github.com/helm/helm/releases
从华为仓库下载 https://repo.huaweicloud.com/helm/
wget https://get.helm.sh/helm-v3.1.2-linux-amd64.tar.gz
tar -zxvf helm-v3.1.2-linux-amd64.tar.gz
cd linux-amd64
mv helm /usr/local/bin/
helm --help
2)脚本安装
curl -fsSL -o get_helm.sh https://raw.githubusercontent.com/helm/helm/master/scripts/get-helm-3
chmod 700 get_helm.sh
./get_helm.sh
3)命令补全
yum install -y bash-completion
source /usr/share/bash-completion/bash_completion
# 在~/.bashrc追加 (根据实际需要添加环境变量)
source <(helm completion bash)
4)自定义helm环境变量
默认值

HELM_BIN="helm"
HELM_CACHE_HOME="/root/.cache/helm"
HELM_CONFIG_HOME="/root/.config/helm"
HELM_DATA_HOME="/root/.local/share/helm"
HELM_DEBUG="false"
HELM_KUBEAPISERVER=""
HELM_KUBEASGROUPS=""
HELM_KUBEASUSER=""
HELM_KUBECAFILE=""
HELM_KUBECONTEXT=""
HELM_KUBETOKEN=""
HELM_MAX_HISTORY="10"
HELM_NAMESPACE="default"
HELM_PLUGINS="/root/.local/share/helm/plugins"
HELM_REGISTRY_CONFIG="/root/.config/helm/registry/config.json"
HELM_REPOSITORY_CACHE="/root/.cache/helm/repository"
HELM_REPOSITORY_CONFIG="/root/.config/helm/repositories.yaml"
改变下面变量对应的值
| Name                               | Description                                                                       |
|------------------------------------|-----------------------------------------------------------------------------------|
| $HELM_CACHE_HOME                   | set an alternative location for storing cached files.                             |
| $HELM_CONFIG_HOME                  | set an alternative location for storing Helm configuration.                       |
| $HELM_DATA_HOME                    | set an alternative location for storing Helm data.                                |
| $HELM_DEBUG                        | indicate whether or not Helm is running in Debug mode                             |
| $HELM_DRIVER                       | set the backend storage driver. Values are: configmap, secret, memory, sql.       |
| $HELM_DRIVER_SQL_CONNECTION_STRING | set the connection string the SQL storage driver should use.                      |
| $HELM_MAX_HISTORY                  | set the maximum number of helm release history.                                   |
| $HELM_NAMESPACE                    | set the namespace used for the helm operations.                                   |
| $HELM_NO_PLUGINS                   | disable plugins. Set HELM_NO_PLUGINS=1 to disable plugins.                        |
| $HELM_PLUGINS                      | set the path to the plugins directory                                             |
| $HELM_REGISTRY_CONFIG              | set the path to the registry config file.                                         |
| $HELM_REPOSITORY_CACHE             | set the path to the repository cache directory                                    |
| $HELM_REPOSITORY_CONFIG            | set the path to the repositories file.                                            |
| $KUBECONFIG                        | set an alternative Kubernetes configuration file (default "~/.kube/config")       |
| $HELM_KUBEAPISERVER                | set the Kubernetes API Server Endpoint for authentication                         |
| $HELM_KUBECAFILE                   | set the Kubernetes certificate authority file.                                    |
| $HELM_KUBEASGROUPS                 | set the Groups to use for impersonation using a comma-separated list.             |
| $HELM_KUBEASUSER                   | set the Username to impersonate for the operation.                                |
| $HELM_KUBECONTEXT                  | set the name of the kubeconfig context.                                           |
| $HELM_KUBETOKEN                    | set the Bearer KubeToken used for authentication.                                 |

Helm stores cache, configuration, and data based on the following configuration order:

- If a HELM_*_HOME environment variable is set, it will be used
- Otherwise, on systems supporting the XDG base directory specification, the XDG variables will be used
- When no other location is set a default location will be used based on the operating system
2、helm本地仓库的搭建
helm chart 能够很好的封装和管理我们的 kubernetes 应用,可以实现中间件、数据库、公共组件等快速发布。
1)什么场景下我们需要构建一个私有的helm仓库
-
首先我们日常发布中肯定是经常使用到了helm
-
有较多自定义的或者调整过的helm模板,或者有多套k8s/ocp 集群要同时基于 helm 进行发布与管理
-
如果想要要更好的管理 charts 历史版本,可以使用下面说的 github page 或者 gitlab page
https://hub.kubeapps.com/charts 国外helm仓库
2)本地仓库选择
Helm chart对仓库的要求并不高,需要你对外提供yaml文件和tar文件的web服务即可。helm2 原本是带了本地仓库功能,helm3 移除了这部分,将他变成了一个纯粹的应用管理工具。
像 harbor镜像仓库,JFrog Artifactory(制品仓库,镜像仓库) 都包含了 helm 商店的功能,如果同时对镜像仓库和制品管理有需求,可以选择上面两款产品,都提供免费社区版。
如果不需要上面两者的镜像仓库功能,可以使用在线的github 或 gitlab
https://www.bookstack.cn/read/kubernetes-handbook-201910/practice-create-private-charts-repo.md
又或者是helm 开源得工具 chartmuseum https://github.com/helm/chartmuseum
3)chartmuseum 自检仓库的搭建
-
根据chart文件自动生成index.yaml(无须使用helm repo index手动生成)
-
helm push的插件,可以在helm命令之上实现将chart文件推送到chartmuseum上
-
相应的tls配置,Basic认证,JWT认证(Bearer token认证)
-
提供了Restful的api(可以使用curl命令操作)和可以使用的cli命令行工具
-
提供了各种后端存储的支持(Amazon s3, Google Cloud Storage, 阿里、百度、腾讯,开源对象存储等)
-
提供了Prometheus的集成,对外提供自己的监控信息。
-
没有用户的概念,但是基于目录实现了一定程度上的多租户的需求。
直接使用最简单的 docker run 方式,使用local 本地存储方式,通过 -v 映射到宿主机 /opt/charts
mkdir /opt/charts

docker run -d \
-p 8080:8080 \
-e DEBUG=1 \
-e STORAGE=local \
-e STORAGE_LOCAL_ROOTDIR=/charts \
-v /opt/charts:/charts \
chartmuseum/chartmuseum:latest

# 使用 curl 测试下接口,没有报错就行,当前仓库内容还是空的
# curl localhost:8080/api/charts
{}
仓库可视化:Monocular UI 必须依赖ingress,如果环境里没有,先安装一个
安装 ingress controller
helm search repo ingress
helm install ng-ingress az-stable/nginx-ingress
安装Monocular UI 界面,管理helm charts
官方站点 https://github.com/helm/monocular
通过 helm 方式来安装
helm repo add monocular https://helm.github.io/monocular
# helm install monocular/monocular

# 下载chart,把mongodb 存储改成持久化
helm pull monocular/monocular
tar -zxvf monocular-1.4.15.tgz
vim values.yaml
在 repos 注释自带的stable 和incubator 4行,添加 localrepo, 地址是 http://192.168.2.19:8080
修改 mongodb.persistence.enabled 为 true

# 安装
helm install helmui .
访问通过 ingress controller 的nodeport, 不是直接通过 monocular 的 nodeport,可以看下ingress 的内容就了解了。
kubectl get svc |grep ingress
通过浏览器访问 k8s节点ip:31537,标记 deprecated: true 的charts,即为弃用的,不会展示在页面
默认是1小时同步一次repo,可以在helm install 的时候修改 values.yaml,比如这样,5分钟同步一次
- name: incubator
url: https://kubernetes-charts-incubator.storage.googleapis.com
schedule: "*/5 * * *
或者部署之后修改 cronjob,修改 schedule: "*/5 * * * *"
kubectl edit cronjob helmui-monocular-sync-scheduled-localrepo
另一款界面管理工具 kubeapps
kubeapps 和 monocular 类似,都是bitnami 公司维护的,多了已发布helm 应用的查看,以及可以通过页面添加 repo,功能比上面的多,建议用这个。
注意访问的时候是使用 kubeapps 这个svc 的nodeport, 不依赖于ingress
查看通过 helm 发布的应用,支持按照 namespace 区分
4)准备 helm 及离线 chart,推送到私有库
为私有仓库准备些chart,获取方式:可以是自己生成的或者从公共仓库获取
# 添加官方源,网络不好可以试试下面微软的helm repo add stable https://kubernetes-charts.storage.googleapis.comhelm repo add incubator https://kubernetes-charts-incubator.storage.googleapis.com# 也可以换成微软的源,速度快,内容和官方同步的helm repo add az-stable http://mirror.azure.cn/kubernetes/charts/helm repo add az-incubator http://mirror.azure.cn/kubernetes/charts-incubator/


### 把 charts 文件直接下载到 chartmuseum 指定的本地目录
cd /opt/charts
chmod 777 -R /opt/charts/
helm search repo mysql

# 将charts 文件下载到本地
helm pull az-stable/mysql
helm pull az-stable/tomcat
可以使用helm push插件上传
# 安装 helm push 插件
helm plugin install https://github.com/chartmuseum/helm-push.git

# 从官网下载一个 consul
helm search repo consul
helm pull az-stable/consul

# 添加本地仓库到 helm repo,看下仓库内容
helm repo add localrepo http://192.168.2.19:8080
helm search repo localrepo

# helm push 推送 postgres
helm push consul-7.1.3.tgz localrepo
3、helm仓库的使用
1)仓库查看
首次安装 helm 3 是没有指定默认仓库的。需要手动疯狂添加仓库才可以获取到程序包
helm repo list
2)helm仓库添加
helm repo add stable https://kubernetes-charts.storage.googleapis.com/
helm repo add bitnami https://charts.bitnami.com/bitnami
helm repo add incubator https://kubernetes-charts-incubator.storage.googleapis.com/
helm repo update # Make sure we get the latest list of charts
helm repo list
3)helm仓库删除
helm repo remove 仓库名称
4)helm查询chart
helm search repo chart_name
4、helm常用命令
helm version //查看helm版本信息 helm list /查看当前安装的Chart包 helm search mysql //查看与mysql相关的chart包 helm fetch stable/mysql //将mysql软件包下载到本地 helm inspect stable/mysql //查看该软件包的详细信息 helm install stable/mysql -n mysql //安装指定的mysql软件包,并命名为mysql
helm install stable/mysql -n mysql //安装指定的mysql软件包,并命名为mysql
helm status mysql //查看mysql的状态信息
helm delete --purge mysql //删除mysql,并将本地的缓存也进行删除
helm repo add stable https://kubernetes.oss-cn-hangzhou.aliyuncs.com/charts //添加阿里云的repo源
helm repo update //更新repo仓库资源
helm create helm_charts //创建一个chart,名称为helm_charts
cd helm_charts/ && helm lint // helm lint myChart//测试charts语法
helm package helm_charts           //打包charts
helm template helm_charts-0.1.0.tgz       //查看该软件包生成的yaml文件
helm install的帮助信息
]# helm  install -h

This command installs a chart archive.

The install argument must be a chart reference, a path to a packaged chart,
a path to an unpacked chart directory or a URL.

To override values in a chart, use either the '--values' flag and pass in a file
or use the '--set' flag and pass configuration from the command line, to force
a string value use '--set-string'. In case a value is large and therefore
you want not to use neither '--values' nor '--set', use '--set-file' to read the
single large value from file.

    $ helm install -f myvalues.yaml myredis ./redis

or

    $ helm install --set name=prod myredis ./redis

or

    $ helm install --set-string long_int=1234567890 myredis ./redis

or
    $ helm install --set-file my_script=dothings.sh myredis ./redis

You can specify the '--values'/'-f' flag multiple times. The priority will be given to the
last (right-most) file specified. For example, if both myvalues.yaml and override.yaml
contained a key called 'Test', the value set in override.yaml would take precedence:

    $ helm install -f myvalues.yaml -f override.yaml  myredis ./redis

You can specify the '--set' flag multiple times. The priority will be given to the
last (right-most) set specified. For example, if both 'bar' and 'newbar' values are
set for a key called 'foo', the 'newbar' value would take precedence:

    $ helm install --set foo=bar --set foo=newbar  myredis ./redis


To check the generated manifests of a release without installing the chart,
the '--debug' and '--dry-run' flags can be combined.

If --verify is set, the chart MUST have a provenance file, and the provenance
file MUST pass all verification steps.

There are five different ways you can express the chart you want to install:

1. By chart reference: helm install mymaria example/mariadb
2. By path to a packaged chart: helm install mynginx ./nginx-1.2.3.tgz
3. By path to an unpacked chart directory: helm install mynginx ./nginx
4. By absolute URL: helm install mynginx https://example.com/charts/nginx-1.2.3.tgz
5. By chart reference and repo url: helm install --repo https://example.com/charts/ mynginx nginx

CHART REFERENCES

A chart reference is a convenient way of referencing a chart in a chart repository.

When you use a chart reference with a repo prefix ('example/mariadb'), Helm will look in the local
configuration for a chart repository named 'example', and will then look for a
chart in that repository whose name is 'mariadb'. It will install the latest stable version of that chart
until you specify '--devel' flag to also include development version (alpha, beta, and release candidate releases), or
supply a version number with the '--version' flag.

To see the list of chart repositories, use 'helm repo list'. To search for
charts in a repository, use 'helm search'.

Usage:
  helm install [NAME] [CHART] [flags]

Flags:
      --atomic                       if set, the installation process deletes the installation on failure. The --wait flag will be set automatically if --atomic is used
      --ca-file string               verify certificates of HTTPS-enabled servers using this CA bundle
      --cert-file string             identify HTTPS client using this SSL certificate file
      --create-namespace             create the release namespace if not present
      --dependency-update            run helm dependency update before installing the chart
      --description string           add a custom description
      --devel                        use development versions, too. Equivalent to version '>0.0.0-0'. If --version is set, this is ignored
      --disable-openapi-validation   if set, the installation process will not validate rendered templates against the Kubernetes OpenAPI Schema
      --dry-run                      simulate an install
  -g, --generate-name                generate the name (and omit the NAME parameter)
  -h, --help                         help for install
      --key-file string              identify HTTPS client using this SSL key file
      --keyring string               location of public keys used for verification (default "/root/.gnupg/pubring.gpg")
      --name-template string         specify template used to name the release
      --no-hooks                     prevent hooks from running during install
  -o, --output format                prints the output in the specified format. Allowed values: table, json, yaml (default table)
      --password string              chart repository password where to locate the requested chart
      --post-renderer postrenderer   the path to an executable to be used for post rendering. If it exists in $PATH, the binary will be used, otherwise it will try to look for the executable at the given path (default exec)
      --render-subchart-notes        if set, render subchart notes along with the parent
      --replace                      re-use the given name, only if that name is a deleted release which remains in the history. This is unsafe in production
      --repo string                  chart repository url where to locate the requested chart
      --set stringArray              set values on the command line (can specify multiple or separate values with commas: key1=val1,key2=val2)
      --set-file stringArray         set values from respective files specified via the command line (can specify multiple or separate values with commas: key1=path1,key2=path2)
      --set-string stringArray       set STRING values on the command line (can specify multiple or separate values with commas: key1=val1,key2=val2)
      --skip-crds                    if set, no CRDs will be installed. By default, CRDs are installed if not already present
      --timeout duration             time to wait for any individual Kubernetes operation (like Jobs for hooks) (default 5m0s)
      --username string              chart repository username where to locate the requested chart
  -f, --values strings               specify values in a YAML file or a URL (can specify multiple)
      --verify                       verify the package before installing it
      --version string               specify the exact chart version to install. If this is not specified, the latest version is installed
      --wait                         if set, will wait until all Pods, PVCs, Services, and minimum number of Pods of a Deployment, StatefulSet, or ReplicaSet are in a ready state before marking the release as successful. It will wait for as long as --timeout

Global Flags:
      --add-dir-header                   If true, adds the file directory to the header
      --alsologtostderr                  log to standard error as well as files
      --debug                            enable verbose output
      --kube-apiserver string            the address and the port for the Kubernetes API server
      --kube-context string              name of the kubeconfig context to use
      --kube-token string                bearer token used for authentication
      --kubeconfig string                path to the kubeconfig file
      --log-backtrace-at traceLocation   when logging hits line file:N, emit a stack trace (default :0)
      --log-dir string                   If non-empty, write log files in this directory
      --log-file string                  If non-empty, use this log file
      --log-file-max-size uint           Defines the maximum size a log file can grow to. Unit is megabytes. If the value is 0, the maximum file size is unlimited. (default 1800)
      --logtostderr                      log to standard error instead of files (default true)
  -n, --namespace string                 namespace scope for this request
      --registry-config string           path to the registry config file (default "/root/.config/helm/registry.json")
      --repository-cache string          path to the file containing cached repository indexes (default "/root/.cache/helm/repository")
      --repository-config string         path to the file containing repository names and URLs (default "/root/.config/helm/repositories.yaml")
      --skip-headers                     If true, avoid header prefixes in the log messages
      --skip-log-headers                 If true, avoid headers when opening log files
      --stderrthreshold severity         logs at or above this threshold go to stderr (default 2)
  -v, --v Level                          number for the log level verbosity
      --vmodule moduleSpec               comma-separated list of pattern=N settings for file-filtered logging
5、helm 插件安装
以安装helm-push插件为例
1)在线安装helm插件
# 安装 helm push 插件
helm plugin install https://github.com/chartmuseum/helm-push.git
2)离线安装插件
1、下载安装包helm-push_0.9.0_linux_amd64.tar.gz
wget https://github.com/chartmuseum/helm-push/releases/download/v0.10.2/helm-push_0.10.2_linux_amd64.tar.gz
2、查看helm的plugin路径:
# helm env
HELM_BIN="helm"
HELM_CACHE_HOME="/root/.cache/helm"
HELM_CONFIG_HOME="/root/.config/helm"
HELM_DATA_HOME="/root/.local/share/helm"
HELM_DEBUG="false"
HELM_KUBEAPISERVER=""
HELM_KUBEASGROUPS=""
HELM_KUBEASUSER=""
HELM_KUBECAFILE=""
HELM_KUBECONTEXT=""
HELM_KUBETOKEN=""
HELM_MAX_HISTORY="10"
HELM_NAMESPACE="default"
HELM_PLUGINS="/root/.local/share/helm/plugins"
HELM_REGISTRY_CONFIG="/root/.config/helm/registry/config.json"
HELM_REPOSITORY_CACHE="/root/.cache/helm/repository"
HELM_REPOSITORY_CONFIG="/root/.config/helm/repositories.yaml"
3、在插件路径下创建helm-push文件夹,并将安装包拷贝到该文件夹下解压即可
cd /root/.local/share/helm/plugins
mkdir -p helm-push
tar -xvf helm-push_0.10.2_linux_amd64.tar.gz -C helm-push

#验证
helm plugin list
helm cm-push harbor-12.0.1.tgz mylibrary
三、chart
kubernetes(k8s) 管理的对象叫做资源(比如 pod)。helm 作为 k8s 生态工具之一,将互相关联的多个资源统一打包成一个整体,交给 k8s 去运行。这个被打包的整体就叫做 chart。可以把 chart 跟程序的源码包做类比。
Helm默认会按照如下的顺序将生成资源配置发送给K8s
Namespace -> NetworkPolicy -> ResourceQuota -> LimitRange -> PodSecurityPolicy --> PodDisruptionBudget -> ServiceAccount -> Secret -> SecretList -> ConfigMap -> StorageClass -> PersistentVolume -> PersistentVolumeClaim -> CustomResourceDefinition -> ClusterRole -> ClusterRoleList -> ClusterRoleBinding -> ClusterRoleBindingList -> Role -> RoleList -> RoleBinding -> RoleBindingList -> Service -> DaemonSet -> Pod -> ReplicationController -> ReplicaSet -> Deployment -> HorizontalPodAutoscaler -> StatefulSet -> Job -> CronJob -> Ingress -> APIService
1、创建自己的chart
- 快速创建模板,
helm create my-charts,修改对应内容 - 打包,然后拷贝至repository的目录,然后执行更新index操作. helm package
- 安装,
helm install . 或 helm install my-charts.tgz - 验证charts格式,helm lint
- 查看charts文件内容.
helm inspect chart my-charts - 查看value文件内容.
helm inspect values my-charts - 查看charts目录下文件内容.
helm inspect my-charts - 查看charts模板渲染后k8s的yaml,
helm template my-charts -f configfile --set a=b
2、创建完chart的目录结构
myapp                                   - chart 包目录名
├── charts                              - 依赖的子包目录,里面可以包含多个依赖的chart包
├── Chart.yaml                          - chart定义,可以定义chart的名字,版本号信息。
├── templates                           - k8s配置模版目录, 我们编写的k8s配置都在这个目录, 除了NOTES.txt和下划线开头命名的文件,其他文件可以随意命名。
│   ├── deployment.yaml
│   ├── _helpers.tpl                    - 下划线开头的文件,helm视为公共库定义文件,主要用于定义通用的子模版、函数等,helm不会将这些公共库文件的渲染结果提交给k8s处理。
│   ├── ingress.yaml
│   ├── NOTES.txt                       - chart包的帮助信息文件,执行helm install命令安装成功后会输出这个文件的内容。
│   └── service.yaml
└── values.yaml                         - chart包的参数配置文件,模版可以引用这里参数。
在k8s中部署一个应用,需要编写deployment、service、ingress三个配置文件,刚才通过helm create命令已经创建好了。
Chart.yaml 文件是 chart 必需的。包含了以下字段
apiVersion:在 Helm3 中,apiVersion=v2;在 Helm3 之前的版本,apiVersion=v1
apiVersion: chart API 版本 (必需)
name: chart名称 (必需)
version: 版本(必需)
kubeVersion: 兼容Kubernetes版本的语义化版本(可选)
description: 一句话对这个项目的描述(可选)
type: chart类型 (可选)
keywords:
 - 关于项目的一组关键字(可选)
home: 项目home页面的URL (可选)
sources:
 - 项目源码的URL列表(可选)
dependencies: # chart 必要条件列表 (可选)
 - name: chart名称 (nginx)
   version: chart版本 ("1.2.3")
   repository: 仓库URL ("https://example.com/charts") 或别名 ("@repo-name")
   condition: (可选) 解析为布尔值的yaml路径,用于启用/禁用chart (e.g. subchart1.enabled )
   tags: # (可选)
     - 用于一次启用/禁用 一组chart的tag
   enabled: (可选) 决定是否加载chart的布尔值
   import-values: # (可选)
     - ImportValue 保存源值到导入父键的映射。每项可以是字符串或者一对子/父列表项
   alias: (可选) chart中使用的别名。当你要多次添加相同的chart时会很有用
maintainers: # (可选)
 - name: 维护者名字 (每个维护者都需要)
   email: 维护者邮箱 (每个维护者可选)
   url: 维护者URL (每个维护者可选)
icon: 用做icon的SVG或PNG图片URL (可选)
appVersion: 包含的应用版本(可选)。不需要是语义化的
deprecated: 不被推荐的chart (可选,布尔值)
annotations:
 example: 按名称输入的批注列表 (可选).
内置对象
(1) Values
Values 对象是为 Chart 模板提供值,这个对象的值有4个来源,后面的可以覆盖前面的:
chart 包中的 values.yaml 文件
父 chart 包的 values.yaml 文件
通过 helm install 或者 helm upgrade 的 -f 或者 --values 参数传入的自定义的 yaml 文件
通过 --set 参数传入的值
在模板文件中,通过 {{.Values}} 对象来访问设置的值。
3、chart使用
1)chart搜索
helm search repo nginx
2)chart下载
helm pull google/nginx-ingress
3)chart自建
除了从远程 helm 仓库中获取第三方 chart 外,你也可以创建自己的 chart
helm create mychart
4)chart打包
如果你想上传自建的 chart 到私有仓库中去,需要先将自建的 chart 打包
helm package mychart
5)chart上传
上传 chart 需要 4 个步骤:
- 自建私有仓库
- 生成或更新 chart 索引文件
- helm repo index /root/helm/repo
- 上传 chart 和索引文件
- 登录私有仓库,上传 chart 和索引文件 index.yaml
- 更新本地 chart 仓库
- helm repo update
- 更新本地 chart 仓库之后,就可以检索到刚上传的自定义 chart 了
四、release
release 理解起来则比较抽象,它是专属于 helm 的一个逻辑概念,用来标识在 k8s 中运行的一组资源
1、release使用
1)release查看
helm ls
2)release安装
在线安装指定的 chart,比如 nginx-ingress。
helm search repo nginx-ingress
helm install mynginx-ingress google/nginx-ingress
3)release更新
如果想修改运行时 release 的配置,可以使用 --set 或者 -f 选项进行修改。
基于命令行更新 release
## mynginx-ingress 是上面创建的 release 名;google/nginx-ingress 是在线 chart 名

# helm upgrade --set controller.hostNetwork=true \
mynginx-ingress google/nginx-ingress
基于文件更新 release
如果想基于文件来更新 release,则首先需要将 chart 下载到本地,然后手动修改 chart 的 values.yaml 文件
## 下载 chart #可以使用--untar下载解压
# helm pull google/nginx-ingress
## 解压缩 chart
# tar -zxvf nginx-ingress-1.26.1.tgz
## 修改 values.yaml 内容。比如修改 hostNetwork 的值为 true
# sed -i 's/hostNetwork: false/hostNetwork: true/g' nginx-ingress/values.yaml
## 针对文件使用 -f 选项更新 release
# helm upgrade mynginx-ingress nginx-ingress -f nginx-ingress/values.yaml

# 不解压替换文件内容进行升级
# helm upgrade mynginx-ingress nginx-ingress-1.26.1.tgz -f nginx-ingress/values.yaml
查看 release 更新后的新值
helm get values mynginx-ingress
4)release 版本
helm history mynginx-ingress
5)release 回滚
helm rollback mynginx-ingress 4
6)release 卸载
helm uninstall mynginx-ingress


【推荐】国内首个AI IDE,深度理解中文开发场景,立即下载体验Trae
【推荐】编程新体验,更懂你的AI,立即体验豆包MarsCode编程助手
【推荐】抖音旗下AI助手豆包,你的智能百科全书,全免费不限次数
【推荐】轻量又高性能的 SSH 工具 IShell:AI 加持,快人一步
· 开发者必知的日志记录最佳实践
· SQL Server 2025 AI相关能力初探
· Linux系列:如何用 C#调用 C方法造成内存泄露
· AI与.NET技术实操系列(二):开始使用ML.NET
· 记一次.NET内存居高不下排查解决与启示
· 阿里最新开源QwQ-32B,效果媲美deepseek-r1满血版,部署成本又又又降低了!
· 开源Multi-agent AI智能体框架aevatar.ai,欢迎大家贡献代码
· Manus重磅发布:全球首款通用AI代理技术深度解析与实战指南
· 被坑几百块钱后,我竟然真的恢复了删除的微信聊天记录!
· AI技术革命,工作效率10个最佳AI工具