深度学习笔记3:使用预训练模型之特征提取
我们在小型图像数据集上做深度学习时,一种高效且实用的方法是采用预训练模型。预训练模型,指的是在大型数据集上预先训练好的模型。如果原始数据集具有足够的规模和通用性,那么预训练模型所学习到的特征的空间层次结构可以被视为视觉世界的通用模型。与许多早期的浅层学习方法相比,这种在不同问题之间移植特征的能力是深度学习的重要优势,它使得深度学习在处理数据量较小的问题时表现得尤为出色。
对于小型图像数据集,使用预训练模型的优势在于可以利用已有的大规模数据集的训练成果,从而避免从头开始训练模型。这种方法可以帮助我们充分利用深度学习中丰富的特征表示能力,从而在资源有限的情况下取得良好的性能。此外,预训练模型还可以作为新任务的起点,通过微调来适应新的任务需求。这种微调的方法可以有效地利用已有的知识,并针对新的任务进行适应性的调整。本文我们采用VGG16 模型,这是一个内置于 Keras 中的模型,可以从 keras.applications模块中导入
将 VGG16 卷积基实例化
from tensorflow import keras
conv_base = keras.applications.vgg16.VGG16(
    weights="imagenet",    include_top=False,    input_shape=(180, 180, 3))
>>> conv_base.summary()
Model: "vgg16"
_________________________________________________________________
 Layer (type)                Output Shape              Param #
=================================================================
 input_1 (InputLayer)        [(None, 180, 180, 3)]     0

 block1_conv1 (Conv2D)       (None, 180, 180, 64)      1792

 block1_conv2 (Conv2D)       (None, 180, 180, 64)      36928

 block1_pool (MaxPooling2D)  (None, 90, 90, 64)        0

 block2_conv1 (Conv2D)       (None, 90, 90, 128)       73856

 block2_conv2 (Conv2D)       (None, 90, 90, 128)       147584

 block2_pool (MaxPooling2D)  (None, 45, 45, 128)       0

 block3_conv1 (Conv2D)       (None, 45, 45, 256)       295168

 block3_conv2 (Conv2D)       (None, 45, 45, 256)       590080

 block3_conv3 (Conv2D)       (None, 45, 45, 256)       590080

 block3_pool (MaxPooling2D)  (None, 22, 22, 256)       0

 block4_conv1 (Conv2D)       (None, 22, 22, 512)       1180160

 block4_conv2 (Conv2D)       (None, 22, 22, 512)       2359808

 block4_conv3 (Conv2D)       (None, 22, 22, 512)       2359808

 block4_pool (MaxPooling2D)  (None, 11, 11, 512)       0

 block5_conv1 (Conv2D)       (None, 11, 11, 512)       2359808

 block5_conv2 (Conv2D)       (None, 11, 11, 512)       2359808

 block5_conv3 (Conv2D)       (None, 11, 11, 512)       2359808

 block5_pool (MaxPooling2D)  (None, 5, 5, 512)         0

=================================================================
Total params: 14714688 (56.13 MB)
Trainable params: 14714688 (56.13 MB)
Non-trainable params: 0 (0.00 Byte)
_________________________________________________________________
>>>
我们将在训练集、验证集和测试集上调用 conv_base 模型的 predict() 方法,将特征提取为 NumPy 数组。
提取 VGG16 的特征和对应的标签
import pathlib
batch_size = 32
img_height = 180
img_width = 180
new_base_dir = pathlib.Path('C:/Users/wuchh/.keras/datasets/dogs-vs-cats-small')
train_dataset = keras.preprocessing.image_dataset_from_directory(
new_base_dir / 'train' ,
validation_split=0.2,
subset="training",
seed=123,
image_size=(img_height, img_width),
batch_size=batch_size
)
validation_dataset = keras.preprocessing.image_dataset_from_directory(
new_base_dir / 'train' ,
validation_split=0.2,
subset="validation",
seed=123,
image_size=(img_height, img_width),
batch_size=batch_size
)
test_dataset = keras.preprocessing.image_dataset_from_directory(
new_base_dir / 'test' ,
seed=123,
image_size=(img_height, img_width),
batch_size=batch_size
)
提取 VGG16 的特征和对应的标签
import numpy as np
def get_features_and_labels(dataset):
    all_features =[]
    all_labels = []
    i=0
    for images, labels in dataset:
        print("batch No:{0}".format(i+1))
        i+=1
        preprocessed_images = keras.applications.vgg16.preprocess_input(images)
        features =conv_base.predict(preprocessed_images)
        all_features.append(features)
        all_labels.append(labels)
    return np.concatenate(all_features), np.concatenate(all_labels)


train_features, train_labels = get_features_and_labels(train_dataset)
val_features, val_labels = get_features_and_labels(validation_dataset)
test_features, test_labels = get_features_and_labels(test_dataset)
定义并训练密集连接分类器
inputs = keras.Input(shape=(5, 5, 512))
x = layers.Flatten()(inputs)
x = layers.Dense(256)(x)
x = layers.Dropout(0.5)(x)
outputs = layers.Dense(1, activation="sigmoid")(x)
model = keras.Model(inputs, outputs)
model.compile(loss="binary_crossentropy",optimizer="rmsprop",metrics=["accuracy"])
训练模型
callbacks = [keras.callbacks.ModelCheckpoint(filepath="feature_extraction.model",save_best_only=True,monitor="val_loss")]
history = model.fit(train_features, train_labels,epochs=20,validation_data=(val_features, val_labels),callbacks=callbacks)
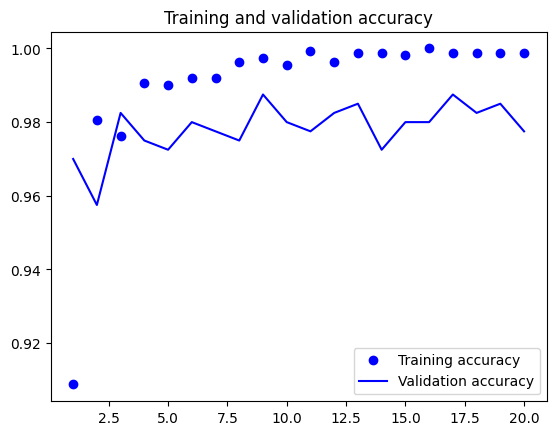
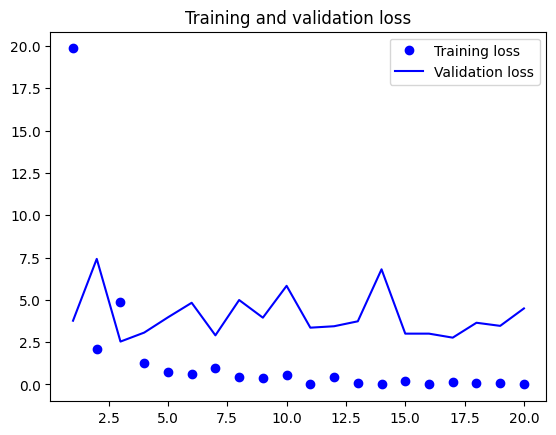
绘制训练结果
import matplotlib.pyplot as plt
acc = history.history["accuracy"]
val_acc = history.history["val_accuracy"]
loss = history.history["loss"]
val_loss = history.history["val_loss"]
epochs = range(1, len(acc) + 1)
plt.plot(epochs, acc, "bo", label="Training accuracy")
plt.plot(epochs, val_acc, "b", label="Validation accuracy")
plt.title("Training and validation accuracy")
plt.legend()
plt.figure()
plt.plot(epochs, loss, "bo", label="Training loss")
plt.plot(epochs, val_loss, "b", label="Validation loss")
plt.title("Training and validation loss")
plt.legend()
plt.show()


测试模型分类精度
test_model = keras.models.load_model("feature_extraction.model")
test_loss, test_acc = test_model.evaluate(test_features, test_labels)
print(f"Test accuracy: {test_acc:.3f}")
>>> test_model = keras.models.load_model("feature_extraction.model")
>>> test_loss, test_acc = test_model.evaluate(test_features, test_labels)
32/32 [==============================] - 0s 2ms/step - loss: 3.5562 - accuracy: 0.9710
>>> print(f"Test accuracy: {test_acc:.3f}")
Test accuracy: 0.971
>>>
总之,使用预训练模型是处理小型图像数据集的有效方法。它利用了深度学习中丰富的特征表示能力,以及在不同任务之间迁移知识的优势。这种方法不仅可以提高模型的性能,而且可以节省训练时间和计算资源。


