
Docker实战 | 第五篇:Docker启用TLS加密解决暴露2375端口引发的安全漏洞,被黑掉三台云主机的教训总结
 Docker启用TLS加密解决暴露2375端口引发的安全漏洞
一. 前言
文末有惊喜!!希望会对您有帮助~
在之前的文章中 IDEA集成Docker插件实现一键自动打包部署微服务项目,其中开放了服务器2375端口监听,此做法却引发出来一个安全问题,在上篇文章评论也有好心的童鞋提示,但自己心存侥幸心理,以为争取时间就没问题。
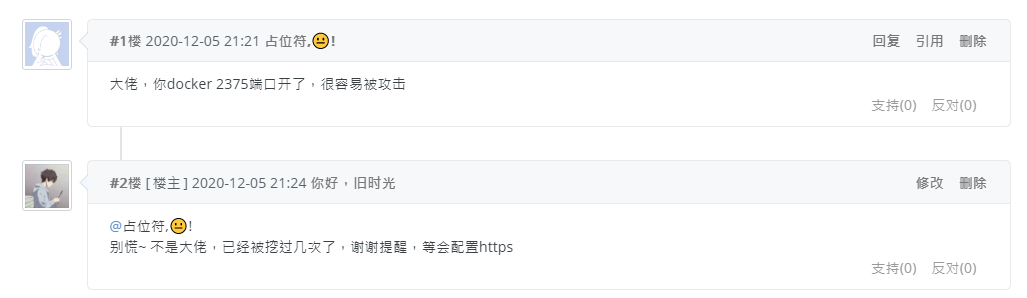
想知道为什么暴露2375不安全看一下大佬的具体操作 传送门。
写这篇时候自己开放2375端口的3台云服务器中招了,两台阿里云服务器root账号被劫权,root这个超级用户俨然已成为傀儡皇帝,有名无权,还有一台ucloud服务器被挖矿内存被打满。意味着环境都要重新装了,想洗洗睡的心都有了,做人真的不能装~
二. 实操
1. 设置主机名
编辑/etc/hostname,服务器主机名 a.youlai.store
vi /etc/hostname
2. 生成TLS证书
创建证书生成脚本 cert.sh,放置/script目录
mkdir -p /script /data/cert/docker
touch /script/cert.sh
vim /script/cert.sh
cert.sh添加内容
#!/bin/bash
set -e
if [ -z $1 ];then
        echo "请输入Docker服务器主机名"
        exit 0
fi
HOST=$1
mkdir -p /data/cert/docker
cd /data/cert/docker
openssl genrsa -aes256 -out ca-key.pem 4096
openssl req -new -x509 -days 365 -key ca-key.pem -sha256 -out ca.pem
openssl genrsa -out server-key.pem 4096
openssl req -subj "/CN=$HOST" -sha256 -new -key server-key.pem -out server.csr
# 配置白名单,推荐配置0.0.0.0,允许所有IP连接但只有证书才可以连接成功
echo subjectAltName = DNS:$HOST,IP:0.0.0.0 > extfile.cnf
openssl x509 -req -days 365 -sha256 -in server.csr -CA ca.pem -CAkey ca-key.pem -CAcreateserial -out server-cert.pem -extfile extfile.cnf
openssl genrsa -out key.pem 4096
openssl req -subj '/CN=client' -new -key key.pem -out client.csr
echo extendedKeyUsage = clientAuth > extfile.cnf
openssl x509 -req -days 365 -sha256 -in client.csr -CA ca.pem -CAkey ca-key.pem -CAcreateserial -out cert.pem -extfile extfile.cnf
rm -v client.csr server.csr
chmod -v 0400 ca-key.pem key.pem server-key.pem
chmod -v 0444 ca.pem server-cert.pem cert.pem
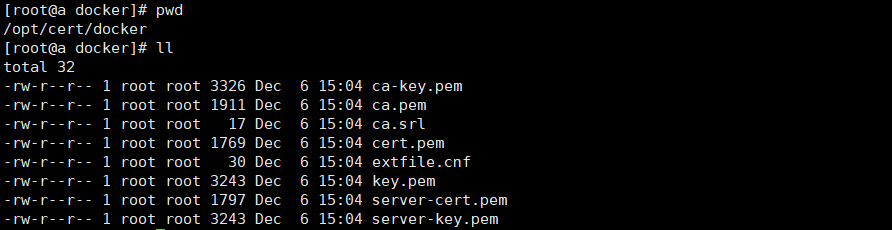
执行 cert.sh 脚本,生成证书放置 /data/cert/docker 目录中
# a.youlai.store是服务器的主机名
sh /script/cert.sh a.youlai.store
按照提示输入相关信息,密码一致就行,其他信息可留空,等脚本指定完成之后,可在 /data/cert/docker 目录查看到生成的证书。
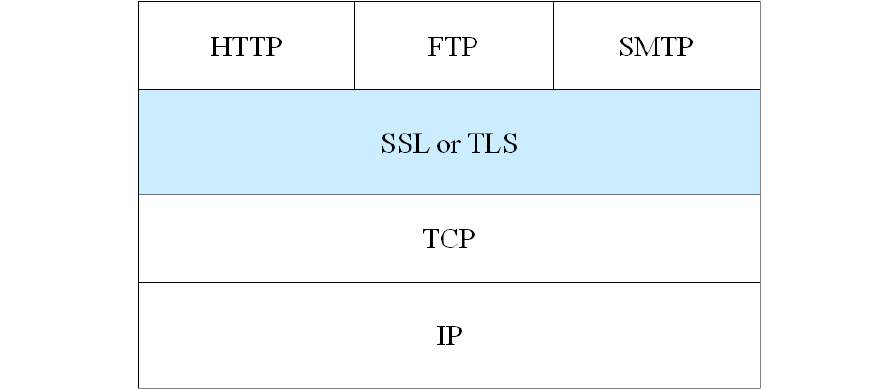
3. 配置Docker启用TLS
vim /usr/lib/systemd/system/docker.service
在ExecStart属性后追加
--tlsverify --tlscacert=/data/cert/docker/ca.pem  \
--tlscert=/data/cert/docker/server-cert.pem \
--tlskey=/data/cert/docker/server-key.pem \
-H tcp://0.0.0.0:2376 -H unix://var/run/docker.sock
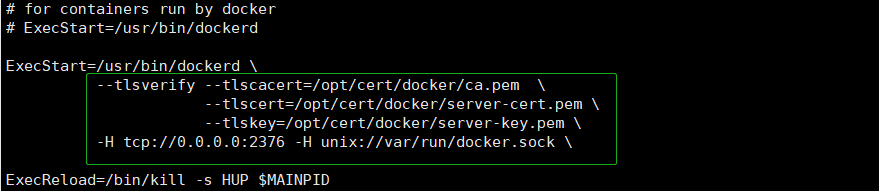
重新加载docker配置后重启
systemctl daemon-reload
systemctl restart docker
查看2376端口是否启动
netstat -nltp | grep 2376

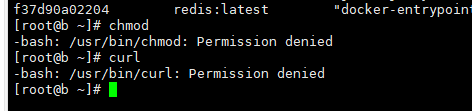
本地连接测试Docker API是否可用
- 没有指定证书访问测试
curl https://a.youlai.store:2376/info
- 指定证书访问测试
curl https://a.youlai.store:2376/info --cert /data/cert/docker/cert.pem --key /data/cert/docker/key.pem --cacert /data/cert/docker/ca.pem
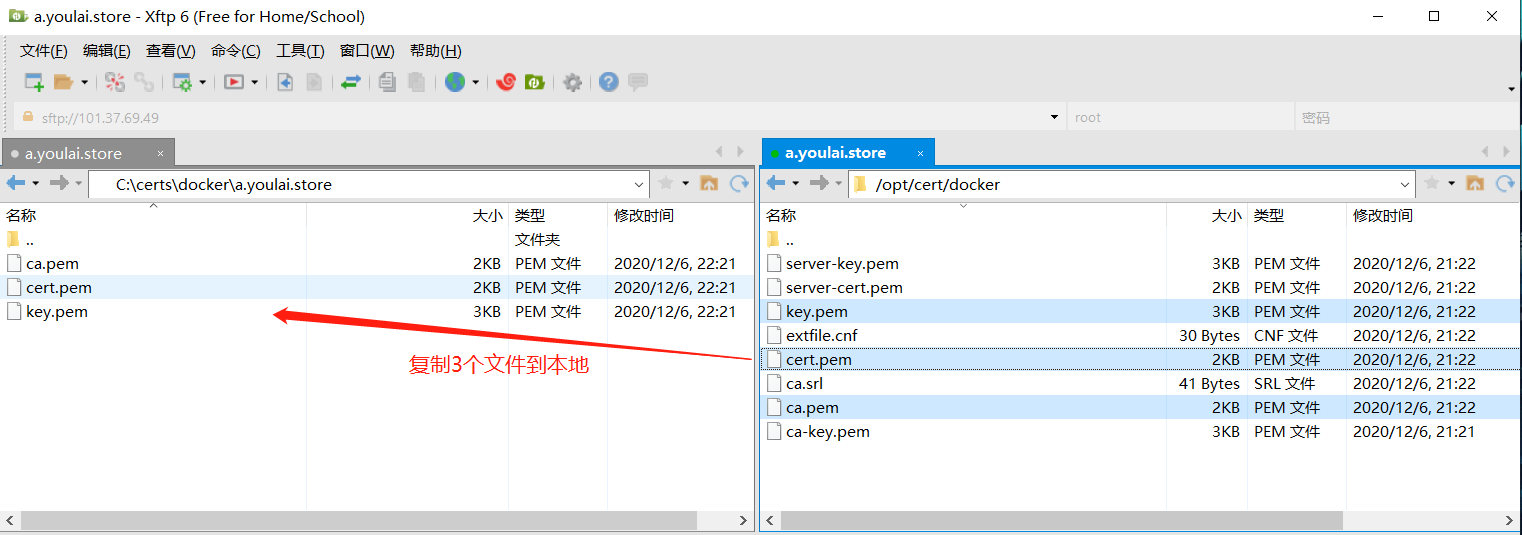
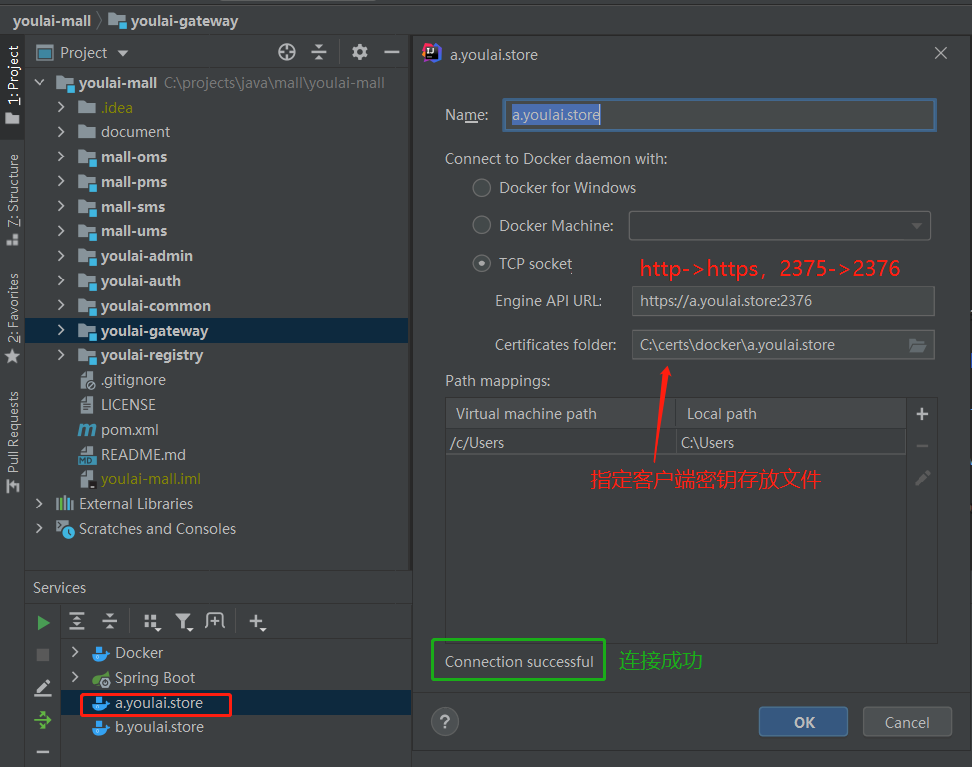
4. IDEA配置
将客户端所需的ca.pem、cert.pem、key.pem3个密钥文件从服务器下载到本地
IDEA连接Docker配置修改
pom.xml
<build>
    <plugins>
        <plugin>
            <groupId>org.springframework.boot</groupId>
            <artifactId>spring-boot-maven-plugin</artifactId>
        </plugin>
        <plugin>
            <groupId>com.spotify</groupId>
            <artifactId>docker-maven-plugin</artifactId>
            <version>1.0.0</version>
            <executions>
                <!--执行mvn package,即执行 mvn clean package docker:build-->
                <execution>
                    <id>build-image</id>
                    <phase>package</phase>
                    <goals>
                        <goal>build</goal>
                    </goals>
                </execution>
            </executions>

            <configuration>
                <!-- 镜像名称 -->
                <imageName>${project.artifactId}</imageName>
                <!-- 指定标签 -->
                <imageTags>
                    <imageTag>latest</imageTag>
                </imageTags>
                <!-- 基础镜像-->
                <baseImage>openjdk:8-jdk-alpine</baseImage>

                <!-- 切换到容器工作目录-->
                <workdir>/</workdir>

                <entryPoint>["java","-jar","${project.build.finalName}.jar"]</entryPoint>

                <!-- 指定远程 Docker API地址  -->
                <dockerHost>https://a.youlai.store:2376</dockerHost>
                <!-- 指定tls证书的目录 -->
                <dockerCertPath>C:\certs\docker\a.youlai.store</dockerCertPath>

                <!-- 复制 jar包到docker容器指定目录-->
                <resources>
                    <resource>
                        <targetPath>/</targetPath>
                        <!-- 用于指定需要复制的根目录,${project.build.directory}表示target目录 -->
                        <directory>${project.build.directory}</directory>
                        <!-- 用于指定需要复制的文件,${project.build.finalName}.jar就是打包后的target目录下的jar包名称 -->
                        <include>${project.build.finalName}.jar</include>
                    </resource>
                </resources>
            </configuration>
        </plugin>
    </plugins>
</build>
打包测试
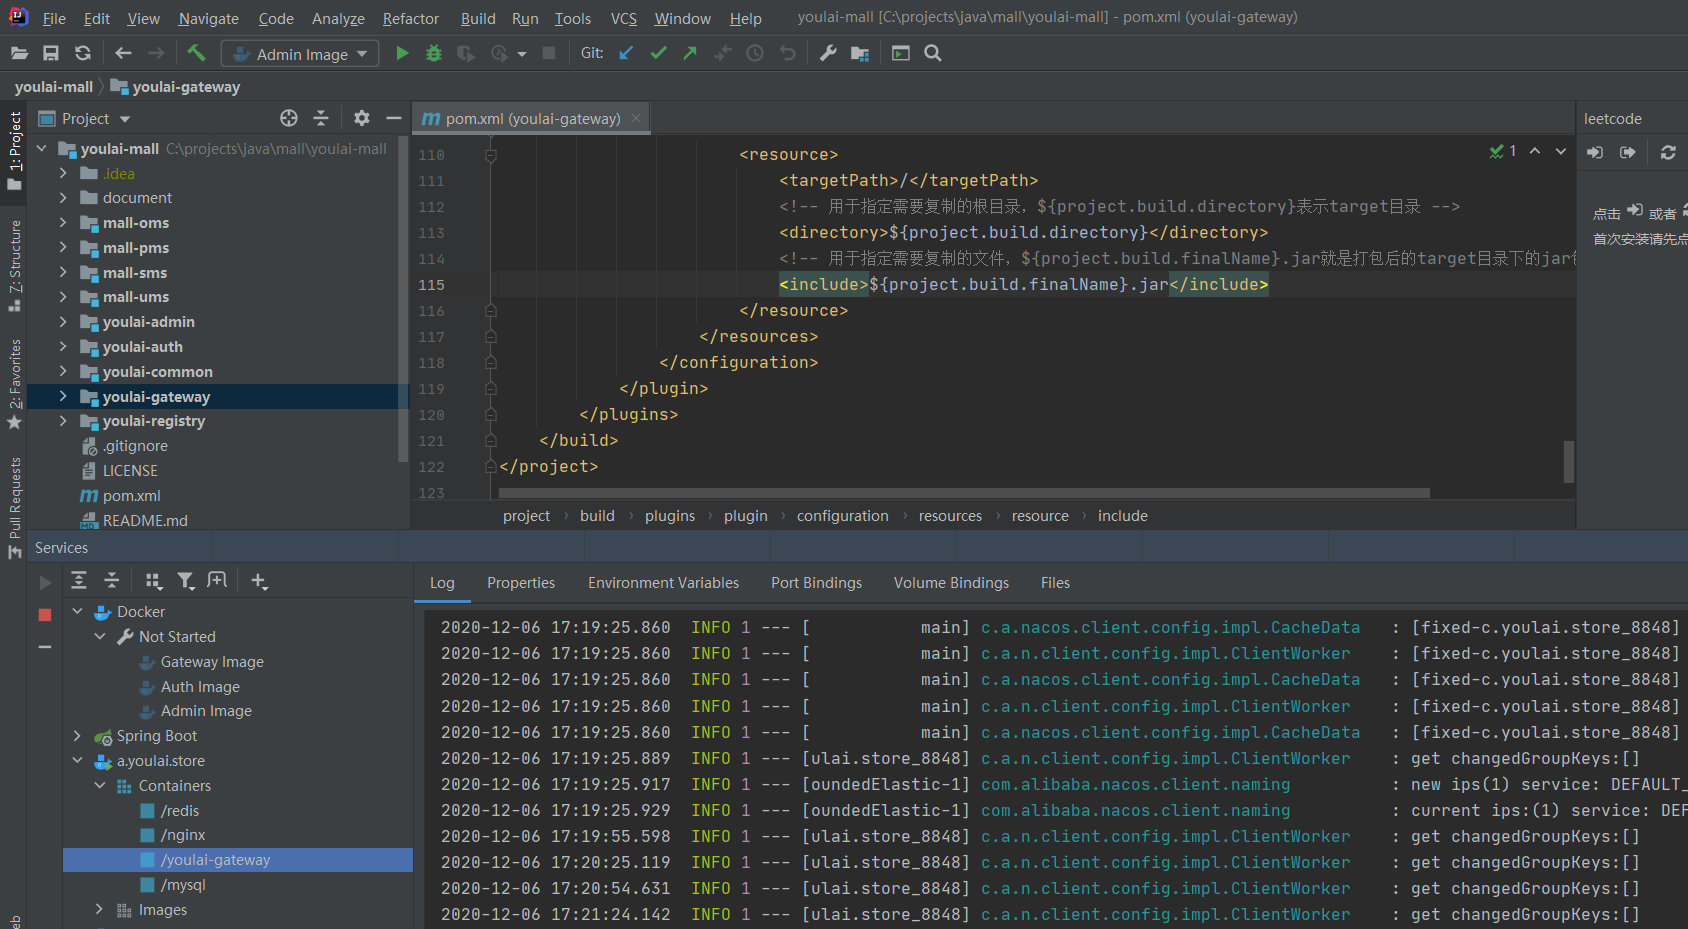
可以看到网关应用已成功部署至服务器,详细操作步骤请参考 Docker实战 | 第二篇:IDEA集成Docker插件实现一键自动打包部署微服务项目
三. 结语
其实没啥好说的,如果大家有云服务器Docker API的2375端口暴露出来的话,建议添加TLS加密认证。不然被黑掉几率非常大,自己就是个活生生栗子,截止到凌晨一点半,还剩下一台机器的环境没有恢复,心累~
如果大家有什么问题,欢迎下方留言,看到第一时间回复~
文章主旨: 服务器被黑什么的都没啥,重点是下面要说的,youlai-mall 自己在工作之余整理的一套 (微服务架构 + 前后端分离 + 微信小程序)的开源项目, 希望能给需要的童鞋提供一个很不错开源项目经验,有兴趣的可以加我(微信号:haoxianrui)一起来“玩”呗~
下面整理出项目开发相关的往期的文章:
后台微服务
- Spring Cloud实战 | 第一篇:Windows搭建Nacos服务
- Spring Cloud实战 | 第二篇:Spring Cloud整合Nacos实现注册中心
- Spring Cloud实战 | 第三篇:Spring Cloud整合Nacos实现配置中心
- Spring Cloud实战 | 第四篇:Spring Cloud整合Gateway实现API网关
- Spring Cloud实战 | 第五篇:Spring Cloud整合OpenFeign实现微服务之间的调用
- Spring Cloud实战 | 第六篇:Spring Cloud Gateway+Spring Security OAuth2+JWT实现微服务统一认证授权
- Spring Cloud实战 | 最七篇:Spring Cloud Gateway+Spring Security OAuth2集成统一认证授权平台下实现注销使JWT失效方案
- Spring Cloud实战 | 最八篇:Spring Cloud +Spring Security OAuth2+ Vue前后端分离模式下无感知刷新实现JWT续期
- Spring Cloud实战 | 最九篇:Spring Security OAuth2认证服务器统一认证自定义异常处理
- Spring Cloud实战 | 第十篇 :Spring Cloud + Nacos整合Seata 1.4.1最新版本实现微服务架构中的分布式事务,进阶之路必须要迈过的槛
- Spring Cloud实战 | 第十一篇 :Spring Cloud Gateway网关实现对RESTful接口权限和按钮权限细粒度控制
后台管理前端
- vue-element-admin实战 | 第一篇: 移除mock接入微服务接口,搭建SpringCloud+Vue前后端分离管理平台
- vue-element-admin实战 | 第二篇: 最小改动接入后台实现根据权限动态加载菜单
微信小程序
应用部署
本文作者:有来技术
本文链接:https://www.cnblogs.com/haoxianrui/p/14095306.html
版权声明:本作品采用知识共享署名-非商业性使用-禁止演绎 2.5 中国大陆许可协议进行许可。


【推荐】国内首个AI IDE,深度理解中文开发场景,立即下载体验Trae
【推荐】编程新体验,更懂你的AI,立即体验豆包MarsCode编程助手
【推荐】抖音旗下AI助手豆包,你的智能百科全书,全免费不限次数
【推荐】轻量又高性能的 SSH 工具 IShell:AI 加持,快人一步