系统优化-------------大江东去,浪淘尽,千古风流人物。
Linux系统优化
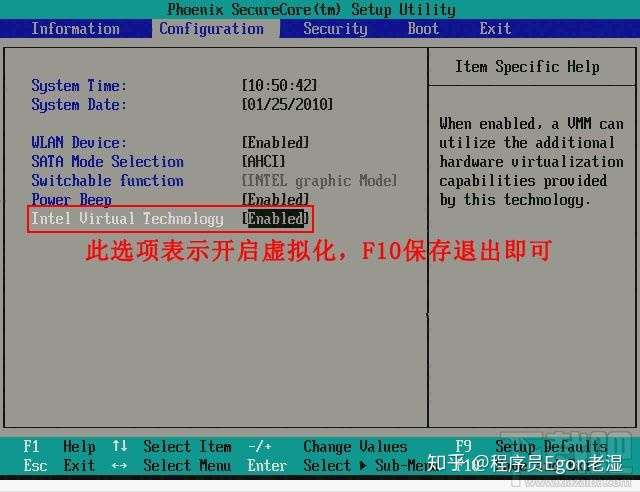
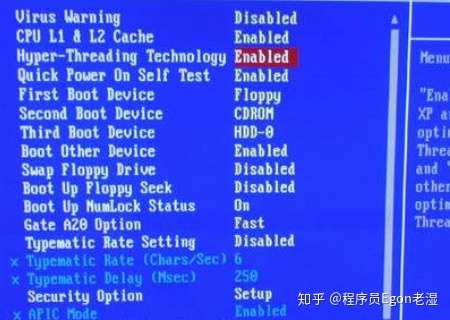
一、开启VT和HT
Hyper-Threading(HT) 基本做云平台的,VT 和 HT 打开都是必须的,超线程技术(HT)就是利用特殊的硬件指令,把两个逻辑内核模拟
成两个物理芯片,让单个处理器都能使用线程级并行计算,进而兼容多线程操作系统和软件,减少了 CPU 的闲置时 间,提高的 CPU 的运行效率。
开启VT
开HT
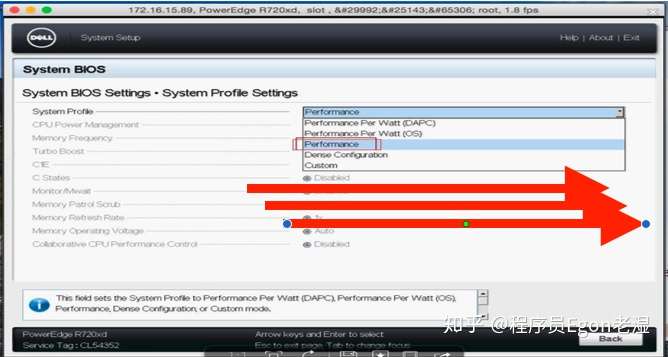
二、关闭CPU节能
关闭节能后,对性能还是有所提升的,所以坚决调整成性能型(Performance)。当然也可以在操作系统级别进行
调整,详细的调整过程请自行谷歌。Dellr720xd bios 配置截图如下:
也可以在系统层面进行设置,配置方法如下:
for CPUFREQ in /sys/devices/system/cpu/cpu*/cpufreq/scaling_governor; do [ -f $CPUFREQ ] || continue; echo -n performance > $CPUFREQ; done
三、yum源处理于常用软件安装
一:先在测试环境,配置好yum源
默认国外的yum源(软件仓库)比较慢,所以换成国内的。
# 1.1、备份
[root@egon ~]# mv /etc/yum.repos.d/CentOS-Base.repo /etc/yum.repos.d/CentOS-Base.repo.backup
# 1.2、下载新的CentOS-Base.repo 到/etc/yum.repos.d/
[root@egon ~]# curl -o /etc/yum.repos.d/CentOS-Base.repo http://mirrors.aliyun.com/repo/Centos-7.repo
# 1.3.添加epel源
[root@egon ~]# curl -o /etc/yum.repos.d/epel.repo http://mirrors.aliyun.com/repo/epel-7.repo
# 二:然后执行yum update -y,以及安装常用软件包,然后执行部署,将部署过程中安装的包缓存本地
[root@egon ~]# yum update -y # 刚装完系统后就立即执行,日后就不要轻易更新了
[root@egon ~]# yum -y install tree nmap sysstat lrzsz telnet bash-completion bash-completion-extras vim lsof net-tools rsync ntpdate nfs-utils
# 三:将所有主机上的软件包汇总到一起,做成一个自己的yum源用来后期使用
四、规范系统主机名
hostnamectl set-hostname 主机名 #主机名能够反映出主机的作用即可
五、添加hosts文件实现集群主机之间互用主机名解析
vim /etc/hosts #编辑好之后,每台机器都发一份
以后机器之间互通信息,不用ip地址进行解析了,可以直接按照主机号进行查找,速度就快了
172.16.10.11 nc1 ceph-deploy
172.16.10.12 nc2
172.16.10.13 nc3
172.16.10.14 cs1
172.16.10.15 cs2
172.16.10.16 cs3
六、关闭SElinux
SELinux(Security-Enhanced Linux)是美国国家安全局(NSA)对于强制访问控制的实现,这个功能让系统管理员又爱又恨,这里我们还是把它给关闭了吧,至于安全问题,后面通过其他手段来解决,这也是大多数生产环境的做法,如果非要开启也是可以的。
# 临时关闭
setenforce 0
# 永久关闭
/etc/selinux/config
# 检查结果
grep "disabled" /etc/selinux/config
七、关闭防火墙(firewalld)或者开发对应的端口
关闭防火墙的目的是为了让初学者学习更方便,将来在学了Firewalld技术后可再统一开启。 在企业环境中,一般只有配置外网IP的linux服务器才需要开启防火墙,但即使是有外网IP,对于高并发高流量的业务服务器仍是不能开的,因为会有较大性能损失,导致网站访问很慢,这种情况下只能在前端加更好的硬件防火墙了。
# 临时关闭
systemctl stop firewalld
# 设置开机不启动
systemctl disable firewalld
八、配置ntp服务,同步系统时间
给定时任务加上注释
[root@egon ~]# echo '#Timing synchronization time' >>/var/spool/cron/root
定时任务
[root@egon ~]# echo '0 */1 * * * /usr/sbin/ntpdate ntp1.aliyun.com &>/dev/null' >>/var/spool/cron/root
检查结果
[root@egon ~]# crontab -l
九、系统内核优化
9.1、ulimit命令介绍
设置用户级所能打开的最大进程数目:-u 选项
ulimit -u 3
设置用户级所能分配到的文件描述符数量:-n
ulimit -n 12
9.2、控制用户开启的最大进程数目
useradd egon
ulimit -u 3 # 每个用户能同时开启的最大进程数均只有3个
su - egon # 切换到egon用户下,先执行了一个bash解释器进程,此外还能再开俩个
$ sleep 1000 &
[1] 1435
$ sleep 2000 &
[2] 1436
$ sleep 3000 &
-bash: fork: retry: 资源暂时不可用
-bash: fork: retry: 资源暂时不可用
-......
注意:
1、ulimit -u 3是限制每个用户能同时开启的最大进程数均只有3,而不是累计到一起总共有3个
2、测试的时候sleep后的时间长一点,模拟出同时开启多个进程的效果,不然执行一条短命令很快就结束了
9.3 、文件描述符
进程每打开一个文件,操作系统内核就会为该打开的文件分配一个编号(非负整数),该编号称之为文件描述符(File Descriptor)或者文件handle->也有人将其译为文件句柄
文件打开后的处理逻辑:
进程->文件描述符->操作系统内核->一个具体的文件
即内核(kernel)就是利用文件描述符(file descriptor)来访问文件
在程序设计中,一些涉及底层的程序编写往往会围绕着文件描述符展开。但是文件描述符这一概念往往只适用于UNIX、Linux这样的操作系统。
更多关于描述符的概念:https://www.cnblogs.com/linhaifeng/articles/13959014.html
进程每打开一个文件,操作系统就会为进程分配一个对应的文件描述符。文件描述符的数目是可以设置的,而一旦设置过小,进程会随着打开的文件数增多,因为达到了文件描述的上限而无法打开文件,从而抛出异常
文件描述符测试代码
cat test1.py
import os
import time
from threading import Thread
print(os.getpid())
def task(n):
with open('%s.txt' %n,mode='wt') as f1:
time.sleep(1000)
if name == "main":
count=1
while True:
Thread(target=task,args=(count,)).start()
count+=1
time.sleep(3)
# cat test2.py
import os
import time
from threading import Thread
print(os.getpid())
def task(n):
with open('egon%s.txt' %n,mode='wt') as f1:
time.sleep(1000)
if name == "main":
count=1
while True:
Thread(target=task,args=(count,)).start()
count+=1
time.sleep(3)
# 测试
# ulimit -n 12 # 最大的文件描述符数为12,每个用户级进程能打开的最大文件数均只有12个
# python test1.py &
[1] 1263
# 1263
# python test2.py &
[2] 1266
# 1266
# 在另外一个终端查看
# ll /proc/1263/fd
总用量 0
lrwx------. 1 root root 64 11月 12 18:18 0 -> /dev/pts/0 # 指向当前终端的标准输入
lrwx------. 1 root root 64 11月 12 18:18 1 -> /dev/pts/0 # 指向当前终端的标准正确输出
lrwx------. 1 root root 64 11月 12 18:18 2 -> /dev/pts/0 # 指向当前终端的标准错误输出
l-wx------. 1 root root 64 11月 12 18:18 3 -> /root/1.txt
l-wx------. 1 root root 64 11月 12 18:18 4 -> /root/2.txt
l-wx------. 1 root root 64 11月 12 18:18 5 -> /root/3.txt
l-wx------. 1 root root 64 11月 12 18:18 6 -> /root/4.txt
l-wx------. 1 root root 64 11月 12 18:18 7 -> /root/5.txt
[root@egon ~~]# ll /proc/1266/fd
总用量 0
lrwx------. 1 root root 64 11月 12 18:18 0 -> /dev/pts/0
lrwx------. 1 root root 64 11月 12 18:18 1 -> /dev/pts/0
lrwx------. 1 root root 64 11月 12 18:18 2 -> /dev/pts/0
l-wx------. 1 root root 64 11月 12 18:18 3 -> /root/egon1.txt
l-wx------. 1 root root 64 11月 12 18:18 4 -> /root/egon2.txt
l-wx------. 1 root root 64 11月 12 18:18 5 -> /root/egon3.txt
l-wx------. 1 root root 64 11月 12 18:18 6 -> /root/egon4.txt
l-wx------. 1 root root 64 11月 12 18:18 7 -> /root/egon5.txt
观察1263与1266这俩进程各自一旦打开的文件数目到达了12,就都会报错
Exception in thread Thread-10:
Traceback (most recent call last):
File "/usr/lib64/python2.7/threading.py", line 812, in __bootstrap_inner
File "/usr/lib64/python2.7/threading.py", line 765, in run
File "test1.py", line 8, in task
IOError: [Errno 24] Too many open files: '10.txt'
Exception in thread Thread-11:
Traceback (most recent call last):
File "/usr/lib64/python2.7/threading.py", line 812, in __bootstrap_inner
File "/usr/lib64/python2.7/threading.py", line 765, in run
File "test1.py", line 8, in task
IOError: [Errno 24] Too many open files: '11.txt'
Exception in thread Thread-10:
Traceback (most recent call last):
File "/usr/lib64/python2.7/threading.py", line 812, in __bootstrap_inner
File "/usr/lib64/python2.7/threading.py", line 765, in run
File "test2.py", line 8, in task
IOError: [Errno 24] Too many open files: 'egon10.txt'
了解:系统级最大的文件描述符个数,即内核程序最大可以打开的文件数
Linux的/proc/sys/fs/file-max决定了当前内核可以打开的最大的文件句柄数。
# 查看当前的值:
cat /proc/sys/fs/file-max
这个值在kernel的文档里是这样描述的:
The value in file-max denotes the maximum number of file handles that the
Linux kernel will allocate. When you get a lot of error messages about running
out of file handles, you might want to raise this limit. The default value is
10% of RAM in kilobytes. To change it, just write the new number into the
file:
意思是file-max一般为内存大小(KB)的10%来计算,如果使用shell,可以这样计算:
grep -r MemTotal /proc/meminfo | awk '{printf("%d",$2/10)}'
一般我们不需要主动设置这个值,因为该值会随着内存大小的变化而自动分配到内存的10%左右,除非这个值确实较小(可能有各种其他原因导致file-max没有设置为内存的10%),我们才需要设置
# 如何查看当前kernel的句柄:
# cat /proc/sys/fs/file-nr
608 0 94306
file-nr在内核文档里得解释如下:
Historically, the three values in file-nr denoted the number of allocated file
handles, the number of allocated but unused file handles, and the maximum
number of file handles. Linux 2.6 always reports 0 as the number of free file
handles -- this is not an error, it just means that the number of allocated
file handles exactly matches the number of used file handles.
过去,filenr中的三个值表示已分配的文件句柄数、已分配但未使用的文件句柄数以及最大文件句柄数。Linux2.6总是报告0作为空闲文件句柄的数量——这不是一个错误,它只是意味着分配的文件句柄的数量与使用的文件句柄的数量完全匹配。
9.4 永久设置与优化
ulimit命令的设置都是临时生效的,可以了解一下它的一些选项如下
-H选项和-S选项分别表示对给定资源的硬限制(hard limit)和软限制(soft limit)进行设置。
硬限制(hard limit)一旦被设置以后就不能被非root用户修改
软限制(soft limit)可以增长达到硬限制(hard limit)。
硬限制(hard limit)一旦被设置以后就不能被非root用户修改,软限制(soft limit)可以增长达到硬限制(hard limit)
如果既没有指定-H选项也没有指定-S选项,那么硬限制(hard limit)和软限制(soft limit)都会被设置。
ulimit设定的值可以是一个数值,也可以是一些特定的值,比如:hard,soft,unlimited,分别代表当前硬件限制、当前软件限制、不限制。
如果limit参数被省略,除非指定-H选项,否则资源当前的软限制(soft limit)将会被打印出来。
如果既没有指定-H选项也没有指定-S选项,那么硬限制(hard limit)和软限制(soft limit)都会被设置。
若想永久设置,需要修改配置文件
配置文件2:/etc/security/limits.conf,该文件可用于控制用户最多同时打开的进程数目与文件数目
配置文件介绍
#加大文件描述符与最大打开的进程数
cat >>/etc/security/limits.conf<<EOF
* soft nofile 102400
* hard nofile 102400
* soft nproc 102400
* hard nproc 102400
EOF
#重启查看
# ulimit -n # 查看最大打开的文件数目
65535
# ulimit -u # 查看最大打开的进程数目
9.5 调整Kernel pid max
This file (new in Linux 2.5) specifies the value at which PIDs wrap around (i.e., the value in this file is one greater than the maximum PID). The default value for this file, 32768,results in the same range of PIDs as on earlier kernels. On 32-bit platfroms, 32768 is the maximum value for pid_max. On 64-bit systems, pid_max can be set to any value up to 2^22 (PID_MAX_LIMIT, approximately 4 million).
这个文件(linux2.5中的新文件)指定了PIDs环绕的值(即,这个文件中的值比最大PID大一个)。此文件的默认值32768将产生与早期内核相同的pid范围。在32位平台上,32768是pid最大值。在64位系统上,pid最大值可以设置为2^22等于4194304(pid最大值限制,大约400万)。
默认是
cat /proc/sys/kernel/pid_max
131072
通常够用,可以酌情调整, 以减少滚动翻转问题
临时 调整为:
echo 4194303 > /proc/sys/kernel/pid_max
永久生效
echo "kernel.pid_max= 4194303" | tee -a /etc/sysctl.conf
sysctl -p
9.6 调整swappiness
调整swappiness, 主要控制系统对 swap 的使用,这个参数的调整最先见于 UnitedStack 公开的文档中:
swappiness参数值可设置范围在0到100之间。 此参数值越低,就会让Linux系统尽量少用swap分区,多用内存。设置为100可能会影响整体性能,如果内存充足,就可以将这个值设置很低,甚至为0,以避免系统进行swap而影响性能,不建议设置成0,建议设置成10即可,详解请看:https://www.cnblogs.com/linhaifeng/articles/13960093.html
cat /proc/sys/vm/swappiness
60
# echo "vm.swappiness = 10" | tee -a /etc/sysctl.conf
9.7 其他内核优化
设置
cat >>/etc/sysctl.conf<<EOF
net.ipv4.tcp_fin_timeout = 2
net.ipv4.tcp_tw_reuse = 1
net.ipv4.tcp_tw_recycle = 1
net.ipv4.tcp_syncookies = 1
net.ipv4.tcp_keepalive_time = 600
net.ipv4.ip_local_port_range = 4000 65000
net.ipv4.tcp_max_syn_backlog = 16384
net.ipv4.tcp_max_tw_buckets = 36000
net.ipv4.route.gc_timeout = 100
net.ipv4.tcp_syn_retries = 1
net.ipv4.tcp_synack_retries = 1
net.core.somaxconn = 16384
net.core.netdev_max_backlog = 16384
net.ipv4.tcp_max_orphans = 16384
net.ipv4.ip_forward = 1
EOF
生效
sysctl -p
syncookies开启后用来防止syn洪水攻击,了解请看https://www.cnblogs.com/linhaifeng/articles/13959796.html
10、网络优化
10.1 关闭NetworkManager
在CentOS系统上,目前有NetworkManager和network两种网络管理工具。如果两种都配置会引起冲突,而且NetworkManager在网络断开的时候,会清理路由,如果一些自定义的路由,没有加入到NetworkManager的配置文件中,路由就被清理掉,网络连接后需要自定义添加上去。
network:对网卡的配置
NetworkManager:这个服务由几个部分组成;一个是管理系统网络连接;一个是允许用户管理网络连接的客户端程序,使用它可以更好的管理网络
临时关闭
systemctl stop NetworkManager
永久关闭
systemctl disable NetworkManager
10.2. Jumbo frames
万兆网卡MTU=9000,交换机也要设置,而且对端的MTU也要=9000,否则会出错误 最大传输单元,以太网(走arp协议,通过mac通信)内一般为1500,这样发送大文件就需要经过:切片-》发送--》重组。 请看https://www.cnblogs.com/linhaifeng/articles/13959997.html
MTU越小分片数越多,对网络cpu压力都会变大,如果升高MTU值,切片数目就会变小,传输效率会升高,但是为什么MTU最大值为9000字节?
从理论上计算,4 bytes的CRC最大支持12000 bytes大小的字节,超过了就没有办法检查了。另外还有其他一些协议如NFS等的限制。
最后需要注意的是,在经过交换网络设备时,仅仅修改主机端的MTU值是不行的,还需要交换网络设备上开启jumbo frames功能。
10.3 网卡绑定
网卡绑定bond模式4(lacp),team模式lacp,teamd绑定模式:这个运行程序可用于两种负载平衡,即主动和被动负载平衡。在主动模式中,通过使用最新流量统计不断进行流量再平衡, 以便尽可能平均分配流量。在静态模式中,流量会在可用链接之间随机分配。鉴于较低的处理开销,这样有速度优势。 在高流量应用程序中通常首选此方式,因为流量通常由多个要在可用链接间随机分配的流组成,使用这种方式时,无需 teamd 介入即可完成负载分布。
所有网卡绑定都采用被动模式,既不配置"tx_balancer": {"name": "basic"}。如果配置为主动模式,会有网路延迟产生,
10.4 禁用ping
禁止主机被ping。echo 1 > /proc/sys/net/ipv4/icmp_echo_ignore_all
11、安全优化
Linux系统安全最小原则说明
最小化原则 对Linux系统安全来说极其重要,即多一事不如少一事 。具体包括如下几个方面:
- 安装Linux系统最小化,即选包最小化,yum安装软件包也要最小化,无用的包不装。
- 开机自启动服务最小化,即无用的服务不开启。
- 操作命令最小化。例如:能用“rm-f test.txt”就不用“rm-fr test.txt”。
- 登录Linux用户最小化。平时没有特殊需求不登录root,用普通用户登录即可。
- 普通用户授权权限最小化,即只给用户必需的管理系统的命令。
- Linux系统文件及目录的权限设置最小化,禁止随意创建、更改、删除文件。
11.1 单用户
进入后输入
chroot /sysroot
然后修改密码
passwd root
注意:事先关闭selinux
11.2 grub加密
centos7.2 + 中引入了新的实用程序“ grub2-setpassword ”
1) 执行 grub2-setpassword 命令
# grub2-setpassword
Enter password:
Confirm password:
2)如果现在重新启动系统并尝试修改引导条目,系统将要求提供凭据,但是可以在没有凭据的情况下修改引导条目。为了阻止未经授权的修改和未经授权的启动,我们需要对 /boot/grub2/grub.cfg 文件进行更改
打开文件并使用密码搜索需要保护的启动条目,它以menuentry开头。找到条目后,从中删除 --unrestricted 参数
3) reboot 重启验证,只有当输入正确的用户名和密码时,才能进入 grub 菜单或者修改引导条目。
11.3 光盘修复模式
1、进入bios、从光盘启动
2、点击Troubleshooting
3、进入到Troubleshooting界面
选择:Rescue a CentOS Linux system
4、三:进入到Rescue选项 按 ENTER键 选1 ,其他选项意思如下
1)continue:救援模式程序会自动查找系统中已有的文件系统,并可读写挂载到/mnt/sysimage目录下。
2)Read-Only:会以只读的方式挂载已有的文件系统。
3)Skip to shell: 手动挂载
5、sh切换bash模式
chroot /mnt/sysimage/
6、执行命令
passwd root
bios加密
....
扣电池
11.4 sudo
普通用户登录,sudo管理
11.5 ssh秘钥登录
ssh-keygen
ssh-copy-id -i root@ip地址 # 把自己的公钥上传到对方,这样就可以秘钥登录对方了
11.6 更改SSH服务端远程登录设置
禁止DNS进行反向解析
sed -i 's/#UseDNS yes/UseDNS no/g' /etc/ssh/sshd_config
禁止GSS认证,减少连接时产生的延迟
sed -i 's/GSSAPIAuthentication yes/GSSAPIAuthentication no/g' /etc/ssh/sshd_config
修改默认端口:ssh默认端口22,你知我知黑客也知,所以需要修改
sed -i 's/#Port.*/Port 6666/' /etc/ssh/sshd_config
其他修改:禁用root登录,以及空密码登录
[root@www ~]#cp /etc/ssh/sshd_config /etc/ssh/sshd_config.ori
<-- 更改配置前进行备份,是系统管理员的一个良好的习惯。
[root@www ~]#vi /etc/ssh/sshd_config
<-- 编辑sshd_config
##########
Port 6666 # 已改
UseDNS no # 已改
GSSAPIAuthentication no # 已改
PermitRootLogin no
PermitEmptyPasswords no
##########
生效
systemctl restart sshd
测试
ssh root@192.168.12.17 -p 6666
除了前面介绍的安全知识以外,还有更高级的SSH安全策略,具体如下。
1)更改SSH监听的IP,使其仅监听内网IP。命令如下:
[root@web01 ~]# cat /etc/ssh/sshd_config
############
Port 52113
PermitRootLogin no
PermitEmptyPasswords no
UseDNS no
GSSAPIAuthentication no
ListenAddress 10.0.0.7 <-- 企业仅指定监听本机内网IP地址
############
2)通过防火墙限制仅能使用内网IP连接此服务器。限制命令如下:
iptables -I INPUT -p tcp --dport 52113 -s 10.0.0.0/24 -j ACCEPT
<-- 默认规则为DROP时的限制SSH命令
3)通过拨号到VPN服务器,然后从局域网访问这些服务器,提升安全性
12、开机优化
12.1 设置运行级别为3
设置运行级别
systemctl set-default multi-user.target
12.2 精简开机启动项
企业环境新装Linux系统之后有必要保留的开机自启动服务有5个,具体如下。
sshd:远程连接Linux服务器时需要用到这个服务程序,所以必须要开启,否则Linux服务器就无法提供远程连接服务了。
rsyslog:日志相关软件,这是操作系统提供的一种机制,系统的守护程序通常会使用rsyslog程序将各种信息写到各个系统日志文件中,在CentOS 6以前此服务的名字为syslog。
network:系统启动时,若想激活/关闭各个网络接口,则应(必须)考虑开启此服务。
crond:该服务用于周期性地执行系统及用户配置的任务计划。有要周期性执行的任务时,就要开启,此服务几乎是生产场景必须要用的一个软件。
sysstat:sysstat是一个软件包,包含监测系统性能及效率的一组工具,这些工具对于我们收集系统性能数据很有帮助,比如CPU使用率、硬盘和网络吞吐数据等,对这些数据的收集和分析,有利于判断系统运行是否正常,所以它是提高系统运行效率、安全运行服务器的得力助手。
sysstat软件包集成的主要工具为:
iostat工具提供CPU使用率及硬盘吞吐效率的数据。
mpstat工具提供与单个或多个处理器相关的数据。
sar工具负责收集、报告并存储系统活跃的信息。
开机启动项目优化
1、使用 systemctl list-unit-files 可以查看启动项
2、systemctl list-unit-files | grep enable 过滤查看启动项如下
abrt-ccpp.service enabled abrt为auto bug report的缩写 用于bug报告 关闭
abrt-oops.service enabled ----------------------
abrt-vmcore.service enabled ----------------------
abrt-xorg.service enabled ----------------------
abrtd.service enabled ----------------------
auditd.service enabled 安全审计 保留
autovt@.service enabled 登陆相关 保留
crond.service enabled 定时任务 保留
dbus-org.freedesktop.NetworkManager.service enabled 桌面网卡管理 关闭
dbus-org.freedesktop.nm-dispatcher.service enabled ----------------------
getty@.service enabled tty控制台相关 保留
irqbalance.service enabled 优化系统中断分配 保留
kdump.service enabled 内核崩溃信息捕获 自定
microcode.service enabled 处理器稳定性增强 保留
NetworkManager-dispatcher.service enabled 网卡守护进程 关闭
NetworkManager.service enabled ----------------------
postfix.service enabled 邮件服务 关闭
rsyslog.service enabled 日志服务 保留
snmpd.service enabled snmp监控 数据抓取 保留
sshd.service enabled ssh登陆 保留
systemd-readahead-collect.service enabled 内核调用--预读取 保留
systemd-readahead-drop.service enabled ----------------------
systemd-readahead-replay.service enabled ----------------------
tuned.service enabled
default.target enabled 默认启动项 multi-user.target的软连接 保留
multi-user.target enabled 启动用户命令环境 保留
remote-fs.target enabled 集合远程文件挂载点 自定
runlevel2.target enabled 运行级别 用于兼容6的SysV 保留
runlevel3.target enabled ----------------------
runlevel4.target enabled ----------------------
3、关闭一下开机启动服务
systemctl disable abrt-ccpp.service
systemctl disable abrt-oops.service
systemctl disable abrt-vmcore.service
systemctl disable abrt-xorg.service
systemctl disable abrtd.service
systemctl disable accounts-daemon.service
systemctl disable atd.service
systemctl disable auditd.service
systemctl disable autovt@.service
systemctl disable avahi-daemon.service
systemctl disable bluetooth.service
systemctl disable cups.service
systemctl disable dbus-org.bluez.service
systemctl disable dbus-org.fedoraproject.FirewallD1.service
systemctl disable dbus-org.freedesktop.Avahi.service
systemctl disable dbus-org.freedesktop.ModemManager1.service
systemctl disable dbus-org.freedesktop.NetworkManager.service
systemctl disable dbus-org.freedesktop.nm-dispatcher.service
systemctl disable display-manager.service
systemctl disable dmraid-activation.service
systemctl disable firewalld.service
systemctl disable gdm.service
systemctl disable irqbalance.service
systemctl disable iscsi.service
systemctl disable ksm.service
systemctl disable ksmtuned.service
systemctl disable libstoragemgmt.service
systemctl disable libvirtd.service
systemctl disable lvm2-monitor.service
systemctl disable mcelog.service
systemctl disable mdmonitor.service
systemctl disable microcode.service
systemctl disable ModemManager.service
systemctl disable multipathd.service
systemctl disable NetworkManager-dispatcher.service
systemctl disable NetworkManager.service
systemctl disable postfix.service
systemctl disable qemu-guest-agent.service
systemctl disable rngd.service
systemctl disable rtkit-daemon.service
systemctl disable smartd.service
systemctl disable spice-vdagentd.service
systemctl disable systemd-readahead-collect.service
systemctl disable systemd-readahead-drop.service
systemctl disable systemd-readahead-replay.service
systemctl disable tuned.service
systemctl disable vgauthd.service
systemctl disable vmtoolsd.service
4、systemctl 用法:
显示服务状态:systemctl status docker.service
列出服务层级和依赖关系:systemctl list-dependencies docker.service
启动服务:systemctl start docker.service
关闭服务:systemctl stop docker.service
重启服务:systemctl restart docker.service
设置服务自启动:systemctl enable docker.service
禁止服务自启动:systemctl disable docker.service
查看服务是否自启动:systemctl is-enabled docker.service
列出系统所有服务的启动情况:systemctl list-units --type=service
列出所有自启动服务:systemctl list-unit-files|grep enabled
对应的旧指令(chkconfig、service)
显示服务状态:service docker status
列出服务层级和依赖关系:systemctl list-dependencies docker.service
启动服务:service docker start
关闭服务:service docker stop
重启服务:service docker restart
设置服务自启动:chkconfig --level 3 docker on
禁止服务自启动:chkconfig --level 3 docker off
查看服务是否自启动:chkconfig --list docker
列出系统所有服务的启动情况:chkconfig --list
注意
到底将哪些服务作为开机自启动服务合适?
其实这个问题没有唯一的正确答案,只要不影响系统及服务的运行,多开点少开点都是可以的。但作为一名优秀的Linux系统管理员,我们应该遵守这样一个原则——最小化原则。就是尽量不安装不使用的软件,尽量不开启不需要开启的服务。即只要不用就不开启,这样系统的性能和安全性才是最好的。若随着业务的运行,因安装了软件而需要开机自启动就设置为开机启动即可。一句话,要清楚每个服务的角色,不用的绝对不安装,默认安装了的绝不开机自启动。
12.3 别名及环境变量优化
设置
cat>/etc/profile.d/color.sh<<'EOF'
alias ll='ls -l --color=auto --time-style=long-iso'
PS1="[\e[37;40m][[\e[32;1m]\u[\e[37;40m]@\h [\e[36;40m]\w[\e[0m]][\e[32;1m]\$ [\e[0m]"
export HISTTIMEFORMAT='%F-%T '
EOF
生效
source /etc/profile
12.4 登录和欢迎信息
/etc/motd 登录成功后显示的信息
示例
[root@localhost ~]# cat /etc/motd
+--------------------------------------------+
| |
| 你当前登录的是支付业务后台数据库服务 |
| 请不要删库 |
| |
+--------------------------------------------+
了解
通常我们会清空/etc/issue、/etc/issue.net的内容,去除系统及内核版本登录前的屏幕显示
/etc/issue 登录画面显示的信息(重启机器后,在本机看到的登录界面内容)
/etc/issue.net 它提供给telnet远程登录程序使用的。默认情况下/etc/issue文件和/etc/issue.Net内容一样,如需要,可根据自己需要修改。
$ telnet 192.168.12.17 22 # 测试端口
Trying 192.168.12.17...
Connected to 192.168.12.17.
Escape character is '^]'. -----》表示已打开,其他情况表示端口未打开
SSH-2.0-OpenSSH_7.4
^]
telnet> quit
ps: telnet由于不安全已经很少使用了,都是以ssh代替。

 浙公网安备 33010602011771号