【Java】基础篇-LinkedList
今天带给大家的是 List 集合大家庭下的--- LinkedList。
说到 LinkedList,那么我们大家的第一想法就是 链表,是插入删除快,随机访问慢,今天我们就来一探究竟,究竟内部的它是什么构造导致的问题,我们是否可以在使用的时候有一个更好的解决方案。
本系列文章基于 JDK 1.8
LinkedList :集合的子类
public class LinkedList<E>
    extends AbstractSequentialList<E>
    implements List<E>, Deque<E>, Cloneable, java.io.Serializable
首先,LinkedList 与 ArrayList 一样,实现了 List,而 List 又拓展了 Collection,而 Collection 又拓展了 Iterable,所以他们的一些公共方法是可以通用的,比如 迭代器方法。
而 LinkedList 还拓展了 Deque 队列接口,也就是我们平时说的 FIFO,先进先出。
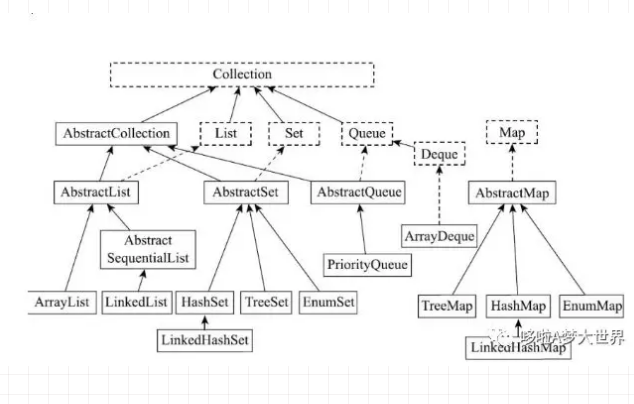
该图引用自网络
从上图可以看出,我们今天要将的 LinkedList 继承了 AbstractSequentialList,而AbstractSequentialList 又继承了 AbstractList,AbstractList 继承 AbstractCollection 并且实现 List。所以,这是一个大的结构链。
这里我们来专门说下 AbstractCollection 和 AbstractSequentialList
-
AbstractCollection
public abstract class AbstractCollection<E> implements Collection<E> {
    protected AbstractCollection() {}
    public abstract Iterator<E> iterator();

    public abstract int size();
    public boolean isEmpty() {}
    public boolean contains(Object o) {}

    public Object[] toArray() {}
    public <T> T[] toArray(T[] a) {}

    private static final int MAX_ARRAY_SIZE = Integer.MAX_VALUE - 8;
    private static <T> T[] finishToArray(T[] r, Iterator<?> it) {}
    private static int hugeCapacity(int minCapacity) {}
    public boolean add(E e) {}
    public boolean remove(Object o) {}
    public boolean containsAll(Collection<?> c) {}
    public boolean addAll(Collection<? extends E> c) {}
    public boolean removeAll(Collection<?> c) {}
    public boolean retainAll(Collection<?> c) {}
    public void clear() {}
    public String toString() {}

}
AbstractCollection 是 Collection 接口的一个基本实现。
public boolean add(E e) {
        throw new UnsupportedOperationException();
    }
public abstract Iterator<E> iterator();
public abstract int size();
在 AbstractCollection 中,其实主要是依赖上面的 3 个方法,其中 add 方法抛出 不支持操作异常,如果子类是不可以修改的,则不用重写 add 方法即可。
size 方法和 iterator 方法是抽象方法,子类必须重写,当然,如果子类是不可修改的,则不用实现 remove 方法至于其他的像判断是否为空的 isEmpty 则是判断 size == 0。contains 方法则是调用 iterator 方法。
public boolean contains(Object o) {
        Iterator<E> it = iterator();
        if (o==null) {
            while (it.hasNext())
                if (it.next()==null)
                    return true;
        } else {
            while (it.hasNext())
                if (o.equals(it.next()))
                    return true;
        }
        return false;
    }
public Object[] toArray() {
        // Estimate size of array; be prepared to see more or fewer elements
        Object[] r = new Object[size()];
        Iterator<E> it = iterator();
        for (int i = 0; i < r.length; i++) {
            if (! it.hasNext()) // fewer elements than expected
                return Arrays.copyOf(r, i);
            r[i] = it.next();
        }
        return it.hasNext() ? finishToArray(r, it) : r;
    }
public boolean remove(Object o) {
        Iterator<E> it = iterator();
        if (o==null) {
            while (it.hasNext()) {
                if (it.next()==null) {
                    it.remove();
                    return true;
                }
            }
        } else {
            while (it.hasNext()) {
                if (o.equals(it.next())) {
                    it.remove();
                    return true;
                }
            }
        }
        return false;
    }
其他的方法都是在上面几个方法上的包装处理,这里就不给大家上代码了。
这里要注意一点,Collection 接口文档建议,每个 Collection 接口的实现类 都应该提供至少 2 个标准的构造方法,描述如下:
 * <p>All general-purpose <tt>Collection</tt> implementation classes (which
 * typically implement <tt>Collection</tt> indirectly through one of its
 * subinterfaces) should provide two "standard" constructors: a void (no
 * arguments) constructor, which creates an empty collection, and a
 * constructor with a single argument of type <tt>Collection</tt>, which
 * creates a new collection with the same elements as its argument.  In
 * effect, the latter constructor allows the user to copy any collection,
 * producing an equivalent collection of the desired implementation type.
 * There is no way to enforce this convention (as interfaces cannot contain
 * constructors) but all of the general-purpose <tt>Collection</tt>
 * implementations in the Java platform libraries comply.
-
AbstractList
public abstract class AbstractList<E> extends AbstractCollection<E> implements List<E> {

    protected AbstractList() {}
    public boolean add(E e) {}
    abstract public E get(int index);
    public E set(int index, E element) {}
    public void add(int index, E element) {}
    public E remove(int index) {}
    public int indexOf(Object o) {}
    public int lastIndexOf(Object o) {}
    public void clear() {}
    public boolean addAll(int index, Collection<? extends E> c) {}
    public Iterator<E> iterator() {}
    public ListIterator<E> listIterator() {}
    public ListIterator<E> listIterator(final int index) {}
}
AbstractList 是基于以下方法进行操作的
abstract public E get(int index);
public E set(int index, E element)
public void add(int index, E element)
public E remove(int index)
由于 AbstractList 是一个抽象类,所以 AbstractList 的子类必须重写 size 方法;get 方法也是抽象方法,也需要重写。
set、add 和 remove 方法和上面 AbstractCollection 类中的一样,默认抛出异常,如果子类容器不可以被修改,则不必重写。
AbstractList 与 AbstractCollection 的区别是 不需要子类实现 迭代器方法,AbstractList 内部已经实现了 2 个迭代器,一个是 Iterator 接口,另一个就是 ListIterator 接口。这里我们就不再代码叙述了。
-
AbstractSequentialList
public abstract class AbstractSequentialList<E> extends AbstractList<E> {
    protected AbstractSequentialList() {}

    public E get(int index) {}
    public E set(int index, E element) {}

    public void add(int index, E element) {}

    public E remove(int index) {}

    public boolean addAll(int index, Collection<? extends E> c) {}

    public Iterator<E> iterator() {}

    public abstract ListIterator<E> listIterator(int index);
}
AbstractSequentialList 是 AbstractList 的子类。不过这里要注意的是,AbstractSequentialList 实现了 根据索引位置的相关操作方法,即 get、set、add、remove。因为这些方法内部调用的其实是 ListIterator,而 ListIterator 已经在 AbstractList 作为一个内部类实现了,即下面代码:
//这里是 AbstractList 的内部类
private class ListItr extends Itr implements ListIterator<E> {
        ListItr(int index) {
            cursor = index;
        }

        public boolean hasPrevious() {
            return cursor != 0;
        }

        public E previous() {
            checkForComodification();
            try {
                int i = cursor - 1;
                E previous = get(i);
                lastRet = cursor = i;
                return previous;
            } catch (IndexOutOfBoundsException e) {
                checkForComodification();
                throw new NoSuchElementException();
            }
        }

        public int nextIndex() {
            return cursor;
        }

        public int previousIndex() {
            return cursor-1;
        }

        public void set(E e) {
            if (lastRet < 0)
                throw new IllegalStateException();
            checkForComodification();

            try {
                AbstractList.this.set(lastRet, e);
                expectedModCount = modCount;
            } catch (IndexOutOfBoundsException ex) {
                throw new ConcurrentModificationException();
            }
        }

        public void add(E e) {
            checkForComodification();

            try {
                int i = cursor;
                AbstractList.this.add(i, e);
                lastRet = -1;
                cursor = i + 1;
                expectedModCount = modCount;
            } catch (IndexOutOfBoundsException ex) {
                throw new ConcurrentModificationException();
            }
        }
    }
终于把 LinkedList 的接口定义讲完了,我们接下来说正文。
LinkedList: 队列的实现类
我们在 LinkedList 的定义的时候讲了 继承之 AbstractSequentialList,这里我们接着补充,它实现了 Deque 接口所谓的队列就是我们常说的 先进先出(FIFO),以及后进先出(LIFO),他们的具体使用场景就是我们经常碰到的堆栈。
-
Queue
Deque 是Queue 的子类,Queue 的接口定义如下:
public interface Queue<E> extends Collection<E> {
    //尾部添加元素
    boolean add(E e);
    //尾部添加元素
    boolean offer(E e);
    //删除头部元素
    E remove();
    //删除头部元素
    E poll();
    //查看头部元素,即返回头部元素,不改变队列内容
    E element();
    //查看头部元素,即返回头部元素,不改变队列内容
    E peek();
在上面的函数定义中,都有 ’重复‘ 的 方法存在,而且方法名还不一样,可能不经常使用的小伙伴们会搞混,当然,JDK 没有闲的给大家出难题记 API,这种 ’重复‘的方法是因为在处理特殊情况下的队列的时候,队列可能是空的或者是满的,(空的就是没有元素,满的是长度有限制,还不能扩容)。所以针对这种情况做了处理;当然,我们今天讲的 LinkedList 是没有长度限制的。
-
队列为空:element() 和 remove() 抛出 NoSuchElementException 异常,而peek() 和 poll() 返回null
-
队列为满:add() 抛出 IllegalStateException 异常, 而 offer() 返回 false
/**
 * LinkedList 作为队列使用
 */
public class Test {
    public static void main(String[] args) {
        Queue<Integer> queue = new LinkedList<>();
        // offer 添加元素,返回 false
        queue.offer(1);
        queue.offer(2);
        queue.offer(3);
        //peek 查看头部元素,返回 null
        while(queue.peek()!=null){
            // poll 删除头部元素 抛出 NoSuchElementException
            System.out.println(queue.poll());
        }
         // 输出 1  2  3
    }
}
-
Deque
双端队列接口 Deque
public interface Deque<E> extends Queue<E> {

    void addFirst(E e);
    void addLast(E e);
    boolean offerFirst(E e);
    boolean offerLast(E e);
    E removeFirst();
    E removeLast();
    E pollFirst();
    E pollLast();
    E getFirst();
    E getLast();
    E peekFirst();
    E peekLast();
    boolean removeFirstOccurrence(Object o);
    boolean removeLastOccurrence(Object o);

    // *** Queue methods ***
    boolean add(E e);
    boolean offer(E e);
    E remove();
    E poll();
    E element();
    E peek();

    // *** Stack methods ***
    void push(E e);
    E pop();

    // *** Collection methods ***
    boolean remove(Object o);
    boolean contains(Object o);
    public int size();
    Iterator<E> iterator();
    Iterator<E> descendingIterator();

}
从代码中可以看到,一个双端队列的方法竟然这么复杂。这也是在我的文章中给大家贴很多源码的原因,毕竟讲的再好不如给大家一看。
在 Deque 中,可以划分为几部分代码,一部分是他自己用的常用操作,还有一些是 stack 用的,以及 queue,和 Collection 。
这里说到了栈,我们再来稍微提一下:
-
push 表示入栈,在头部添加元素,由于栈可能是有容量限制的,所以会抛出 IllegalStateException 异常
-
pop 表示出栈,返回头部元素,并且栈中删除,如果为空,则抛出 NoSuchElementException 异常
-
在 传统的 栈中,或者说是在 Java的 Stack 类中,还有一个查看头部元素的方法,也就是 peek, 但是 在 Queue 中已经实现了,所以代码中直接把 peek 归纳到了 Queue methods 下,并不矛盾哈。如果栈为空,返回null,反之返回头部元素。
/**
 * LinkedList 作为栈使用的实例代码
 */
public class Test {
    public static void main(String[] args) {
        Deque<Integer> stack = new LinkedList<>();
        stack.push(1);
        stack.push(2);
        stack.push(3);
        while(stack.peek()!=null){
            System.out.println(stack.pop());
        }
        // 输出 3  2  1
    }
}
Deque 中还新增了个从后向前遍历的迭代方法:descendingIterator, 和普通方法一样,这里我们就不在细讲了。
构造方法
 public LinkedList() {
   }

    public LinkedList(Collection<? extends E> c) {
        this();
        addAll(c);
    }
通过上面结构的讲解,大家知道了 Collection 接口建议每个子类实现至少 2 个的构造方法,所以。LinkedList 有 2 个构造方法,因此,我们可以这么创建 LinkedList,(当然,第三方库创建的另说)
List<String> list = new LinkedList<>();
List<String> list1 = new LinkedList<>(Arrays.asList(new Integer[]{1,2,3}));
注意,在LinkedList 中是没有初始化容量这一概念的。
存储结构
/**
 * Node 是 LinkedList
 */
private static class Node<E> {
        E item;
        Node<E> next;
        Node<E> prev;

        Node(Node<E> prev, E element, Node<E> next) {
            this.item = element;
            this.next = next;
            this.prev = prev;
        }
    }
Node 是 LinkedList 的内部类, Node 是一个双向链表。每个元素在内部都是单独存放的,元素之间就跟手拉手一样,链接在一起,所以叫链表。
-
item 表示当前节点
-
next 表示下一个节点
-
prev 表示前一个节点
使用方法
LinkedList 内部组成如下:
//表示长度
transient int size = 0;
//指向头节点
transient Node<E> first;
//指向尾节点
transient Node<E> last;
LinkedList 内部的所有操作都是操作这 3 个变量。我们接下来具体看操作:
-
add 方法
public boolean add(E e) {
        linkLast(e);
        return true;
    }

public void add(int index, E element) {
        checkPositionIndex(index);
//如果 插入的下标是 size,则添加到尾部
        if (index == size)
            linkLast(element);
        else
            //反之则,插入到 index对应节点的前面
            linkBefore(element, node(index));
    }

public void addFirst(E e) {
        linkFirst(e);
    }

 public void addLast(E e) {
        linkLast(e);
    }
在上面的几个 add 方法中, 都调用了 linkXXX 系列方法。这里我们以 linkLast 为例,linkBefore、linkLast linkFirst原理相同,我们不再叙述。
void linkLast(E e) {
        final Node<E> l = last;
        final Node<E> newNode = new Node<>(l, e, null);
        last = newNode;
        if (l == null)
            first = newNode;
        else
            l.next = newNode;
        size++;
        modCount++;
    }
主要步骤:
-
定位到尾节点 last
-
创建一个新的 Node 节点
-
修改尾节点
-
修改前后链接,如果原链表是空的,则让头部节点指向新的 Node 节点
-
增加链表大小 size
-
增加修改次数 modCount (modCount 我们在上一篇 ArrayList 中已经讲过,判断结构性修改)
这里我们使用表格来给大家展示,图文结合理解的更加清楚
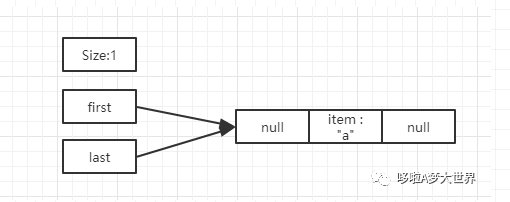
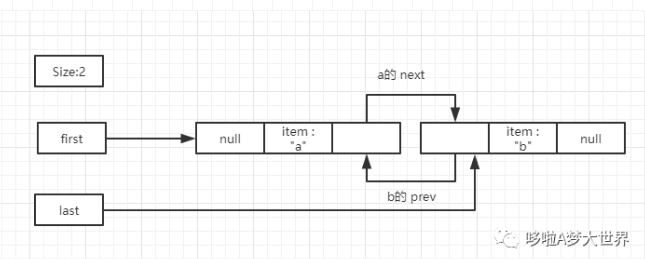
    public static void main(String[] args) {
        List<String> list = new LinkedList<>();
        list.add("a");
        list.add("b");
    }
这是初始化的时候,内部结构,即 new LinkedList<>(); first 和 last 指向的都是 null, size 为 0
添加第一个元素后 :list.add(“a”); first 和 last 指向同一个 node 元素
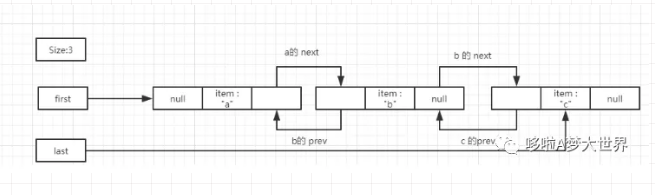
添加第二个元素后:first指向第一个 node -- a, last 指向第二个 node -- b
通过上面的图像,我们可以看出,LinkedList 是按需分配的。
public boolean addAll(Collection<? extends E> c) {
        return addAll(size, c);
    }

public boolean addAll(int index, Collection<? extends E> c) {
        checkPositionIndex(index);

        Object[] a = c.toArray();
        int numNew = a.length;
        if (numNew == 0)
            return false;

        Node<E> pred, succ;
        if (index == size) {
            succ = null;
            pred = last;
        } else {
            succ = node(index);
            pred = succ.prev;
        }

        for (Object o : a) {
            @SuppressWarnings("unchecked") E e = (E) o;
            Node<E> newNode = new Node<>(pred, e, null);
            if (pred == null)
                first = newNode;
            else
                pred.next = newNode;
            pred = newNode;
        }

        if (succ == null) {
            last = pred;
        } else {
            pred.next = succ;
            succ.prev = pred;
        }

        size += numNew;
        modCount++;
        return true;
    }
至于 2个 addAll 方法,原理都一样,只是 循环调用构建 prev 和 next。
上面的 checkPositionIndex 是检查下标,代码很简单:
private void checkPositionIndex(int index) {
        if (!isPositionIndex(index))
            throw new IndexOutOfBoundsException(outOfBoundsMsg(index));
    }
private boolean isPositionIndex(int index) {
        return index >= 0 && index <= size;
    }
-
get 方法
public E get(int index) {
        checkElementIndex(index);
        return node(index).item;
    }

public E getFirst() {
        final Node<E> f = first;
        if (f == null)
            throw new NoSuchElementException();
        return f.item;
    }
public E getLast() {
        final Node<E> l = last;
        if (l == null)
            throw new NoSuchElementException();
        return l.item;
    }
getFirst 和 getLast 我们不再叙述,看一下 get方法。get 方法是根据 索引去当前节点,我们来看一下如何获取索引值:
Node<E> node(int index) {
        // assert isElementIndex(index);

        if (index < (size >> 1)) {
            //前半部分开始找
            Node<E> x = first;
            for (int i = 0; i < index; i++)
                x = x.next;
            return x;
        } else {
            //后半部分开始找
            Node<E> x = last;
            for (int i = size - 1; i > index; i--)
                x = x.prev;
            return x;
        }
    }
这里有个 位运算:size >> 1 ,也就是 size/2。如果索引位置在前半部分,则从头开始找,如果索引位置在后半部分,则从尾开始找。
-
remove方法
 public E remove() {
        //移除头部节点
        return removeFirst();
    }

public E remove(int index) {
        checkElementIndex(index);
        //通过 node(int index)计算出 下标所在位置的节点,然后调用 unlink 删除节点
        return unlink(node(index));
    }

// 由于LinkedList 允许存入 null,所以先判断 节点是 null的
public boolean remove(Object o) {
        if (o == null) {
            for (Node<E> x = first; x != null; x = x.next) {
                if (x.item == null) {
                    unlink(x);
                    return true;
                }
            }
        } else {
            for (Node<E> x = first; x != null; x = x.next) {
                if (o.equals(x.item)) {
                    unlink(x);
                    return true;
                }
            }
        }
        return false;
    }
//移除头部节点
public E removeFirst() {
        final Node<E> f = first;
        if (f == null)
            throw new NoSuchElementException();
        return unlinkFirst(f);
    }
//移除首次出现的指定元素,这里是正序迭代
public boolean removeFirstOccurrence(Object o) {
        return remove(o);
    }
//移除尾节点
public E removeLast() {
        final Node<E> l = last;
        if (l == null)
            throw new NoSuchElementException();
        return unlinkLast(l);
    }
//移除最后出现的指定元素,这里是倒序迭代
 public boolean removeLastOccurrence(Object o) {
        if (o == null) {
            for (Node<E> x = last; x != null; x = x.prev) {
                if (x.item == null) {
                    unlink(x);
                    return true;
                }
            }
        } else {
            for (Node<E> x = last; x != null; x = x.prev) {
                if (o.equals(x.item)) {
                    unlink(x);
                    return true;
                }
            }
        }
        return false;
    }
其实上述几个方法的核心就是 unlink(),我们继续看:
E unlink(Node<E> x) {
        // assert x != null;
        final E element = x.item;
        final Node<E> next = x.next;
        final Node<E> prev = x.prev;

        if (prev == null) {
            first = next;
        } else {
            prev.next = next;
            x.prev = null;
        }

        if (next == null) {
            last = prev;
        } else {
            next.prev = prev;
            x.next = null;
        }

        x.item = null;
        size--;
        modCount++;
        return element;
    }
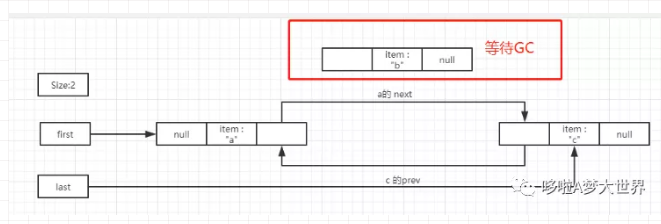
unlink 的核心思路就是把当前节点的前驱和后驱直接连起来,然后自身在没有引用的情况下被GC回收:
-
x 的前驱指向后驱,如果 前驱 prev 是null,那么证明 x 是头部节点,修改头节点 first 指向后驱 next
-
x 的后驱指向 前驱,如果后驱 next 是null,那么证明 x 是尾部节点,修改尾节点 last 指向前驱 prev
如图,假如我们删除 b 节点,也就是 remove(1).
-
其他方法
public boolean offer(E e) {
        return add(e);
    }

public boolean offerFirst(E e) {
        addFirst(e);
        return true;
    }
public boolean offerLast(E e) {
        addLast(e);
        return true;
    }
public E peekFirst() {
        final Node<E> f = first;
        return (f == null) ? null : f.item;
     }
public E peekLast() {
        final Node<E> l = last;
        return (l == null) ? null : l.item;
    }

public E pollFirst() {
        final Node<E> f = first;
        return (f == null) ? null : unlinkFirst(f);
    }

public E pollLast() {
        final Node<E> l = last;
        return (l == null) ? null : unlinkLast(l);
    }

public void push(E e) {
        addFirst(e);
    }
public E pop() {
        return removeFirst();
    }
public void push(E e) {
        addFirst(e);
    }
上面的一些队列方法,核心还是我们之前提到的,这里就不在叙述了。
总结
最后我们再来总结一波:
-
LinkedList 是List 的一个子类,但它同时也实现了 Queue,可以用作队列。
-
没有初始容量概念,按需分配空间
-
查找效率低,查找 某元素时间复杂度为 O(N), 索引位置查找为 O(N/2)
-
头部、尾部插入删除效率高,为 O(1)
-
中间插入删除效率较低,为 O(N),注意,这里的 O(N) 是花费时间在定位上,修改元素操作还是 O(1)

 浙公网安备 33010602011771号