
SpringBoot 使用 Mybatis笔记和防坑的地方
开发工具:IntelliJ IDEA
数据库:MySQL
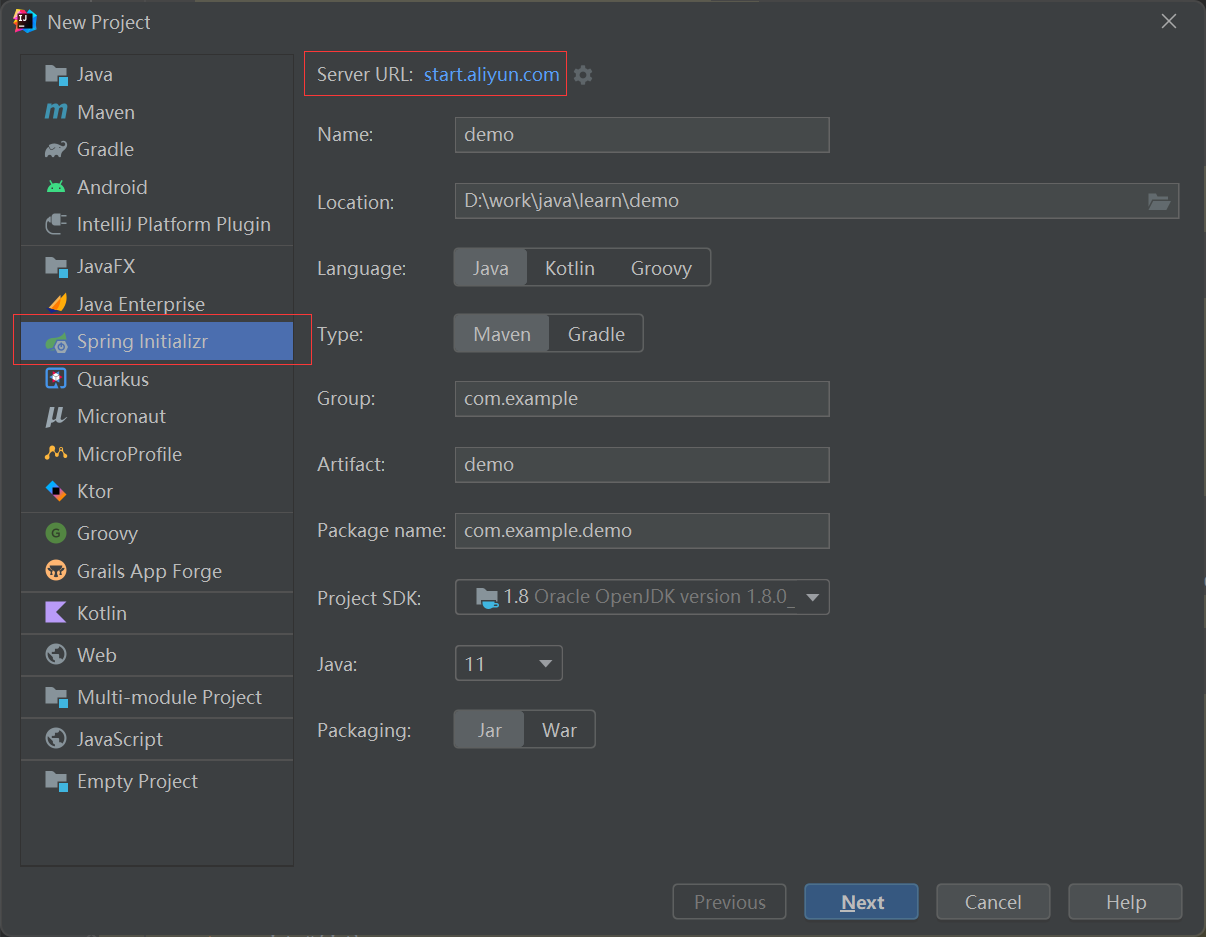
新建Project,选中Spring Initializr,Server URL 使用阿里云的,填入 start.aliyun.com
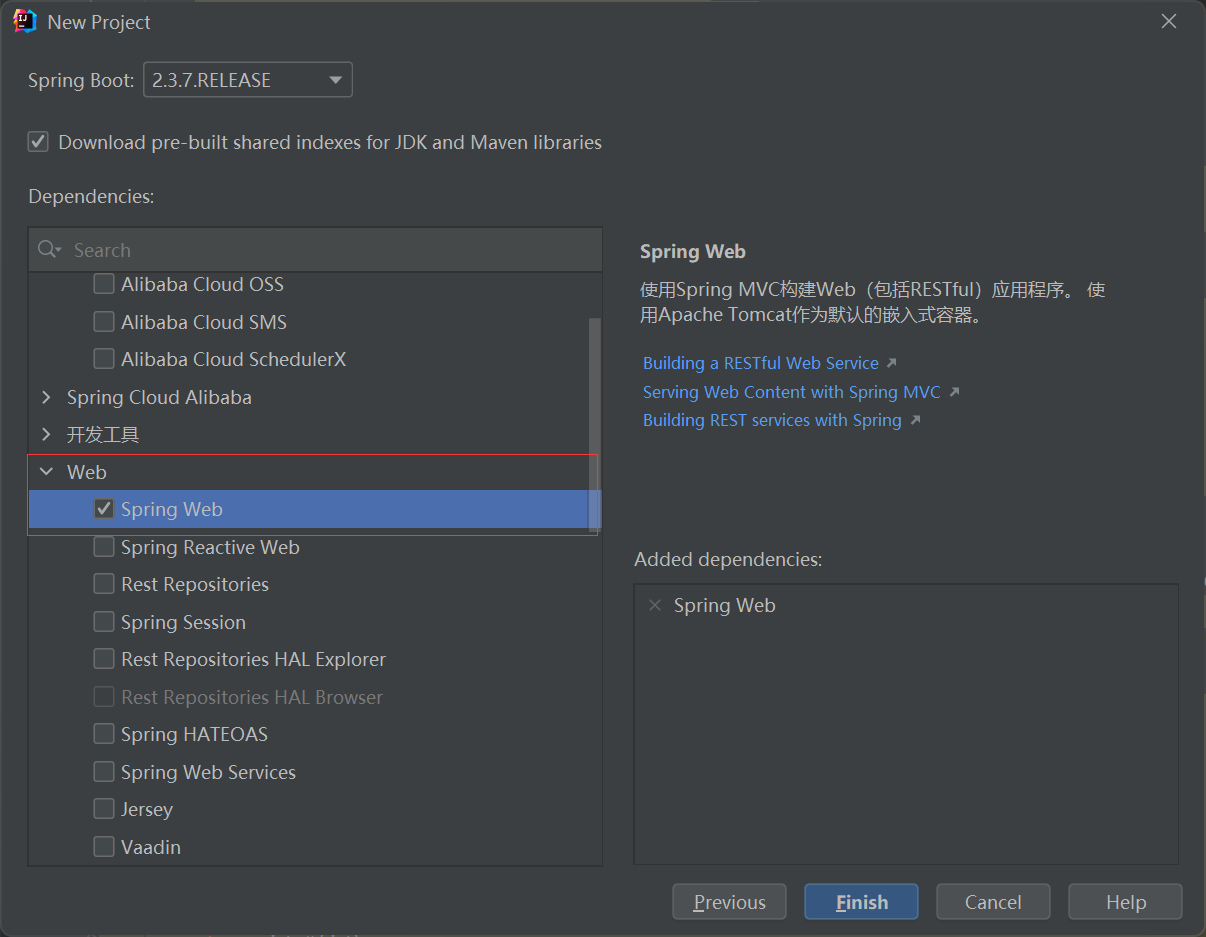
下一步,勾选Web->Spring Web,点Finish完成工程创建。
在pom.xml 中,加入mysql和mybatis 依赖。
<dependency>
    <groupId>org.mybatis.spring.boot</groupId>
    <artifactId>mybatis-spring-boot-starter</artifactId>
    <version>2.0.0</version>
</dependency>
<dependency>
    <groupId>mysql</groupId>
    <artifactId>mysql-connector-java</artifactId>
</dependency>
在application.properties中,指定内置服务端口号,默认是8080,加入数据库的连接信息。
spring.datasource.url=jdbc:mysql://localhost:3306/bbicy?serverTimezone=UTC&useUnicode=true&characterEncoding=utf-8&useSSL=false
spring.datasource.username=bbicy
spring.datasource.password=bbicy
spring.datasource.driver-class-name=com.mysql.cj.jdbc.Driver
在 resources目录下新建mapper目录,此目录下存放mybatis的mapper对应的xml文件。
为了能让springboot扫描到,在application.properties中设置。
mybatis.mapperLocations=classpath:mapper/*.xml
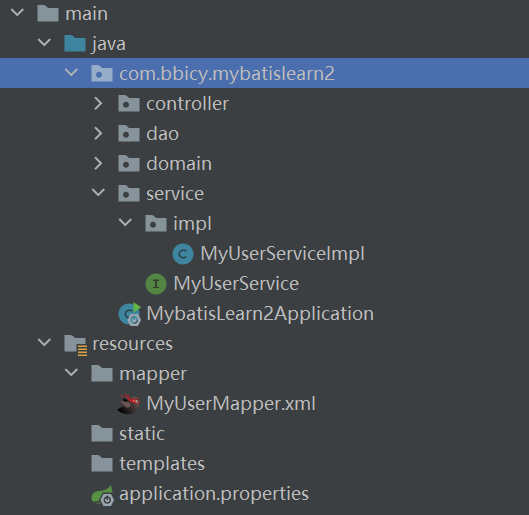
在src/main/java/默认包名目录下,依次建立以下包名
dao:存放数据访问接口
domain:存放实体对象
service:业务逻辑接口
service->Impl
service下建立Impl包名,存放service接口的实现类。
controller:http请求接口
完整的目录结构如下:
在domain中新建实体类,对应数据库的表结构。
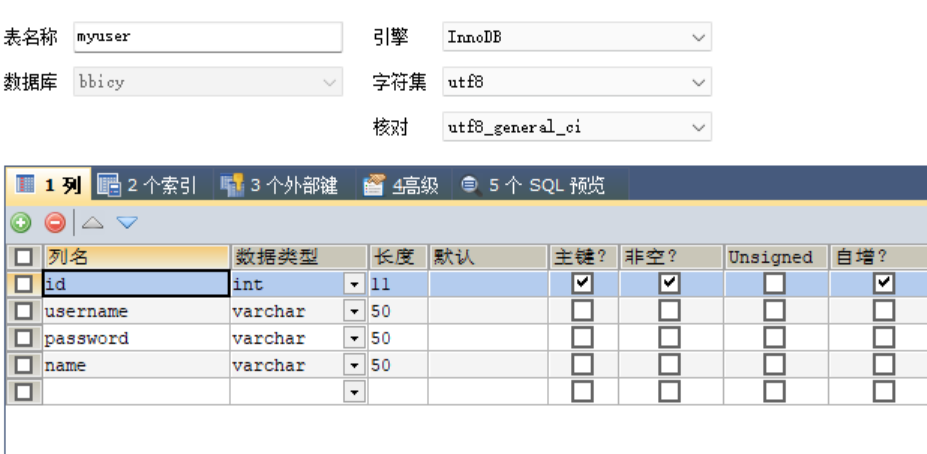
对应的SQL语句:
CREATE TABLE `myuser` (
  `id` int(11) NOT NULL AUTO_INCREMENT,
  `username` varchar(50) DEFAULT NULL,
  `password` varchar(50) DEFAULT NULL,
  `name` varchar(50) DEFAULT NULL,
  PRIMARY KEY (`id`)
) ENGINE=InnoDB AUTO_INCREMENT=1 DEFAULT CHARSET=utf8;
实体类完整代码:
package com.bbicy.mybatislearn2.domain;

public class MyUser {
    private int id;
    private String username;
    private String password;
    private String name;

    public int getId() {
        return id;
    }

    public void setId(int id) {
        this.id = id;
    }

    public String getUsername() {
        return username;
    }

    public void setUsername(String username) {
        this.username = username;
    }

    public String getPassword() {
        return password;
    }

    public void setPassword(String password) {
        this.password = password;
    }

    public String getName() {
        return name;
    }

    public void setName(String name) {
        this.name = name;
    }
}
dao下新建MyUserDao,里面3个方法。
package com.bbicy.mybatislearn2.dao;

import com.bbicy.mybatislearn2.domain.MyUser;

public interface MyUserDao {
    MyUser findById(int id);

    int insertUser(MyUser user);

    int updateUser(MyUser user);
}
为了能让SpringBoot容器能扫描到,在Application所在的类加入MapperScan注解。
@MapperScan("com.bbicy.mybatislearn2.dao")
在mapper目录新建MyUserMapper.xml
写3个方法对应的SQL代码
<?xml version="1.0" encoding="UTF-8" ?>
<!DOCTYPE mapper PUBLIC "-//mybatis.org//DTD Mapper 3.0//EN" "http://mybatis.org/dtd/mybatis-3-mapper.dtd" >
<mapper namespace="com.bbicy.mybatislearn2.dao.MyUserDao">
    <resultMap id="BaseResultMap" type="com.bbicy.mybatislearn2.domain.MyUser">
        <result column="id" property="id"></result>
        <result column="name" property="name"></result>
        <result column="username" property="username"></result>
        <result column="password" property="password"></result>
    </resultMap>

    <sql id="Base_Column_List">
        id,name,username,password
    </sql>

    <select id="findById" resultMap="BaseResultMap" parameterType="int">
        select
        <include refid="Base_Column_List"></include>
        from myuser
        where id = #{id}

    </select>

    <insert id="insertUser" parameterType="com.bbicy.mybatislearn2.domain.MyUser" useGeneratedKeys="true" keyProperty="id">
        insert into myuser(username,name,password) values (#{username},#{name},#{password})
    </insert>

    <update id="updateUser" parameterType="com.bbicy.mybatislearn2.domain.MyUser">
        update myuser
        <trim prefix="set" suffixOverrides=",">
        <if test="username!=null">username=#{username},</if>
        <if test="name!=null">name=#{name},</if>
        <if test="password!=null">password=#{password},</if>
        </trim>
        where id=#{id}
    </update>
</mapper>
在Service下新建MyUserService接口
package com.bbicy.mybatislearn2.service;

import com.bbicy.mybatislearn2.domain.MyUser;

public interface MyUserService {
    MyUser findUserById(int id);
    int insertMyUser(MyUser user);
    int updateUser(MyUser user);
}
在impl新建实现类。
package com.bbicy.mybatislearn2.service.impl;

import com.bbicy.mybatislearn2.dao.MyUserDao;
import com.bbicy.mybatislearn2.domain.MyUser;
import com.bbicy.mybatislearn2.service.MyUserService;
import org.springframework.beans.factory.annotation.Autowired;
import org.springframework.stereotype.Service;

@Service
public class MyUserServiceImpl implements MyUserService {

    @Autowired(required = false)
    private MyUserDao myUserDao;

    @Override
    public MyUser findUserById(int id) {
        return myUserDao.findById(id);
    }

    @Override
    public int insertMyUser(MyUser user) {
        myUserDao.insertUser(user);
        return user.getId();
    }

    @Override
    public int updateUser(MyUser user) {
        return myUserDao.updateUser(user);
    }
}
在controller下新建MyUserController
package com.bbicy.mybatislearn2.controller;


import com.bbicy.mybatislearn2.domain.MyUser;
import com.bbicy.mybatislearn2.service.MyUserService;
import org.springframework.beans.factory.annotation.Autowired;
import org.springframework.web.bind.annotation.RequestMapping;
import org.springframework.web.bind.annotation.RestController;

@RestController
public class MyUserController {

    @Autowired
    private MyUserService myUserService;


    @RequestMapping("/api/myuser")
    public MyUser findMyUserById(int id){
        return myUserService.findUserById(id);
    }

    @RequestMapping("/api/addmyuser")
    public int AddUser(MyUser user){
        return myUserService.insertMyUser(user);
    }
}
通过http://localhost:8082/api/myuser?id=1 访问数据。
写测试代码,测试update方法。
    @Test
    void testUpdateMyUser(){
        MyUser user = new MyUser();
        user.setId(1);
        user.setUsername("user1");
        //user.setName("updatedname1");
        //user.setPassword("0000002");
        int resultId = myUserService.updateUser(user);
        System.out.println("resultId:"+resultId);
    }
有几个需要注意和避坑的地方:
1、application.properties设置 mybatis.mapperLocations 对应的xml路径
2、程序main方法对应的Application类,加入@MapperScan注解,设置需要扫描的dao路径
3、Service实现类,加入@Service注解,类里面的mapper变量加入@Autowired注解
4、Controller中加入@RestController、@RequestMapping注解
5、xml文件中namespace对应dao中的包名和类名
另外在SQL中注意以下几点:
insert方法默认返回影响的行数,为了得到新插入数据的主键。做如下设置
1、数据库是mysql,主键是自增
2、insert标签 useGeneratedKeys="true" keyProperty="id" ,其中keyProperty是Java对象的属性名
3、Mybatis执行完插入语句后,自动将自增长值赋值给对象的id。因此,可通过MyUser对应的getter方法获取!
 <insert id="insertUser" parameterType="com.bbicy.mybatislearn2.domain.MyUser" useGeneratedKeys="true" keyProperty="id">
        insert into myuser(username,name,password) values (#{username},#{name},#{password})
    </insert>
myUserDao.insertUser(user);
return user.getId();
update方法,
1、有时候不需要更新所有的数据,可以通过if test 来判断,特别注意这里不用加#{xxx}标签。设置了对应的属性之后才更新对应的字段信息。
2、因为动态拼凑SQL语句,set 字段名1=xxx,字段名2=xxx where xxx ,这里的逗号需要动态处理,可以用trim来处理。
prefix 给sql语句拼接的前缀
suffix 给sql语句拼接的后缀
prefixOverrides 去除sql语句前面的关键字或者字符,该关键字或者字符由prefixOverrides属性指定,假设该属性指定为"AND",当sql语句的开头为"AND",trim标签将会去除该"AND"
suffixOverrides 去除sql语句后面的关键字或者字符,该关键字或者字符由suffixOverrides属性指定,比如逗号。
    <update id="updateUser" parameterType="com.bbicy.mybatislearn2.domain.MyUser">
        update myuser
        <trim prefix="set" suffixOverrides=",">
        <if test="username!=null">username=#{username},</if>
        <if test="name!=null">name=#{name},</if>
        <if test="password!=null">password=#{password},</if>
        </trim>
        where id=#{id}
    </update>
为了调试方便,可以讲SQL语句打印在控制台,在application.properties设置
logging.level.com.bbicy.mybatislearn2.dao=debug
mybatis.configuration.log-impl=org.apache.ibatis.logging.stdout.StdOutImpl
注意:logging.level.com,后面的路径指的是mybatis对应的dao方法接口所在的包。并不是mapper.xml所在的包
在控制台输出的SQL调试信息


 浙公网安备 33010602011771号