Thrift 简单实现C#通讯服务程序 (跨语言 MicroServices)
Thrift是一种可伸缩的跨语言服务框架,它结合了功能强大的软件堆栈的代码生成引擎,以建设服务,工作效率和无缝地与C++,C#,Java,Python和PHP和Ruby结合。thrift允许你定义一个简单的定义文件中的数据类型和服务接口。以作为输入文件,编译器生成代码用来方便地生成RPC客户端和服务器通信的无缝跨编程语言。 它的好处是什么?当然是它支持大多数时下流行的语言。通过Thrift命令自动生成相应的语言脚本。而进行一些性能对比中,它的好处显而易见。
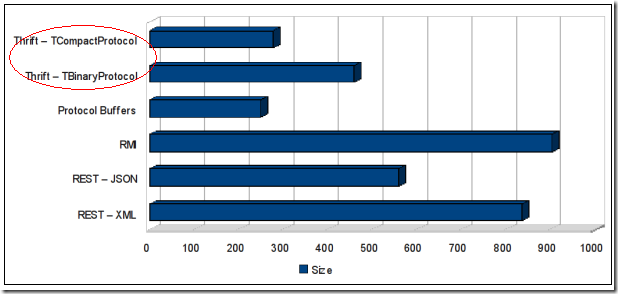
以上是传输相同的内容时内容大小的对比。
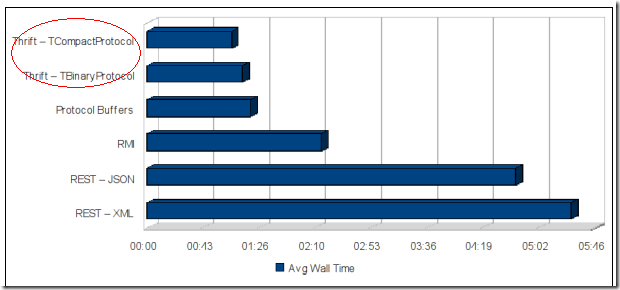
以上是运行开销比较结果。
TCompactProtocol和TBinaryProtocol是Thrift支持的两种协议,其中TCompactProtocol使用Variable-Length Quantity (VLQ) 编码对数据进行压缩。
详细可以查看:http://www.javabloger.com/article/apache-thrift-architecture.html
接下来,我想讲述一下如何使用Thrift搭建C#版的客户端以及服务端通讯的程序。
1. 先从官网下载Thrift安装包以及签出SVN源码:
官网下载地址:http://thrift.apache.org/download/
这里我下载了一个Thrift compiler for Windows版本的EXE文件(thrift-0.7.0.exe)
签出SVN源码地址:http://svn.apache.org/repos/asf/thrift/trunk
2. 这里我利用文章(http://www.javabloger.com/article/thrift-java-code-example.html)的例子(该例子生成Java源码的),完成一个C#版本的示例。
3. 首先创建脚本,命名为textCsharp.thrift,脚本内容如下:
1 2 3 4 5 6 7 8 9 10 11 12 13 14 15 16 17 18 19 20 21 | namespace java com.javabloger.gen.code # 注释1struct Blog { # 注释2 1: string topic 2: binary content 3: i64 createdTime 4: string id 5: string ipAddress 6: map<string,string> props }service ThriftCase { # 注释3 i32 testCase1(1:i32 num1, 2:i32 num2, 3:string num3) # 注释4 list<string> testCase2(1:map<string,string> num1) void testCase3() void testCase4(1:list<Blog> blog) } |
4. 执行thrift命令:thrift -gen csharp testCsharp.thrift,这里说明一下:参数"csharp”意味着这里将自动生成C#代码,如果这里写java,python等等,可以用"java"或者"py”代替。
于是得到gen-csharp的目录,这个目录里面就包含支持Thrift的Blog以及ThriftCase的源代码,具体里面都生成什么代码,后面会做出介绍。
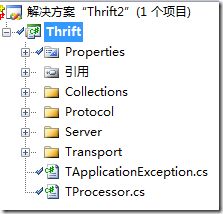
5. 然后,我现在打开SVN源码中的 trunk\lib\csharp\ 路径,我用项目打开
编译后,得到Thrift.dll文件,为了后面使用Thrift做准备。
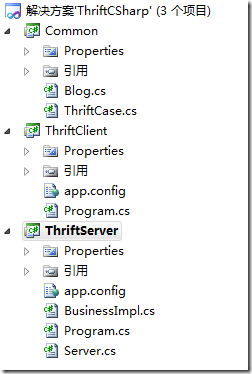
6.新建工程,添加Server以及Client项目,把刚才生成的代码文件放入Common项目中。让Client和Server项目引用Thrift.dll类库。
7. 编写服务端程序:
1 2 3 4 5 6 7 8 9 10 11 | public class Server { public void Start() { TServerSocket serverTransport = new TServerSocket(7911, 0, false); ThriftCase.Processor processor = new ThriftCase.Processor(new BusinessImpl()); TServer server = new TSimpleServer(processor, serverTransport); Console.WriteLine("Starting server on port 7911 ..."); server.Serve(); } } |
其中BusinessImpl具体提供业务逻辑的实现:
1 2 3 4 5 6 7 8 9 10 11 12 13 14 15 16 17 18 19 20 21 22 23 24 25 26 27 28 29 30 31 32 33 34 35 36 37 38 39 | public class BusinessImpl : ThriftCase.Iface { public int testCase1(int num1, int num2, String num3) { int i = num1 + num2; Console.Write( "testCase1 num1+num2 is :"+ i); Console.WriteLine( " num3 is :"+ num3); return i; } public List<String> testCase2(Dictionary<String, String> num1) { Console.WriteLine("testCase2 num1 :" + num1); List<String> list = new List<String>(); list.Add("num1"); return list; } public void testCase3() { Console.WriteLine("testCase3 ..........." + DateTime.Now); } public void testCase4(List<Blog> blogs) { Console.WriteLine("testCase4 ..........."); for (int i = 0; i < blogs.Count; i++) { Blog blog = blogs[i]; Console.Write("id:" + blog.Id); Console.Write(",IpAddress:" + blog.IpAddress); //Console.Write (",Content:" + new String(blog.Content)); Console.Write(",topic:" + blog.Topic); Console.Write(",time:" + blog.CreatedTime); } Console.WriteLine("\n"); } } |
让它继承ThriftCase.Iface接口。
8. 编写客户端程序:
1 2 3 4 5 6 7 8 9 10 11 12 13 14 15 16 17 18 19 20 21 22 23 24 25 26 27 28 29 30 31 32 33 | class Client { static Dictionary<String, String> map = new Dictionary<String, String>(); static List<Blog> blogs = new List<Blog>(); static void Main(string[] args) { TTransport transport = new TSocket("localhost", 7911); TProtocol protocol = new TBinaryProtocol(transport); ThriftCase.Client client = new ThriftCase.Client(protocol); transport.Open(); Console.WriteLine("Client calls ....."); map.Add("blog", "http://www.javabloger.com%22);/ client.testCase1(10, 21, "3"); client.testCase2(map); client.testCase3(); Blog blog = new Blog(); //blog.setContent("this is blog content".getBytes()); blog.CreatedTime = DateTime.Now.Ticks; blog.Id = "123456"; blog.IpAddress = "127.0.0.1"; blog.Topic = "this is blog topic"; blogs.Add(blog); client.testCase4(blogs); transport.Close(); Console.ReadKey(); } } |
9. 运行Server以及Client:
从客户端调用的方法,服务端已经接收到了数据。
源代码下载:ThriftCSharp.rar


· 10年+ .NET Coder 心语,封装的思维:从隐藏、稳定开始理解其本质意义
· .NET Core 中如何实现缓存的预热?
· 从 HTTP 原因短语缺失研究 HTTP/2 和 HTTP/3 的设计差异
· AI与.NET技术实操系列:向量存储与相似性搜索在 .NET 中的实现
· 基于Microsoft.Extensions.AI核心库实现RAG应用
· 阿里巴巴 QwQ-32B真的超越了 DeepSeek R-1吗?
· 10年+ .NET Coder 心语 ── 封装的思维:从隐藏、稳定开始理解其本质意义
· 【译】Visual Studio 中新的强大生产力特性
· 【设计模式】告别冗长if-else语句:使用策略模式优化代码结构
· 字符编码:从基础到乱码解决
2009-05-27 在C#中运用SQLDMO备份和恢复Microsoft SQL Server数据库
2009-05-27 C#调用dos命令
2009-05-27 C# 启动外部程序的几种方法