
在 ASP.NET Core 中使用 Tailwind
在 ASP.NET Core 中使用 Tailwind
https://khalidabuhakmeh.com/install-tailwind-css-with-aspnet-core
表单和函数是成功应用程序的基本元素,它们对应用程序的最终用户扮演者自己的角色,精通两者是爆款 Web 应用的挑战。对于 ASP.NET Core 的开发者来说,Web 设计在开发者的技能中权重并不高。自从 Web 不断演变,开发人员更多地适配 CSS 库和工具来提高设计的生产力。对 ASP.NET 开发者来说,最多的是使用 Bootstrap,因为它默认集成在 ASP.NET 应用程序的模版中。
这里将介绍另一个变的更为流行的,功能类优先的名为 Tailwind 的 CSS 库,以及如何在 ASP.NET Core 应用程序中开始使用它。
Tailwind 是什么?
Tailwind 的首次发布在 2017 年的 11 月,为 Web 开发者带来了功能类优先的框架。Tailwind 的方式与其它 CSS 库不同,它的重点并不在构建组件上,而是关注于构建可组合的 CSS 助手类。我们看一个提示卡的示例。
<div class="p-6 max-w-sm mx-auto bg-white rounded-xl shadow-md flex items-center space-x-4">
  <div class="flex-shrink-0">
    <img class="h-12 w-12" src="/img/logo.svg" alt="ChitChat Logo">
  </div>
  <div>
    <div class="text-xl font-medium text-black">ChitChat</div>
    <p class="text-gray-500">You have a new message!</p>
  </div>
</div>
在样式类的属性中,可以看到用来设置背景色,边距,填充和字体颜色的功能类。在其它框架中,你可能看到的是类似 card 或者 alert 之类的样式类。
Tailwind 的作者承认有些人对该方式的初试反映可能是惊恐地畏缩。
现在我知道你在想什么,"粗暴,如此可怕的混乱",你的看法是正确的,这是一种丑陋
Tailwind 希望你能提供一个解释这种方式优点的机会。
你不会将精力浪费在发明类名上,正视这一点,命名很难,对不对?
你的 CSS 将停止变得更多,或者在一个很低的速率上变得更多。我们可以从现存的实用样式类构建新的可视化组件。更安全地变更,更小的工具类意味着级联的效果更容易理解,以及过度设计意味着什么。
对于希望坚持在传统的 UI 元素组件化的开发者来说,Tailwind CSS 还提供了 @apply 处理器,我们可以使用它来组合多种功能类到单个的逻辑概念中。
<!-- Using utilities -->
<button class="py-2 px-4 font-semibold rounded-lg shadow-md text-white bg-green-500 hover:bg-green-700">
  Click me
</button>

<!-- Extracting classes using @apply -->
<button class="btn btn-green">
  Button
</button>

<style>
  .btn {
    @apply py-2 px-4 font-semibold rounded-lg shadow-md;
  }
  .btn-green {
    @apply text-white bg-green-500 hover:bg-green-700;
  }
</style>
Tailwind 提供了多种方式,最终设计策略对任何产品都至关重要。设计系统对于项目的速度和大型系统的原型至关重要。@apply 处理器可以帮助在设计系统中的固化公共 UI 元素,而不需要添加额外的配重到 HTML中。
我喜欢的一个设计者,Brad Frost,对于原子设计由一篇非常棒的文章。原子设计的方法论建议从从最小的设计元素开始,递进式地构建系统,通过挑选片段来组装完整的设计。
我们对 Tailwind 做了表面上一点介绍,我建议开发者阅读这篇文章来理解 Tailwind 的哲学。
下面我们就看一看如何在 ASP.NET Core 应用程序中使用 Tailwind CSS。
依赖
做为开始,你需要最新的 .NET SDK,最新的 NodeJS 和 NPM。在本文中,我们使用 .NET 5 SDK,Node v15.0.0,以及 NPM 6.14.9。
创建 ASP.NET Core Web 应用
首先,我们需要创建使用 Razor 视图的 ASP.NET Web 应用程序。项目既可以是 Razor 页面应用程序,也可以是传统的 ASP.NET MVC 应用程序,或者是两者的混合体。
借助 .NET CLI,我们创建下面任何一种应用程序
dotnet new webapp
dotnet new mvc
上面的任何一条命令都可以创建一个新的 ASP.NET Core Web 应用程序。然后,我们安装 Tailwind。
安装 Tailwind
我们需要在 ASP.NET Core 的项目文件夹中,初始化 ASP.NET Core 项目所使用的 NPM 项目文件 package.json。执行如下命令。
npm init -y
该命令在项目的根目录中创建 package.json 文件。
然后,安装 Tailwind 和它的依赖项。
npm install tailwindcss@latest postcss@latest autoprefixer@latest
见:https://www.tailwindcss.cn/docs/installation#npm-tailwind
执行之后,我们的 package.json 文件应该如下所示,注意其中的 dependencies 配置节。
{
  "name": "Tailwind",
  "version": "1.0.0",
  "description": "",
  "main": "index.js",
  "dependencies": {
    "autoprefixer": "^10.2.6",
    "postcss": "^8.3.5",
    "tailwindcss": "^2.2.4"
  },
  "scripts": {
    "test": "echo \"Error: no test specified\" && exit 1"
  },
  "keywords": [],
  "author": "",
  "license": "ISC"
}
最后,我们需要执行 Tailwind 的初始化命令。
npx tailwind init -p
命令完成之后,我们会在项目根目录下的到两个新的文件:
- postcss.config
- Tailwind.config.js
添加构建脚本
下一步需要将 Tailwind 的处理集成到 ASP.NET Core 的构建中。
首先,修改 package.json 文件来处理我们输入的 css 文件,并生成一个零件。添加新的 css:build 脚本。不用担心这些文件现在是否存在,下一步我们就将添加它们。
{
  "name": "Tailwind",
  "version": "1.0.0",
  "description": "",
  "main": "index.js",
  "dependencies": {
    "autoprefixer": "^10.2.6",
    "postcss": "^8.3.5",
    "tailwindcss": "^2.2.4"
  },
  "scripts": {
    "css:build": "npx tailwind build -i ./wwwroot/css/site.css -o ./wwwroot/css/output.css"
  },
  "keywords": [],
  "author": "",
  "license": "ISC"
}
还需要修改 ASP.NET Core 项目文件的 .csporj 文件来执行这个新的 NPM 命令。
<Project Sdk="Microsoft.NET.Sdk.Web">

    <PropertyGroup>
        <TargetFramework>net5.0</TargetFramework>
    </PropertyGroup>

    <ItemGroup>
        <UpToDateCheckBuilt Include="wwwroot/css/site.css" Set="Css" />
        <UpToDateCheckBuilt Include="postcss.config.js" Set="Css" />
        <UpToDateCheckBuilt Include="tailwind.config.js" Set="Css" />
    </ItemGroup>

    <Target Name="Tailwind" BeforeTargets="Build">
        <Exec Command="npm run css:build"/>
    </Target>

</Project>
使用 UpToDateCheckBuilt 来确保在这些文件变化的任何时候,我们重新构建整个项目,而不是使用 ItemGroup,那样,我们就需要手工触发 rebuild 了。
添加 CSS 文件
在 wwwroot 文件夹中,我们可以删除掉遗留的 Bootstrap 文件。这些文件位于 ./wwwroot/css 和 ./wwwroot/lib/bootstrap 文件夹中。
现在,我们使用下面的内容来创建新的 site.css 文件。
/*! @import */
@tailwind base;
@tailwind components;
@tailwind utilities;
该文件就是我们可以放置任何使用 @apply 处理器自定义 CSS 组件的地方,也就是,我们可以让文件保持这样。
现在可以构建项目,应该在 ./wwwroot/css 文件夹中得到一个 output.css 文件。其实安装 Tailwind 已经可以到此完成了。但是,我们继续看一下,如何修改视图文件来使用 Tailwind ,以及如何使用 tailwind.config.js 文件中的设置来裁剪 CSS.
调整布局和 Razor 视图
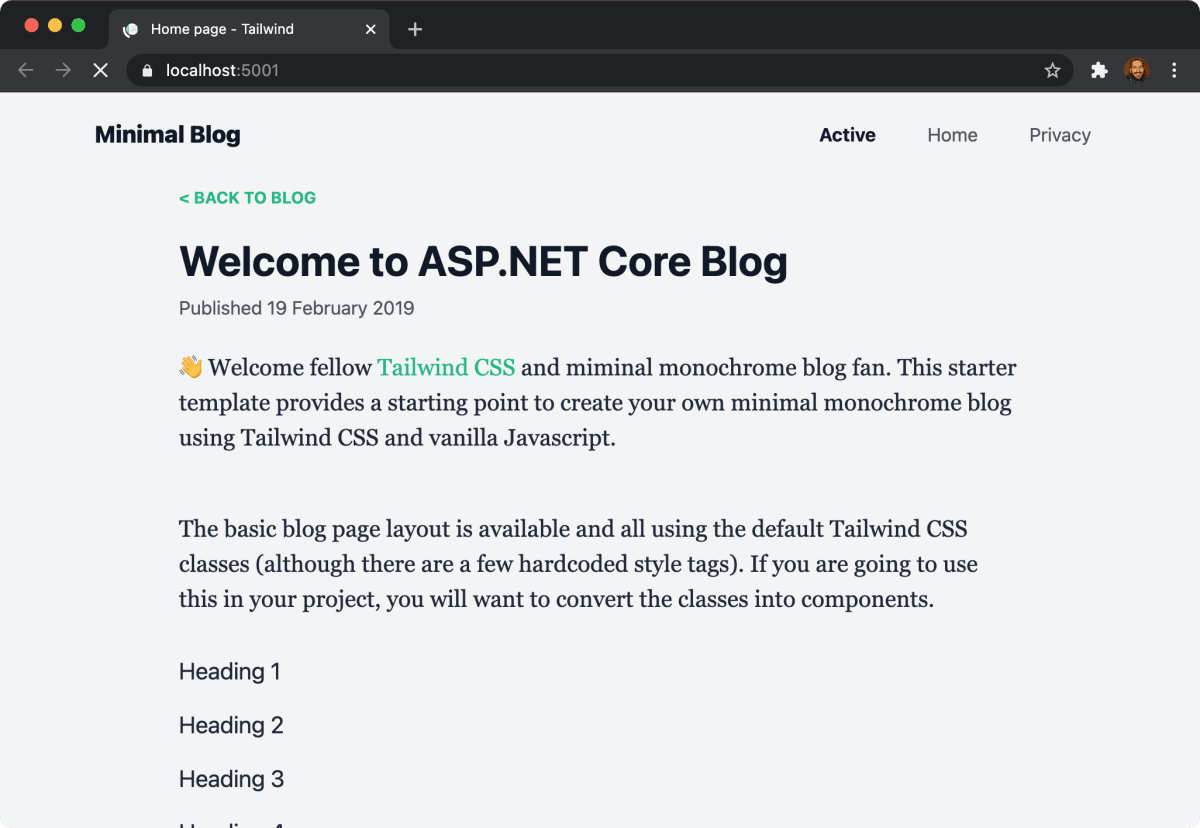
我决定使用来自 Tailwind 工具箱的 Minimal Blog 示例布局。
做为快速上手,这是修改之后的 Razor。
注意,页面引用了生成的 output.css 文件。
<!DOCTYPE html>
<html lang="en">
<head>
    <meta charset="UTF-8"/>
    <meta name="viewport" content="width=device-width, initial-scale=1.0"/>
    <meta http-equiv="X-UA-Compatible" content="ie=edge"/>
    <title>@ViewData["Title"] - Tailwind</title>
    <meta name="author" content="name"/>
    <meta name="description" content="description here"/>
    <meta name="keywords" content="keywords,here"/>
    <link rel="stylesheet" href="~/css/output.css"/>
</head>

<body class="bg-gray-100 font-sans leading-normal tracking-normal">

<nav id="header" class="fixed w-full z-10 top-0">

    <div id="progress" class="h-1 z-20 top-0" style="background:linear-gradient(to right, #4dc0b5 var(--scroll), transparent 0);"></div>

    <div class="w-full md:max-w-4xl mx-auto flex flex-wrap items-center justify-between mt-0 py-3">

        <div class="pl-4">
            <a class="text-gray-900 text-base no-underline hover:no-underline font-extrabold text-xl" href="#">
                Minimal Blog
            </a>
        </div>

        <div class="block lg:hidden pr-4">
            <button id="nav-toggle" class="flex items-center px-3 py-2 border rounded text-gray-500 border-gray-600 hover:text-gray-900 hover:border-green-500 appearance-none focus:outline-none">
                <svg class="fill-current h-3 w-3" viewBox="0 0 20 20" xmlns="http://www.w3.org/2000/svg">
                    <title>Menu</title>
                    <path d="M0 3h20v2H0V3zm0 6h20v2H0V9zm0 6h20v2H0v-2z"/>
                </svg>
            </button>
        </div>

        <div class="w-full flex-grow lg:flex lg:items-center lg:w-auto hidden lg:block mt-2 lg:mt-0 bg-gray-100 md:bg-transparent z-20" id="nav-content">
            <ul class="list-reset lg:flex justify-end flex-1 items-center">
                <li class="mr-3">
                    <a class="inline-block py-2 px-4 text-gray-900 font-bold no-underline" href="#">Active</a>
                </li>
                <li class="mr-3">
                    <a class="inline-block text-gray-600 no-underline hover:text-gray-900 hover:text-underline py-2 px-4" asp-area="" asp-page="Index">
                        Home
                    </a>
                </li>
                <li class="mr-3">
                    <a class="inline-block text-gray-600 no-underline hover:text-gray-900 hover:text-underline py-2 px-4" asp-area="" asp-page="Privacy">
                        Privacy
                    </a>
                </li>
            </ul>
        </div>
    </div>
</nav>

<!--Container-->
<div class="container w-full md:max-w-3xl mx-auto pt-20">
    @RenderBody()
</div>
<!--/container-->

<footer class="bg-white border-t border-gray-400 shadow">
    <div class="container max-w-4xl mx-auto flex py-8">

        <div class="w-full mx-auto flex flex-wrap">
            <div class="flex w-full md:w-1/2 ">
                <div class="px-8">
                    <h3 class="font-bold text-gray-900">About</h3>
                    <p class="py-4 text-gray-600 text-sm">
                        Lorem ipsum dolor sit amet, consectetur adipiscing elit. Maecenas vel mi ut felis tempus commodo nec id erat. Suspendisse consectetur dapibus velit ut lacinia.
                    </p>
                </div>
            </div>

            <div class="flex w-full md:w-1/2">
                <div class="px-8">
                    <h3 class="font-bold text-gray-900">Social</h3>
                    <ul class="list-reset items-center text-sm pt-3">
                        <li>
                            <a class="inline-block text-gray-600 no-underline hover:text-gray-900 hover:text-underline py-1" href="#">Add social link</a>
                        </li>
                        <li>
                            <a class="inline-block text-gray-600 no-underline hover:text-gray-900 hover:text-underline py-1" href="#">Add social link</a>
                        </li>
                        <li>
                            <a class="inline-block text-gray-600 no-underline hover:text-gray-900 hover:text-underline py-1" href="#">Add social link</a>
                        </li>
                    </ul>
                </div>
            </div>
        </div>


    </div>
</footer>

<script src="~/lib/jquery/dist/jquery.min.js"></script>
<script src="~/js/site.js" asp-append-version="true"></script>

@await RenderSectionAsync("Scripts", required: false)

<script>
      /* Progress bar */
      //Source: https://alligator.io/js/progress-bar-javascript-css-variables/
      var h = document.documentElement,
         b = document.body,
         st = 'scrollTop',
         sh = 'scrollHeight',
         progress = document.querySelector('#progress'),
         scroll;
      var scrollpos = window.scrollY;
      var header = document.getElementById("header");
      var navcontent = document.getElementById("nav-content");

      document.addEventListener('scroll', function() {

         /*Refresh scroll % width*/
         scroll = (h[st] || b[st]) / ((h[sh] || b[sh]) - h.clientHeight) * 100;
         progress.style.setProperty('--scroll', scroll + '%');

         /*Apply classes for slide in bar*/
         scrollpos = window.scrollY;

         if (scrollpos > 10) {
            header.classList.add("bg-white");
            header.classList.add("shadow");
            navcontent.classList.remove("bg-gray-100");
            navcontent.classList.add("bg-white");
         } else {
            header.classList.remove("bg-white");
            header.classList.remove("shadow");
            navcontent.classList.remove("bg-white");
            navcontent.classList.add("bg-gray-100");

         }

      });


      //Javascript to toggle the menu
      document.getElementById('nav-toggle').onclick = function() {
         document.getElementById("nav-content").classList.toggle("hidden");
      }
   </script>

</body>

</html>
还可以调整 Index.cshtml 来使用 Tailwind 样式类。我从 Tailwind Toolbox Github 仓库复制来内容。重新运行应用程序,现在可以看到使用 Tailwind 修饰之后的界面。
裁剪未使用的 CSS 设置
你可能已经注意到了,Tailwind 生成了 3M 的构建输出文件。
0>   @tailwindcss/postcss7-compat 2.0.2
0>
0>   🚀 Building: wwwroot/css/site.css
0>
0>   ✅ Finished in 2.55 s
0>   📦 Size: 3.74MB
0>   💾 Saved to wwwroot/css/output.css
不用担心文件的尺寸问题,Tailwind 带来了裁剪机制。可以用来删除未使用的 CSS 工具类。下面修改我们的 tailwind.config.js 配置文件,以便扫描我们的 Razor 视图文件并在最终的输出文件中删除任何多余的 CSS。
module.exports = {
  purge: {
    enabled: true,
    content: [
        './Pages/**/*.cshtml',
        './Views/**/*.chstml'
    ]
  },
  darkMode: false, // or 'media' or 'class'
  theme: {
    extend: {},
  },
  variants: {
    extend: {},
  },
  plugins: [],
}
重新构建项目之后,可以看到巨大的文件尺寸优化效果,最终的输出仅仅是 19.11KB。
0>   @tailwindcss/postcss7-compat 2.0.2
0>
0>   🚀 Building: wwwroot/css/site.css
0>
0>   ✅ Finished in 2.51 s
0>   📦 Size: 19.11KB
0>   💾 Saved to wwwroot/css/output.css
这是 Tailwind 构建管线的标志特性,我们只需要一点配置。
结论
设计对于多数 Web 应用来说非常关键,对于 ASP.NET 开发者来说,我们有一大堆丢弃的选项。幸运的是,伴随着 ASP.NET Core 和最新的 .NET SDK。我们可以简单地集成其它有价值的工具到项目中。
对于指望完整运行的 ASP.NET Core 项目的人来说,请访问在 GitHub 中的项目示例。
看起来 Tailwind 是一种有前途的构建用户界面和设计系统的途径。我也说过我并不是专家。但是,我希望在随后的几个月中,深入该项目。

 浙公网安备 33010602011771号