Java高级教程
1.Java面向对象方法
- 继承
- 封装
- 多态
this的用法
- 引用隐式参数
- 调用该类其他的构造器
super的用法
- 调用超类方法
- 调用超类的构造器
1.1. 创建类和对象的方法
对象和引用的一个关系图:
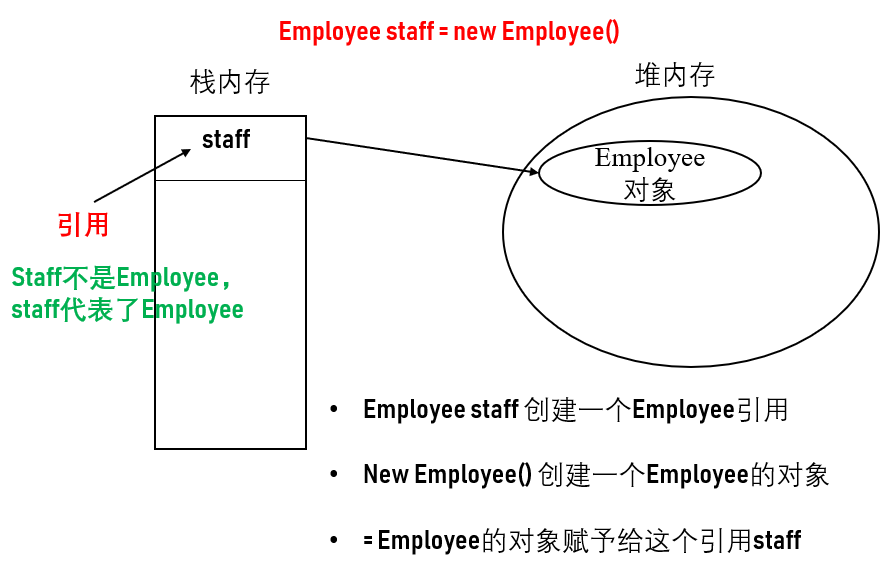

模板:
class ClassName {

  field1 // 属性: 描述类的状态
  field2
  ...
  constructor1
  constructor2
  ...
  method1  // 方法: 描述类的行为
  method2
}
下面是一个简单的实例
public class Main {
    public static void main(String[] args) throws IOException {
      // 对象的使用方法
      // 对象.变量: staff.name
      // 对象.函数(): staff.getname()
        Employee[] staff = new Employee[3];

        staff[0] = new Employee("Zhang", 75000, 1977, 12,15);
        staff[1] = new Employee("Li", 23000, 1932, 3,5);
        staff[2] = new Employee("Zhang", 56444, 1964, 6,21);

        for (Employee e: staff){
            e.raiseSalary(5);
        }

        for (Employee e: staff){
            System.out.println("name=" + e.getName() + ", salary=" + e.getSalary() + ", hireday=" + e.getHireDay());
        }
    }
}


// 一个类可以有无限多个对象
class Employee{

    // 三个实例域用来存放将要操作的数据
    private String name;
    private double salary;
    private LocalDate hireDay;

    // 构造器(与类名同名),总是伴随着new操作符的执行而被调用
    // 每个类可以有一个以上的构造器
    // 如果类中没有构造器,java会默认有一个构造器用于初始化
    // 但是如果类的构造器大于1个的话,需要自己构造默认构造器
    // 构造器可以有0,1,...等多个参数
    // 构造器没有返回值,即没有void
    // 构造器总是伴随着new的操作一起调用

    public Employee(String n, double s, int year, int month, int day){
        name = n;
        salary = s;
        hireDay = LocalDate.of(year, month, day);
    }
    // 需要获得或者设置实例域的值,需要提供以下三个内容:
    // (1).一个私有的数据域
    // (2).一个公有的域访问器方法
    // (3).一个公有的域更改器方法
    public String getName() {
        return name;
    }

    public double getSalary() {
        return salary;
    }

    public LocalDate getHireDay() {
        return hireDay;
    }

    public void setHireDay(LocalDate hireDay) {
        this.hireDay = hireDay;
    }

    public void setName(String name) {
        this.name = name;
    }

    public void setSalary(double salary) {
        this.salary = salary;
    }

    // class方法有两个参数: 显示参数(括号内部的参数) + 隐式参数(引用该方法的对象)
    // 用this来表示隐式参数,表示使用该方法的对象
    public void raiseSalary(double rate){
      // 可以直接访问类的属性
        double raise = this.salary * rate / 100;
        this.salary = this.salary + raise;
    }
}
1.2. this的使用
- 使用this调用成员变量和成员函数
- 使用this调用构造函数
class Person{
  String name;
  int age;
  String address;

  Person(){
    System.out.println("无参数");
  }

  Person(String s, int a){
    this.nanme = s;
    this.age = a;
  }
  // this可以调用构造函数
  Person(String s, int a, String s2){
    this(s, a);
    this.address = s2;
  }

  // this为使用该方法的对象,也称为类的隐式参数
  void talk(){
    System.out.println("my name is " + this.name)
  }

}
1.3. 静态域和静态方法
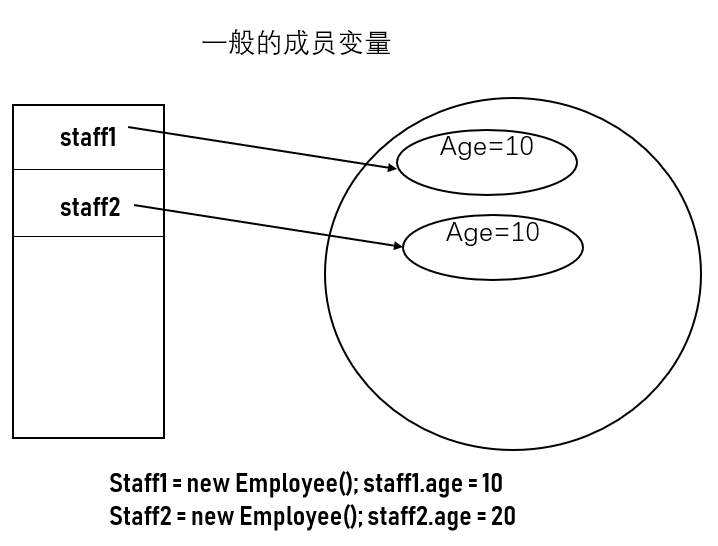
1.3.1. 静态域:属于类的级别
- 一般变量:
对象.变量 - 静态变量:
类名.变量+对象.变量
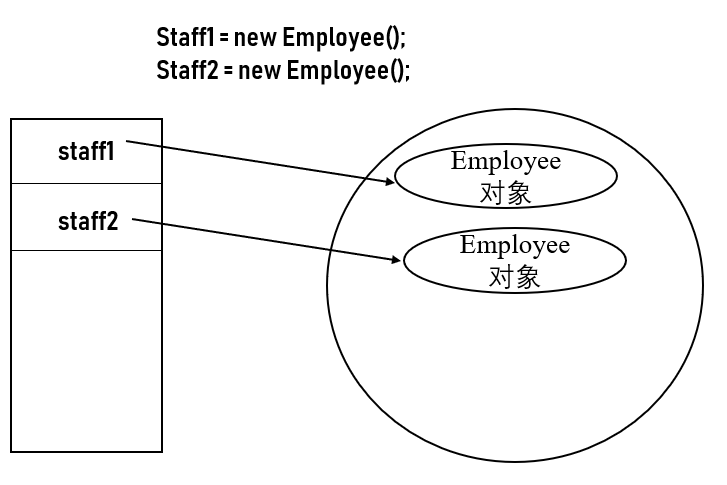
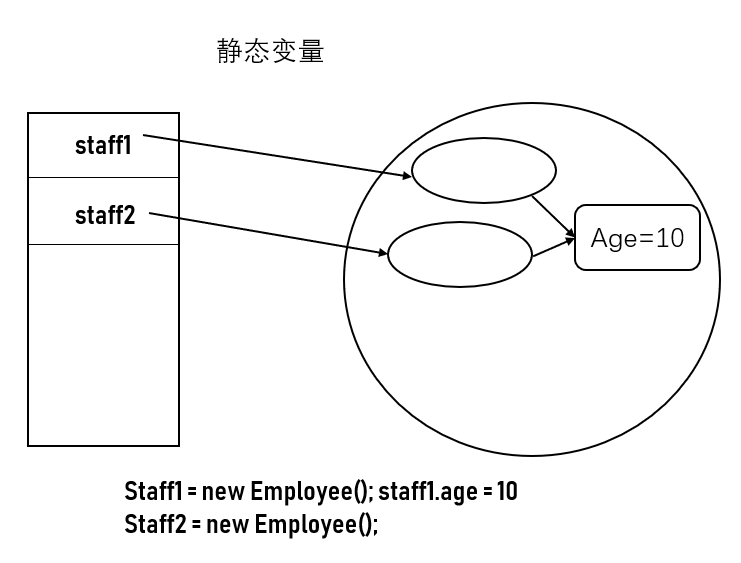
如果将一个域定义为static, 每个类中只有一个这样的域, 而每个对象对于所有的实例域却有自己的一份拷贝, 比如我们创建一个class:
class Employee {
  private static int nextID = 1;
  private int id;
}
如果有1000getEmployee类的对象,就有100个实例域id,但是只有一个静态域nextId
1.3.2.静态常量
// 1000个对象有1000个拷贝
public final double PI = 3.14;
// 1000个对象只有一个PI
public static final doube PI = 3.14;
1.3.3 静态方法
静态方法是一种不能向对象实施操作的方法,只能通过类名调用,也就是说没有this隐式参数
- 非静态方法:
employee.getNextID() - 静态方法:
Employee.getNextID() - 静态函数中不能使用非静态变量(非静态域)
1.3.4. 工厂方法
1.3.5. main方法
public class Main {
  // main是一个静态方法,不对任何对象进行操作
  // 事实上,再启动程序的时候没有任何对象,静态main方法将执行并创建程序需要的对象
    public static void main(String[] args) {
        System.out.println("Hello World!");
    }
}
1.4. 对象构造
1.4.1. 对象重载
如果多个方法有相同的名字、不同的参数,便产生了重载,编译器根据传入的参数自动旋转哪个方法
StringBuilder msg = new StringBuilder();
StringBuilder msg = new StringBuilder("To do: \n");
1.4.2. 类的构造器以及初始化
class Employee {
  private static int nextId;

  private int id;
  private String name;
  private double salary;

  //初始化块中初始化值
  {
    id = nextId;
    nextId++;
  }
  // 构造器中初始化值
  public Employee(){
    name = ""
    salary=0;
  }
  public Employee(String n, double s){
    this.name = name;
    this.salary = s;
  }


}
1.5. 包
管理class文件的
- 导入类文件:
import java.util.* - 将类文件放到包中:
package com.horstman.corejava
2. Java的继承
一个类得到了另外一个类的成员变量和成员函数
Java只支持单继承,不允许多继承
2.1. 继承的语法
public class Main {
    public static void main(String[] args) {
        // 生成子类的过程
        student st = new student("zhang", 20, 6);
        st.introduce();
    }
}

// 将重复代码放到父类中去
class Person{
        String name;
        int age;
        public Person(){
            System.out.println("Person无参数");
        }

        public Person(String name, int age){
            this.name = name;
            this.age = age;
        }

        void eat(){
            System.out.println("吃饭");
        }

        void introduce(){
            System.out.println("my name is " + this.name + ", my age is " + this.age);
        }
}

class student extends Person{

    int grade;
    // 自动继承父类的成员变量和成员函数
    // 在子类的构造函数中,必须调用父类的构造函数
    public student(String name, int age, int grade) {
        super(name, age);
        this.grade = grade;
    }

    // 子类可以写自己的成员函数
    void study(){
        System.out.println("Study");
    }

    // 复写 父类的方法
    // 1. 在具有父子关系的两个类当中
    // 2. 父类和子类中各有一个函数,这两个函数的定义(返回值类型,函数名和参数列表)完全相同
    @Override
    void introduce() {
        super.introduce();
        System.out.println("my grade is " + this.grade);
    }
}
2.2. 继承中的对象转型
2.2.1. 对象向上转型
将子类的对象赋值给父类的引用
// s是学生,也是人
//s: 变量(name,age,address) + 函数(introduce, study)
Student s = new Student();
//p:变量(name,age) + 函数(introduce)
Person p = s;

// 一个引用能够调用哪些成员变量和函数,取决于这个引用的类型(p引用person,看p前面的类型)
// 一个引用调用的哪个方法,取决于这个引用所指向的对象(p指向的是student对象,调用student方法)
p.name = "zhang";
p.age = 12;
// p.address = "bj" 不可以使用(他说)
p.introduce(); // 调用的是子类的Introduce()
// p.study()  不可以使用
2.2.2. 对象向下转型
Student s1 = new Student();
Person p = s1;
Student s2 = (Student)p;
2.3. 阻止继承:final类和方法
- 将类定义为final后,无法继承
- 将类的方法定义为final后,子类无法覆盖该方法
public class final Mother extends Person{
  ....;
}


public class student extends Person{
  public final String getName{
    ....;
  }
}
2.4.抽象类和抽象函数
面向对象思想:先抽象,后具体
2.4.1. 定义方法与语法特征
- 只有函数的定义,没有函数体的函数
- 抽象类不能生成对象(如果能的话,可能调用抽象函数,但是抽象函数没有函数体,无法解释)
- 抽象类天生是当爹的,只能被继承,它的子类可以生成对象
- 如果一个类中包含抽象函数,那么类必须被声明为抽象类
- 如果一个类中没有抽象函数,也可以声明为抽象类
- 抽象类可以有构造函数
public class Main {
    public static void main(String[] args) {
        Person p = new Chinese();
        p.eat();
    }
}

// 抽象类
abstract class Person{
        String name;
        int age;
        public Person(){
            System.out.println("Person无参数");
        }

        public Person(String name, int age){
            this.name = name;
            this.age = age;
        }
        // 抽象函数
        abstract void eat();

        void introduce(){
            System.out.println("my name is " + this.name + ", my age is " + this.age);
        }
}

class Chinese extends Person{

    Chinese(){
      super();
      System.out.println("chinese的构造函数");
    }
    @Override
    void eat() {
        System.out.println("用筷子吃饭");
    }
}
2.4.2. 为什么用抽象类?
- 抽象类表达的是一种抽象的概念,属于比父类还抽象的类
- 抽象函数可以检查子类是否复写了抽象函数,是一种检测机制,检测是否子类有没有写应该复写的抽象函数
public class Main {
    public static void main(String[] args) {
        Person[] p = new Person[2];

        p[0] = new Employee("zhang",5000,2018,10,12);
        p[1] = new Student("Li", "CS");
      // i.getDescription()中由于不能构造抽象类Person的对象,所以变量i永远不会引用person对象,而是引用employee或者student子类的具体对象
        for (Person i:p){
            System.out.println(i.getName() + "," + i.getDescription());
        }
    }
}

// 将重复代码放到父类中去
abstract class Person{
    abstract String getDescription();
    String name;

    Person(String name){
        this.name=name;
    }

    public String getName() {
        return name;
    }
}

class Employee extends Person{
    double salary;
    LocalDate hireday;

    Employee(String name,double salary, int year, int month, int day){
        super(name);
        this.salary = salary;
        hireday = LocalDate.of(year,month, day);
    }

    public double getSalary() {
        return salary;
    }

    @Override
    public String getName() {
        return super.getName();
    }

    public LocalDate getHireday() {
        return hireday;
    }

    @Override
    String getDescription() {
        return String.format("an employee with a salary of %.2f", salary);
    }

}

class Student extends Person{
    String major;

    Student(String name, String major){
        super(name);
        this.major = major;
    }

    @Override
    public String getName() {
        return super.getName();
    }

    public String getMajor() {
        return major;
    }

    @Override
    String getDescription() {
        return "a student majoring in" + major;
    }
}
zhang,an employee with a salary of 5000.00
Li,a student majoring inCS
3. 包的访问权限
3.1. 将类放到包中
什么是软件包?
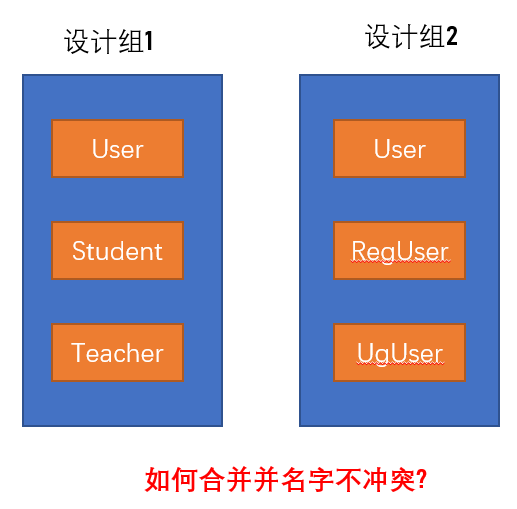
怎么讲类放到软件包中?
- 将类放到一个包中,需要使用packcage “包名”
- 编译时需要使用 -d参数,该参数的作用是依照包名生成相应的文件夹
- 一个类的全名: 包名 + . + 类名:mars.Test
- 包名的命名规范
- 一般小写
- 一般是域名倒过来写:
io.github.com.haochen95;
package mars;

class Test{
  public static void main(String[] args){
    System.out.println("package")
  }
}
3.2. 包的访问权限有哪些
| 访问权限 | 含义 | 包内可否使用 | 包之间可否使用 | 包内继承 | 包间继承 |
|---|---|---|---|---|---|
| public | 公有权限 | Yes | Yes | Yes | Yes |
| private(很少修饰类) | 私有权限 | No | No | No | No |
| default | 包级别访问权限 | Yes | No | Yes | No |
| protected(不修饰类) | 受保护权限 | Yes | No | Yes | Yes(只有子类才能使用) |
- 如果子类和父类不在同一个包中,子类确实继承到了父类的成员变量和成员函数,然后再检查权限,看是否能够使用
public > protected > default > private
4. 接口
4.1. 什么是接口
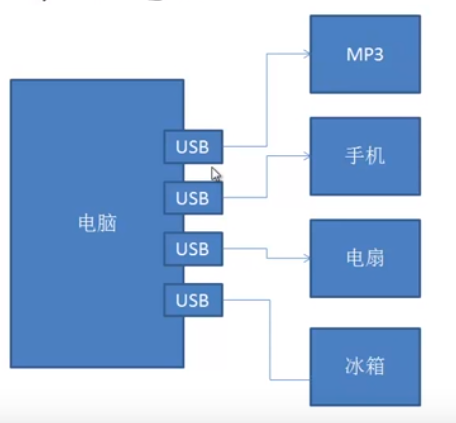
4.2.接口语法
- 使用Interface定义
- 接口中的方法全是抽象方法
- 接口中的方法全是public权限
- 实现接口使用implements关键字
- 一个类可以实现多个接口
- 一个接口可以继承多个接口
// 定义接口
interface USB{
  public void read();
  public void write();
}
interface WIFI{
  public void open();
  public void close();
}
// 继承接口
class Phone implements USB,WIFI{
  public void read(){
    System.out.println("USB READ")
  }
  public void write(){
    System.out.println("USB WRUTE")
  }
  public void open(){
    System.out.println("WIFI OPEN")
  }
  public void close(){
    System.out.println("WIFI CLOSE")
  }
}
// 主函数中调用
class Test{
  public static void main(String[] args){
    Phone phone = new Phone();
    USB usb = phone;
    usb.read();
    usb.write();

    WIFI wifi = phone;
    wifi.open();
    wifi.close();
  }
}
4.3. 接口的应用
- 在继承中,可以将重复代码放到父类中
- 但是所有子类都需要使用类似的方法体,可能使用接口更加的合适
- 接口定义了一种标准,接口只定义应该有这些方法,但是不关心方法的具体实现方法,由每个子类自己去实现
5. Java的异常处理
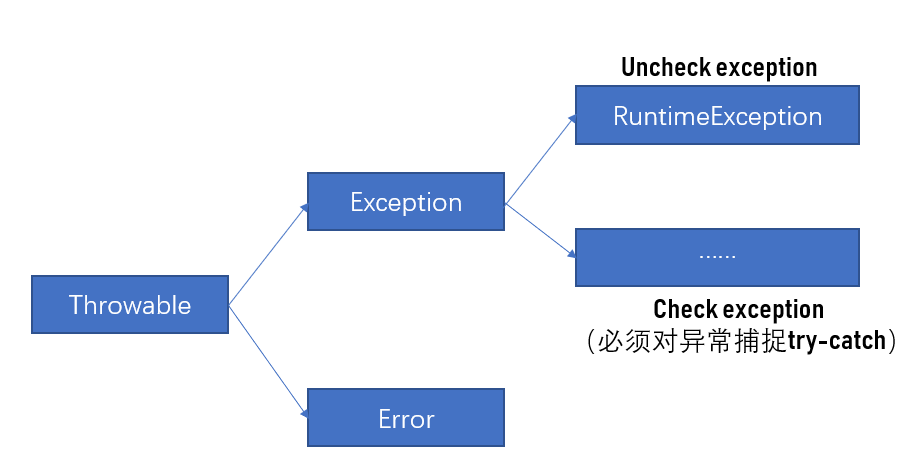
5.1. JDK异常的分类和try-catch捕捉
- 异常:终端了正常指令流的事件;
- 程序在异常处会中断,退出程序
- 使用try-catch捕捉异常(对于track error必须使用)
try{
  System.out.println(4); // 没出异常,继续执行/出了异常跳到catch执行,再继续执行
}
catch(Exception e){
  e.printStackTrace();
  System.out.println(5);
}
finally{   // 异常出不出 都会执行这个程序-----主要用于IO流的关闭文件代码
  System.out.println(6);
}
System.out.println(7);
5.2. 用户自定义的异常处理
- throw和throws关键字的用法
public void setAge(int age){
  if(age<0){
    // untrack excaption---程序运行到这里就会终止
    RuntimeException e = new RuntimeException("年龄不能为负数");
    throw e;
    // track excaption --- 必须用try-catch进行捕捉或者声明(throws Exception)放在类声明中
    Exception e = new Exception("年龄不能为负数")
    throw e;
  }
}
6. Java中的IO
6.1. IO的定义和分类,以及字节流基本用法:
-
IO的目标:从数据源(文件,键盘,网络)中读取数据,从数据写入到数据目的地(文件,屏幕,网络)当中
-
输入和输出流在Java中都设置成一种"管道", IO流也是一种对象
-
IO的分类
- 输入输出流
- 字节流,字符流
- 节点流,处理流
- IO流中的核心类:
InputStream(抽象类) <- FileInputStream,OutputStream(抽象类) <-FileoutputStream
-InputStream: int read(byte[] b, int off, int len),返回读取了多少字节的数据
-OutputStream: void write(byte[] b, int off, int len)
import java.io.*;
// 字节流
class Test{
  public static void main(String[] args){
    // 声明输入流引用
    FileInputStream fis = null;
    // 声明输出流引用
    FileoutputStream fos = null;
    try{
      // 字节流-读数据: 生成代表输入流的对象
      fis = new FileInputStream("D:/from.txt");
      // 生成代表输出流的对象
      fos = new FileoutputStream("D:/to.txt");
      // 生成一个字节数组
      byte[] buffer = new byte[100];
      // 调用输入流的read方法,读取数据
      int temp = fis.read(buffer, 0, 100);
      // 写入到文件中
      fos.write(buffer,0, temp);
      String s = new String(buffer); // 将字节转为字符
      // 去除空格
      s = s.trim();
      System.out.println(s);
    }
    catch(Exception e){
      System.out.println(e);
    }
  }
}
6.2. 大文件的读写方法和字符流的使用
1. 大文件读写
import java.io.*;
class Test{
  public static void main(String[] args){
    FileInputStream fis = null;
    FileoutputStream fos = null;
    try{
      fis = new FileInputStream("D:/from.txt");
      fos = new FileoutputStream("D:/to.txt");
      byte[] buffer = new byte[100];
      // 大文件:循环读取
      while(true){
        int temp = fis.read(buffer, 0, 100);
        // 读到文件最后的时候,read返回-1
        if (temp == -1){
          break;
        }
        fos.write(buffer,0, temp);
      }
    }
    catch(Exception e){
      System.out.println(e);
    }
    finally{
      // 一定要在finally中关闭文件管道
      try{
        fis.close();
        fos.close();
      }
      catch(Exception e){
      System.out.println(e);
      }
    }
  }
}
2.字符流
- 读写文件是,以字符为基础
- 核心方法:
Reader(抽象类) <- FileReader,Writer(抽象类) <-FilWriter
-Reader: int read(char[] b, int off, int len),返回读取了多少字节的数据
-Writer: void write(char[] b, int off, int len)
import java.io.*;
class Test{
  public static void main(String[] args){
    FileReader fr = null;
    FilWriter fw = null;
    try{
      fr = new FileReader("D:/from.txt");
      fw = new FIleWriter("D:/to.txt");
      char[] buffer = new char[100];
      int temp = fr.read(buffer,0,buffer.length);
    }catch(Exception e){
      System.out.println(e);
    }
        finally{
      // 一定要在finally中关闭文件管道
      try{
        fr.close();
        fw.close();
      }
      catch(Exception e){
      System.out.println(e);
      }
    }
  }
}
6.3. 节点流和处理流
1. 处理流: BufferedReader:字符输入处理流
readline功能- 生成BufferedReader对象的方法:
BufferedReader in = new BufferedReader(new FileReader("D:/from.txt"))
import java.io.*;
class Test{
  public static void main(String[] args){
    FileReader fileReader = null;
    BufferedReader bufferedReader = null;
    try{
      fileReader = new FileReader("D:/from.txt");
      bufferedReader = new BufferedReader(fileReader);
      // 按照一行一行的读取
      Strign line = null;
      while(true){
        line = bufferedReader.readline();
        if (line == null){
          break;
        }
        // 打印每一行
        System.out.println(line)
      }

    }
    catch(Exception e){
      System.out.println(e);
    }
    finally{
      // 一定要在finally中关闭文件管道
      try{
        fileReader.close();
        bufferedReader.close();
      }
      catch(Exception e){
      System.out.println(e);
      }
    }
  }
}
7.内部类和匿名内部类
7.1. 内部类
- 生成内部类的对象:
A.B b = new A().new B();
class A{
  int i;
  // 内部类:A&B.class
  class B{
    int j;
    int funB(){
      // 内部类可以随意使用外部类的变量
      int result = i+j;
      return result;
    }

  }
}

class test{
  public static void main(String[] args){
    // 生成内部类的对象
    A a =new A();
    A.B b = new A().new B();

    a.i = 3;
    b.j = 1;
    b.funB();  // 结果是 3 + 1 = 4;
  }
}
7.2. 匿名内部类
interface A{
  public void dosomething{};
}

class B{
  public void fun(A a){
    System.out.println("B lei");
    a.dosomething();
  }
}

class Test{
  public static void main(String[] args){
     B b = new B();
     // 利用匿名内部类 来继承父类或者实现接口
     b.fun(new A(){
       public vod dosomething(){
         System.out.println("Do domething");
       }
     })
  }
}


