django部署
部署
项目不要放在/root目录下
全新的centos7,阿里云
yum -y update

yum install gcc

yum -y install zlib*

yum install openssl-devel -y
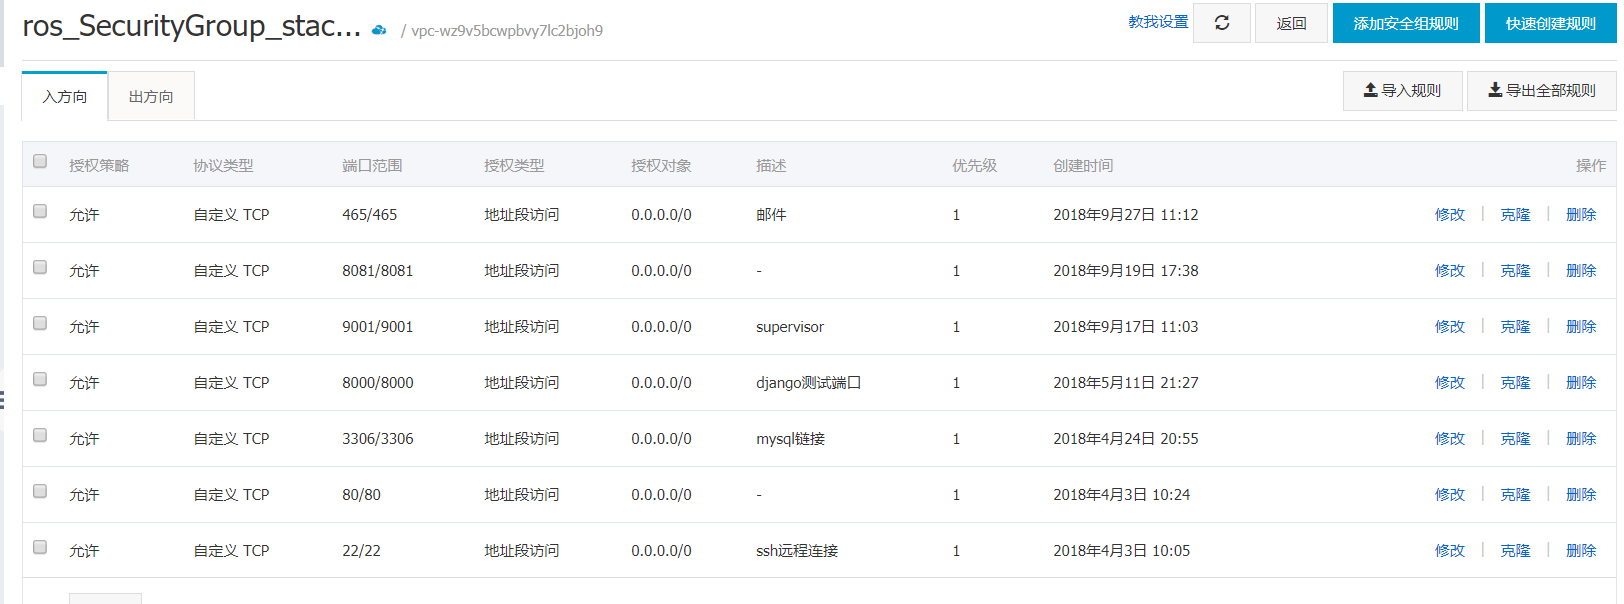
这里先配置一下安全组
ssh安装
不安装也可以,需要配置密匙对
登录时需要使用pem文件+密码的方式进行登陆
yum install openssh-server -y

service sshd restart

#服务端开启密码验证的方法:

vim /etc/ssh/sshd_config
(最后一行)
把PasswordAuthentication项为yes

重启服务

service sshd restart
mysql安装(5.7.23)
安装
下载rpm安装源
官方地址:https://dev.mysql.com/downloads/repo/yum/
rpm文件地址:https://dev.mysql.com/get/mysql57-community-release-el7-11.noarch.rpm
[root@GYJ ~]# mkdir download
[root@GYJ ~]# cd download/
[root@GYJ download]# wget https://dev.mysql.com/get/mysql57-community-release-el7-11.noarch.rpm
--2018-09-30 17:35:27--  https://dev.mysql.com/get/mysql57-community-release-el7-11.noarch.rpm
Resolving dev.mysql.com (dev.mysql.com)... 137.254.60.11
Connecting to dev.mysql.com (dev.mysql.com)|137.254.60.11|:443... connected.
HTTP request sent, awaiting response... 302 Found
Location: https://repo.mysql.com//mysql57-community-release-el7-11.noarch.rpm [following]
--2018-09-30 17:35:29--  https://repo.mysql.com//mysql57-community-release-el7-11.noarch.rpm
Resolving repo.mysql.com (repo.mysql.com)... 23.44.160.128
Connecting to repo.mysql.com (repo.mysql.com)|23.44.160.128|:443... connected.
HTTP request sent, awaiting response... 200 OK
Length: 25680 (25K) [application/x-redhat-package-manager]
Saving to: ‘mysql57-community-release-el7-11.noarch.rpm’

100%[====================================================================================>] 25,680      --.-K/s   in 0.1s

2018-09-30 17:35:30 (194 KB/s) - ‘mysql57-community-release-el7-11.noarch.rpm’ saved [25680/25680]
安装Mysql源文件
yum localinstall -y mysql57-community-release-el7-11.noarch.rpm
查看MySQL源是否安装成功
[root@GYJ download]# yum repolist enabled | grep "mysql.*-community.*"
mysql-connectors-community/x86_64 MySQL Connectors Community                  65
mysql-tools-community/x86_64      MySQL Tools Community                       69
mysql57-community/x86_64          MySQL 5.7 Community Server                 287
[root@GYJ download]#
安装MySQL服务
yum install -y mysql-community-server
启动, 重启
systemctl start mysqld
systemctl restart mysqld
修改root登录密码
获取root默认密码(由于Mysql安全策略升级,安装完成后系统自动设置了一个随机密码)
[root@GYJ download]# grep 'temporary password' /var/log/mysqld.log
2018-09-30T09:39:46.046400Z 1 [Note] A temporary password is generated for root@localhost: CRdwG_iRw58q
使用生成的随机密码登陆MySQL
[root@GYJ download]# mysql -uroot -pCRdwG_iRw58q
mysql: [Warning] Using a password on the command line interface can be insecure.
Welcome to the MySQL monitor.  Commands end with ; or \g.
Your MySQL connection id is 3
Server version: 5.7.23

Copyright (c) 2000, 2018, Oracle and/or its affiliates. All rights reserved.

Oracle is a registered trademark of Oracle Corporation and/or its
affiliates. Other names may be trademarks of their respective
owners.

Type 'help;' or '\h' for help. Type '\c' to clear the current input statement.

mysql>
修改密码
由于Mysql默认要求设置密码复杂度高(必须包含 大小写字母、数字、符号)
mysql> alter user 'root'@'localhost' identified by '123456';
ERROR 1819 (HY000): Your password does not satisfy the current policy requirements
mysql>
这样设置是合法的:
mysql> alter user 'root'@'localhost' identified by 'Mysql666!';
Query OK, 0 rows affected (0.00 sec)

mysql>
关闭Mysql密码校验规则,允许设置简单密码
在Mysql配置文件最后加入:validate_password = off
[root@localhost ~]# vi /etc/my.cnf
# For advice on how to change settings please see
# http://dev.mysql.com/doc/refman/5.7/en/server-configuration-defaults.html

[mysqld]
#
# Remove leading # and set to the amount of RAM for the most important data
# cache in MySQL. Start at 70% of total RAM for dedicated server, else 10%.
# innodb_buffer_pool_size = 128M
#
# Remove leading # to turn on a very important data integrity option: logging
# changes to the binary log between backups.
# log_bin
#
# Remove leading # to set options mainly useful for reporting servers.
# The server defaults are faster for transactions and fast SELECTs.
# Adjust sizes as needed, experiment to find the optimal values.
# join_buffer_size = 128M
# sort_buffer_size = 2M
# read_rnd_buffer_size = 2M
datadir=/var/lib/mysql
socket=/var/lib/mysql/mysql.sock

# Disabling symbolic-links is recommended to prevent assorted security risks
symbolic-links=0

log-error=/var/log/mysqld.log
pid-file=/var/run/mysqld/mysqld.pid

validate_password = off
重启Mysql服务生效
systemctl restart mysqld
配置远程用户登录
指定Ip
mysql> grant all privileges on *.* to 'root'@'192.168.1.1' identified by '123456' with grant option;
Query OK, 0 rows affected, 1 warning (0.00 sec)

mysql>
允许所有
mysql> grant all privileges on *.* to 'root'@'%' identified by '123456' with grant option;
Query OK, 0 rows affected, 1 warning (0.00 sec)

mysql>
FLUSH PRIVILEGES;
设置开机启动
 systemctl enable mysqld

 systemctl daemon-reload
安装mysqlclient出问题
    centos 7:
        yum install python-devel mariadb-devel -y

    ubuntu:
        sudo apt-get install libmysqlclient-dev

    然后:
        pip install mysqlclient
设置mysql密码(可以跳过了,使用123456密码可以登陆了)
    进入mysql:
    set password =password('123456');     #密码123456
    FLUSH PRIVILEGES;
安装python3.6
1. 获取

wget https://www.python.org/ftp/python/3.6.5/Python-3.6.2.tgz
tar -xzvf Python-3.6.2.tgz -C  /tmp
cd  /tmp/Python-3.6.2/

2. 把Python3.6安装到 /usr/local 目录

./configure --prefix=/usr/local
make
make altinstall

3. 更改/usr/bin/python链接

ln -s /usr/local/bin/python3.6 /usr/bin/python3
安装virtualenvwrapper
yum install python-setuptools python-devel
pip install virtualenvwrapper

#编辑.bashrc文件
vim ~/.bashrc

#添加进去
export WORKON_HOME=$HOME/.virtualenvs
source /usr/bin/virtualenvwrapper.sh

#sudo find / -name virtualenvwrapper.sh      查看你的virtualenvwrapper.sh在什么地方

#重新加载.bashrc文件
source ~/.bashrc

#虚拟环境保存的路径
cd ~/.virtualenvs/      (创建的虚拟环境都会保存在这个目录,前面设置的)

#创建指定python版本的虚拟环境方法
mkvirtualenv -p /usr/local/bin/python3.6 MxOnline

workon MxShop

#进虚拟环境安装依赖包

首先 pip freeze > requirements.txt 将本地的虚拟环境安装包导出来,上传到服务器

pip install -r requirements.txt
虚拟环境目录: /root/.virtualenvs/
可以通过pycharm远程调试
git安装(也可以直接从本地通过PyCharm的部署功能直接上传到服务器)
yum install git

git config --global user.name "Your Name"
git config --global user.email "youremail@domain.com"

cd ~/ && ssh-keygen -t rsa -C "你的邮箱"

#提示的信息,直接按enter就行

cd .ssh

把公钥文件(id_rsa.pub)中的码复制到github

# 就可以开始clone代码了
git@github.com:coder-gao/MxOnline.git
拉取所有需要的static file 到同一个目录
在django的setting文件中,添加下面一行内容:
STATIC_ROOT = os.path.join(BASE_DIR, "static")
运行命令
python manage.py collectstatic
uwsgi的安装和配置
进入虚拟环境,安装uwsgi
    workon MxOnline
    pip install uwsgi
在项目根目录下新建uwsgi.ini 配置文件, 内容如下:
    # mysite_uwsgi.ini file
    [uwsgi]

    # Django-related settings
    # the base directory (full path)
    chdir           = /PyProject/MxOnline
    # Django's wsgi file
    module          = MxOnline.wsgi
    # the virtualenv (full path)
    virtualenv = /root/.virtualenvs/MxOnline

    # process-related settings
    # master
    master          = true
    # maximum number of worker processes
    processes       = 5
    # the socket (use the full path to be safe
    socket          = /PyProject/MxOnline/mxonline.sock
    # ... with appropriate permissions - may be needed
    chmod-socket    = 777
    # try to remove all of the generated file/sockets
    vacuum          = true

    logto = /tmp/MxOnline.log
注:
chdir: 表示需要操作的目录,也就是项目的目录
module: wsgi文件的路径
processes: 进程数
virtualenv:虚拟环境的目录
socket: 可以是127.0.0.1:8000,也可以是sock文件;如果是文件,和nginx通信时会自动创建
chmod-socket:
权限,如果权限不够会显示502
如果使用的不是sock文件通信的话,这里可以不设置
nginx的安装和配置
安装
yum install nginx
在/etc/nginx/conf.d下新建MxOnline.conf
# the upstream component nginx needs to connect to
upstream MxOnline {
server unix:///PyProject/MxOnline/mxonline.sock; # for a file socket
# server 127.0.0.1:8000; # for a web port socket (we'll use this first)
}
# configuration of the server

server {
# the port your site will be served on
listen      80;
# the domain name it will serve for
# server_name mxonline.cht3.top; 有域名的话可以直接填域名,没有的话直接写ip
server_name xxx.xx.xx.xx ; # substitute your machine's IP address or FQDN
charset     utf-8;

# max upload size
client_max_body_size 75M;   # adjust to taste

# Django media
location /media  {
    alias /PyProject/MxOnline/media;  # 指向django的media目录
}

location /static {
    alias /PyProject/MxOnline/static; # 指向django的static目录
}

# Finally, send all non-media requests to the Django server.
location / {
    uwsgi_pass  MxOnline;
    include     uwsgi_params; # the uwsgi_params file you installed
}
}
重启nginx,
systemctl restart nginx
进入虚拟环境,
workon MxOnline
,进入项目根路径,执行
uwsgi --ini uwsgi.ini
打开浏览器输入服务器的IP地址,就可以看到网站的页面了
这里推荐一些域名交易网站(域名已备案的那种)
好名网
聚名网
配置好解析后在配置nginx,
重启nginx,浏览器输入域名就可访问了
通过systemctl status nginx.service可以查看启动失败的原因
阿里云要求服务器信息和域名信息一致才行
这里不使用80,在安全组中添加8081端口
nginx中也不再监听80端口,而是监听8081端口
listen      8081;
# the domain name it will serve for
server_name mxonline.cht3.top:8081 mxonline.iceflower.top:8081;
supervisor管理uwsgi
在系统环境,不是虚拟环境,安装supervisor
supervisor不支持3.x,系统的环境是2.7
pip install supervisor
### 生成配置文件,且放在/etc目录下
echo_supervisord_conf > /etc/supervisord.conf

### 为了不将所有新增配置信息全写在一个配置文件里,这里新建一个文件夹,每个程序设置一个配置文件,相互隔离
mkdir /etc/supervisord.d/

### 修改配置文件
vim /etc/supervisord.conf

### 加入以下配置信息
[include]
files = /etc/supervisord.d/*.conf

### 在supervisord.conf中设置通过web可以查看管理的进程,加入以下代码(默认即有,取消注释即可)
[inet_http_server]
port=9001
username=user
password=123


### 启动supervisord

supervisord -c /etc/supervisord.conf
现在通过 http://ip:9001/ 就可以查看supervisor的web界面了(默认用户名及密码是user和123),当然目前还没有加入任何监控的程序。
在/etc/supervisord.d/目录下新建一个MxOnline.conf的文件,内容如下
# 程序的名字,在supervisor中可以用这个名字来管理该程序,随便起
[program:MxOnline]
# 指定运行用户
user = root
# 启动程序的命令
command = /root/.virtualenvs/MxOnline/bin/uwsgi --ini uwsgi.ini
# 项目的目录
directory = /PyProject/MxOnline
# 开始的时候等待多少秒
startsecs = 0
# 停止的时候等待多少秒
stopwaitsecs = 0
# 设置改程序是否虽supervisor的启动而启动
autorstart = true
# 程序挂了是否需要重新将其启动
autorestart = true
# 是否将程序错误信息重定向到文件
redirect_stderr=true
# 输出的log文件(log目录需要手动创建)
stdout_logfile = /PyProject/MxOnline/log/supervisord.log
# 输出的错误文件(log目录需要手动创建)
stderr_logfile = /PyProject/MxOnline/log/supervisord.err

[supervisord]
# log的级别
loglevel = info
忽视这段代码
# 使用supervisorctl的配置
[supervisorctl]
# 使用supervisorctl登陆的地址和端口
serverurl = http://127.0.0.1:9001
# 登陆supervisorctl的用户名和密码
username = admin
password = admin123

# supervisor的服务器,可以通过浏览器进入
[inet_http_server]
port=0.0.0.0:9001
username=admin
password=admin123
重新启动supervisord,或者重新加载配置文件:
supervisorctl reload
### 或者
supervisorctl -c /etc/supervisord.conf
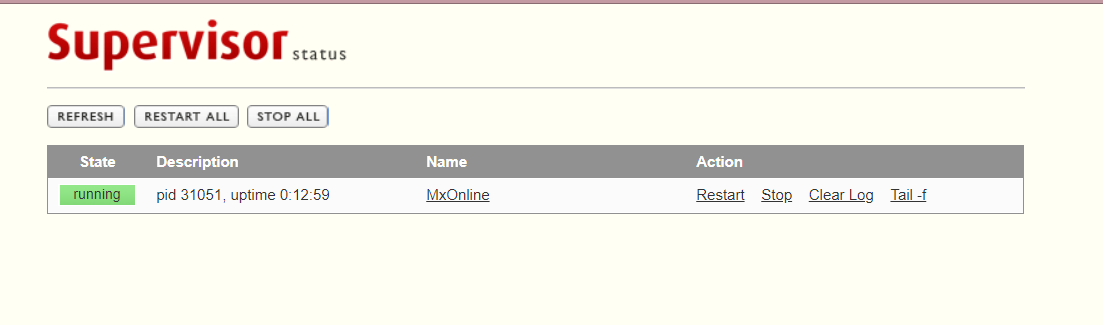
打开浏览器,输入IP:9001
输入账号和密码
即可看到supervisor的web管理界面
阿里云的服务器25端口被封了,邮件无法发送,只能使用465端口了
协议也要使用SSL了
# 发送邮件的setting设置
EMAIL_HOST = "smtp.aliyun.com"
EMAIL_PORT = 465
EMAIL_HOST_USER = "xxxxxx@aliyun.com"
EMAIL_HOST_PASSWORD = "xxxxxx"
EMAIL_USE_SSL= True
EMAIL_FROM = "xxxx@aliyun.com"
服务器重启后查看MySQL和nginx是否重新启动
没有谱的话需要重启
修改系统python版本
安装的python3存放位置
[root@gyj bin]# cd /usr/local/bin/
[root@gyj bin]# ls
2to3-3.6  easy_install-3.6  idle3.6  pip3.6  pydoc3.6  python3.6  python3.6m  python3.6m-config  pyvenv-3.6
创建python3的链接
[root@gyj bin]# ln -s /usr/local/bin/python3.6 /usr/bin/python
ln: failed to create symbolic link ‘/usr/bin/python’: File exists
[root@gyj bin]# pwd
/usr/local/bin
[root@gyj bin]# cd /usr/bin/
[root@gyj bin]# mv python python.back
[root@gyj bin]# ln -s /usr/local/bin/python3.6 /usr/bin/python
[root@gyj bin]# ln -s /usr/local/bin/python3.6 /usr/bin/python3
ln: failed to create symbolic link ‘/usr/bin/python3’: File exists
修改使用系统python的文件,将里面的python改为python2
[root@gyj bin]# cd /usr/bin/
[root@gyj bin]# ls yum*
yum  yum-builddep  yum-config-manager  yum-debug-dump  yum-debug-restore  yumdownloader  yum-groups-manager
[root@gyj bin]# vim yum
[root@gyj bin]# vim yum-builddep
[root@gyj bin]# vim yum-config-manager
[root@gyj bin]# vim yum-debug-dump
[root@gyj bin]# vim yum-debug-restore
[root@gyj bin]# vim yumdownloader
[root@gyj bin]# vim yum-groups-manager
[root@gyj bin]# vim /usr/libexec/urlgrabber-ext-down
