原文来自:https://blog.csdn.net/Somhu/article/details/78614783
https://www.relaxheart.cn/to/master/blog?uuid=83
CountDownLatch 用法
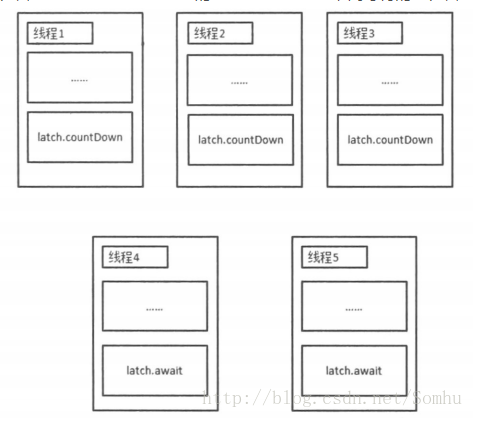
CountDownLatch是java.util.concurrent包中一个类,CountDownLatch只要提供的机制是多个(具体数量等于初始化CountDownLatch时count的值)线程都达到了预期状态或者完成了预期工作时触发事件,其他线程可以等待这个事件来触发自己后续的工作。等待的线程可以是多个,即CountDownLatch可以唤醒多个等待的线程。
到达自己预期状态的线程会调用CountDownLatch的countDown方法,而等待的线程会调用CountDownLatch的await方法。

主要方法讲解:
CountDownLatch(int count) //实例化一个倒计数器,count指定计数个数
countDown() // 计数减一
await() //等待,当计数减到0时,所有线程并行执行
CountDownLatch在工作的多个场景被使用,算是用的很频繁的了,比如我司API接口要求响应时间在200ms以内,但是如果一个接口内部依赖多个三方/外部服务,那串行调用接口的RT必然很久,所以个人用的最多的是接口RT优化场景,内部服务并行调用。
对于倒计数器,一种典型的场景就是火箭发射。在火箭发射前,为了保证万无一失,往往还要进行各项设备、仪器的检测。只有等到所有的检查完毕后,引擎才能点火。那么在检测环节当然是多个检测项可以同时进行的。
代码实现:
 1 public class CountDownLatchDemo implements Runnable{
 2     static final CountDownLatch latch = new CountDownLatch(10);
 3     static final CountDownLatchDemo demo = new CountDownLatchDemo();
 4
 5     @Override
 6     public void run() {
 7          // 模拟检查任务
 8         try {
 9              Thread.sleep(new Random().nextInt(10) * 1000);
10              System.out.println("check complete");
11
12              //计数减一
          latch.countDown();
13         } catch (InterruptedException e) {
14               e.printStackTrace();
15         }
16      }
17
18
19      public static void main(String[] args) throws InterruptedException  {
20           ExecutorService exec = Executors.newFixedThreadPool(10);
21
22           for (int i=0; i<10; i++){
23               exec.submit(demo);
24           }
25
26           // 等待检查
27           latch.await();
28
29           // 发射火箭
30           System.out.println("Fire!");
31
32           // 关闭线程池
33           exec.shutdown();
34       }
35 }
36
37
结合以下几个例子,可以快速掌握这个这个类的基本使用方法:
例一:
 1 public static void main(String[] args) throws InterruptedException {
 2     CountDownLatch countDown = new CountDownLatch(1);
 3         CountDownLatch await = new CountDownLatch(5);
 4
 5         // 依次创建并启动处于等待状态的5个MyRunnable线程
 6         for (int i = 0; i < 5; ++i) {
 7             new Thread(new MyRunnable(countDown, await)).start();
 8         }
 9
10         System.out.println("用于触发处于等待状态的线程开始工作......");
11         System.out.println("用于触发处于等待状态的线程工作完成,等待状态线程开始工作......");
12         countDown.countDown();
13         await.await();
14         System.out.println("Bingo!");
15 }
16
17 public class MyRunnable implements Runnable {
18
19     private final CountDownLatch countDown;
20     private final CountDownLatch await;
21
22     public MyRunnable(CountDownLatch countDown, CountDownLatch await) {
23         this.countDown = countDown;
24         this.await = await;
25     }
26
27     public void run() {
28         try {
29             countDown.await();//等待主线程执行完毕,获得开始执行信号...
30             System.out.println("处于等待的线程开始自己预期工作......");
31             await.countDown();//完成预期工作,发出完成信号...
32         } catch (InterruptedException e) {
33             e.printStackTrace();
34         }
35     }
36 }
37 运行结果:
38 用于触发处于等待状态的线程开始工作......
39 用于触发处于等待状态的线程工作完成,等待状态线程开始工作......
40 处于等待的线程开始自己预期工作......
41 处于等待的线程开始自己预期工作......
42 处于等待的线程开始自己预期工作......
43 处于等待的线程开始自己预期工作......
44 处于等待的线程开始自己预期工作......
45 Bingo!
例子二:
 1 public class TestDemo2 {
 2
 3     public static void main(String[] args) throws InterruptedException {
 4         ThreadPoolExecutor threadPool = new ThreadPoolExecutor(5, 10, 100, TimeUnit.SECONDS, new ArrayBlockingQueue<Runnable>(5));
 5         int count = 10;
 6         final CountDownLatch latch = new CountDownLatch(count);
 7
 8         for (int i = 0; i < count; i++) {
 9             threadPool.execute(new MyRunnable1(latch, i));
10         }
11
12         latch.await();
13         System.err.println("等待线程被唤醒!");
14         threadPool.shutdown();
15     }
16 }
17
18 class MyRunnable1 implements Runnable {
19
20     CountDownLatch latch = null;
21     int i;
22
23     public MyRunnable1(CountDownLatch latch, int i) {
24         this.latch = latch;
25         this.i = i;
26     }
27
28     @Override
29     public void run() {
30         System.err.println("线程" + i +"完成了操作...");
31         try {
32             Thread.currentThread();
33             Thread.sleep(4000);
34         } catch (InterruptedException e) {
35             e.printStackTrace();
36         }
37         latch.countDown();
38     }
39
40 }
41 运行结果:
42 线程0完成了操作...
43 线程3完成了操作...
44 线程2完成了操作...
45 线程1完成了操作...
46 线程4完成了操作...//暂停4秒
47 线程5完成了操作...
48 线程6完成了操作...
49 线程8完成了操作...
50 线程7完成了操作...
51 线程9完成了操作...//暂停4秒
52 等待线程被唤醒!


 浙公网安备 33010602011771号