02:httpd-2.2基础配置
---恢复内容开始---
9、日志设定
错误日志:
ErrorLog logs/error_log //这里使用了相对路径,相对于/etc/httpd/路径
LogLevel warn //定义日志记录级别,指明记录到那个级别,那么这个级别更高的日志级别都会被一并记录
日志级别:debug, info, notice, warn, error, crit, alert, emerg(默认是warn)
访问日志:
CustomLog logs/access_log combined //conbined是日志格式,就是下面
LogFormat "%h %l %u %t \"%r\" %>s %b \"%{Referer}i\" \"%{User-Agent}i\"" combined
%h:客户端IP地址;
%l: Remote logname (from identd, if supplied). “-”表示为空;
%u: Remote user,基于httpd的协议的basic或digist认证所实现的用户登陆(from auth; may be bogus if return status (%s) is 401);大多数为空
%t:Time the request was received (standard english format),服务器收到请求的时间;
%r:First line of request,请求报文的首行信息(method url version);
%>s: 响应状态码;status code
%b: 响应报文的大小,单位是字节,不包括响应报文首部;
%{Referer}i:请求报文当中"referer"首部的值;当前资源的访问入口,即从哪个页面中的超链接跳转而来;referer为空表示是从浏览器直接键入的,不是从超链接跳转的
%{User-Agent}i:请求报文当中"User-Agent"首部的值;即发出请求用到的应用程序;
详情:http://httpd.apache.org/docs/2.2/mod/mod_log_config.html#formats
示例:192.168.108.1 - - [31/May/2018:22:11:15 +0800] "GET / HTTP/1.1" 403 283 "-" "Mozilla/5.0 (Windows NT 10.0; WOW64; Trident/7.0; rv:11.0) like Gecko"
10、路径别名
DocumentRoot "/www/htocs"
http://www.magedu.com/download/bash-4.4.2-3.el6.x86_64.rpm
路径映射:--> /www/htdocs/download/bash-4.4.2-3.el6.x86_64.rpm
Alias /URL/ "/PATH/TO/SOMEDIR/" //URL是原路径,后面为别名路径// 别名指访问一个路径时,这个路径应该在DocumentRoot下,但却被定向到别的位置:
示例:
#mkdir -pv /www/htdocs
#cd !$
#mkdir bbs
#vim /www/htdocs/bbs/index.html //为bbs目录下创建网页添加内容 Page at /bbs,此时在页面中是无法访问的
#vim /etc/httpd/conf.d/httpd.conf //修改
Alias /bbs/ "/forum/htdocs" //定义bbs别名为/forum/htdocs
http://www.magedu.com/bbs/index.html
别名路径为:--> /forum/htdocs/bbs/ /在根目录下创建的forum,这里跟DocumentRoot没有关系
11、设定默认字符集
AddDefaultCharset UTF-8 //设定默认字符集
GBK, GB2312, GB18030 //这3个都是国标中文字符编码
12、基于用户的访问控制(重要)
1、认证质询:
WWW-Authenticate:响应码为401,拒绝客户端请求,并说明要求客户提供账号和密码;
2、认证:
Authorization:客户端用户填入账号和密码后再次发送请求报文;认证通过,则服务器发送响应的资源;
认证类型:
basic:明文认证
digest:消息摘要(经过md5加密)
安全域:需要用户认证后方能访问的路径;
应该通过名称对其进行标识,并用于告知用户认证的原因;
用户的账号和密码存储于何处?
虚拟账号:仅用于访问某服务时用到的认证标识;
存储://虚拟账号存储地方
文本文件
SQL数据库
ldap//轻量目录访问协议
nis
基于IP添加虚拟主机
第一步:先在httpd的主配置文件中添加配置
#vim /etc/httpd/conf/httpd.conf //在主配置文件的最后一行添加两个虚拟主机的配置文件
<VirtualHost 192.168.108.160:80>
ServerName web1.magedu.com
DocumentRoot "/vhosts/web1/htdocs"
</VirtualHost>
<VirtualHost 192.168.108.161:80>
ServerName web2.magedu.com
DocumentRoot "/vhosts/web2/htdocs"
</VirtualHost>
#httpd -t 或者 #service httpd configtest //可以查看主配置文件语法是否正确
第二步:
#mkdir /vhosts/{web1,web2,web3,web4}/htdocs -pv //添加虚拟主机的 DocumentRoot
第三步:为虚拟主机配置访问页面
#vim /vhosts/web1/htdocs/index.html 添加:Page at web1
#vim /vhosts/web2/htdocs/index.html 添加:Page at web2
用浏览器输入网址192.168.108.160/161就可以访问了
---恢复内容结束---
9、日志设定
错误日志:
ErrorLog logs/error_log //这里使用了相对路径,相对于/etc/httpd/路径
LogLevel warn //定义日志记录级别,指明记录到那个级别,那么这个级别更高的日志级别都会被一并记录
日志级别:debug, info, notice, warn, error, crit, alert, emerg(默认是warn)
访问日志:
CustomLog logs/access_log combined //conbined是日志格式,就是下面
LogFormat "%h %l %u %t \"%r\" %>s %b \"%{Referer}i\" \"%{User-Agent}i\"" combined
%h:客户端IP地址;
%l: Remote logname (from identd, if supplied). “-”表示为空;
%u: Remote user,基于httpd的协议的basic或digist认证所实现的用户登陆(from auth; may be bogus if return status (%s) is 401);大多数为空
%t:Time the request was received (standard english format),服务器收到请求的时间;
%r:First line of request,请求报文的首行信息(method url version);
%>s: 响应状态码;status code
%b: 响应报文的大小,单位是字节,不包括响应报文首部;
%{Referer}i:请求报文当中"referer"首部的值;当前资源的访问入口,即从哪个页面中的超链接跳转而来;referer为空表示是从浏览器直接键入的,不是从超链接跳转的
%{User-Agent}i:请求报文当中"User-Agent"首部的值;即发出请求用到的应用程序;
详情:http://httpd.apache.org/docs/2.2/mod/mod_log_config.html#formats
示例:192.168.108.1 - - [31/May/2018:22:11:15 +0800] "GET / HTTP/1.1" 403 283 "-" "Mozilla/5.0 (Windows NT 10.0; WOW64; Trident/7.0; rv:11.0) like Gecko"
10、路径别名
DocumentRoot "/www/htocs"
http://www.magedu.com/download/bash-4.4.2-3.el6.x86_64.rpm
路径映射:--> /www/htdocs/download/bash-4.4.2-3.el6.x86_64.rpm
别名指访问一个路径时,这个路径应该在DocumentRoot下,但却被定向到别的位置:
Alias /URL/ "/PATH/TO/SOMEDIR/" //URL是原路径,后面为别名路径
示例:
Alias /bbs/ "/forum/htdocs" //定义bbs别名为/forum/htdocs
http://www.magedu.com/bbs/index.html
别名路径为:--> /forum/htdocs/bbs/ /在根目录下创建的forum,这里跟DocumentRoot没有关系
11、设定默认字符集
AddDefaultCharset UTF-8 //设定默认字符集
GBK, GB2312, GB18030 //这3个都是国标中文字符编码
12、基于用户的访问控制(重要)
1、认证质询:
WWW-Authenticate:响应码为401,拒绝客户端请求,并说明要求客户提供账号和密码;
2、认证:
Authorization:客户端用户填入账号和密码后再次发送请求报文;认证通过,则服务器发送响应的资源;
认证类型:
basic:明文认证
digest:消息摘要(经过md5加密)
安全域:需要用户认证后方能访问的路径;
应该通过名称对其进行标识,并用于告知用户认证的原因;
用户的账号和密码存储于何处?
虚拟账号:仅用于访问某服务时用到的认证标识;
存储://虚拟账号存储地方
文本文件
SQL数据库
ldap//轻量目录访问协议
nis
基于IP添加虚拟主机
第一步:先在httpd的主配置文件中添加配置
#vim /etc/httpd/conf/httpd.conf //在主配置文件的最后一行添加两个虚拟主机的配置文件
<VirtualHost 192.168.108.160:80>
ServerName web1.magedu.com
DocumentRoot "/vhosts/web1/htdocs"
</VirtualHost>
<VirtualHost 192.168.108.161:80>
ServerName web2.magedu.com
DocumentRoot "/vhosts/web2/htdocs"
</VirtualHost>
#httpd -t 或者 #service httpd configtest //可以查看主配置文件语法是否正确
第二步:
#mkdir /vhosts/{web1,web2,web3,web4}/htdocs -pv //添加虚拟主机的 DocumentRoot
第三步:为虚拟主机配置访问页面
#vim /vhosts/web1/htdocs/index.html 添加:Page at web1
#vim /vhosts/web2/htdocs/index.html 添加:Page at web2
用浏览器输入网址192.168.108.160/161就可以访问了
示例2:基于port
修改主配置文件,G跳转到最后一行
<VirtualHost 192.169.108.161:80>
ServerName web2.magedu.com
DocumentRoot "/vhosts/web2/htdocs"
</VirtualHost>
<VirtualHost 192.168.108.161:8080>
ServerName web3.magedu.com
DocumentRoot "/vhosts/web3/htdocs"
</VirtualHost>
这里添加了8080端口,上面的Listen也需要监听8080端口
Listen 8080
# vim /vhosts/web3/htdocs/index.html //给web3添加页面
这里必须重启httpd,因为这里改变了端口,reload已经不起作用了
在浏览器中键入http://192.168.108.161:8080就可以访问了
示例3:基于hostname
首先需要启用 NameVirtualHost *:80,改为 NameVirtualHost 192.168.108.160:80,要和下面<VittualHost>保持一致,表示基于主机名的虚拟主机,httpd2.2需要修改,httpd2.4就不需要了
VirtualHost 192.168.108.160:80>
ServerName web1.magedu.com
DocumentRoot "/vhosts/web1/htdocs"
</VirtualHost>
<VirtualHost 192.168.108.160:80>
ServerName web2.magedu.com
DocumentRoot "/vhosts/web2/htdocs"
</VirtualHost>
<VirtualHost 192.168.108.161:80>
ServerName web3.magedu.com
DocumentRoot "/vhosts/web3/htdocs"
</VirtualHost>
此时在浏览器中键入web1.magedu.com就可以访问web1 的页面,但是需要解析
这里就利用另外一个主机192.168.108.159进行解析
#vim /etc/hosts
192.168.108.160 web1.magedu.com
192.168.108.160 web2.magedu.com
192.168.108.161 web3.magedu.com
再利用命令curl进行解析,均有相应
#curl web1.magedu.com
#curl web2.magedu.com
#curl web3.magedu.com
每个虚拟主机都可以定义自己的日志
VirtualHost 192.168.108.160:80>
ServerName web1.magedu.com
DocumentRoot "/vhosts/web1/htdocs"
CustomLog logs/web1_access_log combined //这里logs是相对路径 在#ls /var/log/httpd,建议使用单独日志
</VirtualHost>
<VirtualHost 192.168.108.160:80>
ServerName web2.magedu.com
DocumentRoot "/vhosts/web2/htdocs"
CustomLog logs/web2_access_log combined
</VirtualHost>
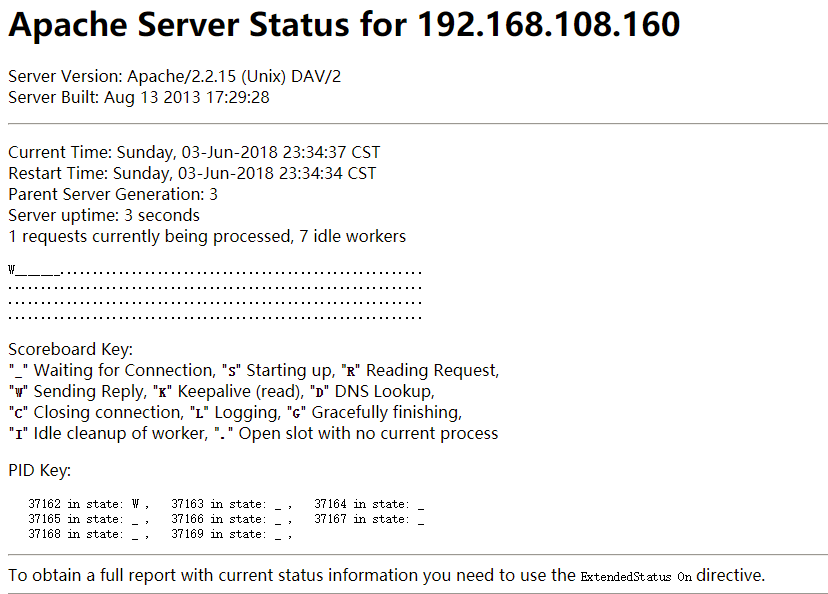
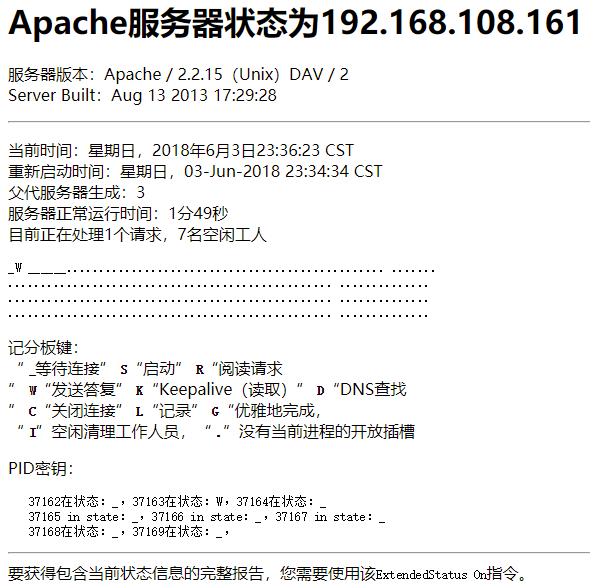
内置的status页面
#vim /httpd/conf/httpd.conf
<Location /server-status> //如果用户在浏览器中使用了server-status,它会调用一个叫server-status的headler来处理,并指明白名单
SetHandler server-status
Order deny,allow
Deny from all
Allow from 192.168.108
</Location>
#service httpd reload
在浏览器中键入http://192.168.108.160/server-status