Django基础一安装、创建项目和目录结构
Django基础一安装、创建项目和目录结构
目录
1. Django介绍
Django是一个开放源代码的Web应用框架,由Python写成。采用了MTV(model–template–views)的软件设计模式,即模型(Model),视图(View)和模板(Template)。它在开发初期用于管理劳伦斯出版集团旗下的一些以新闻为主的网站。Django于2005年7月在BSD许可证下发布,它的名字来源于比利时的吉普赛爵士吉他手金格·莱恩哈特。
官方网站:https://www.djangoproject.com/
1.1 安装Django
前提是已经默认安装完了Python,目前官方网站上Django和Python对应的版本:
| Django 版本 | Python 版本 |
|---|---|
| 1.8 | 2.7,3.2,3.3,3.4,3.5 |
| 1.9,1.10 | 2.7,3.4,3.5 |
| 1.11 | 2.7,3.4,3.5.3.6,3.7(1.11.17添加) |
| 2.0 | 3.4,3.5.3.6,3.7 |
| 2.1 | 3.5.3.6,3.7 |
| 2.2 | 3.5,3.6,3.7,3.8(2.2.8 添加),3.9(2.2.17 添加) |
| 3.0 | 3.6,3.7,3.8,3.9 (3.0.11 添加) |
| 3.1 | 3.6,3.7,3.8,3.9(3.1.3 添加) |
| 3.2 | 3.6, 3.7, 3.8, 3.9, 3.10 (在 3.2.9 中就已经加入了) |
| 4.0 | 3.8,3.9,3.10 |
1. Python版本:
python --version
Python 3.10.0
2. pip版本
pip --version
pip 22.0.3 from D:\Program Files\python\lib\site-packages\pip (python 3.10)
3.安装Djang
pip install Django==3.2(指定版本)

4.验证Django是否安装成功
python
>>> import django
>>> print(django.get_version())
3.2
1.2 利用Django创建项目
1.2.1 利用命令行创建
>django-admin startproject firstDjango  # 创建项目
>cd firstDjango		# 进入到项目目录
>python manage.py runserver		# 启动项目
'''
	python manage.py runserver 默认启动地址为:http://127.0.0.1:8000/
	如果想更换IP和端口:
		python manage.py runserver [ip:port]
		ip为自己设置的ip地址
		port为自己想设置的端口
'''
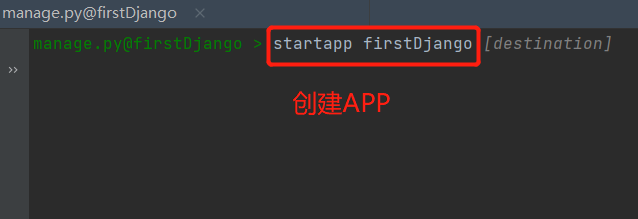
创建APP:
   	python manage.py startapp  app的名字
访问启动的Django:
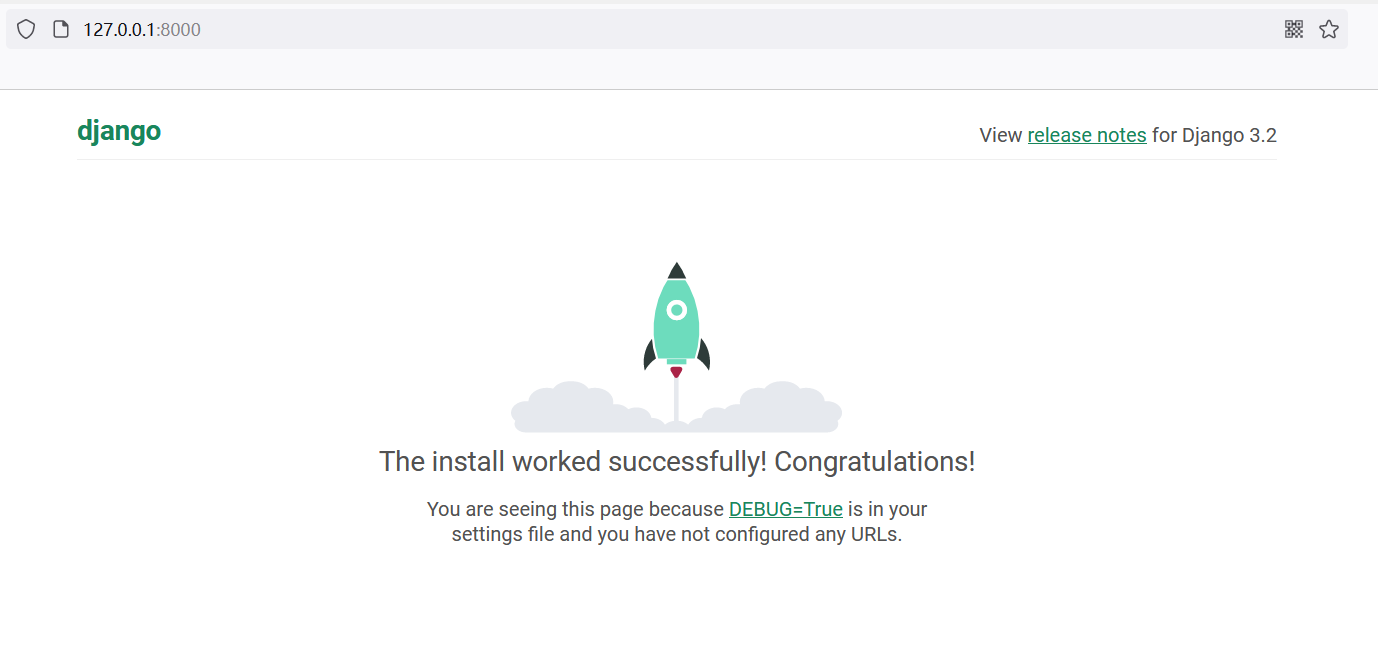
1.2.2 利用Pycharm创建
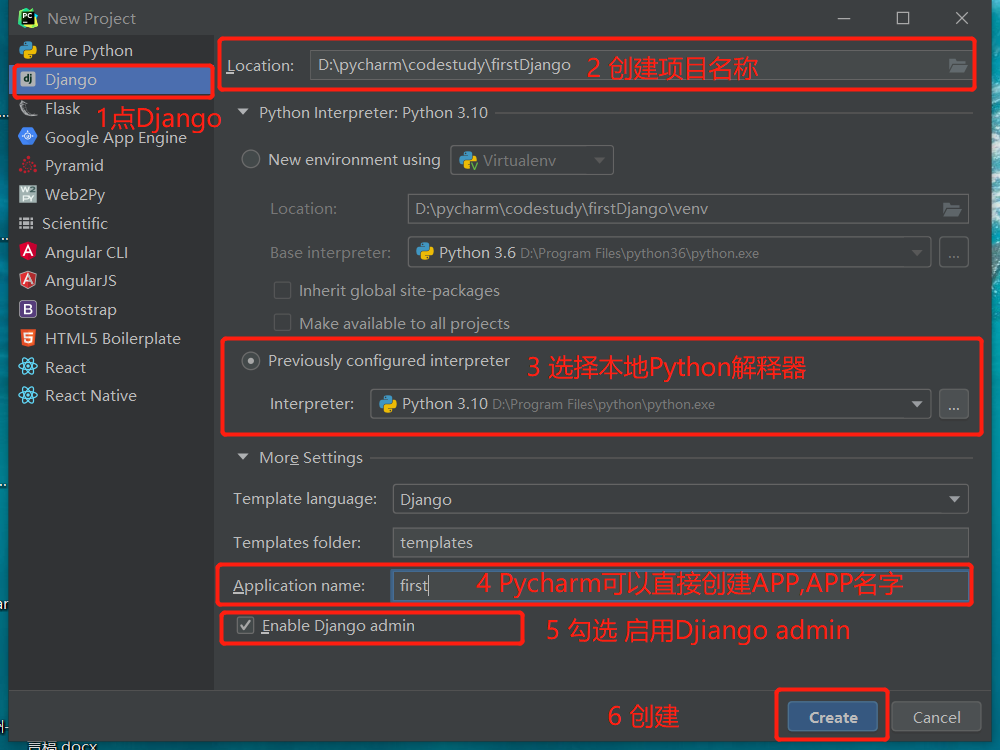
就创建好了,然后启动:
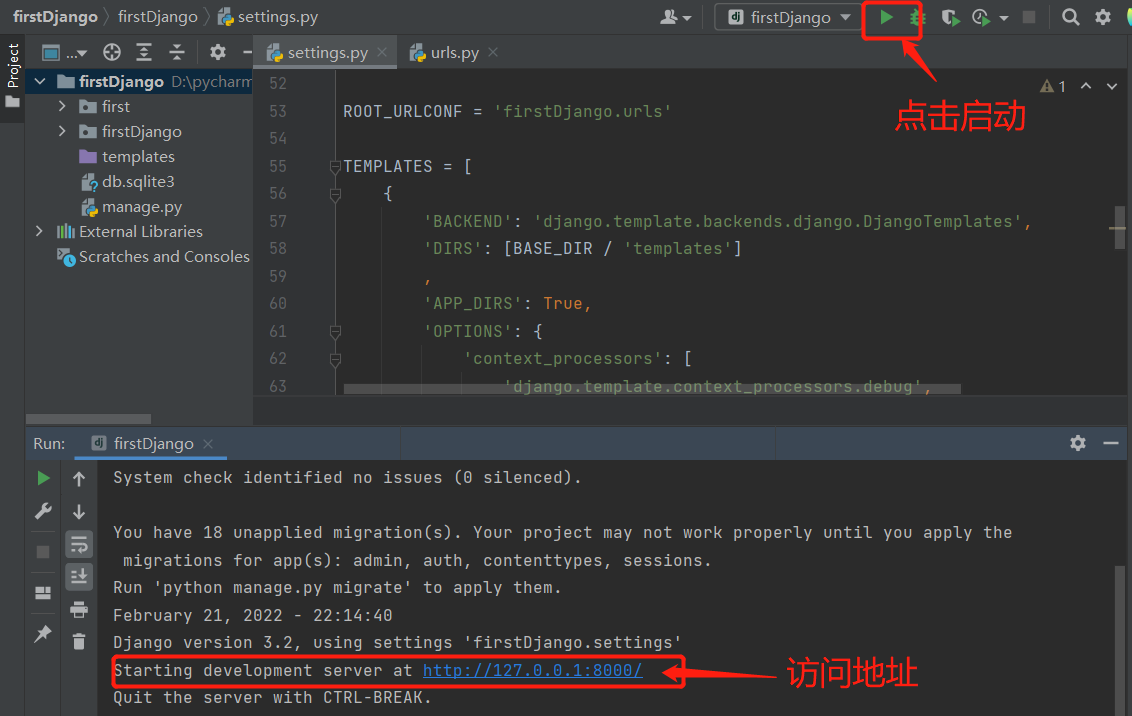
1.2.3 什么是APP
Django是专门开发APP的软件 。
那么Django中的APP是什么?
例子:
    利用Django创建了一个项目就相当于创建了一个大学,里面的APP就相当于是大学里面的学院。每个学院都可以有自己独立的功能和职责。

    还比如使用Django创建了一个电商网站,里面的APP就相当于是各项功能:
    订单功能
    购物车功能
    等等
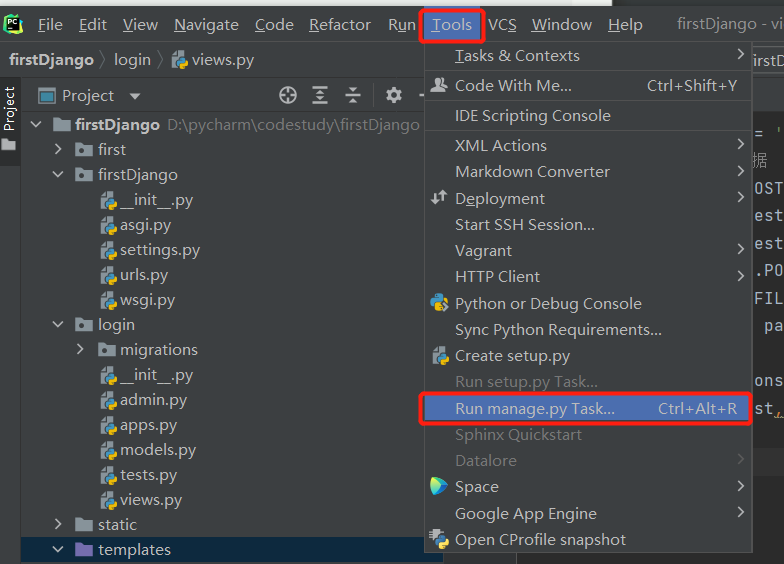
1.3 命令行创建和Pycharm创建Django的区别
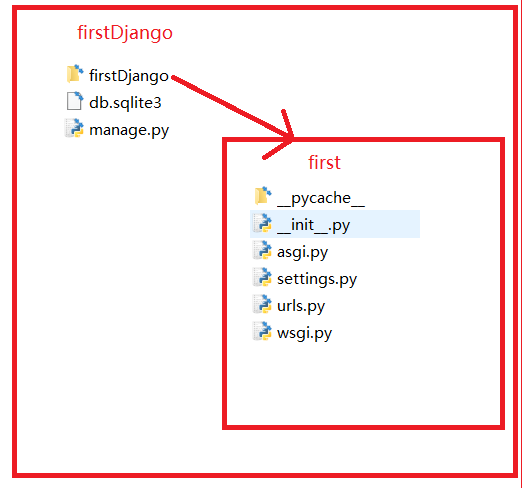
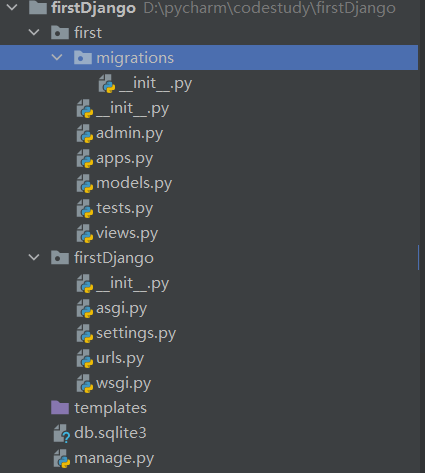
会发现Pycharm里面比命令行多了一个templates目录和fisrt目录,这两个目录是Pycharm 自动创建的。first目录就是app. 如果使用Pycharm创建项目的时候在Application name没有输入则不会自动创建APP,如果没有创建则可使用命令行自己创建:
python manage.py startapp first
这是目录上的差别,还有一处差别是settings.py文件中:
命令行安装settings.py:
    DEBUG = True   # 生产上把DEBUG改成false

	ALLOWED_HOSTS = []  # 在Linux环境部署时[*],代表谁都能访问

    INSTALLED_APPS = [
    'django.contrib.admin',
    'django.contrib.auth',
    'django.contrib.contenttypes',
    'django.contrib.sessions',
    'django.contrib.messages',
    'django.contrib.staticfiles',
]

    TEMPLATES = [
    {
        'DIRS': [],

Pycharm安装:
settings.py:
    INSTALLED_APPS = [
    'django.contrib.admin',
    'django.contrib.auth',
    'django.contrib.contenttypes',
    'django.contrib.sessions',
    'django.contrib.messages',
    'django.contrib.staticfiles',
    'first.apps.FirstConfig',
]
    TEMPLATES = [
    {
        'DIRS': [BASE_DIR / 'templates']

#  Pycharm里面:
        INSTALLED_APPS: 多了一行'first.apps.FirstConfig',
        TEMPLATES:DIRS里面有数据,'DIRS': [BASE_DIR / 'templates']


INSTALL_APPS是注册,'''我们创建的app一定要去settings文件中INSTALL_APPS里注册才能生效'''

    INSTALLED_APPS = [
    'django.contrib.admin',
    'django.contrib.auth',
    'django.contrib.contenttypes',
    'django.contrib.sessions',
    'django.contrib.messages',
    'django.contrib.staticfiles',
    'first.apps.FirstConfig', # 这是完整写法
    'first' # 这是简称
]
这两种写法都可以


TEMPLATES  'DIRS': [BASE_DIR / 'templates']   '''指定template的目录,这个目录主要是放网页文件的。不加的找不到这个目录'''

        1.x 版本:
        'DIRS': [os.path.join(BASE_DIR,'templates')]

"""
总结:
命令行不会自动创建templates模板文件夹
命令行不会自动在配置文件中配置模板文件夹路径
命令行也不会自动创建APP
"""
1.4 Django目录结构
\firstDjango 		# 项目名
├─first    			# 应用名目录
│  ├─migrations		# 用来存储数据库相关(类似操作日志)
│  │  └─__init.py__
│  └─__admin.py		# Django的后台管理
│  └─__apps.py		# 注册APP
│  └─__models.py	# 数据库相关(模型层)
│  └─__tests.py		# 测试文件
│  └─__views.py		#  视图函数(视图层)
│  └─__init__.py
├─firstDjango   	# 和项目同名目录
│  └─__asgi.py  	# 为了支持异步网络服务器和应用而新出现的 Python 标准。
│  └─__settings.py	# Django给用户配置的配置文件
│  └─__urls.py		# 路由与视图函数(可是函数,也可以是类)对应关系(路由层)
│  └─__wsgi.py		# wsgiref模块,Django主要的部署方式
│  └─__init__.py
├─manage.py   		# Django入口文件
├─db.sqlite3		# Django自带的数据库
└─templates			# 模板目录存储HTML目录(模板层)
1.5 Django必会
**HttpResponse **
HttpResponse # 返回字符串
    """要返回字符串使用:HttpResponse"""
    # 要增加一个访问地址:http://127.0.0.1:8000/index
    1, 要在路由与视图函数对应关系的urls.py里导入first这个APP
    """
    from django.contrib import admin
    from django.urls import path
    from first import views

    urlpatterns = [
        path('admin/', admin.site.urls),
        path('index/', views.index),
    ]
    """

    2, 要在views.py里增具体的的处理函数
    """
    from django.shortcuts import render,HttpResponse

    # Create your views here.

    def index(request):
        return  HttpResponse("Hello Django")

    """
render
render # 返回html页面
urls.py:
"""
    from django.contrib import admin
    from django.urls import path
    from first import views

    urlpatterns = [
        path('admin/', admin.site.urls),
        path('html/', views.web),

    ]
"""
views.py:
    """
    from django.shortcuts import render
	def web(request):
        return render(request, 'test.html')
    """

templates目录:
    text.html
"""
<!DOCTYPE html>
<html lang="en">
<head>
    <meta charset="UTF-8">
    <title>Title</title>
</head>
<body>
    <h1>返回的第一个HTML页面</h1>
</body>
</html>
"""

也可以从后端拿值在页面上显示:
    views.py
    """
    from django.shortcuts import render,HttpResponse

    def html(request):
        flist = [1,2,3,4,5]
        return render(request, 'test.html',{'flist':flist})
    """
    text.html
    """
    <!DOCTYPE html>
    <html lang="en">
    <head>
        <meta charset="UTF-8">
        <title>Title</title>
    </head>
    <body>
        <h1>返回的第一个HTML页面</h1>
        <table >
        <thead>
        <tr>
            <th>id</th>
        </tr>
        </thead>
        <tbody>
            {% for foo in flist %}
            <tr>
                <td>{{ foo }}</td>
            </tr>
            {% endfor %}
        </tbody>
    </table>
    </body>
    </html>
    """

locals()  #查看全部局部变量
globals() #查看全部全局蛮
redirct
redirct:重定向

urls.py
"""
from django.contrib import admin
from django.urls import path
from first import views

urlpatterns = [
    path('admin/', admin.site.urls),
    path('index/', views.index),
    path('html/', views.html),
    path('web/', views.web),

]

"""
views.py
"""
from django.shortcuts import render,redirect
def web(request):
    return redirect('http://www.pymysql.com')

"""
访问http://127.0.0.1:8000/web就会跳到http://www.pymysql.com
2 练习把数据库中的某个表的数据在通过Django展示出来
数据库:
    1. 创建数据库:
        create database firstDjango
    2. 创建表:
        create table test1(id int, name varchar(255), age int);
    3. 插入数据:
    insert into test1 values(1,'Hans', 18),(2,'Hello', 20),(3,'Hi', 30);
    (省略创建远程连接用户和授权步骤)

Django:

firstDjango目录
urls.py
	"""
	from django.contrib import admin
    from django.urls import path
    from first import views

    urlpatterns = [
    path('admin/', admin.site.urls),
    path('db/', views.db),
	]
	"""
first目录
views.py
"""
def mysqlData():
    from django.shortcuts import render,HttpResponse,redirect
    import pymysql

	def mysqlData():   # 获取数据库数据
    conn = pymysql.connect(
        host='192.168.1.109',
        user='root',
        password='123456',
        port=3306,
        database='firstDjango',
        charset='utf8'
    )
    cursor = conn.cursor(pymysql.cursors.DictCursor)
    sql='select * from test1'
    cursor.execute(sql)
    data = cursor.fetchall()
    return data

def db(request):
    data = mysqlData()
    return render(request, 'db.html',{"data":data})

"""

templates目录下:
    db.html
    """
    <!DOCTYPE html>
    <html lang="en">
    <head>
        <meta charset="UTF-8">
        <title>Title</title>
        <script src="https://cdn.bootcdn.net/ajax/libs/jquery/3.4.1/jquery.min.js"></script>
        <link href="https://cdn.bootcdn.net/ajax/libs/twitter-bootstrap/3.4.1/css/bootstrap.min.css" rel="stylesheet">
        <script src="https://cdn.bootcdn.net/ajax/libs/twitter-bootstrap/3.4.1/js/bootstrap.min.js"></script>
    </head>
    <body>
    <div class="container">
       <table class="table table-striped table-hover">
            <thead>
            <tr>
                <th>id</th>
                <th>name</th>
                <th>age</th>
            </tr>
            </thead>
            <tbody>
                {% for foo in data %}
                <tr>
                    <td class="success">{{ foo.id }}</td>
                    <td class="warning">{{ foo.name }}</td>
                    <td class="danger">{{ foo.age }}</td>
                </tr>
                {% endfor %}
            </tbody>
        </table>
    </div>
    </body>
    </html>

    """
访问:


 浙公网安备 33010602011771号