
第12章intofy工具实时同步方案
12.1实时同步的原理与企业应用场景

12.2inotify介绍及数据同步原理
12.2.1 inotfy简介
Inotfy是一种强大的,细粒度的,异步的文件系统时间监控机制,linux内核从2.6.13起加入Inotify支持,通过Inotify可以监控文件系统中的添加,删除,修改,移动等各种事件,利用这个内核接口,第三方软件就可以监控文件系统下文件的各种变化情况,而Inotify-tools正是 这样的监控软件。
12.2.2 Inotify的工作机制
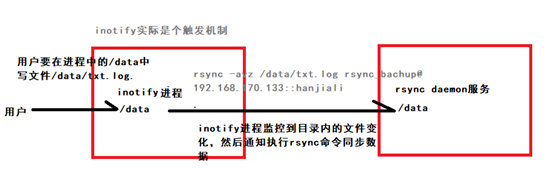
12.2.2 系统架构拓扑
- 准备条件
只有rsync配置成功后。才可以配置inoify服务,而且此服务只能配置在客户端上。
1) Uname -r查看内核是否满足要求 32
2) ls -l /proc/sys/fs/inotify/ 查看是否支持inotify服务
3) 最重要的一点。只有配置了rsync成功之后,可以推拉,才能在客户端配置inotify服务。
- 下载inotify源码包(最好将它放入一个文件夹中)
检查是否有安装inotify 如果没有就安装
rpm -qa inotify-tools
没有就先安装epol源
wget -O/etc/yum.repos.d/epel.repo http://mirrors.aliyun.com/repo/epel-6.repo
之后安装
yum install inotify-tools –y
- 编译安装inotify(第二步和第三步二选一安装就0K)
上传文件:
[root@client tools]# tar zxf inotify-tool-3.14.tar.gz   //上传文件之后解压
[root@client tools]# cd inotify-tools-3.14
[root@client tools]# ./configure -prefix=/usr/local/inotify-tools-3.14   //安装地点
[root@client tools]# make && make install
[root@client tools]# cd../
[root@client tools]# echo $?                  //检查上一步是否有错
0
创建软链接
[root@client ~]# ln -s /usr/share/doc/inotify-tools-3.14 /usr/local/inotify
[root@client ~]# cd /usr/local/inotify
[root@client inotify]# ls -l
总用量 32
-rw-r--r--. 1 root root    39 3月  12 2010 AUTHORS
-rw-r--r--. 1 root root     0 3月  12 2010 ChangeLog
-rw-r--r--. 1 root root 17999 3月  12 2010 COPYING
-rw-r--r--. 1 root root    48 3月  12 2010 NEWS
-rw-r--r--. 1 root root   246 3月  12 2010 README
人工测试监控事件
1) 测试create
[root@client ~]# /bin/inotifywait -mrq --timefmt '%d/%m/%y %H:%M' --format '%T %w%f' -e create /backup
重新开启一个窗口,进入目录创建文件:
      Last login: Wed Oct 16 21:48:17 2019 from 192.168.170.19
[root@client ~]# cd /backup/
[root@client backup]# ls
[root@client backup]# touch test.txt
[root@client backup]#
回到原来的窗口会出现下面的情况:
2) 测试删除
在旧窗口上监听删除
[root@client ~]# /bin/inotifywait -mrq --timefmt '%d/%m/%y %H:%M' --format '%T %w%f' -e create,delete /backup
新窗口上
rm -f test.txt
3) 测试close_write(写功能)
旧窗口
[root@client ~]# /bin/inotifywait -mrq --timefmt '%d/%m/%y %H:%M' --format '%T %w%f' -e create,delete,close_write /backup
新窗口:创建文件并写入内容
[root@client backup]# touch a.log
[root@client backup]# echo 111 >a.log
监控是可以并行触发的,创建文件时,creat监控一次,close_write监控一次,所以出现两次,编写文件又出现一次,一共三次。
4) 简化
[root@client ~]# /bin/inotifywait -mrq --format '%w%f' -e create,delete,close_write /backup
- 同步测试
[root@client ~]# mkdir /server/scripts -p
[root@client ~]# cd /server/scripts
[root@client scripts]# vim /inotify.sh
#!/bin/sh
cmd="/bin/inotifywait"
$cmd -mrq --format '%w%f' -e create,delete,close_write /backupwhile read line
do
    rsync -az $line rsync_backup@192.168.170.133::hanjiali --password-file=/etc/rsync.password
done
[root@client scripts]# sh -x inotify.sh    //查看脚本输出过程
到上次的新窗口(backup])
[root@client backup]# touch hanjiali.log
到服务器查看:
[root@server ~]# ls
anaconda-ks.cfg  hanjiali  hanjialii.log  hanjiali.txt
