ReactNative开发总结
https://www.jianshu.com/u/b09c3959ab3b
ReactNative之项目结构介绍
- 一、初始化ReactNative工程
- 自动创建iOS和安卓工程,和对应的JS文件,index.ios.js,index.android.js
- 并且通过Npm加载package.json中描述的第三方框架,放入node_modules文件夹中
react-native init ReactDemo
- 二、打开iOS工程,找到AppDelegate.m文件,查看程序启动完成
- 注意:加载控件方法(initWithBundleURL:moduleName:initialProperties:launchOptions:)
moduleName不能乱传,必须跟js文件中注册的模块名字保持一致
- (BOOL)application:(UIApplication *)application didFinishLaunchingWithOptions:(NSDictionary *)launchOptions
{
  NSURL *jsCodeLocation;

  // 1.获取js文件url
  jsCodeLocation = [[RCTBundleURLProvider sharedSettings] jsBundleURLForBundleRoot:@"index.ios" fallbackResource:nil];

  // 2.加载控件
  RCTRootView *rootView = [[RCTRootView alloc] initWithBundleURL:jsCodeLocation
                                                      moduleName:@"ReactDemo"
                                               initialProperties:nil
                                                   launchOptions:launchOptions];
  rootView.backgroundColor = [[UIColor alloc] initWithRed:1.0f green:1.0f blue:1.0f alpha:1];

  // 3.创建窗口
  self.window = [[UIWindow alloc] initWithFrame:[UIScreen mainScreen].bounds];
  UIViewController *rootViewController = [UIViewController new];

  // 4.设置窗口根控制器的View
  rootViewController.view = rootView;
  self.window.rootViewController = rootViewController;

  // 5.显示窗口
  [self.window makeKeyAndVisible];

  return YES;
}
-
三、打开index.ios.js文件,使用webStorm打开。webStorm代码提示
- iOS程序一启动,就会加载这个文件,去创建组件,并且把加载完的组件显示到界面上
-
index.ios.js实现步骤
- 1.加载React模块,因为需要用到JSX,加载Compoent,需要用到里面的Compoent组件
- React默认组件,Compoent非默认组件,都在react文件夹中。
- 2.加载AppRegistry,StyleSheet,Text,View原生组件,在react-native文件夹中
- 3.自定义组件,作为程序入口组件
- 4.创建样式表
- 5.注册组件,程序入口,程序一启动就会自动加载注册组件.
- 1.加载React模块,因为需要用到JSX,加载Compoent,需要用到里面的Compoent组件
// 1.加载React,Componet组件
import React,{compoent} from 'react'

// 2.加载原生组件
import
{
    AppRegistry,
    StyleSheet,
    View,
    Text
}
from 'react-native'

// 3.自定义组件,作为程序入口组件
export default class ReactDemo extends Component {

    // 当加载组件的时候,就会调用render方法,去渲染组件
    render(){
        return (
            <View style={styles.mainStyle}>

            </View>
        )
    }
}

// 4.创建样式表
// 传入一个样式对象,根据样式对象中的描述,创建样式表
var styles = Stylesheet.create({
    mainStyle:{
        flex:1,
        backgroundColor:'red'
    }
})

// 5.注册组件,程序入口
// 第一个参数:注册模块名称
// 第二个参数:函数, 此函数返回组件类名, 程序启动就会自动去加载这个组件
AppRegistry.registerComponent('ReactDemo',()=>ReactDemo)
ReactNative语法
- 对于第一次接触ReactNative的同学,最痛苦的是什么时候使用{},什么时候使用(),当然我也经历过那段时间,为此简单总结了下。
- ReactNative中,使用表达式的时候需要用{}包住
style={styles.mainStyle}
- ReactNative中,在字符串中使用变量的时候,需要用{}包住
var str = 'hello'
<Text>{str}</Text>
- ReactNative中,对象,字典需要用{}包住
- style = {},最外层表达式,用{}包住
- {flex:1},对象,用{}包住
<View style={{flex:1}}></View>
- 创建组件<View></View>,必须要用()包住
- 因此只要返回组件,都需要用()
    render(){
        return (
            <View style={styles.mainStyle}>

            </View>
        )
    }
一、ReactNative之CSS布局
- 一款App要想吸引人的眼球,必须要有好的界面布局,一直以来我的风格都是根据需求讲解,接下来本篇文章将通过需求给大家介绍ReactNative中的布局
- ReactNative支持CSS中的布局属性,因此可以使用CSS布局属性
- CSS颜色大全,下面会用到,点击这CSS颜色代码大全
1.1 视图边框
- 什么时候使用?想设置自己周边有边框的时候
- 注意点:
一定要设置边框宽度
borderBottomWidth number 底部边框宽度
borderLeftWidth number 左边框宽度
borderRightWidth number 右边框宽度
borderTopWidth number 顶部边框宽度
borderWidth number 边框宽度
border<Bottom|Left|Right|Top>Color 各方向边框的颜色,<>表示连着一起,例如borderBottomColor
borderColor 边框颜色
1.2 尺寸
width number
height number
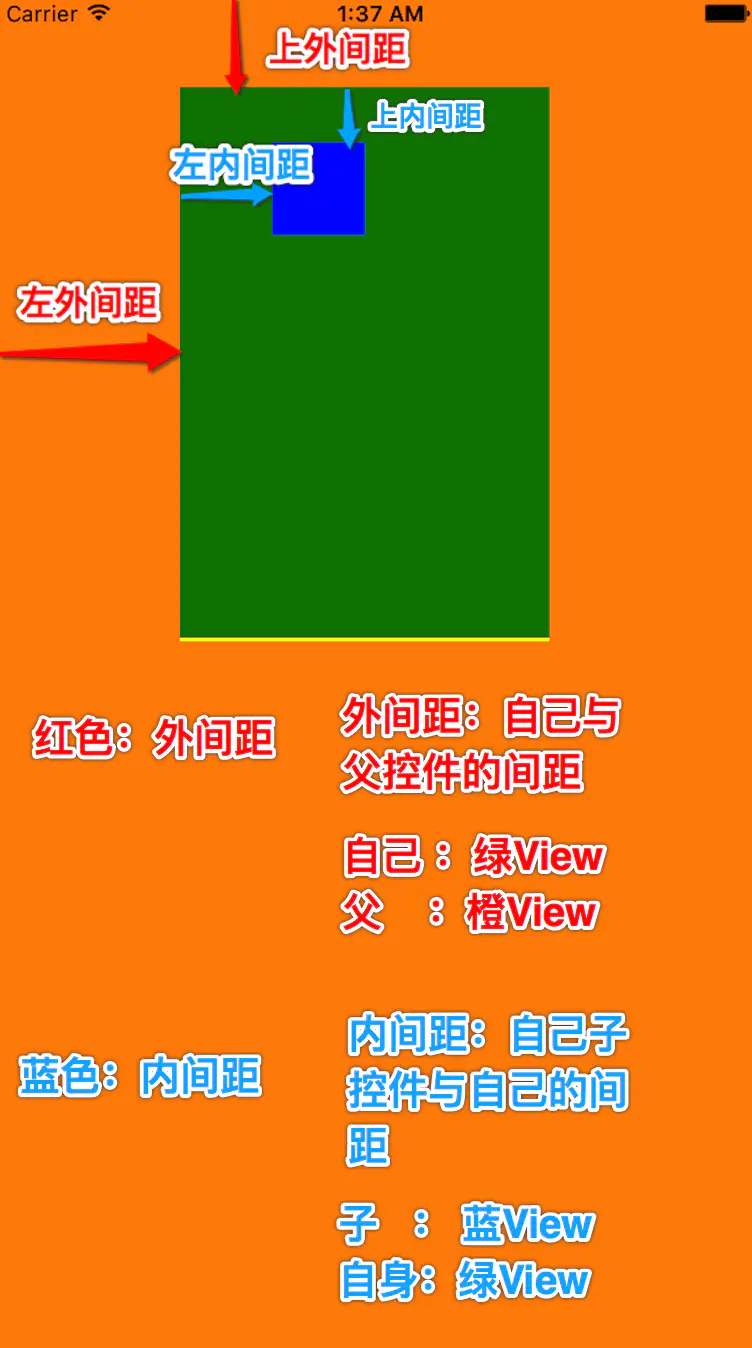
1.3 外边距
- 设置组件与组件之间的间距
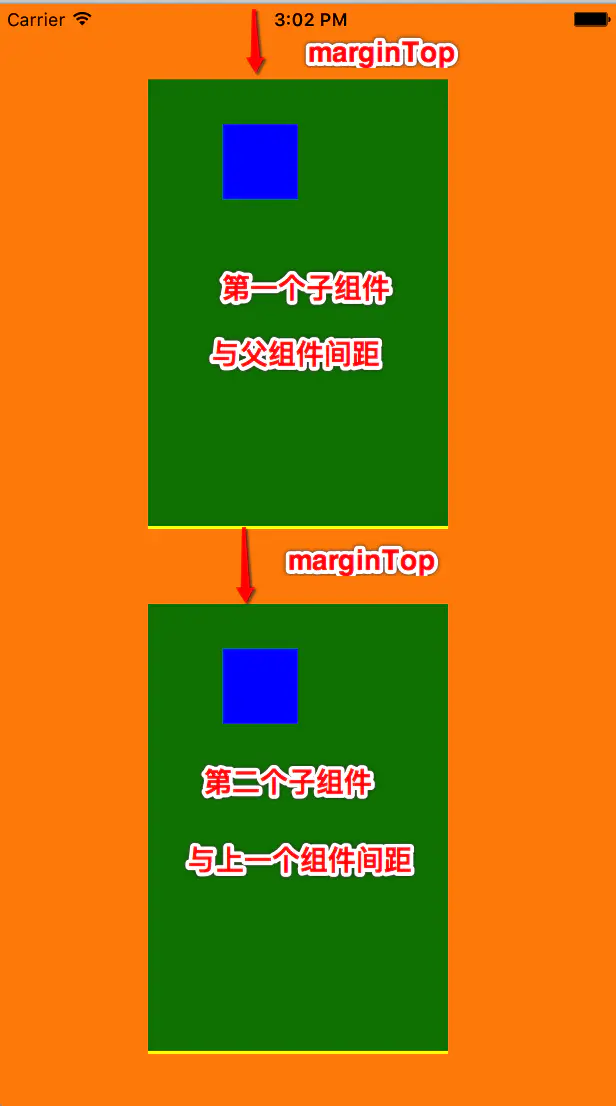
- 注意:第一个组件比较特殊,参照父组件,与父控件之间的间距。
- 其他组件间距,相对于上一个组件
- 什么时候使用?想设置自己在父控件的位置的时候使用
margin number 外边距
marginBottom number 下外边距
marginHorizontal number 左右外边距
marginLeft number 左外边距
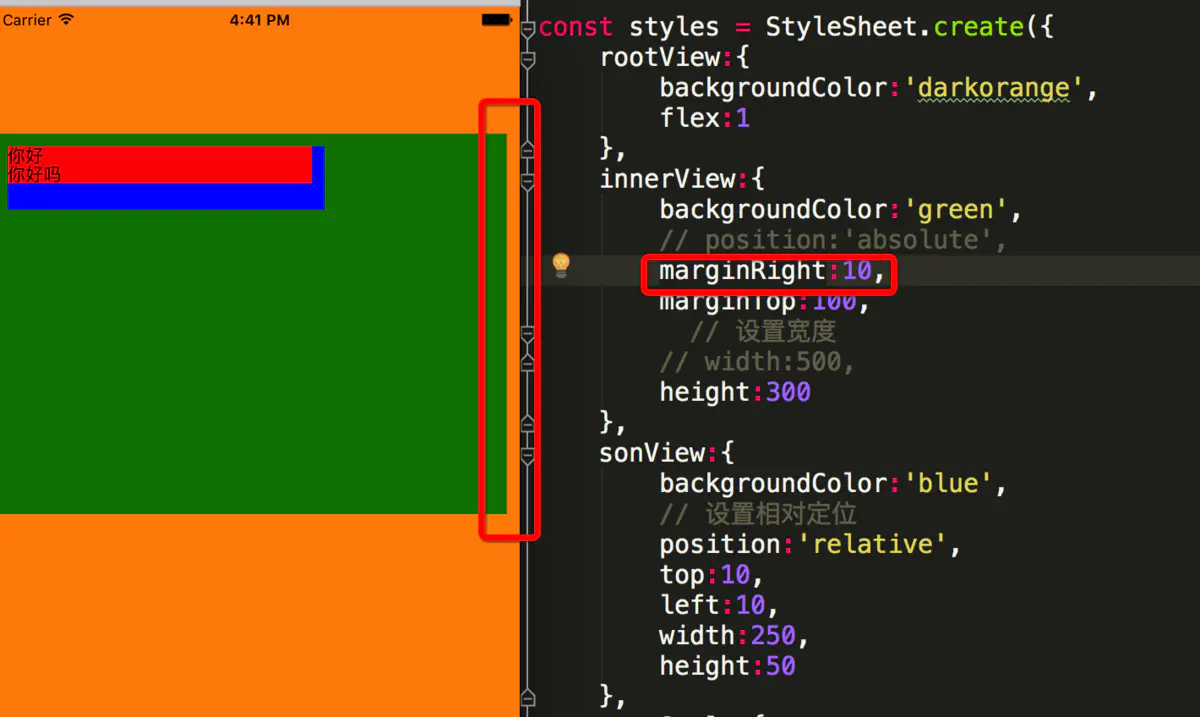
marginRight number 右外边距
marginTop number 上外边距
marginVertical number 上下外边距
- 注意marginRight和width冲突,如果设置了width,marginRight无效。
- 正确做法
1.4 内边距
- 设置子控件与当前控件的位置
- 什么时候使用?想设置自己的子控件相对自己的位置的时候使用
padding number 内边距
paddingBottom number 下内边距
paddingHorizontal number 左右内边距
paddingLeft number 做内边距
paddingRight number 右内边距
paddingTop number 上内边距
paddingVertical number 上下内边距
1.5 一个子组件代码演示
- 渲染组件
export default class ReactDemo extends Component {
  render() {
    return (
      <View style={styles.rootView}>
          <View style={styles.innerView}>
              <View style={styles.paddingView}></View>
          </View>
      </View>
    );
  }
}
- 样式描述
const styles = StyleSheet.create({
    rootView:{
        backgroundColor:'darkorange',
        flex:1
    },
    innerView:{
        backgroundColor:'green',
        // 设置底部边框,一定要设置宽度才行
        borderBottomColor:'yellow',
        borderBottomWidth:2,
        // 设置外间距
        marginTop:50,
        marginLeft:100,
        // 设置内间距
        paddingTop:30,
        paddingLeft:50,
        // 设置宽度
        width:200,
        height:300
    },
    paddingView:{
        backgroundColor:'blue',
        width:50,
        height:50
    }
});
- 一个子组件运行效果
1.6 二个子组件代码演示
- 渲染组件
  render() {
    return (
      <View style={styles.rootView}>
          <View style={styles.innerView}>
              <View style={styles.paddingView}></View>
          </View>
          <View style={styles.innerView}>
              <View style={styles.paddingView}></View>
          </View>
      </View>
    );
  }
}
- 样式描述
const styles = StyleSheet.create({
    rootView:{
        backgroundColor:'darkorange',
        flex:1
    },
    innerView:{
        backgroundColor:'green',
        // 设置底部边框
        borderBottomColor:'yellow',
        borderBottomWidth:2,
        // 设置外间距
        marginTop:50,
        marginLeft:100,
        // 设置内间距
        paddingTop:30,
        paddingLeft:50,
        // 设置宽度
        width:200,
        height:300
    },
    paddingView:{
        backgroundColor:'blue',
        width:50,
        height:50
    }
});
- 两个子组件运行效果
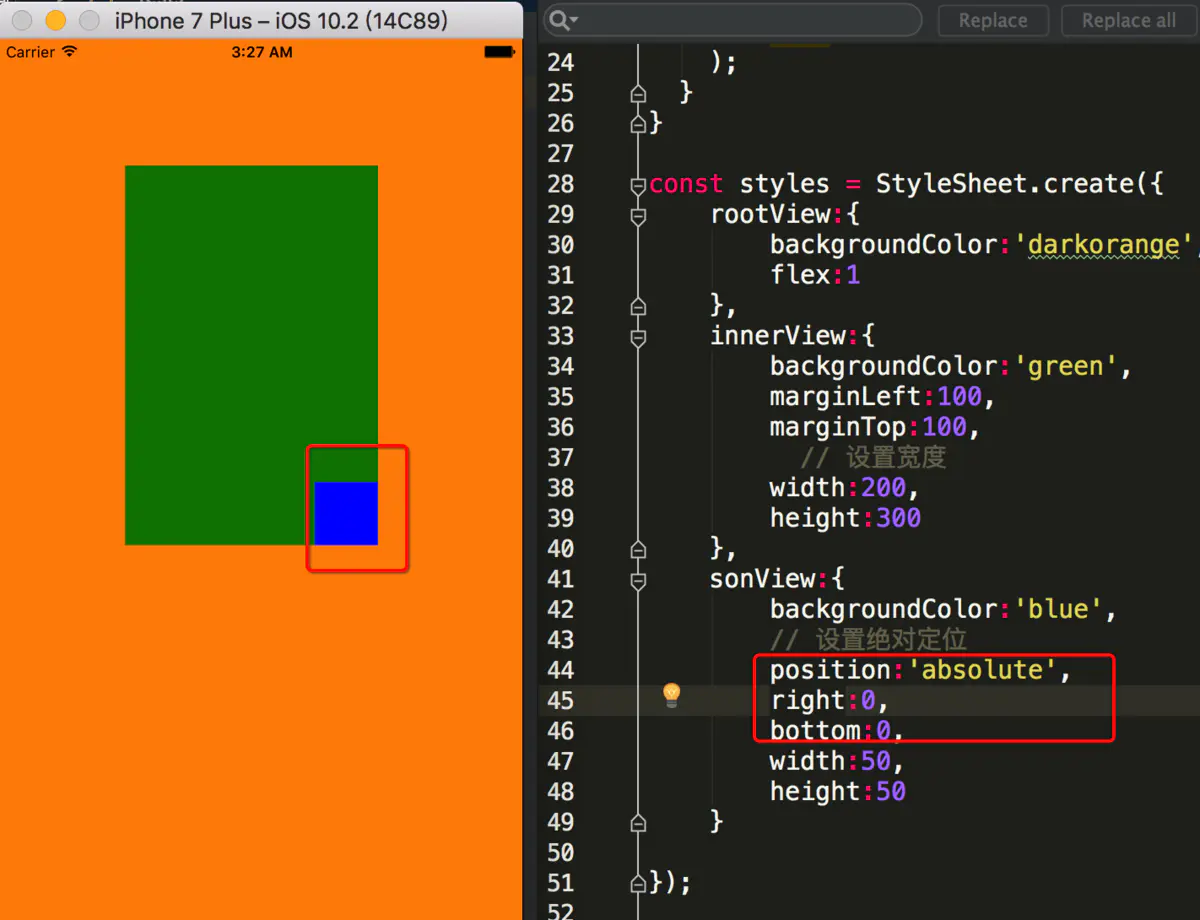
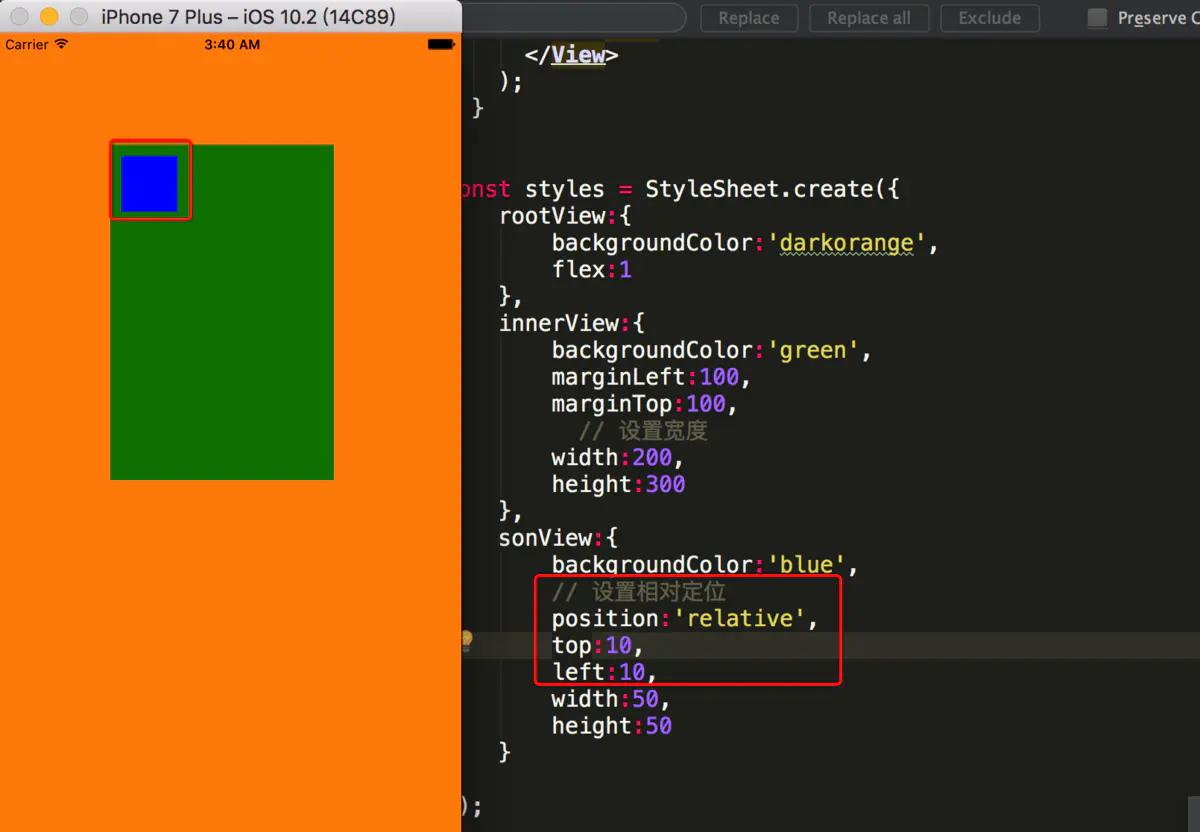
相对定位和绝对定位
- 边缘
left   number  左边缘。
right  number  右边缘。
top    number  顶部边缘。
bottom number  底部边缘。
- 定位(position):
- 通过 "left", "top", "right" 以及 "bottom" 边缘属性进行定位。
absolute:绝对定位,参照父控件位置定位
relative:相对定位,参照当前控件原始位置定位
- 什么时候使用绝对定位,当想把一个已经设置了宽度的控件快速的放在左下角,右下角的时候,可以使用绝对定位。
- 什么时候使用相对定位,当想相对自己做出一些改变的时候,采用相对定位,比如相对自己,往下移动一点
ReactNative之Flex布局
- 一般使用ReactNative开发App,一般都采用Flex布局,使用这套布局就非常快。
Flex简介
- Flex又叫弹性布局,会把当前组件看做一个容器,他的所有子组件都是他容器中的成员,通过Flex,就能迅速的布局容器中的成员。
- 使用场景:当想快速布局一个组件中所有子组件的时候,可以使用Flex布局
Flex主轴和侧轴
- Flex中有两个主要的概念:主轴和侧轴
- 主轴与侧轴的关系:相互垂直的。
- 主轴:决定容器中子组件默认的布局方向:水平,垂直
- 侧轴:决定容器中子组件与主轴垂直的布局方向
- 比如主轴水平,那么子组件默认就是水平布局排布,侧轴就是控制子组件在垂直方向的布局
flexDirection属性
- flexDirection:决定主轴的方向,水平或者垂直,这样子组件就会水平排布或者垂直排布
- flexDirection共有四个值,在RN中默认为column。
row(默认值):主轴为水平方向,从左向右。依次排列
row-reverse:主轴为水平方向,从右向左依次排列
column:主轴为垂直方向,默认的排列方式,从上向下排列
column-reverse:主轴为垂直方向,从下向上排列
- 使用
export default class ReactDemo extends Component {
  render() {
    return (
      <View style={styles.rootView}>
          <Text style={[styles.text1Style,styles.baseTextStyle]}>1</Text>
          <Text style={[styles.text1Style,styles.baseTextStyle]}>2</Text>
          <Text style={[styles.text2Style,styles.baseTextStyle]}>3</Text>
          <Text style={[styles.text3Style,styles.baseTextStyle]}>4</Text>
      </View>
    );
  }
}

const styles = StyleSheet.create({
    rootView:{
        backgroundColor:'darkorange',
        flex:1,
        flexDirection:'row'
    },
    baseTextStyle:{
        backgroundColor:'deepskyblue',
        width:50,
        height:50,
        fontSize:15,
        textAlign:'center',
        margin:20,
    }
});
- 效果:
- row

row.png
- row-reverse

row-reverse.png
- column

column.png
- column-reverse

column-reverse .png
flexWrap属性
- flexWrap:决定子控件在父视图内是否允许多行排列。
- flexWrap共有两个值,默认为nowrap。
nowrap 组件只排列在一行上,可能导致溢出。
wrap   组件在一行排列不下时,就进行多行排列
- 使用
  render() {
    return (
      <View style={styles.rootView}>
          <Text style={[styles.text1Style,styles.baseTextStyle]}>1</Text>
          <Text style={[styles.text1Style,styles.baseTextStyle]}>2</Text>
          <Text style={[styles.text2Style,styles.baseTextStyle]}>3</Text>
          <Text style={[styles.text3Style,styles.baseTextStyle]}>4</Text>
      </View>
    );
  }
}

const styles = StyleSheet.create({
    rootView:{
        backgroundColor:'darkorange',
        flex:1,
        flexDirection:'row',
        flexWrap:'wrap'
    },
    baseTextStyle:{
        backgroundColor:'deepskyblue',
        width:75,
        height:50,
        fontSize:15,
        textAlign:'center',
        margin:20,
    }
});
- 效果
- nowrap

nowrap.png
- wrap

wrap.png
justifyContent
- justifyContent:决定子组件在主轴中具体布局,是靠左,还是居中等
- justifyContent共有五个值,默认为flex-start
flex-start: 子组件向主轴起点对齐,如果主轴水平,从左开始,主轴垂直,从上开始。
flex-end 子组件向主轴终点对齐,如果主轴水平,从右开始,主轴垂直,从下开始。
center 居中显示,注意:并不是让某一个子组件居中,而是整体有居中效果
space-between 均匀分配,相邻元素间距离相同。每行第一个组件与行首对齐,每行最后一个组件与行尾对齐。
space-around 均匀分配,相邻元素间距离相同。每行第一个组件到行首的距离和每行最后一个组件到行尾的距离将会是相邻元素之间距离的一半
- 使用
export default class ReactDemo extends Component {
  render() {
    return (
      <View style={styles.rootView}>
          <Text style={[styles.text1Style,styles.baseTextStyle]}>1</Text>
          <Text style={[styles.text1Style,styles.baseTextStyle]}>2</Text>
          <Text style={[styles.text2Style,styles.baseTextStyle]}>3</Text>
          <Text style={[styles.text3Style,styles.baseTextStyle]}>4</Text>
      </View>
    );
  }
}

const styles = StyleSheet.create({
    rootView:{
        backgroundColor:'darkorange',
        flex:1,
        flexDirection:'row',
        justifyContent:'space-around'
    },
    baseTextStyle:{
        backgroundColor:'deepskyblue',
        width:50,
        height:50,
        fontSize:15,
        textAlign:'center',
        marginTop:20,
    }
});
- 效果
- flex-start

flex-start.png
- flex-end

flex-end.png
- center

center.png
- space-between

space-between .png
- space-around

space-around.png
alignItems
- alignItems:决定子组件在测轴中具体布局
- 一直都没有管过侧轴,如果侧轴垂直,决定子组件在上,还是下,或者居中
- alignItems共有四个值,默认为stretch。
flex-start 子组件向侧轴起点对齐。
flex-end 子组件向侧轴终点对齐。
center 子组件在侧轴居中。
stretch 子组件在侧轴方向被拉伸到与容器相同的高度或宽度。
- 使用
  render() {
    return (
      <View style={styles.rootView}>
          <Text style={[styles.text1Style,styles.baseTextStyle]}>1</Text>
          <Text style={[styles.text1Style,styles.baseTextStyle]}>2</Text>
          <Text style={[styles.text2Style,styles.baseTextStyle]}>3</Text>
          <Text style={[styles.text3Style,styles.baseTextStyle]}>4</Text>
      </View>
    );
  }
}

const styles = StyleSheet.create({
    rootView:{
        backgroundColor:'darkorange',
        flex:1,
        flexDirection:'row',
        justifyContent:'space-around',
        alignItems:'stretch'
    },
    baseTextStyle:{
        backgroundColor:'deepskyblue',
        width:50,
        // height:50,
        fontSize:15,
        textAlign:'center',
        marginTop:20,
    }
});
- 效果
- flex-start

flex-start .png
- flex-end

flex-end .png
- center

center .png
- stretch

stretch .png
alignSelf
- alignSelf:自定义自己的侧轴布局,用于一个子组件设置。
- 注意:当某个子组件不想参照默认的alignItems时,可以设置alignSelf,自定义自己的侧轴布局。
- alignSelf共有五个值,默认为auto。
auto 继承它的父容器的alignItems属性。如果没有父容器则为 "stretch"
flex-start 子组件向侧轴起点对齐。
flex-end 子组件向侧轴终点对齐。
center 子组件在侧轴居中。
stretch 子组件在侧轴方向被拉伸到与容器相同的高度或宽度。
- 使用
export default class ReactDemo extends Component {
  render() {
    return (
      <View style={styles.rootView}>
          <Text style={[styles.text1Style,styles.baseTextStyle]}>1</Text>
          <Text style={[styles.text2Style,styles.baseTextStyle]}>2</Text>
          <Text style={[styles.text3Style,styles.baseTextStyle]}>3</Text>
          <Text style={[styles.text4Style,styles.baseTextStyle]}>4</Text>
      </View>
    );
  }
}

const styles = StyleSheet.create({
    rootView:{
        backgroundColor:'darkorange',
        flex:1,
        flexDirection:'row',
        justifyContent:'space-around',
        alignItems:'center'
    },
    baseTextStyle:{
        backgroundColor:'deepskyblue',
        width:50,
        // height:50,
        fontSize:15,
        textAlign:'center',
        marginTop:20,
    },
    text3Style:{
        alignSelf:'flex-start'
    }
});
- 效果

alignSelf.png
flex
-
flex: 决定子控件在主轴中占据几等分。
-
flex: 任意数字,所有子控件flex相加,自己flex占总共多少,就有多少宽度.
-
使用
export default class ReactDemo extends Component {
  render() {
    return (
      <View style={styles.rootView}>
          <Text style={[styles.text1Style,styles.baseTextStyle]}>1</Text>
          <Text style={[styles.text2Style,styles.baseTextStyle]}>2</Text>
          <Text style={[styles.text3Style,styles.baseTextStyle]}>3</Text>
          <Text style={[styles.text4Style,styles.baseTextStyle]}>4</Text>
      </View>
    );
  }
}

const styles = StyleSheet.create({
    rootView:{
        backgroundColor:'darkorange',
        flex:1,
        flexDirection:'row',
        justifyContent:'space-around',
        alignItems:'center'
    },
    baseTextStyle:{
        // width:50,
        // height:50,
        fontSize:15,
        textAlign:'center',
        marginTop:20,
    },
    text1Style:{
        flex:1,
        backgroundColor:'red',
    },
    text2Style:{
        flex:1,
        backgroundColor:'deepskyblue',
    },
    text3Style:{
        flex:3,
        backgroundColor:'green'
    },
    text4Style:{
        flex:1,
        backgroundColor:'blue',
    }
});
- 效果

flex.png
ReactNative之组件属性(Props、State)
- 在App开发中,少不了组件之间的传值,在RN中组件之间通信需要用到Props和State。
Props(属性)
- 什么是Props?一般用于自定义组件,大多数组件在创建时就可以使用各种参数来进行定制,用于定制的这些参数就称为props(属性)。
- name:就是Props,通过this.props.name访问
<Room name="小码哥" />
- 注意:props是在父组件中指定,而且一经指定,在整个组件的生命周期中都不再改变。
- 使用
class Room extends Component {
    render() {
        return (
            <View style={styles.viewStyle}>
                <Text sytle={styles.textStyle}>欢迎来到{this.props.name}直播间</Text>
            </View>

        );
    }

}

export default class ReactDemo extends Component {
  render() {
    return (
        <Room name="小码哥" />
    );
  }
}

const styles = StyleSheet.create({
    viewStyle:{
        flex:1,
        justifyContent:'center',
        alignItems:'center',

    },
    textStyle:{
        marginTop:20
    }

});
- 效果
State
-
State:如果以后想修改某个属性,就修改界面,就需要用state。
-
注意:State属性一般在constructor中声明(ES6),在setState中修改数据.
-
定义state属性
this.state = {
            num:1,
        };
- 修改state属性
this.setState({
            num : number
        })
-
每隔一秒,人数+1,定时器
-
注意:这里定时器方法必须用bind.
-
使用
// 自定义房间组件
class Room extends Component {

    timeUpdate() {
        var number = this.state.num;

        number++;

        this.setState({
            num : number
        })

    }

    // 构造方法
    constructor(props){
        super(props);

        // 定义state属性
        this.state = {
            num:1,
        };

        console.log('初始化对象');

        // 创建定时器 1秒 = 1000
        // 这里必须绑定,bind会生成了一个新的函数,并且由绑定者调用,否则this不明确
        setInterval(this.timeUpdate.bind(this),1000);

    }

    render() {
        return (
            <View style={styles.viewStyle}>
                <Text sytle={styles.textStyle}>欢迎来到{this.props.name}直播间</Text>
                <Text>观众数 {this.state.num}</Text>
            </View>

        );
    }

}

// 主组件

export default class ReactDemo extends Component {
  render() {
    return (
        <Room name="小码哥" />
    );
  }
}

const styles = StyleSheet.create({
    viewStyle:{
        flex:1,
        justifyContent:'center',
        alignItems:'center',

    },
    textStyle:{
        marginTop:20
    }

});
ReactNative之父子组件传值
顺传(父传子)
- 1.通过props传值
- 案例:父控件给子控件传递名称,子控件根据父控件提供的名称显示谁的儿子
// 子组件
class  SonCompoent extends Component{

    render() {
        return (
            <View style={styles.sonViewStyle}>
                <Text style={{fontSize:20}}>{this.props.name}的baby</Text>
            </View>
        );
    };
}

// 父组件
class FatherComponet extends Component {

    render() {
        return (
            <View style={{flex:1,alignItems:'center'}}>
                <SonCompoent  name={this.props.name}/>
            </View>
        );
    }
}

// 主组件
export default class ReactDemo extends Component {
    render() {
        return (
            <FatherComponet name="xmg" />
        );
    }
}

const styles = StyleSheet.create({
    sonViewStyle:{
        flex:1,
        justifyContent:'center',
        alignItems:'center',

    }

});
- 2.有时候需要拿到组件传值,通过ref拿到控件给控件传值。
- 案例:爸爸每个月,给儿子生活费.
- 使用箭头函数解决绑定this问题
import React, { Component } from 'react';
import {
  AppRegistry,
  StyleSheet,
  Text,
  View
} from 'react-native';

class  SonCompoent extends Component{

    constructor(props){
        super(props);

        this.state = {
            money:0
        }
    }

    receiveMoney(money){
        this.setState({
            money:money
        });
    }

    render() {
        return (
            <View style={styles.sonViewStyle}>
                <Text style={{fontSize:20}}>{this.props.name}的baby</Text>
                <Text>总共收到{this.state.money}生活费</Text>
            </View>
        );
    };
}

class FatherComponet extends Component {


    render() {
        return (
            <View style={{flex:1,alignItems:'center'}}>
                <Text style={{marginTop:100}} onPress={()=>{
                    this.refs.son.receiveMoney(1000);
                }}>发生活费</Text>
                <SonCompoent ref="son" name={this.props.name} />
            </View>
        );
    }
}

export default class ReactDemo extends Component {
  render() {
    return (
        <FatherComponet name="xmg" />
    );
  }
}

const styles = StyleSheet.create({
    sonViewStyle:{
        flex:1,
        justifyContent:'center',
        alignItems:'center',

    }

});

AppRegistry.registerComponent('React', () => ReactDemo);
逆传(子传父)
- 使用方法回调
- 1.在父组件中定义一个处理接收到值的方法
- 2.把这个方法传递给子组件,并且绑定this,子组件就能通过this.props拿到这个方法调用
- 案例:儿子赚钱了,把赚的钱传递给父亲
import React, { Component } from 'react';
import {
  AppRegistry,
  StyleSheet,
  Text,
  View
} from 'react-native';

class  SonCompoent extends Component{

    makeMoney (money) {
        // 传递给父控件
        console.log('赚了'+ money);
        console.log(this)
        this.props.receiveMoney(money);

    }

    render() {
        return (
            <View style={styles.sonViewStyle}>
                <Text style={{fontSize:20}}>{this.props.name}的baby</Text>
                <Text onPress={this.makeMoney.bind(this,100)}>赚100块钱</Text>
            </View>
        );
    };
}

class FatherComponet extends Component {

    constructor(props){
        super(props);
        console.log(this);
        this.state = {
            money:0
        };
    }

    receiveMoney(money) {
        console.log('爸爸收到'+ money);

        console.log(this);

        var m = this.state.money;

        m += money;

        this.setState({
            money:m
        });

    }

    render() {
        return (
            <View style={{flex:1,alignItems:'center'}}>
                <SonCompoent  name={this.props.name+'A'} receiveMoney={this.receiveMoney.bind(this)}/>
                <SonCompoent  name={this.props.name+'B'} receiveMoney={this.receiveMoney.bind(this)}/>
                <Text style={{marginBottom:50}}>爸爸收到{this.state.money}</Text>