w3cschool-Netty 实战精髓篇2
https://www.w3cschool.cn/essential_netty_in_action/essential_netty_in_action-adkv28bm.html
研究Netty中的ChannelHandler 和 ChannelPipeline
本章内容包括:
- Channel
- ChannelHandler
- ChannePipeline
- ChannelHandlerContext
上一章我们研究了 ByteBuf ,了解到它是一个用来“包装”数据的容器。那么这些容器是如何在应用程序中进行传输以及是怎么处理它们的“包装”的数据的呢?这就是本章要介绍的内容了。
Netty 在这方面提供了强大的支持。它让Channelhandler 链接在ChannelPipeline上使数据处理更加灵活和模块化。
在这一章中,下面我们会遇到各种各样 Channelhandler,ChannelPipeline 的使用案例,以及重要的相关的类Channelhandlercontext 。我们将展示如何将这些基本组成的框架可以帮助我们写干净可重用的处理实现。
Netty中的ChannelHandler 家族
在我们深入研究 ChannelHandler 内部之前,让我们花几分钟了解下这个 Netty 组件模型的基础。这里先对ChannelHandler 及其子类做个简单的介绍。
Channel 生命周期
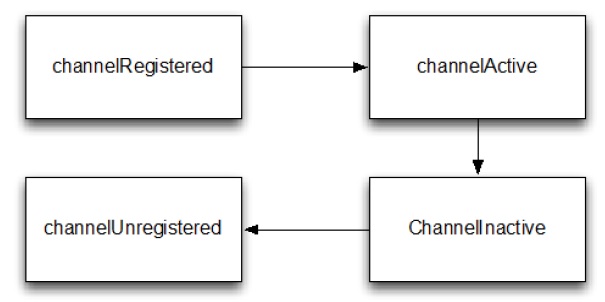
Channel 有个简单但强大的状态模型,与 ChannelInboundHandler API 密切相关。下面表格是 Channel 的四个状态
Table 6.1 Channel lifeycle states
| 状态 | 描述 |
|---|---|
| channelUnregistered | channel已创建但未注册到一个 EventLoop. |
| channelRegistered | channel 注册到一个 EventLoop. |
| channelActive | channel 变为活跃状态(连接到了远程主机),现在可以接收和发送数据了 |
| channelInactive | channel 处于非活跃状态,没有连接到远程主机 |
Channel 的正常的生命周期如下图,当状态出现变化,就会触发对应的事件,这样就能与 ChannelPipeline 中的 ChannelHandler进行及时的交互。
Figure 6.1 Channel State Model
ChannelHandler 生命周期
ChannelHandler 定义的生命周期操作如下表,当 ChannelHandler 添加到 ChannelPipeline,或者从 ChannelPipeline 移除后,对应的方法将会被调用。每个方法都传入了一个 ChannelHandlerContext 参数
Table 6.2 ChannelHandler lifecycle methods
| 类型 | 描述 |
|---|---|
| handlerAdded | 当 ChannelHandler 添加到 ChannelPipeline 调用 |
| handlerRemoved | 当 ChannelHandler 从 ChannelPipeline 移除时调用 |
| exceptionCaught | 当 ChannelPipeline 执行抛出异常时调用 |
ChannelHandler 子接口
Netty 提供2个重要的 ChannelHandler 子接口:
- ChannelInboundHandler - 处理进站数据和所有状态更改事件
- ChannelOutboundHandler - 处理出站数据,允许拦截各种操作
ChannelHandler 适配器
Netty 提供了一个简单的 ChannelHandler 框架实现,给所有声明方法签名。这个类 ChannelHandlerAdapter 的方法,主要推送事件 到 pipeline 下个 ChannelHandler 直到 pipeline 的结束。这个类 也作为 ChannelInboundHandlerAdapter 和ChannelOutboundHandlerAdapter 的基础。所有三个适配器类的目的是作为自己的实现的起点;您可以扩展它们,覆盖你需要自定义的方法。
ChannelInboundHandler
ChannelInboundHandler 的生命周期方法在下表中,当接收到数据或者与之关联的 Channel 状态改变时调用。之前已经注意到了,这些方法与 Channel 的生命周期接近
Table 6.3 ChannelInboundHandler methods
| 类型 | 描述 |
|---|---|
| channelRegistered | Invoked when a Channel is registered to its EventLoop and is able to handle I/O. |
| channelUnregistered | Invoked when a Channel is deregistered from its EventLoop and cannot handle any I/O. |
| channelActive | Invoked when a Channel is active; the Channel is connected/bound and ready. |
| channelInactive | Invoked when a Channel leaves active state and is no longer connected to its remote peer. |
| channelReadComplete | Invoked when a read operation on the Channel has completed. |
| channelRead | Invoked if data are read from the Channel. |
| channelWritabilityChanged | Invoked when the writability state of the Channel changes. The user can ensure writes are not done too fast (with risk of an OutOfMemoryError) or can resume writes when the Channel becomes writable again.Channel.isWritable() can be used to detect the actual writability of the channel. The threshold for writability can be set via Channel.config().setWriteHighWaterMark() and Channel.config().setWriteLowWaterMark(). |
| userEventTriggered(...) | Invoked when a user calls Channel.fireUserEventTriggered(...) to pass a pojo through the ChannelPipeline. This can be used to pass user specific events through the ChannelPipeline and so allow handling those events. |
注意,ChannelInboundHandler 实现覆盖了 channelRead() 方法处理进来的数据用来响应释放资源。Netty 在 ByteBuf 上使用了资源池,所以当执行释放资源时可以减少内存的消耗。
Listing 6.1 Handler to discard data
@ChannelHandler.Sharable
public class DiscardHandler extends ChannelInboundHandlerAdapter {        //1

    @Override
    public void channelRead(ChannelHandlerContext ctx,
                                     Object msg) {
        ReferenceCountUtil.release(msg); //2
    }

}
1.扩展 ChannelInboundHandlerAdapter
2.ReferenceCountUtil.release() 来丢弃收到的信息
Netty 用一个 WARN-level 日志条目记录未释放的资源,使其能相当简单地找到代码中的违规实例。然而,由于手工管理资源会很繁琐,您可以通过使用 SimpleChannelInboundHandler 简化问题。如下:
Listing 6.2 Handler to discard data
@ChannelHandler.Sharable
public class SimpleDiscardHandler extends SimpleChannelInboundHandler<Object> {  //1

    @Override
    public void channelRead0(ChannelHandlerContext ctx,
                                     Object msg) {
        // No need to do anything special //2
    }

}
1.扩展 SimpleChannelInboundHandler
2.不需做特别的释放资源的动作
注意 SimpleChannelInboundHandler 会自动释放资源,而无需存储任何信息的引用。
更多详见 “Error! Reference source not found..” 一节
ChannelOutboundHandler
ChannelOutboundHandler 提供了出站操作时调用的方法。这些方法会被 Channel, ChannelPipeline, 和 ChannelHandlerContext 调用。
ChannelOutboundHandler 另个一个强大的方面是它具有在请求时延迟操作或者事件的能力。比如,当你在写数据到 remote peer 的过程中被意外暂停,你可以延迟执行刷新操作,然后在迟些时候继续。
下面显示了 ChannelOutboundHandler 的方法(继承自 ChannelHandler 未列出来)
Table 6.4 ChannelOutboundHandler methods
| 类型 | 描述 |
|---|---|
| bind | Invoked on request to bind the Channel to a local address |
| connect | Invoked on request to connect the Channel to the remote peer |
| disconnect | Invoked on request to disconnect the Channel from the remote peer |
| close | Invoked on request to close the Channel |
| deregister | Invoked on request to deregister the Channel from its EventLoop |
| read | Invoked on request to read more data from the Channel |
| flush | Invoked on request to flush queued data to the remote peer through the Channel |
| write | Invoked on request to write data through the Channel to the remote peer |
几乎所有的方法都将 ChannelPromise 作为参数,一旦请求结束要通过 ChannelPipeline 转发的时候,必须通知此参数。
ChannelPromise vs. ChannelFuture
ChannelPromise 是 特殊的 ChannelFuture,允许你的 ChannelPromise 及其 操作 成功或失败。所以任何时候调用例如 Channel.write(...) 一个新的 ChannelPromise将会创建并且通过 ChannelPipeline传递。这次写操作本身将会返回 ChannelFuture, 这样只允许你得到一次操作完成的通知。Netty 本身使用 ChannelPromise 作为返回的 ChannelFuture 的通知,事实上在大多数时候就是 ChannelPromise 自身(ChannelPromise 扩展了 ChannelFuture)
如前所述,ChannelOutboundHandlerAdapter 提供了一个实现了 ChannelOutboundHandler 所有基本方法的实现的框架。 这些简单事件转发到下一个 ChannelOutboundHandler 管道通过调用 ChannelHandlerContext 相关的等效方法。你可以根据需要自己实现想要的方法。
资源管理
当你通过 ChannelInboundHandler.channelRead(...) 或者 ChannelOutboundHandler.write(...) 来处理数据,重要的是在处理资源时要确保资源不要泄漏。
Netty 使用引用计数器来处理池化的 ByteBuf。所以当 ByteBuf 完全处理后,要确保引用计数器被调整。
引用计数的权衡之一是用户时必须小心使用消息。当 JVM 仍在 GC(不知道有这样的消息引用计数)这个消息,以至于可能是之前获得的这个消息不会被放回池中。因此很可能,如果你不小心释放这些消息,很可能会耗尽资源。
为了让用户更加简单的找到遗漏的释放,Netty 包含了一个 ResourceLeakDetector ,将会从已分配的缓冲区 1% 作为样品来检查是否存在在应用程序泄漏。因为 1% 的抽样,开销很小。
对于检测泄漏,您将看到类似于下面的日志消息。
LEAK: ByteBuf.release() was not called before it’s garbage-collected. Enable advanced leak reporting to find out where the leak occurred. To enable advanced
leak reporting, specify the JVM option ’-Dio.netty.leakDetectionLevel=advanced’ or call ResourceLeakDetector.setLevel()

Relaunch your application with the JVM option mentioned above, then you’ll see the recent locations of your application where the leaked buffer was accessed. The following output shows a leak from our unit test (XmlFrameDecoderTest.testDecodeWithXml()):

Running io.netty.handler.codec.xml.XmlFrameDecoderTest

15:03:36.886 [main] ERROR io.netty.util.ResourceLeakDetector - LEAK:
ByteBuf.release() was not called before it’s garbage-collected.

Recent access records: 1

#1:

io.netty.buffer.AdvancedLeakAwareByteBuf.toString(AdvancedLeakAwareByteBuf.java:697)

io.netty.handler.codec.xml.XmlFrameDecoderTest.testDecodeWithXml(XmlFrameDecoderTest.java:157)
    io.netty.handler.codec.xml.XmlFrameDecoderTest.testDecodeWithTwoMessages(XmlFrameDecoderTest.java:133)
泄漏检测等级
Netty 现在定义了四种泄漏检测等级,可以按需开启,见下表
Table 6.5 Leak detection levels
| Level Description | DISABLED |
|---|---|
| Disables | Leak detection completely. While this even eliminates the 1 % overhead you should only do this after extensive testing. |
| SIMPLE | Tells if a leak was found or not. Again uses the sampling rate of 1%, the default level and a good fit for most cases. |
| ADVANCED | Tells if a leak was found and where the message was accessed, using the sampling rate of 1%. |
| PARANOID | Same as level ADVANCED with the main difference that every access is sampled. This it has a massive impact on performance. Use this only in the debugging phase. |
修改检测等级,只需修改 io.netty.leakDetectionLevel 系统属性,举例
# java -Dio.netty.leakDetectionLevel=paranoid
这样,我们就能在 ChannelInboundHandler.channelRead(...) 和 ChannelOutboundHandler.write(...) 避免泄漏。
当你处理 channelRead(...) 操作,并在消费消息(不是通过 ChannelHandlerContext.fireChannelRead(...) 来传递它到下个 ChannelInboundHandler) 时,要释放它,如下:
Listing 6.3 Handler that consume inbound data
@ChannelHandler.Sharable
public class DiscardInboundHandler extends ChannelInboundHandlerAdapter {  //1

    @Override
    public void channelRead(ChannelHandlerContext ctx,
                                     Object msg) {
        ReferenceCountUtil.release(msg); //2
    }

}
- 继承 ChannelInboundHandlerAdapter
- 使用 ReferenceCountUtil.release(...) 来释放资源
所以记得,每次处理消息时,都要释放它。
SimpleChannelInboundHandler -消费入站消息更容易
使用入站数据和释放它是一项常见的任务,Netty 为你提供了一个特殊的称为 SimpleChannelInboundHandler 的 ChannelInboundHandler 的实现。该实现将自动释放一个消息,一旦这个消息被用户通过channelRead0() 方法消费。
当你在处理写操作,并丢弃消息时,你需要释放它。现在让我们看下实际是如何操作的。
Listing 6.4 Handler to discard outbound data
@ChannelHandler.Sharable public class DiscardOutboundHandler extends ChannelOutboundHandlerAdapter { //1
@Override
public void write(ChannelHandlerContext ctx,
                                 Object msg, ChannelPromise promise) {
    ReferenceCountUtil.release(msg);  //2
    promise.setSuccess();    //3

}
}
- 继承 ChannelOutboundHandlerAdapter
- 使用 ReferenceCountUtil.release(...) 来释放资源
- 通知 ChannelPromise 数据已经被处理
重要的是,释放资源并通知 ChannelPromise。如果,ChannelPromise 没有被通知到,这可能会引发 ChannelFutureListener 不会被处理的消息通知的状况。
所以,总结下:如果消息是被 消耗/丢弃 并不会被传入下个 ChannelPipeline 的 ChannelOutboundHandler ,调用 ReferenceCountUtil.release(message) 。一旦消息经过实际的传输,在消息被写或者 Channel 关闭时,它将会自动释放。
介绍Netty的ChannelPipeline
ChannelPipeline 是一系列的ChannelHandler 实例,流经一个 Channel 的入站和出站事件可以被ChannelPipeline 拦截,ChannelPipeline能够让用户自己对入站/出站事件的处理逻辑,以及pipeline里的各个Handler之间的交互进行定义。
每当一个新的Channel被创建了,都会建立一个新的 ChannelPipeline,并且这个新的 ChannelPipeline 还会绑定到Channel上。这个关联是永久性的;Channel 既不能附上另一个 ChannelPipeline 也不能分离当前这个。这些都由Netty负责完成,,而无需开发人员的特别处理。
根据它的起源,一个事件将由 ChannelInboundHandler 或 ChannelOutboundHandler 处理。随后它将调用 ChannelHandlerContext 实现转发到下一个相同的超类型的处理程序。
ChannelHandlerContext
一个 ChannelHandlerContext 使 ChannelHandler 与 ChannelPipeline 和 其他处理程序交互。一个处理程序可以通知下一个 ChannelPipeline 中的 ChannelHandler 甚至动态修改 ChannelPipeline 的归属。
下图展示了用于入站和出站 ChannelHandler 的 典型 ChannelPipeline 布局。

Figure 6.2 ChannelPipeline and ChannelHandlers
上图说明了 ChannelPipeline 主要是一系列 ChannelHandler。通过ChannelPipeline ChannelPipeline 还提供了方法传播事件本身。如果一个入站事件被触发,它将被传递的从 ChannelPipeline 开始到结束。举个例子,在这个图中出站 I/O 事件将从 ChannelPipeline 右端开始一直处理到左边。
ChannelPipeline 相对论
你可能会说,从 ChannelPipeline 事件传递的角度来看,ChannelPipeline 的“开始” 取决于是否入站或出站事件。然而,Netty 总是指 ChannelPipeline 入站口(图中的左边)为“开始”,出站口(右边)作为“结束”。当我们完成使用 ChannelPipeline.add() 添加混合入站和出站处理程序,每个 ChannelHandler 的“顺序”是它的地位从“开始”到“结束”正如我们刚才定义的。因此,如果我们在图6.1处理程序按顺序从左到右第一个ChannelHandler被一个入站事件将是#1,第一个处理程序被出站事件将是#5*
随着管道传播事件,它决定下个 ChannelHandler 是否是相匹配的方向运动的类型。如果没有,ChannelPipeline 跳过 ChannelHandler 并继续下一个合适的方向。记住,一个处理程序可能同时实现ChannelInboundHandler 和 ChannelOutboundHandler 接口。
修改 ChannelPipeline
ChannelHandler 可以实时修改 ChannelPipeline 的布局,通过添加、移除、替换其他 ChannelHandler(也可以从 ChannelPipeline 移除 ChannelHandler 自身)。这个 是 ChannelHandler 重要的功能之一。
Table 6.6 ChannelHandler methods for modifying a ChannelPipeline
| 名称 | 描述 |
|---|---|
| addFirst addBefore addAfter addLast | 添加 ChannelHandler 到 ChannelPipeline. |
| Remove | 从 ChannelPipeline 移除 ChannelHandler. |
| Replace | 在 ChannelPipeline 替换另外一个 ChannelHandler |
下面展示了操作
Listing 6.5 Modify the ChannelPipeline
ChannelPipeline pipeline = null; // get reference to pipeline;
FirstHandler firstHandler = new FirstHandler(); //1
pipeline.addLast("handler1", firstHandler); //2
pipeline.addFirst("handler2", new SecondHandler()); //3
pipeline.addLast("handler3", new ThirdHandler()); //4

pipeline.remove("handler3"); //5
pipeline.remove(firstHandler); //6

pipeline.replace("handler2", "handler4", new ForthHandler()); //6
- 创建一个 FirstHandler 实例
- 添加该实例作为 "handler1" 到 ChannelPipeline
- 添加 SecondHandler 实例作为 "handler2" 到 ChannelPipeline 的第一个槽,这意味着它将替换之前已经存在的 "handler1"
- 添加 ThirdHandler 实例作为"handler3" 到 ChannelPipeline 的最后一个槽
- 通过名称移除 "handler3"
- 通过引用移除 FirstHandler (因为只有一个,所以可以不用关联名字 "handler1").
- 将作为"handler2"的 SecondHandler 实例替换为作为 "handler4"的 FourthHandler
以后我们将看到,这种轻松添加、移除和替换 ChannelHandler 能力, 适合非常灵活的实现逻辑。
ChannelHandler 执行 ChannelPipeline 和阻塞
通常每个 ChannelHandler 添加到 ChannelPipeline 将处理事件 传递到 EventLoop( I/O 的线程)。至关重要的是不要阻塞这个线程, 它将会负面影响的整体处理I/O。 有时可能需要使用阻塞 api 接口来处理遗留代码。对于这个情况下,ChannelPipeline 已有 add() 方法,它接受一个EventExecutorGroup。如果一个定制的 EventExecutorGroup 传入事件将由含在这个 EventExecutorGroup 中的 EventExecutor之一来处理,并且从 Channel 的 EventLoop 本身离开。一个默认实现,称为来自 Netty 的 DefaultEventExecutorGroup
除了上述操作,其他访问 ChannelHandler 的方法如下:
Table 6.7 ChannelPipeline operations for retrieving ChannelHandlers
| 名称 | 描述 |
|---|---|
| get(...) | Return a ChannelHandler by type or name |
| context(...) | Return the ChannelHandlerContext bound to a ChannelHandler. |
| names() iterator() | Return the names or of all the ChannelHander in the ChannelPipeline. |
发送事件
ChannelPipeline API 有额外调用入站和出站操作的方法。下表列出了入站操作,用于通知 ChannelPipeline 中 ChannelInboundHandlers 正在发生的事件
Table 6.8 Inbound operations on ChannelPipeline
| 名称 | 描述 |
|---|---|
| fireChannelRegistered | Calls channelRegistered(ChannelHandlerContext) on the next ChannelInboundHandler in the ChannelPipeline. |
| fireChannelUnregistered | Calls channelUnregistered(ChannelHandlerContext) on the next ChannelInboundHandler in the ChannelPipeline. |
| fireChannelActive | Calls channelActive(ChannelHandlerContext) on the next ChannelInboundHandler in the ChannelPipeline. |
| fireChannelInactive | Calls channelInactive(ChannelHandlerContext)on the next ChannelInboundHandler in the ChannelPipeline. |
| fireExceptionCaught | Calls exceptionCaught(ChannelHandlerContext, Throwable) on the next ChannelHandler in the ChannelPipeline. |
| fireUserEventTriggered | Calls userEventTriggered(ChannelHandlerContext, Object) on the next ChannelInboundHandler in the ChannelPipeline. |
| fireChannelRead | Calls channelRead(ChannelHandlerContext, Object msg) on the next ChannelInboundHandler in the ChannelPipeline. |
| fireChannelReadComplete | Calls channelReadComplete(ChannelHandlerContext) on the next ChannelStateHandler in the ChannelPipeline. |
在出站方面,处理一个事件将导致底层套接字的一些行动。下表列出了ChannelPipeline API 出站的操作。
Table 6.9 Outbound operations on ChannelPipeline
| 名称 | 描述 |
|---|---|
| bind | Bind the Channel to a local address. This will call bind(ChannelHandlerContext, SocketAddress, ChannelPromise) on the next ChannelOutboundHandler in the ChannelPipeline. |
| connect | Connect the Channel to a remote address. This will call connect(ChannelHandlerContext, SocketAddress,ChannelPromise) on the next ChannelOutboundHandler in the ChannelPipeline. |
| disconnect | Disconnect the Channel. This will call disconnect(ChannelHandlerContext, ChannelPromise) on the next ChannelOutboundHandler in the ChannelPipeline. |
| close | Close the Channel. This will call close(ChannelHandlerContext,ChannelPromise) on the next ChannelOutboundHandler in the ChannelPipeline. |
| deregister | Deregister the Channel from the previously assigned EventExecutor (the EventLoop). This will call deregister(ChannelHandlerContext,ChannelPromise) on the next ChannelOutboundHandler in the ChannelPipeline. |
| flush | Flush all pending writes of the Channel. This will call flush(ChannelHandlerContext) on the next ChannelOutboundHandler in the ChannelPipeline. |
| write | Write a message to the Channel. This will call write(ChannelHandlerContext, Object msg, ChannelPromise) on the next ChannelOutboundHandler in the ChannelPipeline. Note: this does not write the message to the underlying Socket, but only queues it. To write it to the Socket call flush() or writeAndFlush(). |
| writeAndFlush | Convenience method for calling write() then flush(). |
| read | Requests to read more data from the Channel. This will call read(ChannelHandlerContext) on the next ChannelOutboundHandler in the ChannelPipeline. |
总结下:
- 一个 ChannelPipeline 是用来保存关联到一个 Channel 的ChannelHandler
- 可以修改 ChannelPipeline 通过动态添加和删除 ChannelHandler
- ChannelPipeline 有着丰富的API调用动作来回应入站和出站事件。
Netty接口ChannelHandlerContext
在ChannelHandler 添加到 ChannelPipeline 时会创建一个实例,就是接口 ChannelHandlerContext,它代表了 ChannelHandler 和ChannelPipeline 之间的关联。接口ChannelHandlerContext 主要是对通过同一个 ChannelPipeline 关联的 ChannelHandler 之间的交互进行管理
ChannelHandlerContext 中包含了有许多方法,其中一些方法也出现在 Channel 和ChannelPipeline 本身。如果您通过Channel 或ChannelPipeline 的实例来调用这些方法,他们就会在整个 pipeline中传播 。相比之下,一样的方法在 ChannelHandlerContext 的实例上调用, 就只会从当前的 ChannelHandler 开始并传播到相关管道中的下一个有处理事件能力的 ChannelHandler 。
ChannelHandlerContext API 总结如下:
Table 6.10 ChannelHandlerContext API
| 名称 | 描述 |
|---|---|
| bind | Request to bind to the given SocketAddress and return a ChannelFuture. |
| channel | Return the Channel which is bound to this instance. |
| close | Request to close the Channel and return a ChannelFuture. |
| connect | Request to connect to the given SocketAddress and return a ChannelFuture. |
| deregister | Request to deregister from the previously assigned EventExecutor and return a ChannelFuture. |
| disconnect | Request to disconnect from the remote peer and return a ChannelFuture. |
| executor | Return the EventExecutor that dispatches events. |
| fireChannelActive | A Channel is active (connected). |
| fireChannelInactive | A Channel is inactive (closed). |
| fireChannelRead | A Channel received a message. |
| fireChannelReadComplete | Triggers a channelWritabilityChanged event to the next |
ChannelInboundHandler. handler | Returns the ChannelHandler bound to this instance. isRemoved | Returns true if the associated ChannelHandler was removed from the ChannelPipeline. name | Returns the unique name of this instance. pipeline | Returns the associated ChannelPipeline. read | Request to read data from the Channel into the first inbound buffer. Triggers a channelRead event if successful and notifies the handler of channelReadComplete. write | Request to write a message via this instance through the pipeline.
其他注意注意事项:
- ChannelHandlerContext 与 ChannelHandler 的关联从不改变,所以缓存它的引用是安全的。
- 正如我们前面指出的,ChannelHandlerContext 所包含的事件流比其他类中同样的方法都要短,利用这一点可以尽可能高地提高性能。
使用 ChannelHandler
本节,我们将说明 ChannelHandlerContext的用法 ,以及ChannelHandlerContext, Channel 和 ChannelPipeline 这些类中方法的不同表现。下图展示了 ChannelPipeline, Channel, ChannelHandler 和 ChannelHandlerContext 的关系
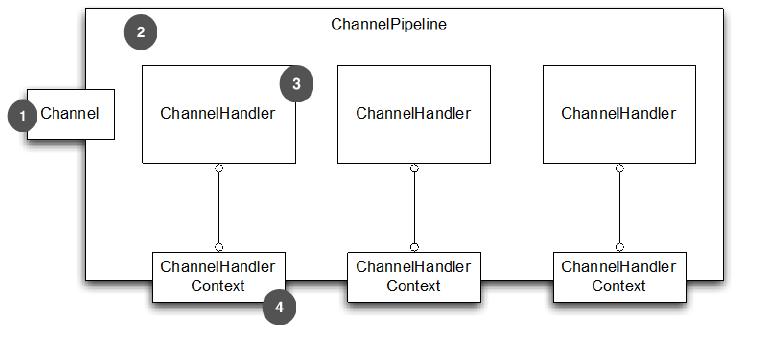
- Channel 绑定到 ChannelPipeline
- ChannelPipeline 绑定到 包含 ChannelHandler 的 Channel
- ChannelHandler
- 当添加 ChannelHandler 到 ChannelPipeline 时,ChannelHandlerContext 被创建
Figure 6.3 Channel, ChannelPipeline, ChannelHandler and ChannelHandlerContext
下面展示了, 从 ChannelHandlerContext 获取到 Channel 的引用,通过调用 Channel 上的 write() 方法来触发一个 写事件到通过管道的的流中
Listing 6.6 Accessing the Channel from a ChannelHandlerContext
ChannelHandlerContext ctx = context;
Channel channel = ctx.channel();  //1
channel.write(Unpooled.copiedBuffer("Netty in Action",
        CharsetUtil.UTF_8));  //2
- 得到与 ChannelHandlerContext 关联的 Channel 的引用
- 通过 Channel 写缓存
下面展示了 从 ChannelHandlerContext 获取到 ChannelPipeline 的相同示例
Listing 6.7 Accessing the ChannelPipeline from a ChannelHandlerContext
ChannelHandlerContext ctx = context;
ChannelPipeline pipeline = ctx.pipeline(); //1
pipeline.write(Unpooled.copiedBuffer("Netty in Action", CharsetUtil.UTF_8));  //2
- 得到与 ChannelHandlerContext 关联的 ChannelPipeline 的引用
- 通过 ChannelPipeline 写缓冲区
流在两个清单6.6和6.7是一样的,如图6.4所示。重要的是要注意,虽然在 Channel 或者 ChannelPipeline 上调用write() 都会把事件在整个管道传播,但是在 ChannelHandler 级别上,从一个处理程序转到下一个却要通过在 ChannelHandlerContext 调用方法实现。
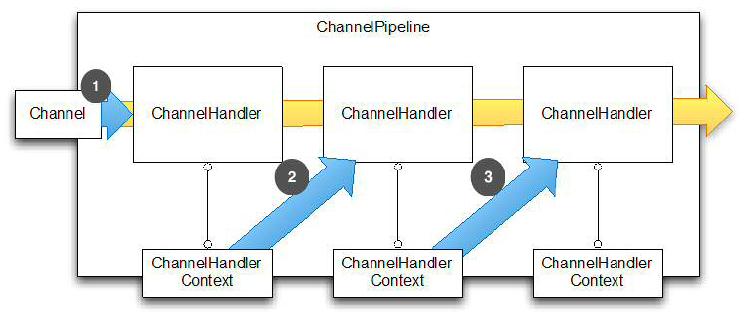
- 事件传递给 ChannelPipeline 的第一个 ChannelHandler
- ChannelHandler 通过关联的 ChannelHandlerContext 传递事件给 ChannelPipeline 中的 下一个
- ChannelHandler 通过关联的 ChannelHandlerContext 传递事件给 ChannelPipeline 中的 下一个
Figure 6.4 Event propagation via the Channel or the ChannelPipeline
为什么你可能会想从 ChannelPipeline 一个特定的点开始传播一个事件?
- 通过减少 ChannelHandler 不感兴趣的事件的传递,从而减少开销
- 排除掉特定的对此事件感兴趣的处理程序的处理
想要实现从一个特定的 ChannelHandler 开始处理,你必须引用与 此ChannelHandler的前一个ChannelHandler 关联的 ChannelHandlerContext 。这个ChannelHandlerContext 将会调用与自身关联的 ChannelHandler 的下一个ChannelHandler 。
下面展示了使用场景
Listing 6.8 Events via ChannelPipeline
ChannelHandlerContext ctx = context;
ctx.write(Unpooled.copiedBuffer("Netty in Action",              CharsetUtil.UTF_8));
- 获得 ChannelHandlerContext 的引用
- write() 将会把缓冲区发送到下一个 ChannelHandler
如下所示,消息将会从下一个ChannelHandler开始流过 ChannelPipeline ,绕过所有在它之前的ChannelHandler。

- ChannelHandlerContext 方法调用
- 事件发送到了下一个 ChannelHandler
- 经过最后一个ChannelHandler后,事件从 ChannelPipeline 移除
Figure 6.5 Event flow for operations triggered via the ChannelHandlerContext
我们刚刚描述的用例是一种常见的情形,当我们想要调用某个特定的 ChannelHandler操作时,它尤其有用。
ChannelHandler 和 ChannelHandlerContext 的高级用法
正如我们在清单6.6中看到的,通过调用ChannelHandlerContext的 pipeline() 方法,你可以得到一个封闭的 ChannelPipeline 引用。这使得可以在运行时操作 pipeline 的 ChannelHandler ,这一点可以被利用来实现一些复杂的需求,例如,添加一个 ChannelHandler 到 pipeline 来支持动态协议改变。
其他高级用例可以实现通过保持一个 ChannelHandlerContext 引用供以后使用,这可能发生在任何 ChannelHandler 方法,甚至来自不同的线程。清单6.9显示了此模式被用来触发一个事件。
Listing 6.9 ChannelHandlerContext usage
public class WriteHandler extends ChannelHandlerAdapter {

    private ChannelHandlerContext ctx;

    @Override
    public void handlerAdded(ChannelHandlerContext ctx) {
        this.ctx = ctx;        //1
    }

    public void send(String msg) {
        ctx.writeAndFlush(msg);  //2
    }
}
- 存储 ChannelHandlerContext 的引用供以后使用
- 使用之前存储的 ChannelHandlerContext 来发送消息
因为 ChannelHandler 可以属于多个 ChannelPipeline ,它可以绑定多个 ChannelHandlerContext 实例。然而,ChannelHandler 用于这种用法必须添加 @Sharable 注解。否则,试图将它添加到多个 ChannelPipeline 将引发一个异常。此外,它必须既是线程安全的又能安全地使用多个同时的通道(比如,连接)。
清单6.10显示了此模式的正确实现。
Listing 6.10 A shareable ChannelHandler
@ChannelHandler.Sharable            //1
public class SharableHandler extends ChannelInboundHandlerAdapter {

    @Override
    public void channelRead(ChannelHandlerContext ctx, Object msg) {
        System.out.println("channel read message " + msg);
        ctx.fireChannelRead(msg);  //2
    }
}
- 添加 @Sharable 注解
- 日志方法调用, 并专递到下一个 ChannelHandler
上面这个 ChannelHandler 实现符合所有包含在多个管道的要求;它通过@Sharable 注解,并不持有任何状态。而下面清单6.11中列出的情况则恰恰相反,它会造成问题。
Listing 6.11 Invalid usage of @Sharable
@ChannelHandler.Sharable  //1
public class NotSharableHandler extends ChannelInboundHandlerAdapter {
    private int count;

    @Override
    public void channelRead(ChannelHandlerContext ctx, Object msg) {
        count++;  //2

        System.out.println("inboundBufferUpdated(...) called the "
        + count + " time");  //3
        ctx.fireChannelRead(msg);
    }

}
- 添加 @Sharable
- count 字段递增
- 日志方法调用, 并专递到下一个 ChannelHandler
这段代码的问题是它持有状态:一个实例变量保持了方法调用的计数。将这个类的一个实例添加到 ChannelPipeline 并发访问通道时很可能产生错误。(当然,这个简单的例子中可以通过在 channelRead() 上添加 synchronized 来纠正 )
总之,使用@Sharable的话,要确定 ChannelHandler 是线程安全的。
为什么共享 ChannelHandler
常见原因是要在多个 ChannelPipelines 上安装一个 ChannelHandler 以此来实现跨多个渠道收集统计数据的目的。
我们的讨论 ChannelHandlerContext 及与其他框架组件关系的 到此结束。接下来我们将解析 Channel 状态模型,准备仔细看看ChannelHandler 本身。
Netty核心之Codec 框架
本章介绍
- Decoder(解码器)
- Encoder(编码器)
- Codec(编解码器)
在前面的章节中,我们讨论了连接到拦截操作或数据处理链的不同方式,展示了如何使用 ChannelHandler 及其相关的类来实现几乎任何一种应用程序所需的逻辑。但正如标准架构模式通常有专门的框架,通用处理模式很适合使用目标实现,可以节省我们大量的开发时间和精力。
在这一章,我们将研究编码和解码——数据从一种特定协议格式到另一种格式的转换。这种处理模式是由通常被称为“codecs(编解码器)”的组件来处理的。Netty提供了一些组件,利用它们可以很容易地为各种不同协议编写编解码器。例如,如果您正在构建一个基于 Netty 的邮件服务器,你可以使用POP3, IMAP 和 SMTP的现成的实现
Netty 什么是 Codec
我们在编写一个网络应用程序的时候需要实现某种 codec (编解码器),有了codec就能够将原始字节数据与目标程序数据的格式相互转化。我们知道数据在网络中的传播都是以字节码的数据形式进行的,codec的组成部分有两个,分别是:decoder(解码器)和encoder(编码器)。
编码器和解码器将一个字节序列转换为另一个业务对象,那么我们要如何区分它们呢?
想到一个“消息”是一个结构化的字节序列,语义为一个特定的应用程序——它的“数据”。encoder 是组件,转换消息格式适合传输(就像字节流),而相应的 decoder 转换传输数据回到程序的消息格式。逻辑上,“从”消息转换来是当作操作 outbound(出站)数据,而转换“到”消息是处理 inbound(入站)数据。
我们看看 Netty 的提供的类实现的 codec 。
解码器负责将消息从字节或其他序列形式转成指定的消息对象,编码器的功能则相反;解码器负责处理“入站”数据,编码器负责处理“出站”数据。编码器和解码器的结构很简单,消息被编码后解码后会自动通过ReferenceCountUtil.release(message)释放,如果不想释放消息可以使用ReferenceCountUtil.retain(message),这将会使引用数量增加而没有消息发布,大多数时候不需要这么做。
Netty提供的Decoder(解码器)
在本节内容中,我们会提供几个类用于 decoder 的实现,并且通过一些具体的例子来告诉大家什么情况下可以使用它们以及它们的使用方法。
Netty 提供了丰富的解码器抽象基类,我们可以很容易的实现这些基类来自定义解码器。主要分两类:
- 解码字节到消息(ByteToMessageDecoder 和 ReplayingDecoder)
- 解码消息到消息(MessageToMessageDecoder)
decoder 负责将“入站”数据从一种格式转换到另一种格式,Netty的解码器是一种 ChannelInboundHandler 的抽象实现。实践中使用解码器很简单,就是将入站数据转换格式后传递到 ChannelPipeline 中的下一个ChannelInboundHandler 进行处理;这样的处理是很灵活的,我们可以将解码器放在 ChannelPipeline 中,重用逻辑。
ByteToMessageDecoder
ByteToMessageDecoder 是用于将字节转为消息(或其他字节序列)。
你不能确定远端是否会一次发送完一个完整的“信息”,因此这个类会缓存入站的数据,直到准备好了用于处理。表7.1说明了它的两个最重要的方法。
Table 7.1 ByteToMessageDecoder API
| 方法名称 | 描述 |
|---|---|
| Decode | This is the only abstract method you need to implement. It is called with a ByteBuf having the incoming bytes and a List into which decoded messages are added. decode() is called repeatedly until the List is empty on return. The contents of the List are then passed to the next handler in the pipeline. |
| decodeLast | The default implementation provided simply calls decode().This method is called once, when the Channel goes inactive. Override to provide special |
handling
假设我们接收一个包含简单整数的字节流,每个都单独处理。在本例中,我们将从入站 ByteBuf 读取每个整数并将其传递给 pipeline 中的下一个ChannelInboundHandler。“解码”字节流成整数我们将扩展ByteToMessageDecoder,实现类为“ToIntegerDecoder”,如图7.1所示。
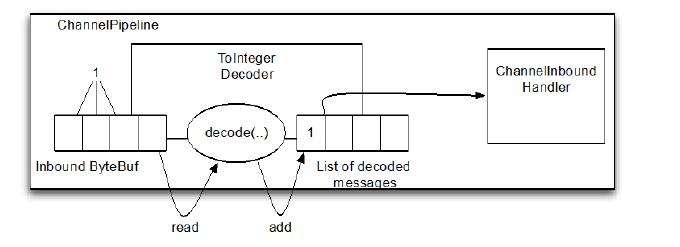
Figure 7.1 ToIntegerDecoder
每次从入站的 ByteBuf 读取四个字节,解码成整形,并添加到一个 List (本例是指 Integer),当不能再添加数据到 list 时,它所包含的内容就会被发送到下个 ChannelInboundHandler
Listing 7.1 ByteToMessageDecoder that decodes to Integer
public class ToIntegerDecoder extends ByteToMessageDecoder {  //1

    @Override
    public void decode(ChannelHandlerContext ctx, ByteBuf in, List<Object> out)
            throws Exception {
        if (in.readableBytes() >= 4) {  //2
            out.add(in.readInt());  //3
        }
    }
}
- 实现继承了 ByteToMessageDecode 用于将字节解码为消息
- 检查可读的字节是否至少有4个 ( int 是4个字节长度)
- 从入站 ByteBuf 读取 int , 添加到解码消息的 List 中
尽管 ByteToMessageDecoder 简化了这个模式,你会发现它还是有点烦人,在实际的读操作(这里 readInt())之前,必须要验证输入的 ByteBuf 要有足够的数据。在下一节中,我们将看看 ReplayingDecoder,一个特殊的解码器。
章节5和6中提到,应该特别注意引用计数。对于编码器和解码器来说,这个过程非常简单。一旦一个消息被编码或解码它自动被调用ReferenceCountUtil.release(message) 。如果你稍后还需要用到这个引用而不是马上释放,你可以调用 ReferenceCountUtil.retain(message)。这将增加引用计数,防止消息被释放。
ReplayingDecoder
ReplayingDecoder 是 byte-to-message 解码的一种特殊的抽象基类,读取缓冲区的数据之前需要检查缓冲区是否有足够的字节,使用ReplayingDecoder就无需自己检查;若ByteBuf中有足够的字节,则会正常读取;若没有足够的字节则会停止解码。
ByteToMessageDecoder 和 ReplayingDecoder
注意到 ReplayingDecoder 继承自 ByteToMessageDecoder ,所以API 跟表 7.1 是相同的
也正因为这样的包装使得 ReplayingDecoder 带有一定的局限性:
- 不是所有的标准 ByteBuf 操作都被支持,如果调用一个不支持的操作会抛出 UnreplayableOperationException
- ReplayingDecoder 略慢于 ByteToMessageDecoder
如果这些限制是可以接受你可能更喜欢使用 ReplayingDecoder。下面是一个简单的准则:
如果不引入过多的复杂性 使用 ByteToMessageDecoder 。否则,使用ReplayingDecoder。
Listing 7.2 ReplayingDecoder
public class ToIntegerDecoder2 extends ReplayingDecoder<Void> {   //1

    @Override
    public void decode(ChannelHandlerContext ctx, ByteBuf in, List<Object> out)
            throws Exception {
        out.add(in.readInt());  //2
    }
}
- 实现继承自 ReplayingDecoder 用于将字节解码为消息
- 从入站 ByteBuf 读取整型,并添加到解码消息的 List 中
如果我们比较清单7.1和7.2很明显,实现使用 ReplayingDecoder 更简单。
更多 Decoder
下面是更加复杂的使用场景: io.netty.handler.codec.LineBasedFrameDecoder 通过结束控制符("\n" 或 "\r\n").解析入站数据。 io.netty.handler.codec.http.HttpObjectDecoder 用于 HTTP 数据解码
MessageToMessageDecoder
用于从一种消息解码为另外一种消息(例如,POJO 到 POJO),下表展示了方法:
Table 7.2 MessageToMessageDecoder API
| 方法名称 | 描述 |
|---|---|
| decode | decode is the only abstract method you need to implement. It is called for each inbound message to be decoded to another format . The decoded messages are then passed to the next ChannelInboundHandler in the pipeline. |
| decodeLast | The default implementation provided simply calls decode().This method is called once, when the Channel goes inactive. Override to provide special |
handling
将 Integer 转为 String,我们提供了 IntegerToStringDecoder,继承自 MessageToMessageDecoder。
因为这是一个参数化的类,实现的签名是:
public class IntegerToStringDecoder extends MessageToMessageDecoder<Integer>
decode() 方法的签名是
protected void decode( ChannelHandlerContext ctx,
Integer msg, List<Object> out ) throws Exception
也就是说,入站消息是按照在类定义中声明的参数类型(这里是 Integer) 而不是 ByteBuf来解析的。在之前的例子,解码消息(这里是String)将被添加到List,并传递到下个 ChannelInboundHandler。 这是如图7.2所示。

Figure 7.2 IntegerToStringDecoder
实现如下:
Listing 7.3 MessageToMessageDecoder - Integer to String
public class IntegerToStringDecoder extends
        MessageToMessageDecoder<Integer> { //1

    @Override
    public void decode(ChannelHandlerContext ctx, Integer msg, List<Object> out)
            throws Exception {
        out.add(String.valueOf(msg)); //2
    }
}
- 实现继承自 MessageToMessageDecoder
- 通过 String.valueOf() 转换 Integer 消息字符串
正如我们上面指出的,decode()方法的消息参数的类型是由给这个类指定的泛型的类型(这里是Integer)确定的。
HttpObjectAggregator
更多复杂的示例,请查看类 io.netty.handler.codec.http.HttpObjectAggregator,继承自MessageToMessageDecoder
在解码时处理太大的帧
Netty 是异步框架需要缓冲区字节在内存中,直到你能够解码它们。因此,你不能让你的解码器缓存太多的数据以免耗尽可用内存。为了解决这个共同关心的问题, Netty 提供了一个 TooLongFrameException ,通常由解码器在帧太长时抛出。
为了避免这个问题,你可以在你的解码器里设置一个最大字节数阈值,如果超出,将导致 TooLongFrameException 抛出(并由 ChannelHandler.exceptionCaught() 捕获)。然后由译码器的用户决定如何处理它。虽然一些协议,比如 HTTP、允许这种情况下有一个特殊的响应,有些可能没有,事件唯一的选择可能就是关闭连接。
如清单7.4所示 ByteToMessageDecoder 可以利用 TooLongFrameException 通知其他 ChannelPipeline 中的 ChannelHandler。
Listing 7.4 SafeByteToMessageDecoder encodes shorts into a ByteBuf
public class SafeByteToMessageDecoder extends ByteToMessageDecoder {  //1
    private static final int MAX_FRAME_SIZE = 1024;

    @Override
    public void decode(ChannelHandlerContext ctx, ByteBuf in,
                       List<Object> out) throws Exception {
        int readable = in.readableBytes();
        if (readable > MAX_FRAME_SIZE) { //2
            in.skipBytes(readable);        //3
            throw new TooLongFrameException("Frame too big!");
        }
        // do something
    }
}
- 实现继承 ByteToMessageDecoder 来将字节解码为消息
- 检测缓冲区数据是否大于 MAX_FRAME_SIZE
- 忽略所有可读的字节,并抛出 TooLongFrameException 来通知 ChannelPipeline 中的 ChannelHandler 这个帧数据超长
这种保护是很重要的,尤其是当你解码一个有可变帧大小的协议的时候。
好了,解码器常见用例的解释以及 Netty 提供的用于构建它们它们的抽象基类就讲到这了。但是理解完解码器只是一方面而已,另一方面,我们还需要完成 Codec API,所以在下一章中我们将介绍编码器,它是用来转换消息到出站数据的。
Netty的Encoder(编码器)
在之前的章节中,我们对encoder有了定义,它是用来把出站数据从一种格式转换到另外一种格式,因此它实现了 ChanneOutboundHandler 。就像decoder一样,Netty 也为你提供了一组类来写 encoder ,当然这些类提供的是与 decoder 完全相反的方法,如下所示:
- 编码从消息到字节
- 编码从消息到消息
MessageToByteEncoder
之前我们学习了如何使用 ByteToMessageDecoder 来将字节转换成消息,现在我们使用 MessageToByteEncoder 实现相反的效果。
Table 7.3 MessageToByteEncoder API
| 方法名称 | 描述 |
|---|---|
| encode | The encode method is the only abstract method you need to implement. It is called with the outbound message, which this class will encodes to a ByteBuf. The ByteBuf is then forwarded to the next ChannelOutboundHandler in the ChannelPipeline. |
这个类只有一个方法,而 decoder 却是有两个,原因就是 decoder 经常需要在 Channel 关闭时产生一个“最后的消息”。出于这个原因,提供了decodeLast(),而 encoder 没有这个需求。
下面示例,我们想产生 Short 值,并想将他们编码成 ByteBuf 来发送到 线上,我们提供了 ShortToByteEncoder 来实现该目的。
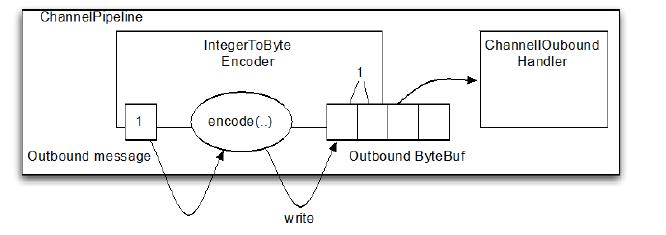
Figure 7.3 ShortToByteEncoder
上图展示了,encoder 收到了 Short 消息,编码他们,并把他们写入 ByteBuf。 ByteBuf 接着前进到下一个 pipeline 的ChannelOutboundHandler。每个 Short 将占用 ByteBuf 的两个字节
Listing 7.5 ShortToByteEncoder encodes shorts into a ByteBuf
public class ShortToByteEncoder extends
        MessageToByteEncoder<Short> {  //1
    @Override
    public void encode(ChannelHandlerContext ctx, Short msg, ByteBuf out)
            throws Exception {
        out.writeShort(msg);  //2
    }
}
- 实现继承自 MessageToByteEncoder
- 写 Short 到 ByteBuf
Netty 提供很多 MessageToByteEncoder 类来帮助你的实现自己的 encoder 。其中 WebSocket08FrameEncoder 就是个不错的范例。可以在 io.netty.handler.codec.http.websocketx 包找到。
MessageToMessageEncoder
我们已经知道了如何将入站数据从一个消息格式解码成另一个格式。现在我们需要一种方法来将出站数据从一种消息编码成另一种消息。MessageToMessageEncoder 提供此功能,见表7.4,同样的只有一个方法,因为不需要产生“最后的消息”。
Table 7.4 MessageToMessageEncoder API
| 方法名称 | 描述 |
|---|---|
| encode | The encode method is the only abstract method you need to implement. It is called for each message written with write(...) to encode the message to one or multiple new outbound messages. The encoded messages are then forwarded |
下面例子,我们将要解码 Integer 消息到 String 消息。可简单使用 MessageToMessageEncoder
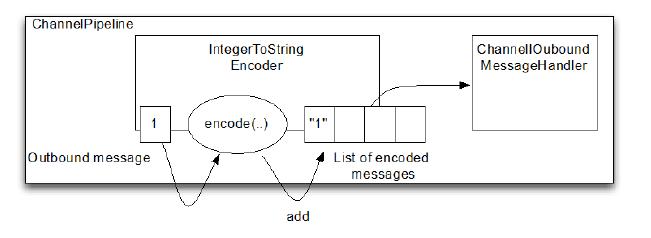
Figure 7.4 IntegerToStringEncoder
encoder 从出站字节流提取 Integer,以 String 形式传递给ChannelPipeline 中的下一个 ChannelOutboundHandler 。清单7.6 显示了细节。
Listing 7.6 IntegerToStringEncoder encodes integer to string
public class IntegerToStringEncoder extends
        MessageToMessageEncoder<Integer> { //1

    @Override
    public void encode(ChannelHandlerContext ctx, Integer msg, List<Object> out)
            throws Exception {
        out.add(String.valueOf(msg));  //2
    }
}
- 实现继承自 MessageToMessageEncoder
- 转 Integer 为 String,并添加到 MessageBuf
更复杂 的 MessageToMessageEncoder 应用案例,可以查看 io.netty.handler.codec.protobuf 包下的 ProtobufEncoder
Netty抽象 Codec(编解码器)类
我们在讨论解码器和编码器的时候,都是把它们当成不同的实体的,但是有时候如果在同一个类中同时放入入站和出站的数据和信息转换的话,发现会更加实用。而Netty中的抽象Codec(编解码器)类就能达到这个目的,它们成对地组合解码器和编码器,以此提供对于字节和消息都相同的操作(这些类实现了 ChannelInboundHandler 和 ChannelOutboundHandler )。
您可能想知道是否有时候使用单独的解码器和编码器会比使用这些组合类要好,最简单的答案是,紧密耦合的两个函数减少了他们的可重用性,但是把他们分开实现就会更容易扩展。当我们研究抽象编解码器类时,我们也会拿它和对应的独立的解码器和编码器做对比。
ByteToMessageCodec
我们需要解码字节到消息,也许是一个 POJO,然后转回来。ByteToMessageCodec 将为我们处理这个问题,因为它结合了ByteToMessageDecoder 和 MessageToByteEncoder。表7.5中列出的重要方法。
Table 7.5 ByteToMessageCodec API
| 方法名称 | 描述 |
|---|---|
| decode | This method is called as long as bytes are available to be consumed. It converts the inbound ByteBuf to the specified message format and forwards them to the next ChannelInboundHandler in the pipeline. |
| decodeLast | The default implementation of this method delegates to decode(). It is called only be called once, when the Channel goes inactive. For special handling it can be oerridden. |
| encode | This method is called for each message to be written through the ChannelPipeline. The encoded messages are contained in a ByteBuf which |
什么会是一个好的 ByteToMessageCodec 用例?任何一个请求/响应协议都可能是,例如 SMTP。编解码器将读取入站字节并解码到一个自定义的消息类型 SmtpRequest 。当接收到一个 SmtpResponse 会产生,用于编码为字节进行传输。
MessageToMessageCodec
7.3.2节中我们看到的一个例子使用 MessageToMessageEncoder 从一个消息格式转换到另一个地方。现在让我们看看 MessageToMessageCodec 是如何处理 单个类 的往返。
在进入细节之前,让我们看看表7.6中的重要方法。
Table 7.6 Methods of MessageToMessageCodec
| 方法名称 | 描述 |
|---|---|
| decode | This method is called with the inbound messages of the codec and decodes them to messages. Those messages are forwarded to the next ChannelInboundHandler in the ChannelPipeline |
| decodeLast | Default implementation delegates to decode().decodeLast will only be called one time, which is when the Channel goes inactive. If you need special handling here you may override decodeLast() to implement it. |
| encode | The encode method is called for each outbound message to be moved through the ChannelPipeline. The encoded messages are forwarded to the next ChannelOutboundHandler in the pipeline |
MessageToMessageCodec 是一个参数化的类,定义如下:
public abstract class MessageToMessageCodec<INBOUND,OUTBOUND>
上面所示的完整签名的方法都是这样的
protected abstract void encode(ChannelHandlerContext ctx,
OUTBOUND msg, List<Object> out)
protected abstract void decode(ChannelHandlerContext ctx,
INBOUND msg, List<Object> out)
encode() 处理出站消息类型 OUTBOUND 到 INBOUND,而 decode() 则相反。我们在哪里可能使用这样的编解码器?
在现实中,这是一个相当常见的用例,往往涉及两个来回转换的数据消息传递API 。这是常有的事,当我们不得不与遗留或专有的消息格式进行互操作。
如清单7.7所示这样的可能性。在这个例子中,WebSocketConvertHandler 是一个静态嵌套类,继承了参数为 WebSocketFrame(类型为 INBOUND)和 WebSocketFrame(类型为 OUTBOUND)的 MessageToMessageCode
Listing 7.7 MessageToMessageCodec
public class WebSocketConvertHandler extends MessageToMessageCodec<WebSocketFrame, WebSocketConvertHandler.WebSocketFrame> {  //1

    public static final WebSocketConvertHandler INSTANCE = new WebSocketConvertHandler();

    @Override
    protected void encode(ChannelHandlerContext ctx, WebSocketFrame msg, List<Object> out) throws Exception {
        ByteBuf payload = msg.getData().duplicate().retain();
        switch (msg.getType()) {   //2
            case BINARY:
                out.add(new BinaryWebSocketFrame(payload));
                break;
            case TEXT:
                out.add(new TextWebSocketFrame(payload));
                break;
            case CLOSE:
                out.add(new CloseWebSocketFrame(true, 0, payload));
                break;
            case CONTINUATION:
                out.add(new ContinuationWebSocketFrame(payload));
                break;
            case PONG:
                out.add(new PongWebSocketFrame(payload));
                break;
            case PING:
                out.add(new PingWebSocketFrame(payload));
                break;
            default:
                throw new IllegalStateException("Unsupported websocket msg " + msg);
        }
    }

    @Override
    protected void decode(ChannelHandlerContext ctx, io.netty.handler.codec.http.websocketx.WebSocketFrame msg, List<Object> out) throws Exception {
        if (msg instanceof BinaryWebSocketFrame) {  //3
            out.add(new WebSocketFrame(WebSocketFrame.FrameType.BINARY, msg.content().copy()));
        } else if (msg instanceof CloseWebSocketFrame) {
            out.add(new WebSocketFrame(WebSocketFrame.FrameType.CLOSE, msg.content().copy()));
        } else if (msg instanceof PingWebSocketFrame) {
            out.add(new WebSocketFrame(WebSocketFrame.FrameType.PING, msg.content().copy()));
        } else if (msg instanceof PongWebSocketFrame) {
            out.add(new WebSocketFrame(WebSocketFrame.FrameType.PONG, msg.content().copy()));
        } else if (msg instanceof TextWebSocketFrame) {
            out.add(new WebSocketFrame(WebSocketFrame.FrameType.TEXT, msg.content().copy()));
        } else if (msg instanceof ContinuationWebSocketFrame) {
            out.add(new WebSocketFrame(WebSocketFrame.FrameType.CONTINUATION, msg.content().copy()));
        } else {
            throw new IllegalStateException("Unsupported websocket msg " + msg);
        }
    }

    public static final class WebSocketFrame {  //4
        public enum FrameType {        //5
            BINARY,
            CLOSE,
            PING,
            PONG,
            TEXT,
            CONTINUATION
        }

        private final FrameType type;
        private final ByteBuf data;
        public WebSocketFrame(FrameType type, ByteBuf data) {
            this.type = type;
            this.data = data;
        }

        public FrameType getType() {
            return type;
        }

        public ByteBuf getData() {
            return data;
        }
    }
}
- 编码 WebSocketFrame 消息转为 WebSocketFrame 消息
- 检测 WebSocketFrame 的 FrameType 类型,并且创建一个新的响应的 FrameType 类型的 WebSocketFrame
- 通过 instanceof 来检测正确的 FrameType
- 自定义消息类型 WebSocketFrame
- 枚举类明确了 WebSocketFrame 的类型
CombinedChannelDuplexHandler
如前所述,结合解码器和编码器在一起可能会牺牲可重用性。为了避免这种方式,并且部署一个解码器和编码器到 ChannelPipeline 作为逻辑单元而不失便利性。
关键是下面的类:
public class CombinedChannelDuplexHandler<I extends ChannelInboundHandler,O extends ChannelOutboundHandler>
这个类是扩展 ChannelInboundHandler 和 ChannelOutboundHandler 参数化的类型。这提供了一个容器,单独的解码器和编码器类合作而无需直接扩展抽象的编解码器类。我们将在下面的例子说明这一点。首先查看 ByteToCharDecoder ,如清单7.8所示。
Listing 7.8 ByteToCharDecoder
public class ByteToCharDecoder extends
        ByteToMessageDecoder { //1

    @Override
    public void decode(ChannelHandlerContext ctx, ByteBuf in, List<Object> out)
            throws Exception {
        if (in.readableBytes() >= 2) {  //2
            out.add(in.readChar());
        }
    }
}
- 继承 ByteToMessageDecoder
- 写 char 到 MessageBuf
decode() 方法从输入数据中提取两个字节,并将它们作为一个 char 写入 List 。(注意,实现扩展 ByteToMessageDecoder 因为它从 ByteBuf 读取字符。)
现在看一下清单7.9中,把字符转换为字节的编码器。
Listing 7.9 CharToByteEncoder
public class CharToByteEncoder extends
        MessageToByteEncoder<Character> { //1

    @Override
    public void encode(ChannelHandlerContext ctx, Character msg, ByteBuf out)
            throws Exception {
        out.writeChar(msg);   //2
    }
}
- 继承 MessageToByteEncoder
- 写 char 到 ByteBuf
这个实现继承自 MessageToByteEncoder 因为他需要编码 char 消息 到 ByteBuf。这将直接将字符串写为 ByteBuf。
现在我们有编码器和解码器,将他们组成一个编解码器。见下面的 CombinedChannelDuplexHandler.
Listing 7.10 CombinedByteCharCodec
public class CombinedByteCharCodec extends CombinedChannelDuplexHandler<ByteToCharDecoder, CharToByteEncoder> {
    public CombinedByteCharCodec() {
        super(new ByteToCharDecoder(), new CharToByteEncoder());
    }
}
- CombinedByteCharCodec 的参数是解码器和编码器的实现用于处理进站字节和出站消息
- 传递 ByteToCharDecoder 和 CharToByteEncoder 实例到 super 构造函数来委托调用使他们结合起来。
正如你所看到的,它可能是用上述方式来使程序更简单、更灵活,而不是使用一个以上的编解码器类。它也可以归结到你个人喜好或风格。
使用 SSL/TLS 加密 Netty 程序
现在数据隐私问题受到越来越多人的关注,开发人员在进行开发的时候必须把这个问题考虑好。最基础的就是需要熟悉加密协议 SSL 和 TLS 等更上一层的其他协议来实现数据安全。作为一个 HTTPS 网站的用户,你是安全的。当然,这些协议是广泛不基于 http 的应用程序,例如安全SMTP(SMTPS)邮件服务,甚至于关系数据库系统。
为了支持 SSL/TLS,Java 提供了 javax.net.ssl API 的类SslContext 和 SslEngine 使它相对简单的实现解密和加密。Netty 的利用该 API 命名 SslHandler 的 ChannelHandler 实现, 有一个内部 SslEngine 做实际的工作。
图8.1显示了一个使用 SslHandler 数据流图。
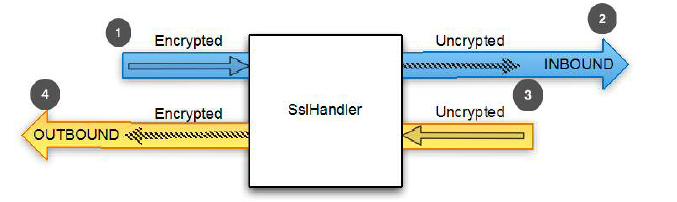
- 加密的入站数据被 SslHandler 拦截,并被解密
- 前面加密的数据被 SslHandler 解密
- 平常数据传过 SslHandler
- SslHandler 加密数据并它传递出站
Figure 8.1 Data flow through SslHandler for decryption and encryption
如清单8.1所示一个 SslHandler 使用 ChannelInitializer 添加到 ChannelPipeline。(回想一下,当 Channel 注册时 ChannelInitializer 用于设置 ChannelPipeline 。)
Listing 8.1 Add SSL/TLS support
public class SslChannelInitializer extends ChannelInitializer<Channel> {

    private final SslContext context;
    private final boolean startTls;
    public SslChannelInitializer(SslContext context,
    boolean client, boolean startTls) {   //1
        this.context = context;
        this.startTls = startTls;
    }
    @Override
    protected void initChannel(Channel ch) throws Exception {
        SSLEngine engine = context.newEngine(ch.alloc());  //2
        engine.setUseClientMode(client); //3
        ch.pipeline().addFirst("ssl", new SslHandler(engine, startTls));  //4
    }
}
- 使用构造函数来传递 SSLContext 用于使用(startTls 是否启用)
- 从 SslContext 获得一个新的 SslEngine 。给每个 SslHandler 实例使用一个新的 SslEngine
- 设置 SslEngine 是 client 或者是 server 模式
- 添加 SslHandler 到 pipeline 作为第一个处理器
在大多数情况下,SslHandler 将成为 ChannelPipeline 中的第一个 ChannelHandler 。这将确保所有其他 ChannelHandler 应用他们的逻辑到数据后加密后才发生,从而确保他们的变化是安全的。
SslHandler 有很多有用的方法,如表8.1所示。例如,在握手阶段两端相互验证,商定一个加密方法。您可以配置 SslHandler 修改其行为或提供 在SSL/TLS 握手完成后发送通知,这样所有数据都将被加密。 SSL/TLS 握手将自动执行。
Table 8.1 SslHandler methods
| 名称 | 描述 |
|---|---|
| setHandshakeTimeout(...) setHandshakeTimeoutMillis(...) getHandshakeTimeoutMillis() | Set and get the timeout, after which the handshake ChannelFuture is notified of failure. |
| setCloseNotifyTimeout(...) setCloseNotifyTimeoutMillis(...) getCloseNotifyTimeoutMillis() | Set and get the timeout after which the close notify will time out and the connection will close. This also results in having the close notify ChannelFuture fail. |
| handshakeFuture() | Returns a ChannelFuture that will be notified once the handshake is complete. If the handshake was done before it will return a ChannelFuture that contains the result of the previous handshake. |
| close(...) | Send the close_notify to request close and destroy the underlying SslEngine. |
构建 Netty HTTP/HTTPS 应用
最常见的一种协议是 HTTP/HTTPS ,尤其在智能手机上更是广泛使用。虽然我们可以通过HTTP或HTTPS访问一家公司的主页,但是它其实还有别的用处。就像许多组织会通过HTTP(S)来公开 WebService API ,这样做的目的是可以缓解独立平台带来的弊端。
下面让我们来看看 Netty 提供的 ChannelHandler是怎样允许您使用 HTTP 和 HTTPS 而无需编写自己的编解码器。
HTTP Decoder, Encoder 和 Codec
HTTP 是请求-响应模式,客户端发送一个 HTTP 请求,服务就响应此请求。Netty 提供了简单的编码、解码器来简化基于这个协议的开发工作。图8.2和图8.3显示 HTTP 请求和响应的方法是如何生产和消费的
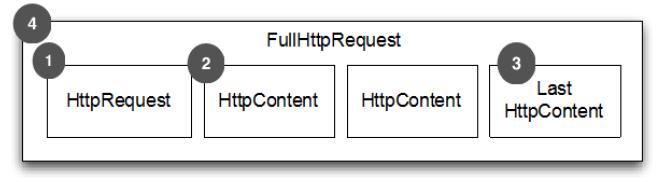
- HTTP Request 第一部分是包含的头信息
- HttpContent 里面包含的是数据,可以后续有多个 HttpContent 部分
- LastHttpContent 标记是 HTTP request 的结束,同时可能包含头的尾部信息
- 完整的 HTTP request
Figure 8.2 HTTP request component parts
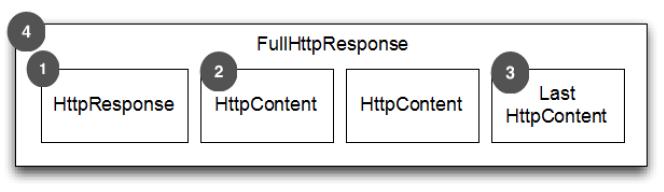
- HTTP response 第一部分是包含的头信息
- HttpContent 里面包含的是数据,可以后续有多个 HttpContent 部分
- LastHttpContent 标记是 HTTP response 的结束,同时可能包含头的尾部信息
- 完整的 HTTP response
Figure 8.3 HTTP response component parts
如图8.2和8.3所示的 HTTP 请求/响应可能包含不止一个数据部分,它总是终止于 LastHttpContent 部分。FullHttpRequest 和FullHttpResponse 消息是特殊子类型,分别表示一个完整的请求和响应。所有类型的 HTTP 消息(FullHttpRequest ,LastHttpContent 以及那些如清单8.2所示)实现 HttpObject 接口。
表8.2概述 HTTP 解码器和编码器的处理和生产这些消息。
Table 8.2 HTTP decoder and encoder
| 名称 | 描述 |
|---|---|
| HttpRequestEncoder | Encodes HttpRequest , HttpContent and LastHttpContent messages to bytes. |
| HttpResponseEncoder | Encodes HttpResponse, HttpContent and LastHttpContent messages to bytes. |
| HttpRequestDecoder | Decodes bytes into HttpRequest, HttpContent and LastHttpContent messages. |
| HttpResponseDecoder | Decodes bytes into HttpResponse, HttpContent and LastHttpContent messages. |
清单8.2所示的是将支持 HTTP 添加到您的应用程序是多么简单。仅仅添加正确的 ChannelHandler 到 ChannelPipeline 中
Listing 8.2 Add support for HTTP
public class HttpPipelineInitializer extends ChannelInitializer<Channel> {

    private final boolean client;

    public HttpPipelineInitializer(boolean client) {
        this.client = client;
    }

    @Override
    protected void initChannel(Channel ch) throws Exception {
        ChannelPipeline pipeline = ch.pipeline();
        if (client) {
            pipeline.addLast("decoder", new HttpResponseDecoder());  //1
            pipeline.addLast("encoder", new HttpRequestEncoder());  //2
        } else {
            pipeline.addLast("decoder", new HttpRequestDecoder());  //3
            pipeline.addLast("encoder", new HttpResponseEncoder());  //4
        }
    }
}
- client: 添加 HttpResponseDecoder 用于处理来自 server 响应
- client: 添加 HttpRequestEncoder 用于发送请求到 server
- server: 添加 HttpRequestDecoder 用于接收来自 client 的请求
- server: 添加 HttpResponseEncoder 用来发送响应给 client
HTTP消息聚合
安装 ChannelPipeline 中的初始化之后,你能够对不同 HttpObject 消息进行操作。但由于 HTTP 请求和响应可以由许多部分组合而成,你需要聚合他们形成完整的消息。为了消除这种繁琐任务, Netty 提供了一个聚合器,合并消息部件到 FullHttpRequest 和 FullHttpResponse 消息。这样您总是能够看到完整的消息内容。
这个操作有一个轻微的成本,消息段需要缓冲,直到完全可以将消息转发到下一个 ChannelInboundHandler 管道。但好处是,你不必担心消息碎片。
实现自动聚合只需添加另一个 ChannelHandler 到 ChannelPipeline。清单8.3显示了这是如何实现的。
Listing 8.3 Automatically aggregate HTTP message fragments
public class HttpAggregatorInitializer extends ChannelInitializer<Channel> {

    private final boolean client;

    public HttpAggregatorInitializer(boolean client) {
        this.client = client;
    }

    @Override
    protected void initChannel(Channel ch) throws Exception {
        ChannelPipeline pipeline = ch.pipeline();
        if (client) {
            pipeline.addLast("codec", new HttpClientCodec());  //1
        } else {
            pipeline.addLast("codec", new HttpServerCodec());  //2
        }
        pipeline.addLast("aggegator", new HttpObjectAggregator(512 * 1024));  //3
    }
}
- client: 添加 HttpClientCodec
- server: 添加 HttpServerCodec 作为我们是 server 模式时
- 添加 HttpObjectAggregator 到 ChannelPipeline, 使用最大消息值是 512kb
HTTP 压缩
使用 HTTP 时建议压缩数据以减少传输流量,压缩数据会增加 CPU 负载,现在的硬件设施都很强大,大多数时候压缩数据时一个好主意。Netty 支持“gzip”和“deflate”,为此提供了两个 ChannelHandler 实现分别用于压缩和解压。看下面代码:
HTTP Request Header
客户端可以通过提供下面的头显示支持加密模式。然而服务器不是,所以不得不压缩它发送的数据。
GET /encrypted-area HTTP/1.1
Host: www.example.com
Accept-Encoding: gzip, deflate
下面是一个例子
Listing 8.4 Automatically compress HTTP messages
public class HttpAggregatorInitializer extends ChannelInitializer<Channel> {

    private final boolean isClient;
    public HttpAggregatorInitializer(boolean isClient) {
        this.isClient = isClient;
    }
    @Override
    protected void initChannel(Channel ch) throws Exception {
        ChannelPipeline pipeline = ch.pipeline();
        if (isClient) {
            pipeline.addLast("codec", new HttpClientCodec()); //1
            pipeline.addLast("decompressor",new HttpContentDecompressor()); //2
        } else {
            pipeline.addLast("codec", new HttpServerCodec()); //3
            pipeline.addLast("compressor",new HttpContentCompressor()); //4
        }
    }
}
- client: 添加 HttpClientCodec
- client: 添加 HttpContentDecompressor 用于处理来自服务器的压缩的内容
- server: HttpServerCodec
- server: HttpContentCompressor 用于压缩来自 client 支持的 HttpContentCompressor
压缩与依赖
注意,Java 6或者更早版本,如果要压缩数据,需要添加 jzlib 到 classpath
<dependency>
    <groupId>com.jcraft</groupId>
        <artifactId>jzlib</artifactId>
    <version>1.1.3</version>
</dependency>
使用 HTTPS
启用 HTTPS,只需添加 SslHandler
Listing 8.5 Using HTTPS
public class HttpsCodecInitializer extends ChannelInitializer<Channel> {

    private final SslContext context;
    private final boolean client;

    public HttpsCodecInitializer(SslContext context, boolean client) {
        this.context = context;
        this.client = client;
    }

    @Override
    protected void initChannel(Channel ch) throws Exception {
        ChannelPipeline pipeline = ch.pipeline();
        SSLEngine engine = context.newEngine(ch.alloc());
        pipeline.addFirst("ssl", new SslHandler(engine));  //1

        if (client) {
            pipeline.addLast("codec", new HttpClientCodec());  //2
        } else {
            pipeline.addLast("codec", new HttpServerCodec());  //3
        }
    }
}
- 添加 SslHandler 到 pipeline 来启用 HTTPS
- client: 添加 HttpClientCodec
- server: 添加 HttpServerCodec ,如果是 server 模式的话
上面的代码就是一个很好的例子,解释了 Netty 的架构是如何让“重用”变成了“杠杆”。我们可以添加一个新的功能,甚至是一样重要的加密支持,几乎没有工作量,只需添加一个ChannelHandler 到 ChannelPipeline。
WebSocket
HTTP 是不错的协议,但是如果需要实时发布信息怎么做?有个做法就是客户端一直轮询请求服务器,这种方式虽然可以达到目的,但是其缺点很多,也不是优秀的解决方案,为了解决这个问题,便出现了 WebSocket。
WebSocket 允许数据双向传输,而不需要请求-响应模式。早期的WebSocket 只能发送文本数据,然后现在不仅可以发送文本数据,也可以发送二进制数据,这使得可以使用 WebSocket 构建你想要的程序。下图是WebSocket 的通信示例图:
WebSocket 规范及其实现是为了一个更有效的解决方案。简单的说, 一个WebSocket 提供一个 TCP 连接两个方向的交通。结合 WebSocket API 它提供了一个替代 HTTP 轮询双向通信从页面到远程服务器。
也就是说,WebSocket 提供真正的双向客户机和服务器之间的数据交换。 我们不会对内部太多的细节,但我们应该提到,虽然最早实现仅限于文本数据,但现在不再是这样,WebSocket可以用于任意数据,就像一个正常的套接字。
图8.4给出了一个通用的 WebSocket 协议。在这种情况下的通信开始于普通 HTTP ,并“升级”为双向 WebSocket。
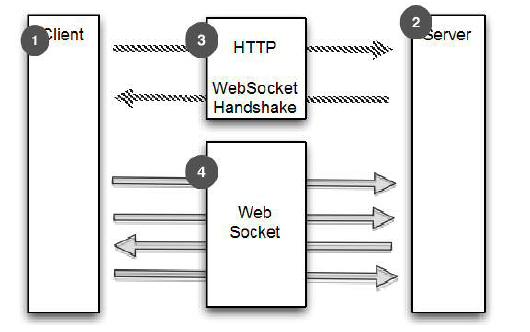
- Client (HTTP) 与 Server 通讯
- Server (HTTP) 与 Client 通讯
- Client 通过 HTTP(s) 来进行 WebSocket 握手,并等待确认
- 连接协议升级至 WebSocket
Figure 8.4 WebSocket protocol
添加应用程序支持 WebSocket 只需要添加适当的客户端或服务器端WebSocket ChannelHandler 到管道。这个类将处理特殊 WebSocket 定义的消息类型,称为“帧。“如表8.3所示,这些可以归类为“数据”和“控制”帧。
Table 8.3 WebSocketFrame types
| 名称 | 描述 |
|---|---|
| BinaryWebSocketFrame | Data frame: binary data |
| TextWebSocketFrame | Data frame: text data |
| ContinuationWebSocketFrame | Data frame: text or binary data that belongs to a previous BinaryWebSocketFrame or TextWebSocketFrame |
| CloseWebSocketFrame | Control frame: a CLOSE request, close status code and a phrase |
| PingWebSocketFrame | Control frame: requests the send of a PongWebSocketFrame |
| PongWebSocketFrame | Control frame: sent as response to a PingWebSocketFrame |
由于 Netty 的主要是一个服务器端技术重点在这里创建一个 WebSocket server 。清单8.6使用 WebSocketServerProtocolHandler 提出了一个简单的例子。该类处理协议升级握手以及三个“控制”帧 Close, Ping 和 Pong。Text 和 Binary 数据帧将被传递到下一个处理程序(由你实现)进行处理。
Listing 8.6 Support WebSocket on the server
public class WebSocketServerInitializer extends ChannelInitializer<Channel> {
    @Override
    protected void initChannel(Channel ch) throws Exception {
        ch.pipeline().addLast(
                new HttpServerCodec(),
                new HttpObjectAggregator(65536),  //1
                new WebSocketServerProtocolHandler("/websocket"),  //2
                new TextFrameHandler(),  //3
                new BinaryFrameHandler(),  //4
                new ContinuationFrameHandler());  //5
    }

    public static final class TextFrameHandler extends SimpleChannelInboundHandler<TextWebSocketFrame> {
        @Override
        public void channelRead0(ChannelHandlerContext ctx, TextWebSocketFrame msg) throws Exception {
            // Handle text frame
        }
    }

    public static final class BinaryFrameHandler extends SimpleChannelInboundHandler<BinaryWebSocketFrame> {
        @Override
        public void channelRead0(ChannelHandlerContext ctx, BinaryWebSocketFrame msg) throws Exception {
            // Handle binary frame
        }
    }

    public static final class ContinuationFrameHandler extends SimpleChannelInboundHandler<ContinuationWebSocketFrame> {
        @Override
        public void channelRead0(ChannelHandlerContext ctx, ContinuationWebSocketFrame msg) throws Exception {
            // Handle continuation frame
        }
    }
}
- 添加 HttpObjectAggregator 用于提供在握手时聚合 HttpRequest
- 添加 WebSocketServerProtocolHandler 用于处理色好给你寄握手如果请求是发送到"/websocket." 端点,当升级完成后,它将会处理Ping, Pong 和 Close 帧
- TextFrameHandler 将会处理 TextWebSocketFrames
- BinaryFrameHandler 将会处理 BinaryWebSocketFrames
- ContinuationFrameHandler 将会处理ContinuationWebSocketFrames
加密 WebSocket 只需插入 SslHandler 到作为 pipline 第一个 ChannelHandler
SPDY
SPDY(读作“SPeeDY”)是Google 开发的基于 TCP 的应用层协议,用以最小化网络延迟,提升网络速度,优化用户的网络使用体验。SPDY 并不是一种用于替代 HTTP 的协议,而是对 HTTP 协议的增强。SPDY 实现技术:
- 压缩报头
- 加密所有
- 多路复用连接
- 提供支持不同的传输优先级
SPDY 主要有5个版本:
- 1 - 初始化版本,但没有使用
- 2 - 新特性,包含服务器推送
- 3 - 新特性包含流控制和更新压缩
- 3.1 - 会话层流程控制
- 4.0 - 流量控制,并与 HTTP 2.0 更加集成
SPDY 被很多浏览器支持,包括 Google Chrome, Firefox, 和 Opera
Netty序列化数据
在JDK中是使用了 ObjectOutputStream 和 ObjectInputStream 来通过网络将原始数据类型和 POJO 进行序列化和反序列化,API并不复杂,支持 java.io.Serializable 接口,但是它也不算是高效的。本节内容中,我们来看看 Netty 所提供的。
JDK 序列化
如果程序与端对端间的交互是使用 ObjectOutputStream 和 ObjectInputStream,并且主要面临的问题是兼容性,那么, JDK 序列化 是不错的选择。
表8.8列出了序列化类,Netty 提供了与 JDK 的互操作。
Table 8.8 JDK Serialization codecs
| 名称 | 描述 |
|---|---|
| CompatibleObjectDecoder | 该解码器使用 JDK 序列化,用于与非 Netty 进行互操作。 |
| CompatibleObjectEncoder | 该编码器使用 JDK 序列化,用于与非 Netty 进行互操作。 |
| ObjectDecoder | 基于 JDK 序列化来使用自定义序列化解码。外部依赖被排除在外时,提供了一个速度提升。否则选择其他序列化实现 |
| ObjectEncoder | 基于 JDK 序列化来使用自定义序列化编码。外部依赖被排除在外时,提供了一个速度提升。否则选择其他序列化实现 |
JBoss Marshalling 序列化
如果可以使用外部依赖 JBoss Marshalling 是个明智的选择。比 JDK 序列化快3倍且更加简练。
JBoss Marshalling 是另一个序列化 API,修复的许多 JDK序列化 API 中发现的问题,它与 java.io.Serializable 完全兼容。并添加了一些新的可调参数和附加功能,所有这些都可插入通过工厂配置外部化,类/实例查找表,类决议,对象替换,等等)
下表展示了 Netty 支持 JBoss Marshalling 的编解码器。
Table 8.9 JBoss Marshalling codecs
| 名称 | 描述 |
|---|---|
| CompatibleMarshallingDecoder | 为了与使用 JDK 序列化的端对端间兼容。 |
| CompatibleMarshallingEncoder | 为了与使用 JDK 序列化的端对端间兼容。 |
| MarshallingDecoder | 使用自定义序列化用于解码,必须使用 |
MarshallingEncoder MarshallingEncoder | 使用自定义序列化用于编码,必须使用 MarshallingDecoder
下面展示了使用 MarshallingDecoder 和 MarshallingEncoder
Listing 8.13 Using JBoss Marshalling
public class MarshallingInitializer extends ChannelInitializer<Channel> {

    private final MarshallerProvider marshallerProvider;
    private final UnmarshallerProvider unmarshallerProvider;

    public MarshallingInitializer(UnmarshallerProvider unmarshallerProvider,
                                  MarshallerProvider marshallerProvider) {
        this.marshallerProvider = marshallerProvider;
        this.unmarshallerProvider = unmarshallerProvider;
    }
    @Override
    protected void initChannel(Channel channel) throws Exception {
        ChannelPipeline pipeline = channel.pipeline();
        pipeline.addLast(new MarshallingDecoder(unmarshallerProvider));
        pipeline.addLast(new MarshallingEncoder(marshallerProvider));
        pipeline.addLast(new ObjectHandler());
    }

    public static final class ObjectHandler extends SimpleChannelInboundHandler<Serializable> {
        @Override
        public void channelRead0(ChannelHandlerContext channelHandlerContext, Serializable serializable) throws Exception {
            // Do something
        }
    }
}
ProtoBuf 序列化
ProtoBuf 来自谷歌,并且开源了。它使编解码数据更加紧凑和高效。它已经绑定各种编程语言,使它适合跨语言项目。
下表展示了 Netty 支持 ProtoBuf 的 ChannelHandler 实现。
Table 8.10 ProtoBuf codec
| 名称 | 描述 |
|---|---|
| ProtobufDecoder | 使用 ProtoBuf 来解码消息 |
| ProtobufEncoder | 使用 ProtoBuf 来编码消息 |
| ProtobufVarint32FrameDecoder | 在消息的整型长度域中,通过 "Base 128 Varints"将接收到的 ByteBuf 动态的分割 |
用法见下面
Listing 8.14 Using Google Protobuf
public class ProtoBufInitializer extends ChannelInitializer<Channel> {

    private final MessageLite lite;

    public ProtoBufInitializer(MessageLite lite) {
        this.lite = lite;
    }

    @Override
    protected void initChannel(Channel ch) throws Exception {
        ChannelPipeline pipeline = ch.pipeline();
        pipeline.addLast(new ProtobufVarint32FrameDecoder());
        pipeline.addLast(new ProtobufEncoder());
        pipeline.addLast(new ProtobufDecoder(lite));
        pipeline.addLast(new ObjectHandler());
    }

    public static final class ObjectHandler extends SimpleChannelInboundHandler<Object> {
        @Override
        public void channelRead0(ChannelHandlerContext ctx, Object msg) throws Exception {
            // Do something with the object
        }
    }
}
- 添加 ProtobufVarint32FrameDecoder 用来分割帧
- 添加 ProtobufEncoder 用来处理消息的编码
- 添加 ProtobufDecoder 用来处理消息的解码
- 添加 ObjectHandler 用来处理解码了的消息
本章在这最后一节中,我们探讨了 Netty 支持的不同的序列化的专门的解码器和编码器。这些是标准 JDK 序列化 API,JBoss Marshalling 和谷歌ProtoBuf。
Netty如何编写大型数据
出于网络的原因,有一个特殊的问题需要我们思考,就是如何能够有效的在异步框架写大数据。因为写操作是非阻塞的,即使不能写出数据,也只是通知 ChannelFuture 完成了。每当发生这种情况,就必须停止写操作或面临内存耗尽的风险。所以在进行写操作的时候,会产生的大量的数据,在这种情况下我们要准备好处理因为连接远端缓慢而导致的延迟释放内存的问题。作为一个例子让我们考虑写一个文件的内容到网络。
我们讨论传输的时候,有提到 NIO 的“zero-copy(零拷贝)”功能,消除移动一个文件的内容从文件系统到网络堆栈的复制步骤。所有这一切发生在 Netty 的核心,因此所有所需的应用程序代码是使用 interface FileRegion 的实现,在 Netty 的API 文档中定义如下为一个通过 Channel 支持 zero-copy 文件传输的文件区域。
下面演示了通过 zero-copy 将文件内容从 FileInputStream 创建 DefaultFileRegion 并写入 使用 Channel
Listing 8.11 Transferring file contents with FileRegion
FileInputStream in = new FileInputStream(file); //1
FileRegion region = new DefaultFileRegion(in.getChannel(), 0, file.length()); //2

channel.writeAndFlush(region).addListener(new ChannelFutureListener() { //3
    @Override
    public void operationComplete(ChannelFuture future) throws Exception {
        if (!future.isSuccess()) {
            Throwable cause = future.cause(); //4
            // Do something
        }
    }
});
- 获取 FileInputStream
- 创建一个新的 DefaultFileRegion 用于文件的完整长度
- 发送 DefaultFileRegion 并且注册一个 ChannelFutureListener
- 处理发送失败
只是看到的例子只适用于直接传输一个文件的内容,没有执行的数据应用程序的处理。在相反的情况下,将数据从文件系统复制到用户内存是必需的,您可以使用 ChunkedWriteHandler。这个类提供了支持异步写大数据流不引起高内存消耗。
这个关键是 interface ChunkedInput,实现如下:
| 名称 | 描述 |
|---|---|
| ChunkedFile | 当你使用平台不支持 zero-copy 或者你需要转换数据,从文件中一块一块的获取数据 |
| ChunkedNioFile | 与 ChunkedFile 类似,处理使用了NIOFileChannel |
| ChunkedStream | 从 InputStream 中一块一块的转移内容 |
| ChunkedNioStream | 从 ReadableByteChannel 中一块一块的转移内容 |
清单 8.12 演示了使用 ChunkedStream,实现在实践中最常用。 所示的类被实例化一个 File 和一个 SslContext。当 initChannel() 被调用来初始化显示的处理程序链的通道。
当通道激活时,WriteStreamHandler 从文件一块一块的写入数据作为ChunkedStream。最后将数据通过 SslHandler 加密后传播。
Listing 8.12 Transfer file content with FileRegion
public class ChunkedWriteHandlerInitializer extends ChannelInitializer<Channel> {
    private final File file;
    private final SslContext sslCtx;

    public ChunkedWriteHandlerInitializer(File file, SslContext sslCtx) {
        this.file = file;
        this.sslCtx = sslCtx;
    }

    @Override
    protected void initChannel(Channel ch) throws Exception {
        ChannelPipeline pipeline = ch.pipeline();
        pipeline.addLast(new SslHandler(sslCtx.createEngine()); //1
        pipeline.addLast(new ChunkedWriteHandler());//2
        pipeline.addLast(new WriteStreamHandler());//3
    }

    public final class WriteStreamHandler extends ChannelInboundHandlerAdapter {  //4

        @Override
        public void channelActive(ChannelHandlerContext ctx) throws Exception {
            super.channelActive(ctx);
            ctx.writeAndFlush(new ChunkedStream(new FileInputStream(file)));
        }
    }
}
- 添加 SslHandler 到 ChannelPipeline.
- 添加 ChunkedWriteHandler 用来处理作为 ChunkedInput 传进的数据
- 当连接建立时,WriteStreamHandler 开始写文件的内容
- 当连接建立时,channelActive() 触发使用 ChunkedInput 来写文件的内容 (插图显示了 FileInputStream;也可以使用任何 InputStream )
ChunkedInput 所有被要求使用自己的 ChunkedInput 实现,是安装ChunkedWriteHandler 在管道中
在本节中,我们讨论
- 如何采用zero-copy(零拷贝)功能高效地传输文件
- 如何使用 ChunkedWriteHandler 编写大型数据而避免 OutOfMemoryErrors 错误。
在下一节中我们将研究几种不同方法来序列化 POJO。
Netty如何解码分隔符和基于长度的协议
使用 Netty 时会遇到需要解码以分隔符和长度为基础的协议,本节讲解Netty 如何解码这些协议。
分隔符协议
经常需要处理分隔符协议或创建基于它们的协议,例如SMTP、POP3、IMAP、Telnet等等。Netty 附带的解码器可以很容易的提取一些序列分隔:
Table 8.5 Decoders for handling delimited and length-based protocols
| 名称 | 描述 |
|---|---|
| DelimiterBasedFrameDecoder | 接收ByteBuf由一个或多个分隔符拆分,如NUL或换行符 |
| LineBasedFrameDecoder | 接收ByteBuf以分割线结束,如"\n"和"\r\n" |
下图显示了使用"\r\n"分隔符的处理:
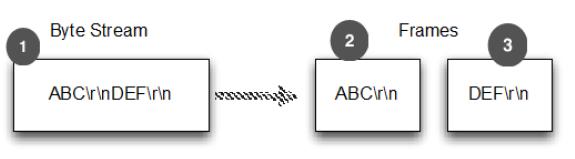
- 字节流
- 第一帧
- 第二帧
Figure 8.5 Handling delimited frames
下面展示了如何用 LineBasedFrameDecoder 处理
Listing 8.8 Handling line-delimited frames
public class LineBasedHandlerInitializer extends ChannelInitializer<Channel> {

    @Override
    protected void initChannel(Channel ch) throws Exception {
        ChannelPipeline pipeline = ch.pipeline();
        pipeline.addLast(new LineBasedFrameDecoder(65 * 1024));   //1
        pipeline.addLast(new FrameHandler());  //2
    }

    public static final class FrameHandler extends SimpleChannelInboundHandler<ByteBuf> {
        @Override
        public void channelRead0(ChannelHandlerContext ctx, ByteBuf msg) throws Exception {  //3
            // Do something with the frame
        }
    }
}
- 添加一个 LineBasedFrameDecoder 用于提取帧并把数据包转发到下一个管道中的处理程序,在这种情况下就是 FrameHandler
- 添加 FrameHandler 用于接收帧
- 每次调用都需要传递一个单帧的内容
使用 DelimiterBasedFrameDecoder 可以方便处理特定分隔符作为数据结构体的这类情况。如下:
- 传入的数据流是一系列的帧,每个由换行(“\n”)分隔
- 每帧包括一系列项目,每个由单个空格字符分隔
- 一帧的内容代表一个“命令”:一个名字后跟一些变量参数
清单8.9中显示了的实现的方式。定义以下类:
- 类 Cmd - 存储帧的内容,其中一个 ByteBuf 用于存名字,另外一个存参数
- 类 CmdDecoder - 从重写方法 decode() 中检索一行,并从其内容中构建一个 Cmd 的实例
- 类 CmdHandler - 从 CmdDecoder 接收解码 Cmd 对象和对它的一些处理。
所以关键的解码器是扩展了 LineBasedFrameDecoder
Listing 8.9 Decoder for the command and the handler
public class CmdHandlerInitializer extends ChannelInitializer<Channel> {

    @Override
    protected void initChannel(Channel ch) throws Exception {
        ChannelPipeline pipeline = ch.pipeline();
        pipeline.addLast(new CmdDecoder(65 * 1024));//1
        pipeline.addLast(new CmdHandler()); //2
    }

    public static final class Cmd { //3
        private final ByteBuf name;
        private final ByteBuf args;

        public Cmd(ByteBuf name, ByteBuf args) {
            this.name = name;
            this.args = args;
        }

        public ByteBuf name() {
            return name;
        }

        public ByteBuf args() {
            return args;
        }
    }

    public static final class CmdDecoder extends LineBasedFrameDecoder {
        public CmdDecoder(int maxLength) {
            super(maxLength);
        }

        @Override
        protected Object decode(ChannelHandlerContext ctx, ByteBuf buffer) throws Exception {
            ByteBuf frame =  (ByteBuf) super.decode(ctx, buffer); //4
            if (frame == null) {
                return null; //5
            }
            int index = frame.indexOf(frame.readerIndex(), frame.writerIndex(), (byte) ' ');  //6
            return new Cmd(frame.slice(frame.readerIndex(), index), frame.slice(index +1, frame.writerIndex())); //7
        }
    }

    public static final class CmdHandler extends SimpleChannelInboundHandler<Cmd> {
        @Override
        public void channelRead0(ChannelHandlerContext ctx, Cmd msg) throws Exception {
            // Do something with the command  //8
        }
    }
}
- 添加一个 CmdDecoder 到管道;将提取 Cmd 对象和转发到在管道中的下一个处理器
- 添加 CmdHandler 将接收和处理 Cmd 对象
- 命令也是 POJO
- super.decode() 通过结束分隔从 ByteBuf 提取帧
- frame 是空时,则返回 null
- 找到第一个空字符的索引。首先是它的命令名;接下来是参数的顺序
- 从帧先于索引以及它之后的片段中实例化一个新的 Cmd 对象
- 处理通过管道的 Cmd 对象
基于长度的协议
基于长度的协议协议在帧头文件里定义了一个帧编码的长度,而不是结束位置用一个特殊的分隔符来标记。表8.6列出了 Netty 提供的两个解码器,用于处理这种类型的协议。
Table 8.6 Decoders for length-based protocols
| 名称 | 描述 |
|---|---|
| FixedLengthFrameDecoder | 提取固定长度 |
| LengthFieldBasedFrameDecoder | 读取头部长度并提取帧的长度 |
如下图所示,FixedLengthFrameDecoder 的操作是提取固定长度每帧8字节

- 字节流 stream
- 4个帧,每个帧8个字节
大部分时候帧的大小被编码在头部,这种情况可以使用LengthFieldBasedFrameDecoder,它会读取头部长度并提取帧的长度。下图显示了它是如何工作的:
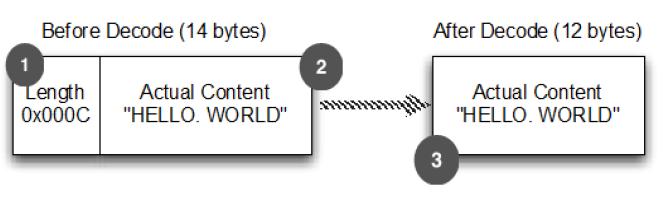
- 长度 "0x000C" (12) 被编码在帧的前两个字节
- 后面的12个字节就是内容
- 提取没有头文件的帧内容
Figure 8.7 Message that has frame size encoded in the header
LengthFieldBasedFrameDecoder 提供了几个构造函数覆盖各种各样的头长字段配置情况。清单8.10显示了使用三个参数的构造函数是maxFrameLength,lengthFieldOffset lengthFieldLength。在这 情况下,帧的长度被编码在帧的前8个字节。
Listing 8.10 Decoder for the command and the handler
public class LengthBasedInitializer extends ChannelInitializer<Channel> {
    @Override
    protected void initChannel(Channel ch) throws Exception {
        ChannelPipeline pipeline = ch.pipeline();
        pipeline.addLast(
        new LengthFieldBasedFrameDecoder(65 * 1024, 0, 8)); //1
        pipeline.addLast(new FrameHandler()); //2
    }

    public static final class FrameHandler
        extends SimpleChannelInboundHandler<ByteBuf> {
        @Override
        public void channelRead0(ChannelHandlerContext ctx,
        ByteBuf msg) throws Exception {
        // Do something with the frame //3
        }
    }
}
- 添加一个 LengthFieldBasedFrameDecoder ,用于提取基于帧编码长度8个字节的帧。
- 添加一个 FrameHandler 用来处理每帧
- 处理帧数据
总而言之,本部分探讨了 Netty 提供的编解码器支持协议,包括定义特定的分隔符的字节流的结构或协议帧的长度。这些编解码器非常有用。
Netty引导(Bootstrapping)
本章介绍:
- 引导客户端和服务器
- 从Channel引导客户端
- 添加 ChannelHandler
- 使用 ChannelOption 和属性
正如我们所见,ChannelPipeline 、ChannelHandler和编解码器提供工具,我们可以处理一个广泛的数据处理需求。但是你可能会问,“我创建了组件后,如何将其组装形成一个应用程序?”
答案是“bootstrapping(引导)”。到目前为止我们使用这个词有点模糊,时间可以来定义它。在最简单的条件下,引导就是配置应用程序的过程。但正如我们看到的,不仅仅如此;Netty 的引导客户端和服务器的类从网络基础设施使您的应用程序代码在后台可以连接和启动所有的组件。简而言之,引导使你的 Netty 应用程序完整。
Netty引导客户端和无连接协议
Bootstrap类可以用来引导客户端和一些无连接协议,在本节中,我们将回顾可用的各种方法引导客户端,引导线程,和可用的管道实现。
客户端引导方法
下表是 Bootstrap 的常用方法,其中很多是继承自 AbstractBootstrap。
Table 9.1 Bootstrap methods
| 名称 | 描述 |
|---|---|
| group | 设置 EventLoopGroup 用于处理所有的 Channel 的事件 |
| channel channelFactory | channel() 指定 Channel 的实现类。如果类没有提供一个默认的构造函数,你可以调用 channelFactory() 来指定一个工厂类被 bind() 调用。 |
| localAddress | 指定应该绑定到本地地址 Channel。如果不提供,将由操作系统创建一个随机的。或者,您可以使用 bind() 或 connect()指定localAddress |
| option | 设置 ChannelOption 应用于 新创建 Channel 的 ChannelConfig。这些选项将被 bind 或 connect 设置在通道,这取决于哪个被首先调用。这个方法在创建管道后没有影响。所支持 ChannelOption 取决于使用的管道类型。请参考9.6节和 ChannelConfig 的 API 文档 的 Channel 类型使用。 |
| attr | 这些选项将被 bind 或 connect 设置在通道,这取决于哪个被首先调用。这个方法在创建管道后没有影响。请参考9.6节。 |
| handler | 设置添加到 ChannelPipeline 中的 ChannelHandler 接收事件通知。 |
| clone | 创建一个当前 Bootstrap的克隆拥有原来相同的设置。 |
| remoteAddress | 设置远程地址。此外,您可以通过 connect() 指定 |
| connect | 连接到远端,返回一个 ChannelFuture, 用于通知连接操作完成 |
| bind | 将通道绑定并返回一个 ChannelFuture,用于通知绑定操作完成后,必须调用 Channel.connect() 来建立连接。 |
如何引导客户端
Bootstrap 类负责创建管道给客户或应用程序,利用无连接协议和在调用 bind() 或 connect() 之后。
下图展示了如何工作
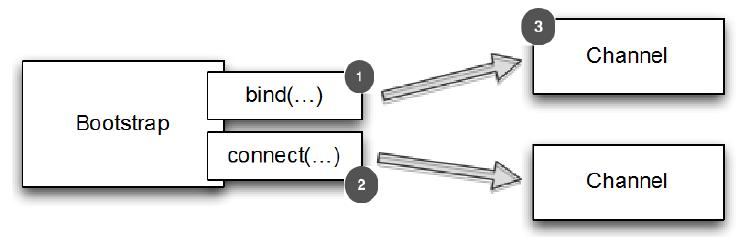
- 当 bind() 调用时,Bootstrap 将创建一个新的管道, 当 connect() 调用在 Channel 来建立连接
- Bootstrap 将创建一个新的管道, 当 connect() 调用时
- 新的 Channel
Figure 9.2 Bootstrap process
下面演示了引导客户端,使用的是 NIO TCP 传输
Listing 9.1 Bootstrapping a client
EventLoopGroup group = new NioEventLoopGroup();
Bootstrap bootstrap = new Bootstrap(); //1
bootstrap.group(group) //2
    .channel(NioSocketChannel.class) //3
    .handler(new SimpleChannelInboundHandler<ByteBuf>() { //4
        @Override
        protected void channeRead0(
            ChannelHandlerContext channelHandlerContext,
            ByteBuf byteBuf) throws Exception {
                System.out.println("Received data");
                byteBuf.clear();
            }
        });
ChannelFuture future = bootstrap.connect(
    new InetSocketAddress("www.manning.com", 80)); //5
future.addListener(new ChannelFutureListener() {
    @Override
    public void operationComplete(ChannelFuture channelFuture)
        throws Exception {
            if (channelFuture.isSuccess()) {
                System.out.println("Connection established");
            } else {
                System.err.println("Connection attempt failed");
                channelFuture.cause().printStackTrace();
            }
        }
    });
- 创建一个新的 Bootstrap 来创建和连接到新的客户端管道
- 指定 EventLoopGroup
- 指定 Channel 实现来使用
- 设置处理器给 Channel 的事件和数据
- 连接到远端主机
注意 Bootstrap 提供了一个“流利”语法——示例中使用的方法(除了connect()) 由 Bootstrap 返回实例本身的引用链接他们。
兼容性
Channel 的实现和 EventLoop 的处理过程在 EventLoopGroup 中必须兼容,哪些 Channel 是和 EventLoopGroup 是兼容的可以查看 API 文档。经验显示,相兼容的实现一般在同一个包下面,例如使用NioEventLoop,NioEventLoopGroup 和 NioServerSocketChannel 在一起。请注意,这些都是前缀“Nio”,然后不会用这些代替另一个实现和另一个前缀,如“Oio”,也就是说 OioEventLoopGroup 和NioServerSocketChannel 是不相容的。
Channel 和 EventLoopGroup 的 EventLoop 必须相容,例如NioEventLoop、NioEventLoopGroup、NioServerSocketChannel是相容的,但是 OioEventLoopGroup 和 NioServerSocketChannel 是不相容的。从类名可以看出前缀是“Nio”的只能和“Nio”的一起使用。
EventLoop 和 EventLoopGroup
记住,EventLoop 分配给该 Channel 负责处理 Channel 的所有操作。当你执行一个方法,该方法返回一个 ChannelFuture ,它将在 分配给 Channel 的 EventLoop 执行。
EventLoopGroup 包含许多 EventLoops 和分配一个 EventLoop 通道时注册。我们将在15章更详细地讨论这个话题。
清单9.2所示的结果,试图使用一个 Channel 类型与一个 EventLoopGroup 兼容。
Listing 9.2 Bootstrap client with incompatible EventLoopGroup
EventLoopGroup group = new NioEventLoopGroup();
Bootstrap bootstrap = new Bootstrap(); //1
bootstrap.group(group) //2
    .channel(OioSocketChannel.class) //3
    .handler(new SimpleChannelInboundHandler<ByteBuf>() { //4
        @Override
        protected void channelRead0(
            ChannelHandlerContext channelHandlerContext,
                    ByteBuf byteBuf) throws Exception {
                System.out.println("Reveived data");
                byteBuf.clear();
            }
        });
ChannelFuture future = bootstrap.connect(
    new InetSocketAddress("www.manning.com", 80)); //5
future.syncUninterruptibly();
- 创建新的 Bootstrap 来创建新的客户端管道
- 注册 EventLoopGroup 用于获取 EventLoop
- 指定要使用的 Channel 类。通知我们使用 NIO 版本用于 EventLoopGroup , OIO 用于 Channel
- 设置处理器用于管道的 I/O 事件和数据
- 尝试连接到远端。当 NioEventLoopGroup 和 OioSocketChannel 不兼容时,会抛出 IllegalStateException 异常
IllegalStateException 显示如下:
Listing 9.3 IllegalStateException thrown because of invalid configuration
Exception in thread "main" java.lang.IllegalStateException: incompatible event loop
type: io.netty.channel.nio.NioEventLoop
at
io.netty.channel.AbstractChannel$AbstractUnsafe.register(AbstractChannel.java:5
71)
...
出现 IllegalStateException 的其他情况是,在 bind() 或 connect() 调用前 调用需要设置参数的方法调用失败时,包括:
- group()
- channel() 或 channnelFactory()
- handler()
handler() 方法尤为重要,因为这些 ChannelPipeline 需要适当配置。 一旦提供了这些参数,应用程序将充分利用 Netty 的能力。
Netty引导服务器
服务器的引导共用了客户端引导的一些逻辑。
引导服务器的方法
下表显示了 ServerBootstrap 的方法
Table 9.2 Methods of ServerBootstrap‘
| 名称 | 描述 |
|---|---|
| group | 设置 EventLoopGroup 用于 ServerBootstrap。这个 EventLoopGroup 提供 ServerChannel 的 I/O 并且接收 Channel |
| channel channelFactory | channel() 指定 Channel 的实现类。如果管道没有提供一个默认的构造函数,你可以提供一个 ChannelFactory。 |
| localAddress | 指定 ServerChannel 实例化的类。如果不提供,将由操作系统创建一个随机的。或者,您可以使用 bind() 或 connect()指定localAddress |
| option | 指定一个 ChannelOption 来用于新创建的 ServerChannel 的 ChannelConfig 。这些选项将被设置在管道的 bind() 或 connect(),这取决于谁首先被调用。在此调用这些方法之后设置或更改 ChannelOption 是无效的。所支持 ChannelOption 取决于使用的管道类型。请参考9.6节和 ChannelConfig 的 API 文档 的 Channel 类型使用。 |
| childOption | 当管道已被接受,指定一个 ChannelOption 应用于 Channel 的 ChannelConfig。 |
| attr | 指定 ServerChannel 的属性。这些属性可以被 管道的 bind() 设置。当调用 bind() 之后,修改它们不会生效。 |
| childAttr | 应用属性到接收到的管道上。后续调用没有效果。 |
| handler | 设置添加到 ServerChannel 的 ChannelPipeline 中的 ChannelHandler。 具体详见 childHandler() 描述 |
| childHandler | 设置添加到接收到的 Channel 的 ChannelPipeline 中的 ChannelHandler。handler() 和 childHandler()之间的区别是前者是接收和处理ServerChannel,同时 childHandler() 添加处理器用于处理和接收 Channel。后者代表一个套接字绑定到一个远端。 |
| clone | 克隆 ServerBootstrap 用于连接到不同的远端,通过设置相同的原始 ServerBoostrap。 |
| bind | 绑定 ServerChannel 并且返回一个 ChannelFuture,用于 通知连接操作完成了(结果可以是成功或者失败) |
如何引导一个服务器
ServerBootstrap 中的 childHandler(), childAttr() 和 childOption() 是常用的服务器应用的操作。具体来说,ServerChannel实现负责创建子 Channel,它代表接受连接。因此 引导 ServerChannel 的 ServerBootstrap ,提供这些方法来简化接收的 Channel 对 ChannelConfig 应用设置的任务。
图9.3显示了 ServerChannel 创建 ServerBootstrap 在 bind(),后者管理大量的子 Channel。
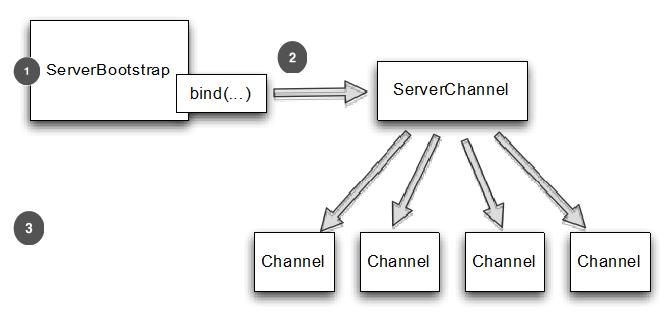
- 当调用 bind() 后 ServerBootstrap 将创建一个新的管道,这个管道将会在绑定成功后接收子管道
- 接收新连接给每个子管道
- 接收连接的 Channel
Figure 9.3 ServerBootstrap
记住 child* 的方法都是操作在子的 Channel,被 ServerChannel 管理。
清单9.4 ServerBootstrap 时会创建一个 NioServerSocketChannel实例 bind() 。这个 NioServerChannel 负责接受新连接和创建NioSocketChannel 实例。
Listing 9.4 Bootstrapping a server
NioEventLoopGroup group = new NioEventLoopGroup();
ServerBootstrap bootstrap = new ServerBootstrap(); //1
bootstrap.group(group) //2
    .channel(NioServerSocketChannel.class) //3
    .childHandler(new SimpleChannelInboundHandler<ByteBuf>() { //4
        @Override
        protected void channelRead0(ChannelHandlerContext ctx,
            ByteBuf byteBuf) throws Exception {
                System.out.println("Reveived data");
                byteBuf.clear();
            }
        }
    );
ChannelFuture future = bootstrap.bind(new InetSocketAddress(8080)); //5
future.addListener(new ChannelFutureListener() {
    @Override
    public void operationComplete(ChannelFuture channelFuture)
        throws Exception {
            if (channelFuture.isSuccess()) {
                System.out.println("Server bound");
            } else {
                System.err.println("Bound attempt failed");
                channelFuture.cause().printStackTrace();
            }
        }
    }
);
- 创建要给新的 ServerBootstrap 来创建新的 SocketChannel 管道并绑定他们
- 指定 EventLoopGroup 用于从注册的 ServerChannel 中获取EventLoop 和接收到的管道
- 指定要使用的管道类
- 设置子处理器用于处理接收的管道的 I/O 和数据
- 通过配置引导来绑定管道
Netty 从 Channel 引导客户端
我们会碰到引导客户端 Channel 从另一个 Channel的情况。如果您正在编写一个代理或者要从其他系统需要检索数据的时候,这可能发生。后一种情况是常见的,因为许多 Netty 的应用程序集成现有系统,例如 web 服务或数据库。
你当然可以创建一个新的 Bootstrap 并使用它如9.2.1节所述,这个解决方案不一定有效。至少,你需要创建另一个 EventLoop 给新客户端 Channel 的,并且 Channel 将会需要在不同的 Thread 间进行上下文切换。
幸运的是,由于 EventLoop 继承自 EventLoopGroup ,您可以通过传递 接收到的 Channel 的 EventLoop 到 Bootstrap 的 group() 方法。这允许客户端 Channel 来操作 相同的 EventLoop,这样就能消除了额外的线程创建和所有相关的上下文切换的开销。
为什么共享 EventLoop 呢?
当你分享一个 EventLoop ,你保证所有 Channel 分配给 EventLoop 将使用相同的线程,消除上下文切换和相关的开销。(请记住,一个EventLoop分配给一个线程执行操作。)
共享一个 EventLoop 描述如下:

- 当 bind() 调用时,ServerBootstrap 创建一个新的ServerChannel 。 当绑定成功后,这个管道就能接收子管道了
- ServerChannel 接收新连接并且创建子管道来服务它们
- Channel 用于接收到的连接
- 管道自己创建了 Bootstrap,用于当 connect() 调用时创建一个新的管道
- 新管道连接到远端
- 在 EventLoop 接收通过 connect() 创建后就在管道间共享
Figure 9.4 EventLoop shared between channels with ServerBootstrap and Bootstrap
实现 EventLoop 共享,包括设置 EventLoop 引导通过Bootstrap.eventLoop() 方法。这是清单9.5所示。
ServerBootstrap bootstrap = new ServerBootstrap(); //1
bootstrap.group(new NioEventLoopGroup(), //2
    new NioEventLoopGroup()).channel(NioServerSocketChannel.class) //3
        .childHandler(        //4
            new SimpleChannelInboundHandler<ByteBuf>() {
            ChannelFuture connectFuture;

            @Override
            public void channelActive(ChannelHandlerContext ctx) throws Exception {
                Bootstrap bootstrap = new Bootstrap();//5
                bootstrap.channel(NioSocketChannel.class) //6
                        .handler(new SimpleChannelInboundHandler<ByteBuf>() {  //7
                            @Override
                            protected void channelRead0(ChannelHandlerContext ctx, ByteBuf in) throws Exception {
                                System.out.println("Reveived data");
                            }
                        });
                bootstrap.group(ctx.channel().eventLoop()); //8
                connectFuture = bootstrap.connect(new InetSocketAddress("www.manning.com", 80));  //9
            }

            @Override
            protected void channelRead0(ChannelHandlerContext channelHandlerContext, ByteBuf byteBuf) throws Exception {
                if (connectFuture.isDone()) {
                    // do something with the data  //10
                }
            }
        });
ChannelFuture future = bootstrap.bind(new InetSocketAddress(8080));  //11
future.addListener(new ChannelFutureListener() {
    @Override
    public void operationComplete(ChannelFuture channelFuture) throws Exception {
        if (channelFuture.isSuccess()) {
            System.out.println("Server bound");
        } else {
            System.err.println("Bound attempt failed");
            channelFuture.cause().printStackTrace();
        }
    }
});
- 创建一个新的 ServerBootstrap 来创建新的 SocketChannel 管道并且绑定他们
- 指定 EventLoopGroups 从 ServerChannel 和接收到的管道来注册并获取 EventLoops
- 指定 Channel 类来使用
- 设置处理器用于处理接收到的管道的 I/O 和数据
- 创建一个新的 Bootstrap 来连接到远程主机
- 设置管道类
- 设置处理器来处理 I/O
- 使用相同的 EventLoop 作为分配到接收的管道
- 连接到远端
- 连接完成处理业务逻辑 (比如, proxy)
- 通过配置了的 Bootstrap 来绑定到管道
注意,新的 EventLoop 会创建一个新的 Thread。出于该原因,EventLoop 实例应该尽量重用。或者限制实例的数量来避免耗尽系统资源。
Netty 在一个引导中添加多个 ChannelHandler
在所有的例子代码中,我们在引导过程中通过 handler() 或childHandler() 都只添加了一个 ChannelHandler 实例,对于简单的程序可能足够,但是对于复杂的程序则无法满足需求。例如,某个程序必须支持多个协议,如 HTTP、WebSocket。若在一个 ChannelHandle r中处理这些协议将导致一个庞大而复杂的 ChannelHandler。Netty 通过添加多个 ChannelHandler,从而使每个 ChannelHandler 分工明确,结构清晰。
Netty 的一个优势是可以在 ChannelPipeline 中堆叠很多ChannelHandler 并且可以最大程度的重用代码。如何添加多个ChannelHandler 呢?Netty 提供 ChannelInitializer 抽象类用来初始化 ChannelPipeline 中的 ChannelHandler。ChannelInitializer是一个特殊的 ChannelHandler,通道被注册到 EventLoop 后就会调用ChannelInitializer,并允许将 ChannelHandler 添加到CHannelPipeline;完成初始化通道后,这个特殊的 ChannelHandler 初始化器会从 ChannelPipeline 中自动删除。
听起来很复杂,其实很简单,看下面代码:
Listing 9.6 Bootstrap and using ChannelInitializer
ServerBootstrap bootstrap = new ServerBootstrap();//1
bootstrap.group(new NioEventLoopGroup(), new NioEventLoopGroup())  //2
    .channel(NioServerSocketChannel.class)  //3
    .childHandler(new ChannelInitializerImpl()); //4
ChannelFuture future = bootstrap.bind(new InetSocketAddress(8080));  //5
future.sync();


final class ChannelInitializerImpl extends ChannelInitializer<Channel> {  //6
    @Override
    protected void initChannel(Channel ch) throws Exception {
        ChannelPipeline pipeline = ch.pipeline(); //7
        pipeline.addLast(new HttpClientCodec());
        pipeline.addLast(new HttpObjectAggregator(Integer.MAX_VALUE));

    }
}
- 创建一个新的 ServerBootstrap 来创建和绑定新的 Channel
- 指定 EventLoopGroups 从 ServerChannel 和接收到的管道来注册并获取 EventLoops
- 指定 Channel 类来使用
- 设置处理器用于处理接收到的管道的 I/O 和数据
- 通过配置的引导来绑定管道
- ChannelInitializer 负责设置 ChannelPipeline
- 实现 initChannel() 来添加需要的处理器到 ChannelPipeline。一旦完成了这方法 ChannelInitializer 将会从 ChannelPipeline 删除自身。
通过 ChannelInitializer, Netty 允许你添加你程序所需的多个 ChannelHandler 到 ChannelPipeline
使用Netty 的 ChannelOption 和属性
如果每次创建通道后都不得不手动配置每个通道,这样会很麻烦,所幸,Netty提供了 ChannelOption 来帮助引导配置。这些选项都会自动的应用到引导创建的所有通道中去,可用的各种选项可以配置底层连接的详细信息,如通道“keep-alive(保持活跃)”或“timeout(超时)”的特性。
Netty 应用程序通常会与组织或公司其他的软件进行集成,在某些情况下,Netty 的组件如 Channel 会在 Netty 正常生命周期外使用;Netty 的提供了抽象 AttributeMap 集合,这是由 Netty的管道和引导类,和AttributeKey,常见类用于插入和检索属性值。属性允许您安全的关联任何数据项与客户端和服务器的Channel。
例如,考虑一个服务器应用程序跟踪用户和Channel之间的关系。这可以通过存储用户ID作为Channel的一个属性。类似的技术可以用来路由消息到基于用户ID或关闭基于用户活动的一个管道。
清单9.7展示了如何使用 ChannelOption 配置 Channel 和一个属性来存储一个整数值。
Listing 9.7 Using Attributes
final AttributeKey<Integer> id = new AttributeKey<Integer>("ID"); //1

Bootstrap bootstrap = new Bootstrap(); //2
bootstrap.group(new NioEventLoopGroup()) //3
        .channel(NioSocketChannel.class) //4
        .handler(new SimpleChannelInboundHandler<ByteBuf>() { //5
            @Override
            public void channelRegistered(ChannelHandlerContext ctx) throws Exception {
               Integer idValue = ctx.channel().attr(id).get();  //6
                // do something  with the idValue
            }

            @Override
            protected void channelRead0(ChannelHandlerContext channelHandlerContext, ByteBuf byteBuf) throws Exception {
                System.out.println("Reveived data");
            }
        });
bootstrap.option(ChannelOption.SO_KEEPALIVE, true).option(ChannelOption.CONNECT_TIMEOUT_MILLIS, 5000);   //7
bootstrap.attr(id, 123456); //8

ChannelFuture future = bootstrap.connect(new InetSocketAddress("www.manning.com", 80));   //9
future.syncUninterruptibly();
- 新建一个 AttributeKey 用来存储属性值
- 新建 Bootstrap 用来创建客户端管道并连接他们
- 指定 EventLoopGroups 从和接收到的管道来注册并获取 EventLoop
- 指定 Channel 类
- 设置处理器来处理管道的 I/O 和数据
- 检索 AttributeKey 的属性及其值
- 设置 ChannelOption 将会设置在管道在连接或者绑定
- 存储 id 属性
- 通过配置的 Bootstrap 来连接到远程主机
关闭Netty之前已经引导的客户端或服务器
当引导我们的应用程序启动和运行之后,我们也需要懂得如何关闭它。虽然您可以使用JVM来处理所有退出,但是这样做并不能很干净地释放资源。如果要关闭一个Netty的应用程序是挺简单的,但是需要记住以下几点。
主要是记住关闭 EventLoopGroup,将处理任何悬而未决的事件和任务并随后释放所有活动线程。这只是一种叫EventLoopGroup.shutdownGracefully()。这个调用将返回一个 Future 用来通知关闭完成。注意,shutdownGracefully()也是一个异步操作,所以你需要阻塞,直到它完成或注册一个侦听器直到返回的 Future 来通知完成。
清单9.9定义了“优雅地关闭”
Listing 9.9 Graceful shutdown
EventLoopGroup group = new NioEventLoopGroup() //1
Bootstrap bootstrap = new Bootstrap(); //2
bootstrap.group(group)
    .channel(NioSocketChannel.class);
...
...
Future<?> future = group.shutdownGracefully(); //3
// block until the group has shutdown
future.sync();
- 创建 EventLoopGroup 用于处理 I/O
- 创建一个新的 Bootstrap 并且配置他
- 最终优雅的关闭 EventLoopGroup 释放资源。这个也会关闭中当前使用的 Channel
或者,您可以调用 Channel.close() 显式地在所有活动管道之前调用EventLoopGroup.shutdownGracefully()。但是在所有情况下,记得关闭EventLoopGroup 本身

 浙公网安备 33010602011771号