
MyBatis源码分析
MyBatis故事:
官方文档:http://www.mybatis.org/mybatis-3/
GitHub:https://github.com/mybatis
通过在MyBatis的官方网站,我们会看到和MyBatis相关的一些软件产品:
MyBatis Migrations 是一款数据库迁移工具 http://www.mybatis.org/migrations;
MyBatipse (Eclipse plugin) ,Eclipse插件提供在编写xml配置文件时的内容提示和验证;
MyBatis Generator 代码生成工具;
MyBatis 是一款优秀的持久层框架,它支持自定义 SQL、存储过程以及高级映射。MyBatis 免除了几乎所有的 JDBC 代码以及设置参数和获取结果集的工作。MyBatis 可以通过简单的 XML 或注解来配置和映射原始类型、接口和 Java POJO(Plain Old Java Objects,普通老式 Java 对象)为数据库中的记录。
MyBatis SQL mapper framework for Java可以将其称之为Java持久层框架.
MyBatis 的前身是apache下的一个开源项目iBatis, iBATIS是一个由Clinton Begin在2002年发起的开源项目,是一个基于Java的持久层框架。
iBATIS:http://ibatis.apache.org
iBATIS这个项目于2010年6月16号由apache迁移到了google code,iBatis3.x并且改名为MyBatis 。
MyBatis: http://code.google.com/p/mybatis/ (现在已经无法打开)
2013年11月MyBatis又从google code将代码迁移到Github。
MyBatis和Hibernate
MyBatis的作者:Clinton Begin 加拿大人 https://www.linkedin.com/in/clintonbegin
Hibernate 2001年推出的Java持久层框架,澳大利亚人 Gavin King https://www.linkedin.com/in/GavinKing
人们经常喜欢比较这两款优秀的持久层框架的特点:
| 技术 | 优点 | 缺点 |
| jdbc | 简单,纯粹,一切均可见,最基础的一种技术 |
1:需要手动关闭连接 2:结果集不能自动映射为对象 3:SQL夹杂在代码中,耦合度高,导致硬编码内伤 4:实际开发中SQL经常随需求变动,导致频繁修改,不易维护 |
| jdbcTemplate |
简单、纯粹、自动会话管理、结果集映射 |
需要手动拼装SQL,SQL与Java代码混合在一起,长的SQL管理混乱 |
|
Hibernate JPA |
编程效率高,无需编写SQL。 较完善的二级缓存、自动防SQL注入 |
完全掌握的门槛高; |
| MyBatis |
学习成本低、可以进行更为细腻的SQL优化,减少查询字段、统一的SQL管理 |
需要手动编写维护SQL、表结构变更之后需要手动维护SQL与映射; |
MyBatis的定位
MyBatis专注于SQL本身,其为SQL映射,而非完整的SQL映射,它是一个半自动的ORM框架,需要自己编写SQL语句,这是其优点,也是缺点.
优点:SQL语句单独维护,便于SQL优化,便于发挥SQL的最大性能.
缺点:当数据库表和字段更改后,实体和数据库的映射关系需要手动维护,耗费时间长.
使用场景:是用于性能要求高,有大量的查询操作,适用于互联网项目,如:电商,O2O
互联网项目对持久层的需求:
1:对数据库的访问更加纯粹
2:尽可能不要使用数据库做运算
3:SQL语句尽可能命中索引(字段排序,查询字段,查询条件,尽可能命中索引)
MyBatis实战应用:
Mybatis框架就一个jar包;要使用 MyBatis, 只需将 mybatis-3.5.1.jar 文件置于 classpath 中即可。
使用Maven构建项目
<dependency>
    <groupId>org.mybatis</groupId>
    <artifactId>mybatis</artifactId>
    <version>3.5.1</version>
</dependency>
下载MyBatis源码,构建MyBatis项目;https://codeload.github.com/mybatis/mybatis-3/zip/mybatis-3.5.1
如果不出意外,我们解压下载的压缩包,然后通过pom.xml导入IDEA中,通过Maven的compiler就可以正常编译成功,首次编译可能需要一定时间。
为了验证我么编译的项目是否可用,我们可以写一个简单的案例项目去测试一下,也方便后续的断点跟踪源码分析。
创建普通的Maven项目,添加Maven依赖
 <dependency>
            <groupId>junit</groupId>
            <artifactId>junit</artifactId>
            <version>4.11</version>
            <scope>test</scope>
        </dependency>

        <!--mysql的jdbc驱动jar包依赖-->
        <dependency>
            <groupId>mysql</groupId>
            <artifactId>mysql-connector-java</artifactId>
            <version>5.1.47</version>
        </dependency>

        <!--lombok代码生成工具的jar包依赖-->
        <dependency>
            <groupId>org.projectlombok</groupId>
            <artifactId>lombok</artifactId>
            <version>1.18.8</version>
        </dependency>

        <!--slf4j日志门面-->
        <dependency>
            <groupId>org.slf4j</groupId>
            <artifactId>slf4j-api</artifactId>
            <version>1.7.26</version>
        </dependency>

        <!--log4j2日志实现-->
        <dependency>
            <groupId>org.apache.logging.log4j</groupId>
            <artifactId>log4j-api</artifactId>
            <version>2.11.2</version>
        </dependency>
        <dependency>
            <groupId>org.apache.logging.log4j</groupId>
            <artifactId>log4j-slf4j-impl</artifactId>
            <version>2.11.2</version>
        </dependency>

        <!-- cglib -->
        <dependency>
            <groupId>cglib</groupId>
            <artifactId>cglib</artifactId>
            <version>3.3.0</version>
        </dependency>

        <!-- javassist -->
        <dependency>
            <groupId>org.javassist</groupId>
            <artifactId>javassist</artifactId>
            <version>3.27.0-GA</version>
        </dependency>
添加resources编译,个人建议添加
  <resources>
            <resource>
                <directory>src/main/java</directory>
                <includes>
                    <include>**/*.xml</include>
                </includes>
            </resource>
            <resource>
                <directory>src/main/resources</directory>
                <includes>
                    <include>**/*.*</include>
                </includes>
            </resource>
        </resources>
添加jdbc.properties,根据自身配置
jdbc.username=xxx
jdbc.password=xxxxx
jdbc.driver=com.mysql.jdbc.Driver
jdbc.url=jdbc:mysql://xxxx:3306/xxx?serverTimezone=GMT%2B8&useUnicode=true&characterEncoding=utf8&rewriteBatchedStatements=true&useSSL=false
最后贴上mybatis的xml配置
<?xml version="1.0" encoding="UTF-8" ?>
<!DOCTYPE configuration
        PUBLIC "-//mybatis.org//DTD Config 3.0//EN"
        "http://mybatis.org/dtd/mybatis-3-config.dtd">

<!--dtd的xml约束是有顺序,标签顺序不能错-->
<configuration>

    <!--mybatis框架的核心功能可以通过该配置进行设置-->

    <!--配置属性-->
    <properties resource="D:\mybatis-3-mybatis-3.5.1\mybatis3-test\src\main\resources\jdbc.properties"/>

    <settings>
        <!--mybatis输出日志,采用何种组件输出-->
        <setting name="logImpl" value="SLF4J"/>
        <!--开启二级缓存-->
        <setting name="cacheEnabled" value="true"/>
    </settings>

    <!--类型别名-->
    <typeAliases>
        <typeAlias type="com.xxx.model.User" alias="User"/>
    </typeAliases>

    <typeHandlers>
        <!--自定义的类型转换器-->
        <typeHandler handler="com.xxx.type.CryptHandlerType"
                javaType="com.xxx.model.IdCardType"/>
    </typeHandlers>

    <!--插件-->
    <!--
    <plugins>
        <plugin interceptor="com.xxx.plugin.xxxx"></plugin>
    </plugins>
    -->

    <!--多环境配置,默认开发-->
    <environments default="development">
        <environment id="development">
            <transactionManager type="org.apache.ibatis.transaction.jdbc.JdbcTransactionFactory"/>
            <dataSource type="POOLED">
                <property name="driver" value="${jdbc.driver}"/>
                <property name="url" value="${jdbc.url}"/>
                <property name="username" value="${jdbc.username}"/>
                <property name="password" value="${jdbc.password}"/>
            </dataSource>
        </environment>

        <environment id="test">
            <transactionManager type="JDBC"/>
            <dataSource type="POOLED">
                <property name="driver" value="${jdbc.driver}"/>
                <property name="url" value="${jdbc.url}"/>
                <property name="username" value="${jdbc.username}"/>
                <property name="password" value="${jdbc.password}"/>
            </dataSource>
        </environment>

        <environment id="product">
            <transactionManager type="JDBC"/>
            <dataSource type="POOLED">
                <property name="driver" value="${jdbc.driver}"/>
                <property name="url" value="${jdbc.url}"/>
                <property name="username" value="${jdbc.username}"/>
                <property name="password" value="${jdbc.password}"/>
            </dataSource>
        </environment>
    </environments>

    <!--映射器-->
    <mappers>

        <mapper resource="com/xxx/mapper/UsersMapper.xml"/>
    </mappers>

</configuration>
日志配置
<?xml version="1.0" encoding="UTF-8"?>
<Configuration status="debug">

    <Appenders>
        <Console name="Console" target="SYSTEM_OUT">
            <PatternLayout pattern="%d{yyyy-MM-dd HH:mm:ss.SSS} [%t] %-5level %logger{36} - %msg%n"/>
        </Console>
    </Appenders>

    <Loggers>
        <Root level="debug">
            <AppenderRef ref="Console"/>
        </Root>
    </Loggers>
</Configuration>
贴上本人的项目结构,仅供参考

MyBatis独立使用
     //通过配置文件获取输入流
        InputStream resourceAsStream = Resources.getResourceAsStream("mybatis-config.xml");

        //构建SqlSessionFactory
        SqlSessionFactory sqlSessionFactory = new SqlSessionFactoryBuilder().build(resourceAsStream);

        //打开session
        SqlSession sqlSession = sqlSessionFactory.openSession();

        //第四步 获取Mapper接口对象
        UserMapper mapper = sqlSession.getMapper(UserMapper.class);

        //第五步 调用Mapper接口对象的方法操作数据库
        User user = mapper.selectByPrimaryKey(1);

        //获取结果,处理业务
        log.info("查询结果:",user.getId());
当我们数据库配置等都设置完毕,正常来说查询数据是不会出现异常的,这样就说明我们的源码编译是成功的。
MyBatis Generator (MBG)
MyBatis Generator 简称MBG,是用Java语言开发的一个代码生成工具,可以深入分析你的数据库和表,帮助你生成基本的对数据库的CRUD操作代码以及QBC风格的条件查询,但是表连接、存储过程等这些复杂SQL的定义需要我们手工编写。
MyBatis Generator 生成3个东西:
1、POJO
2、Mapper XML Files
3、Mapper interface
MyBatis Generator 生成代码不需要依赖任何第三方jar包,仅仅需要一个jdbc驱动包;
文档:http://www.mybatis.org/generator/
Github:https://github.com/mybatis/generator
原来MyBatis Generator老版本:ibator,用于iBatis代码生成;
1、配置MyBatis Generator (MBG) 的配置文件;
<?xml version="1.0" encoding="UTF-8"?>
<!DOCTYPE generatorConfiguration
        PUBLIC "-//mybatis.org//DTD MyBatis Generator Configuration 1.0//EN"
        "http://mybatis.org/dtd/mybatis-generator-config_1_0.dtd">

<generatorConfiguration>

    <!--在配置文件中使用占位符引用该属性文件的值-->
    <properties resource="jdbc.properties"/>

    <!-- 指定连接数据库的JDBC驱动包所在位置,指定到你本机的完整路径 -->
    <classPathEntry location="F:/mysql-connector-java-5.1.46.jar"/>

    <!-- 配置table表信息内容体,targetRuntime指定采用MyBatis3的版本 -->
    <context id="tables" targetRuntime="MyBatis3">

        <!-- 抑制生成注释,由于生成的注释都是英文的,可以不让它生成 -->
        <commentGenerator>
            <property name="suppressAllComments" value="true" />
        </commentGenerator>

        <!-- 配置数据库连接信息 -->
        <connectionFactory>
            <property name="driverClass" value="${jdbc.driver}"/>
            <property name="connectionURL" value="${jdbc.url}"/>
            <property name="userId" value="${jdbc.username}"/>
            <property name="password" value="${jdbc.password}"/>
        </connectionFactory>

        <!-- 配置数据库连接信息 connectionFactory与jdbcConnection只能配置其一-->
        <!--
        <jdbcConnection driverClass="COM.ibm.db2.jdbc.app.DB2Driver"
                        connectionURL="jdbc:db2:TEST"
                        userId="db2admin"
                        password="db2admin">
        </jdbcConnection>
        -->

        <!-- 生成model类,targetPackage指定model类的包名, targetProject指定生成的model放在eclipse的哪个工程下面-->
        <javaModelGenerator targetPackage="org.mybatis.model" targetProject="src/main/java">
            <property name="enableSubPackages" value="false" />
            <property name="trimStrings" value="false" />
        </javaModelGenerator>

        <!-- 生成MyBatis的Mapper.xml文件,targetPackage指定mapper.xml文件的包名, targetProject指定生成的mapper.xml放在eclipse的哪个工程下面 -->
        <sqlMapGenerator targetPackage="org.mybatis.mapper" targetProject="src/main/java">
            <property name="enableSubPackages" value="false" />
        </sqlMapGenerator>

        <!-- 生成MyBatis的Mapper接口类文件,targetPackage指定Mapper接口类的包名, targetProject指定生成的Mapper接口放在eclipse的哪个工程下面 -->
        <javaClientGenerator type="XMLMAPPER" targetPackage="org.mybatis.mapper" targetProject="src/main/java">
            <property name="enableSubPackages" value="false" />
        </javaClientGenerator>

        <!-- 数据库表名及对应的Java模型类名 -->
        <table tableName="user"
                domainObjectName="User"
                enableCountByExample="false"
                enableUpdateByExample="false"
                enableDeleteByExample="false"
                enableSelectByExample="false"
                selectByExampleQueryId="false"/>
    </context>

</generatorConfiguration>
1、生成代码
--通过命令行生成 java -jar mybatis-generator-core-1.3.7.jar -configfile generatorConfig.xml (用得比较少)
--通过Ant生成 (ant几乎被淘汰了)
--通过java程序生成
--通过maven生成
 <plugins>
            <!--mybatis代码自动生成插件-->
            <plugin>
                <groupId>org.mybatis.generator</groupId>
                <artifactId>mybatis-generator-maven-plugin</artifactId>
                <version>1.3.7</version>
                <configuration>
                    <!--配置文件的位置-->
                    <configurationFile>src/main/resources/generatorConfig.xml</configurationFile>
                    <!--生成代码过程中是否打印日志-->
                    <verbose>true</verbose>
                    <!--生成时是否覆盖java文件,xml文件总是合并-->
                    <overwrite>true</overwrite>
                </configuration>
            </plugin>
        </plugins>
--通过Eclipse生成
建议不要用mysql驱动8.0, 用5.1.x系列的驱动;
使用maven插件通过以下方式即可自动生成。

在源码分析的前面,我会分享一些MyBatis的常规应用
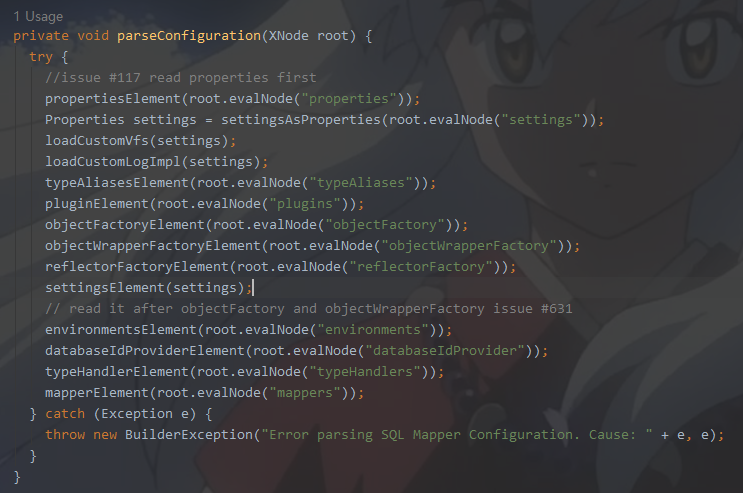
MyBatis的xml配置(核心配置)
configuration(配置)
   properties(属性)
   settings(设置)
   typeAliases(类型别名)
   typeHandlers(类型处理器)
   objectFactory(对象工厂)
   plugins(插件)
   environments(环境配置)
        environment(环境变量)
            transactionManager(事务管理器)
            dataSource(数据源)
  databaseIdProvider(数据库厂商标识)
  mappers(映射器)
MyBatis的Mapper映射
Mapper映射文件只有几个顶级元素(按照应被定义的顺序如下):
cache – 对给定命名空间的缓存配置。
cache-ref – 对其他命名空间缓存配置的引用。
resultMap – 是最复杂也是最强大的元素,用来描述如何从数据库结果集中来加载对象。
sql – 可被其他语句引用的可重用语句块。
insert – 映射插入语句
update – 映射更新语句
delete – 映射删除语句
select – 映射查询语句
MyBatis也可以使用注解开发
生成代码时候,配置:
<javaClientGenerator type="ANNOTATEDMAPPER"...
生成注解代码,不生成xml代码了
MyBatis开发使用注解还是xml?
| 方式 | 优点 | 缺点 |
| Xml | Xml与接口分离,方便管理,复杂的SQL不影响代码的可读性 | 过多的Xml配置文件 |
| Annotation | 接口就能看到SQL语句,可读性强,不需要去找xml文件,方便 | 代码和SQL混杂,复杂一点过于混乱 |
MyBatis批量插入
1 普通for循环(此种方式对于数据库的I/O过于频繁,不适合大数据量的操作)
for (int i = 0; i < 500; i++) {
    user = new User();
    user.setId("id" + i);
    user.setName("name" + i);
    userMapper.insert(user);
}
2 ExeutorType.BATCH(设置批量模式),把SQL语句发个数据库,数据库预编译好,然后数据库等待需要运行的参数,接收到参数一次性运行
session = sqlSessionFactory.openSession(ExecutorType.BATCH, true);
for (int i=0; i<500; i++) {
    UUserInfo userInfo = new UUserInfo();
    userInfo.setPhone("1346262122" + i);
    userInfo.setUserName("张" + i);
    uUserInfoMapper.insert(userInfo);
}
3 传入一个数组或集合,标签<foreach>插入
 <foreach item="item" collection="strs.split(',')" separator="," open="(" close=")">
            #{item}
  </foreach>
| 方式 | 性能 | 说明 |
| For循环 | 性能低,IO高 | |
| ExeutorType.BATCH | 性能居中 | |
| <foreach>标签拼SQL | 性能最高 |
有SQL长度限制,mysql默认接收SQl的长度为10486576(1M),该方式若超过1M 会抛出异常 |
MyBatis联合查询
一对一关系
在一对一关系中,A表中的一行最多只能匹配B表的一行,反之亦然.这种关系并不常见,因为一般来说,这种关系的信息会保存在一张表中,当然也可以利用一对一关系来保存,比如分割具有多列的表.(如:一个人只有一个身份证)
<association>标签
<resultMap id="OneToOneBaseResultMap" type="com.test.mybatis.model.Person">
  <id column="id" jdbcType="INTEGER" property="id" />
  <result column="nick" jdbcType="VARCHAR" property="nick" />
  <result column="phone" jdbcType="VARCHAR" property="phone" />
  <result column="sex" jdbcType="INTEGER" property="sex" />
  <association property="idCard" javaType="com.test.mybatis.model.IdCard">
    <id column="id" jdbcType="INTEGER" property="id" />
    <result column="personId" jdbcType="INTEGER" property="personid" />
    <result column="realName" jdbcType="VARCHAR" property="realname" />
    <result column="idCard" jdbcType="VARCHAR" property="idcard" />
  </association>
</resultMap>
一对多关系
一对多是最普通的一种关系,在这种关系中,A表的一行可以匹配B表中的多行,但是B表中的一行只能匹配A表中的一行.举例:(一个部门可以有多个员工)
<collection>标签
<resultMap type="com.mybatis.bean.Department" id="MyDept">
        <id column="did" property="id"/>
        <result column="dept_name" property="departmentName"/>
        <!--
            collection定义关联集合类型的属性的封装规则
            ofType:指定集合里面元素的类型
        -->
        <collection property="emps" ofType="com.mybatis.bean.Employee">
            <!-- 定义这个集合中元素的封装规则 -->
            <id column="eid" property="id"/>
            <result column="last_name" property="lastName"/>
            <result column="email" property="email"/>
            <result column="gender" property="gender"/>
        </collection>
    </resultMap>
多对多关系
在多对多的关系中,A表的一行可以匹配B表的多行.反之亦然.要创建这种关系,需要定义第三张表,也可以称之为结合表或者关系表.它的主键是由A表和B表的外部键组成. 举例(一个用户有多个角色,一个角色可以对应多个用户)
<collection>标签
MyBatis插入并返回主键
方式一:(数据库要设置主键自增长)
<insert id="insertSelective" useGeneratedKeys="true" keyProperty="id" keyColumn="id"
 parameterType="com.test.mybatis.model.UUserInfo">
useGeneratedKeys="true"表示使用主键自增  keyProperty="id"表示将主键自增后的主键值赋值给实体类中的id属性
parameterType="com.test.mybatis.model.UUserInfo" 实体类,自增后的主键值将会赋值给该实体类的id属性
方式二:(一般用在<insert>标签里面)
<selectKey keyProperty="id" resultType="integer" order="AFTER">
  SELECT LAST_INSERT_ID()
</selectKey>
 SELECT LAST_INSERT_ID()表示查询出刚刚插入的的记录自增长id  order='AFTER' 表示先执行插入语句,之后再执行查询语句

MyBatis的SQL注入攻击
  注入攻击的危害
  1:数据库被拖库(把数据从数据库拉取出来,造成数据泄露)
  2.重要信息被泄露
注入的本质是把用户输入的数据当做有效代码执行.
Mybatis的预编译机制可以有效防止SQL注入攻击.
  '#{}' 和 '${}'的区别:
'#{}':MyBaits会首先对其进行预编译,将#{user_ids}替换成?占位符,然后在执行时替换成实际传入的user_id值,**并在两边加上单引号,以字符串方式处理。
'${}':简单的字符串拼接
栗子:
uUserInfoMapper.selectByIn("select user_name from u_user_info");
where user_name in (${userName})
可使用MyBatis自带循环标签解决SQL语句动态拼接的问题:
select * from news where id in
<foreach collection="ids" item="item" open="("separator="," close=")">
  #{item}
</foreach>
MyBatis的自定义类型转换器(实现数据类型和数据库数据类型的映射关系 如:String和VARCHAR的对应关系) 需求:实现对数据库身份证存储的加密
1、定义自己的HandlerType实现TypeHandler接口或者继承BaseTypeHandler类
2、覆盖其四个方法;
3、在核心配置文件mybatis-config.xml中配置<typeHandlers>标签或者在映射文件的增、改、查位置单独配置;

<typeHandlers>
    <typeHandler javaType="com.test.mybatis.typehandler.UserIdCard" handler="com.bjpowernode.mybatis.typehandler.CryptTypeHandler"/>
</typeHandlers>

<result column="idCard" jdbcType="VARCHAR" property="userIdCard" javaType="com.bjpowernode.mybatis.typehandler.UserIdCard"
typeHandler="com.test.mybatis.typehandler.CryptTypeHandler"/>

<if test="userIdCard != null">
  #{userIdCard, jdbcType=VARCHAR, typeHandler=com.test.mybatis.typehandler.CryptTypeHandler},
</if>
系统自带的类型转换器StringTypeHandler
public class StringTypeHandler extends BaseTypeHandler<String> {

  @Override
  public void setNonNullParameter(PreparedStatement ps, int i, String parameter, JdbcType jdbcType)
      throws SQLException {
    ps.setString(i, parameter);
  }

  @Override
  public String getNullableResult(ResultSet rs, String columnName)
      throws SQLException {
    return rs.getString(columnName);
  }

  @Override
  public String getNullableResult(ResultSet rs, int columnIndex)
      throws SQLException {
    return rs.getString(columnIndex);
  }

  @Override
  public String getNullableResult(CallableStatement cs, int columnIndex)
      throws SQLException {
    return cs.getString(columnIndex);
  }
}
MyBatis的动态SQL
if --判断标签
choose (when, otherwise) --多项选择 ,与页面的 jstl 标签非常类似
trim (where, set) --修剪、格式化,添加前后缀的一个标签
foreach --循环
<select id="dynamicChoose" parameterType="News" resultType="News">
    select * from news where 1 = 1
    <choose>
        <when test="title != null">
            and title = #{title}
        </when>
        <when test="content != null">
            and content = #{content}
        </when>
        <otherwise>
            and owner = "zhangsan"
        </otherwise>
    </choose>
</select>
MyBatis的SQL片段使用
  <sql id="Base_Column_List">
    id, name
  </sql>
 <select id="selectByPrimaryKey" parameterType="java.lang.Integer" resultMap="BaseResultMap">
        select
        <include refid="Base_Column_List"/>
        from user
        where id = #{id,jdbcType=INTEGER}
    </select>
MyBatis的一级.二级缓存
一级缓存是sqlSession级别,默认开启
二级缓存是mapper级别,默认关闭,缓存命中率低
MyBatis的事务管理:
<transactionManager type="JDBC">
      <property name="..." value="..."/>
</transactionManager>
如果你正在使用 Spring + MyBatis,则没有必要配置事务管理器, 因为 Spring 模块会使用自带的管理器来覆盖前面的配置.
之前已经讲了一个MyBatis项目的基本配置,接下来我们来通过断点跟踪,一步一步揭开它的神秘面纱.
@Slf4j
public class App
{
    public static void main( String[] args ) throws IOException {
        //通过配置文件获取输入流
        InputStream resourceAsStream = Resources.getResourceAsStream("mybatis-config.xml");
        //构建SqlSessionFactory
        SqlSessionFactory sqlSessionFactory = new SqlSessionFactoryBuilder().build(resourceAsStream);
        //打开session
        SqlSession sqlSession = sqlSessionFactory.openSession();
        //第四步 获取Mapper接口对象
        UserMapper mapper = sqlSession.getMapper(UserMapper.class);
        //第五步 调用Mapper接口对象的方法操作数据库
        User user = mapper.selectByPrimaryKey(1);
        //获取结果,处理业务
        log.info("查询结果:",user.getId());
    }
}
1.如何通过配置文件获取输入流
//第一步,调用
  public static InputStream getResourceAsStream(String resource) throws IOException {
    return getResourceAsStream(null, resource);
  }
//第二步调用
  public static InputStream getResourceAsStream(ClassLoader loader, String resource) throws IOException {
    InputStream in = classLoaderWrapper.getResourceAsStream(resource, loader);
    if (in == null) {
      throw new IOException("Could not find resource " + resource);
    }
    return in;
  }
通过进入源码,我们可以看到通过配置文件获取输入流最核心的一步 classLoaderWrapper.getResourceAsStream(resource, loader);
那么classLoaderWrapper这个成员变量又是如何来的呢?原来是Resource的静态成员变量
private static ClassLoaderWrapper classLoaderWrapper = new ClassLoaderWrapper();
在静态变量实例化的时候,我把关键的几行代码粘出来.只是给成员变量systemClassLoader赋值.
public class ClassLoaderWrapper {

  ClassLoader defaultClassLoader;
  ClassLoader systemClassLoader;

  ClassLoaderWrapper() {
    try {
      systemClassLoader = ClassLoader.getSystemClassLoader();
    } catch (SecurityException ignored) {
      // AccessControlException on Google App Engine
    }
  }
  ClassLoader[] getClassLoaders(ClassLoader classLoader) {
    return new ClassLoader[]{
        classLoader,
        defaultClassLoader,
        Thread.currentThread().getContextClassLoader(),
        getClass().getClassLoader(),
        systemClassLoader};
  }

}
我们回到classLoaderWrapper.getResourceAsStream(resource, loader),可以看出最终是通过类加载器去读取配置文件获取输入流
  public InputStream getResourceAsStream(String resource) {
    return getResourceAsStream(resource, getClassLoaders(null));
  }

  InputStream getResourceAsStream(String resource, ClassLoader[] classLoader) {
    for (ClassLoader cl : classLoader) {
      if (null != cl) {

        // try to find the resource as passed
        InputStream returnValue = cl.getResourceAsStream(resource);

        // now, some class loaders want this leading "/", so we'll add it and try again if we didn't find the resource
        if (null == returnValue) {
          returnValue = cl.getResourceAsStream("/" + resource);
        }

        if (null != returnValue) {
          return returnValue;
        }
      }
    }
    return null;
  }
类加载器是一个数组,一共五个类加载器,前两个初次是没有赋值的,可以最终的到一个APP-classLoader,根据;类加载机制双亲委派,三种类型加载器
BootStrapClassLoader-ExtClassLoader-APPClassLoader
  ClassLoader[] getClassLoaders(ClassLoader classLoader) {
    return new ClassLoader[]{
        classLoader,
        defaultClassLoader,
        Thread.currentThread().getContextClassLoader(),
        getClass().getClassLoader(),
        systemClassLoader};
  }
第一步,我们可以总结为简单的一句话:通过类加载器读取类的根路径下的配置文件获取输入流,我们以后的开发也可以借鉴这种方式
2.构建SqlSessionFactory
 //构建SqlSessionFactory
        SqlSessionFactory sqlSessionFactory = new SqlSessionFactoryBuilder().build(resourceAsStream);
这一步主要是build方法,前面的创建对象调用默认无参构造,并没有做什么事情.
  public SqlSessionFactory build(InputStream inputStream) {
    return build(inputStream, null, null);
  }
调用同一个类的重载方法
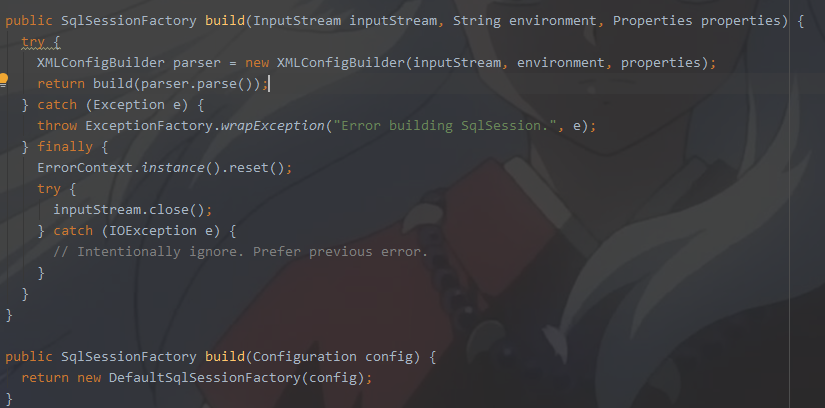
  public SqlSessionFactory build(InputStream inputStream, String environment, Properties properties) {
    try {
      XMLConfigBuilder parser = new XMLConfigBuilder(inputStream, environment, properties);
      return build(parser.parse());
    } catch (Exception e) {
      throw ExceptionFactory.wrapException("Error building SqlSession.", e);
    } finally {
      ErrorContext.instance().reset();
      try {
        inputStream.close();
      } catch (IOException e) {
        // Intentionally ignore. Prefer previous error.
      }
    }
  }
重点在于:XMLConfigBuilder parser = new XMLConfigBuilder(inputStream, environment, properties);
我们通过传递可知,后两个参数environment为null,properties为null.
  public XMLConfigBuilder(InputStream inputStream, String environment, Properties props) {
    this(new XPathParser(inputStream, true, props, new XMLMapperEntityResolver()), environment, props);
  }
new XPathParser(inputStream, true, props, new XMLMapperEntityResolver())这一步到底做了什么?
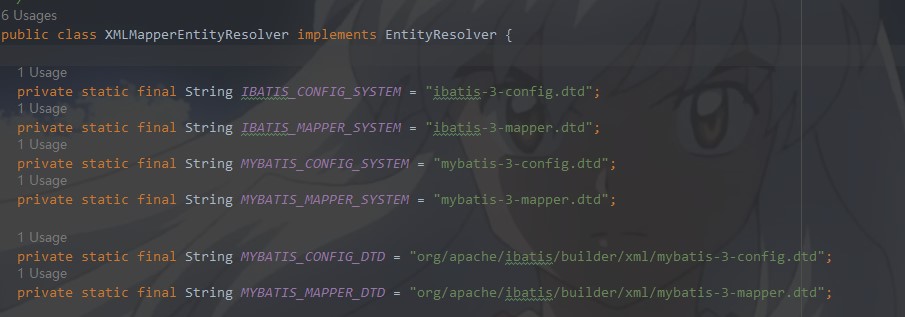
首先看下new XMLMapperEntityResolver(),你会在下图看到熟悉的dtd,你会想到什么?这一步也只是初始化了内部成员变量.
我们再看下new XPathParser(inputStream, true, props, new XMLMapperEntityResolver())下一步调用
 public XPathParser(InputStream inputStream, boolean validation, Properties variables, EntityResolver entityResolver) {
    commonConstructor(validation, variables, entityResolver);
    this.document = createDocument(new InputSource(inputStream));
  }
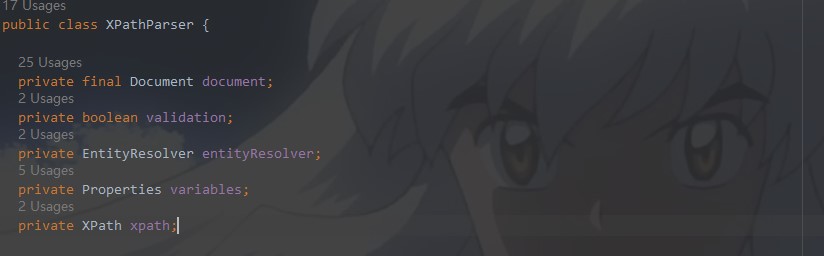
首先进入第一个方法内部一探究竟,给成员变量赋值
  private void commonConstructor(boolean validation, Properties variables, EntityResolver entityResolver) {
    this.validation = validation;
    this.entityResolver = entityResolver;
    this.variables = variables;
    XPathFactory factory = XPathFactory.newInstance();
    this.xpath = factory.newXPath();
  }
然后是通过输入流,构建Document对象,赋值给成员变量document
  private Document createDocument(InputSource inputSource) {
    // important: this must only be called AFTER common constructor
    try {
      DocumentBuilderFactory factory = DocumentBuilderFactory.newInstance();
      factory.setValidating(validation);

      factory.setNamespaceAware(false);
      factory.setIgnoringComments(true);
      factory.setIgnoringElementContentWhitespace(false);
      factory.setCoalescing(false);
      factory.setExpandEntityReferences(true);

      DocumentBuilder builder = factory.newDocumentBuilder();
      builder.setEntityResolver(entityResolver);
      builder.setErrorHandler(new ErrorHandler() {
        @Override
        public void error(SAXParseException exception) throws SAXException {
          throw exception;
        }

        @Override
        public void fatalError(SAXParseException exception) throws SAXException {
          throw exception;
        }

        @Override
        public void warning(SAXParseException exception) throws SAXException {
        }
      });
      return builder.parse(inputSource);
    } catch (Exception e) {
      throw new BuilderException("Error creating document instance.  Cause: " + e, e);
    }
  }
这里面一大堆到底做了什么呢,大致就是设置xml的验证,毕竟我们要保证xml的配置是符合MyBatis的配置书写规则,不然后续的解析也是有问题的.
XPathParser解析完毕之后,XPathParser此时成员变量已经赋值完毕,调用重载方法
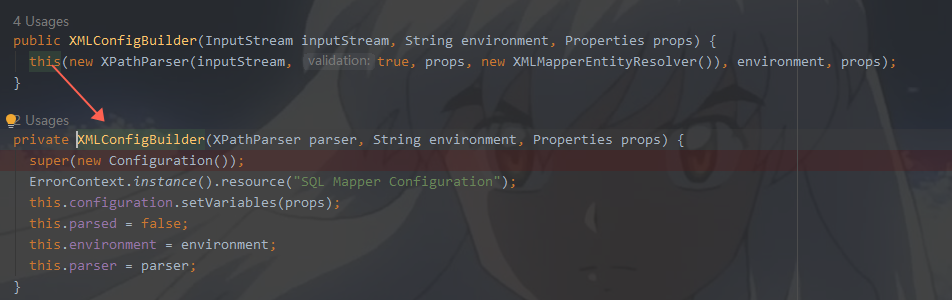
首先看一下new Configuration()做了什么?里面的成员变量响应初始化,我们暂且不看,看看无参构造干了什么.下面的代码是不是很熟悉?好像在哪里见过?
没错,这些我们在配置mybatis-config.xml的时候见过,通过别名可以找到对应的类,而我们配置文件只需要写别名,方便我们的记忆和配置
  public Configuration() {
    typeAliasRegistry.registerAlias("JDBC", JdbcTransactionFactory.class);
    typeAliasRegistry.registerAlias("MANAGED", ManagedTransactionFactory.class);

    typeAliasRegistry.registerAlias("JNDI", JndiDataSourceFactory.class);
    typeAliasRegistry.registerAlias("POOLED", PooledDataSourceFactory.class);
    typeAliasRegistry.registerAlias("UNPOOLED", UnpooledDataSourceFactory.class);

    typeAliasRegistry.registerAlias("PERPETUAL", PerpetualCache.class);
    typeAliasRegistry.registerAlias("FIFO", FifoCache.class);
    typeAliasRegistry.registerAlias("LRU", LruCache.class);
    typeAliasRegistry.registerAlias("SOFT", SoftCache.class);
    typeAliasRegistry.registerAlias("WEAK", WeakCache.class);

    typeAliasRegistry.registerAlias("DB_VENDOR", VendorDatabaseIdProvider.class);

    typeAliasRegistry.registerAlias("XML", XMLLanguageDriver.class);
    typeAliasRegistry.registerAlias("RAW", RawLanguageDriver.class);

    typeAliasRegistry.registerAlias("SLF4J", Slf4jImpl.class);
    typeAliasRegistry.registerAlias("COMMONS_LOGGING", JakartaCommonsLoggingImpl.class);
    typeAliasRegistry.registerAlias("LOG4J", Log4jImpl.class);
    typeAliasRegistry.registerAlias("LOG4J2", Log4j2Impl.class);
    typeAliasRegistry.registerAlias("JDK_LOGGING", Jdk14LoggingImpl.class);
    typeAliasRegistry.registerAlias("STDOUT_LOGGING", StdOutImpl.class);
    typeAliasRegistry.registerAlias("NO_LOGGING", NoLoggingImpl.class);

    typeAliasRegistry.registerAlias("CGLIB", CglibProxyFactory.class);
    typeAliasRegistry.registerAlias("JAVASSIST", JavassistProxyFactory.class);

    languageRegistry.setDefaultDriverClass(XMLLanguageDriver.class);
    languageRegistry.register(RawLanguageDriver.class);
  }
ErrorContext.instance().resource("SQL Mapper Configuration");这个是什么呢,我们也进去瞅一眼
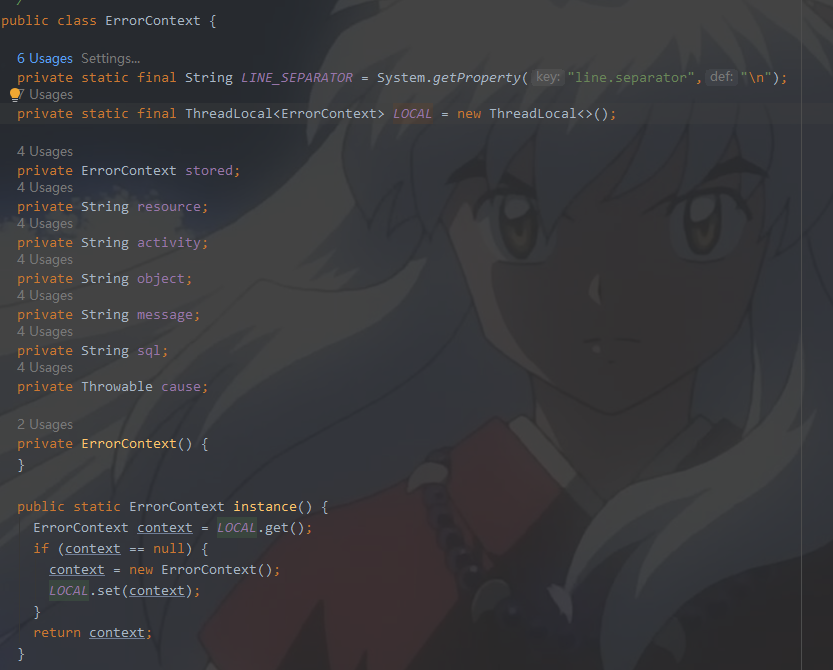
我们一眼就可以看到ThreadLocal,想到了什么吗?指定线程内存储数据,数据存储以后,只有指定线程可以得到存储数据.这个是错误上下文,打印异常使用,可以认为是线程单例,因为它针对的级别是线程.
我们再次回到SqlSessionFactory的build方法
调用parser.parse()的方法
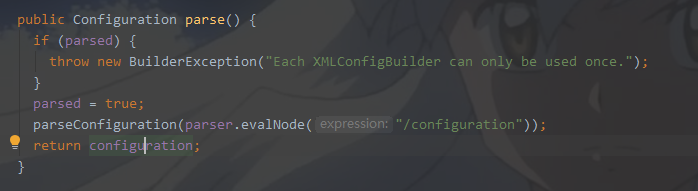
XPATH解析/configuration,解析之后我们会把所有解析获取的配置信息防止到成员变量configuration里面
最终我们获取的SqlSessionFactory的时候,里面的Configuration成员变量就包含了我们xml里面配置的所有解析出来的信息
3.打开session SqlSession sqlSession = sqlSessionFactory.openSession();
public class DefaultSqlSessionFactory implements SqlSessionFactory {

  private final Configuration configuration;

  public DefaultSqlSessionFactory(Configuration configuration) {
    this.configuration = configuration;
  }

  @Override
  public SqlSession openSession() {
    return openSessionFromDataSource(configuration.getDefaultExecutorType(), null, false);
  }
调用一下方法,这里面顾名思义,根据我我们解析出来的配置信息,拿到数据源,构建出事务对象,然后创建出默认的SqlSession
  private SqlSession openSessionFromDataSource(ExecutorType execType, TransactionIsolationLevel level, boolean autoCommit) {
    Transaction tx = null;
    try {
      final Environment environment = configuration.getEnvironment();
      final TransactionFactory transactionFactory = getTransactionFactoryFromEnvironment(environment);
      tx = transactionFactory.newTransaction(environment.getDataSource(), level, autoCommit);
      final Executor executor = configuration.newExecutor(tx, execType);
      return new DefaultSqlSession(configuration, executor, autoCommit);
    } catch (Exception e) {
      closeTransaction(tx); // may have fetched a connection so lets call close()
      throw ExceptionFactory.wrapException("Error opening session.  Cause: " + e, e);
    } finally {
      ErrorContext.instance().reset();
    }
  }

sqlSession里面都是诸如此类的方法DefaultSqlSession做了实现
4.获取Mapper接口对象 UserMapper mapper = sqlSession.getMapper(UserMapper.class);
我们去看下getMapper的实现,我们传入了接口类型,但是我们并没有具体的实现类代码,看看Mybatis是如何做的。
  @Override
  public <T> T getMapper(Class<T> type) {
    return configuration.getMapper(type, this);
  }
再向下断点调试
 public <T> T getMapper(Class<T> type, SqlSession sqlSession) {
    return mapperRegistry.getMapper(type, sqlSession);
  }
这个不是核心,接着向下调用,下面这是重点,我们来看一看
  @SuppressWarnings("unchecked")
  public <T> T getMapper(Class<T> type, SqlSession sqlSession) {
    final MapperProxyFactory<T> mapperProxyFactory = (MapperProxyFactory<T>) knownMappers.get(type);
    if (mapperProxyFactory == null) {
      throw new BindingException("Type " + type + " is not known to the MapperRegistry.");
    }
    try {
      return mapperProxyFactory.newInstance(sqlSession);
    } catch (Exception e) {
      throw new BindingException("Error getting mapper instance. Cause: " + e, e);
    }
  }
private final Map<Class<?>, MapperProxyFactory<?>> knownMappers = new HashMap<>();
knownMappers这个就是一个HashMap,这个map是时候放进去值的呢?
其实我们在解析xml的时候,MyBatis已经悄悄地放进去了,不信请看,这个有一点就是,此刻其实也已经把mapper.xml解析数据放入configuration里面了
  <!--映射器-->
    <mappers>
        <mapper resource="com/bjpowernode/mapper/UsersMapper.xml"/>
    </mappers>

通过这种不知不觉的方法,就把我们的mapper接口类型放进了map里面

所以我们最后一定会执行
return mapperProxyFactory.newInstance(sqlSession);
如果我们对于反射和动态代理有了解的话,是不是很熟悉,动态代理实例化。下面的代码也证实了这一点,如果对于动态代理不太了解

我们先来看一下MapperProxy的方法

上面有一个经典面试题:动态代理,投鞭断流
final MapperMethod mapperMethod = cachedMapperMethod(method);
return mapperMethod.execute(sqlSession, args);
我们直接看最后一个地方,前一个地方cachedMapperMethod(method),这个地方字面应该是缓存,略过
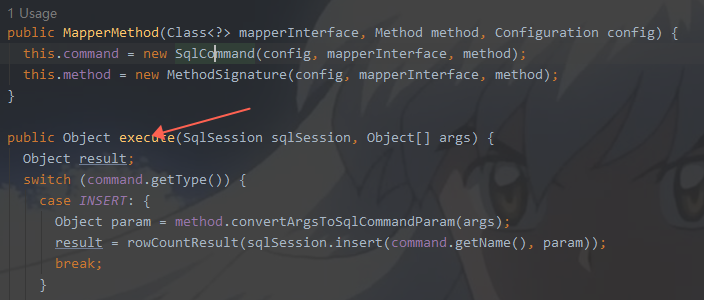
这里根据mapper.xml里面的标签确定是什么操作,最后把结果集返回
5.调用Mapper接口对象的方法操作数据库
当我们调用mapper接口的方法,通过动态代理,底层自动给我们生成动态代理对象,执行exceute方法,返回结果集。
6.获取结果,处理业务

