IDEA安装Git
参考 https://www.runoob.com/git/git-tutorial.html
maven 查找坐标(推荐网址)
http://mvnrepository.com/
http://search.maven.org/
http://repository.sonatype.org/content/groups/public/
http://people.apache.org/repo/m2-snapshot-repository/
http://people.apache.org/repo/m2-incubating-repository/
第一个是最常用的,然后是第二个,然后是第三个,最后两个是 Apache 的私有仓库
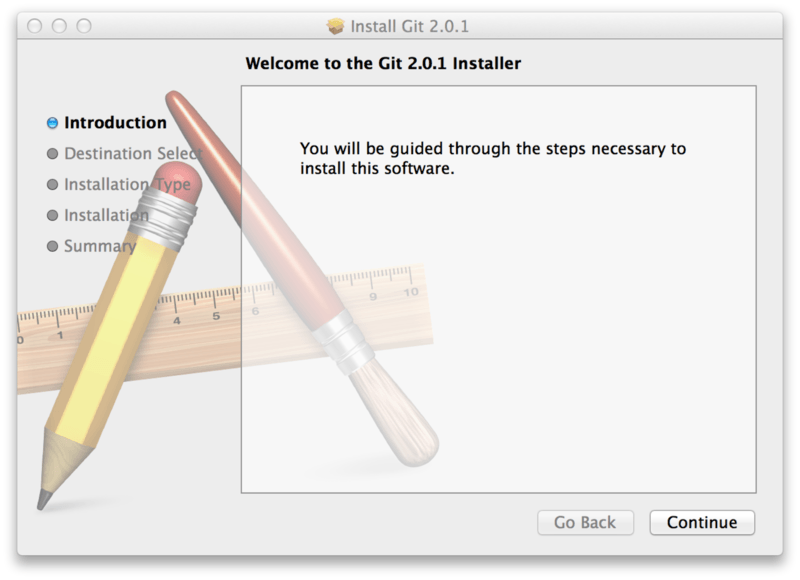
1、下载Git 官方地址为:https://git-scm.com/download/win

2、下载完之后,双击安装

3、选择安装目录

4、选择组件

5、开始菜单目录名设置

6、选择使用命令行环境

7、以下三步默认,直接点击下一步


8、安装完成

9、把本地安装的git添加到idea里面去

把本地的git添加进来,注意添加的是bin目录下的git.exe

在 Linux 上安装
如果你想在 Linux 上用二进制安装程序来安装基本的 Git 工具,可以使用发行版包含的基础软件包管理工具来安装。 以 Fedora 为例,如果你在使用它(或与之紧密相关的基于 RPM 的发行版,如 RHEL 或 CentOS),你可以使用 dnf:
$ sudo dnf install git-all如果你在基于 Debian 的发行版上,如 Ubuntu,请使用 apt:
$ sudo apt install git-all要了解更多选择,Git 官方网站上有在各种 Unix 发行版的系统上安装步骤,网址为 https://git-scm.com/download/linux。
在 macOS 上安装
在 Mac 上安装 Git 有多种方式。 最简单的方法是安装 Xcode Command Line Tools。 Mavericks (10.9) 或更高版本的系统中,在 Terminal 里尝试首次运行 git 命令即可。
$ git --version如果没有安装过命令行开发者工具,将会提示你安装。
如果你想安装更新的版本,可以使用二进制安装程序。 官方维护的 macOS Git 安装程序可以在 Git 官方网站下载,网址为 https://git-scm.com/download/mac。
你也可以将它作为 GitHub for macOS 的一部分来安装。 它们的图形化 Git 工具有一个安装命令行工具的选项。 你可以从 GitHub for macOS 网站下载该工具,网址为 https://mac.github.com。
目录
- 安装git
- 创建ssh key、配置git
- 提交本地项目到GitHub
一、安装Git
MAC 上安装Git主要有两种方式
首先查看电脑是否安装Git,终端输入:
git
安装过则会输出:
WMBdeMacBook-Pro:~ WENBO$ git
usage: git [--version] [--help] [-C <path>] [-c name=value]
           [--exec-path[=<path>]] [--html-path] [--man-path] [--info-path]
           [-p | --paginate | --no-pager] [--no-replace-objects] [--bare]
           [--git-dir=<path>] [--work-tree=<path>] [--namespace=<name>]
           <command> [<args>]

These are common Git commands used in various situations:

start a working area (see also: git help tutorial)
   clone      Clone a repository into a new directory
   init       Create an empty Git repository or reinitialize an existing one

work on the current change (see also: git help everyday)
   add        Add file contents to the index
   mv         Move or rename a file, a directory, or a symlink
   reset      Reset current HEAD to the specified state
   rm         Remove files from the working tree and from the index

examine the history and state (see also: git help revisions)
   bisect     Use binary search to find the commit that introduced a bug
   grep       Print lines matching a pattern
   log        Show commit logs
   show       Show various types of objects
   status     Show the working tree status

grow, mark and tweak your common history
   branch     List, create, or delete branches
   checkout   Switch branches or restore working tree files
   commit     Record changes to the repository
   diff       Show changes between commits, commit and working tree, etc
   merge      Join two or more development histories together
   rebase     Reapply commits on top of another base tip
   tag        Create, list, delete or verify a tag object signed with GPG

collaborate (see also: git help workflows)
   fetch      Download objects and refs from another repository
   pull       Fetch from and integrate with another repository or a local branch
   push       Update remote refs along with associated objects

'git help -a' and 'git help -g' list available subcommands and some
concept guides. See 'git help <command>' or 'git help <concept>'
to read about a specific subcommand or concept.
1、通过homebrew安装Git
- 1、未安装homebrew,需安装homebrew
/usr/bin/ruby -e "$(curl -fsSL https://raw.githubusercontent.com/Homebrew/install/master/install)"
- 2、安装git
brew install git
2、通过Xcode安装
直接从AppStore安装Xcode,Xcode集成了Git,不过默认没有安装,你需要运行Xcode,选择菜单“Xcode”->“Preferences”,在弹出窗口中找到“Downloads”,选择“Command Line Tools”,点“Install”就可以完成安装了。
二、创建ssh key、配置git
- 1、设置username和email(github每次commit都会记录他们)
git config --global user.name "wenbo"
git config --global user.email "1050794513@qq.com"
- 2、通过终端命令创建ssh key
ssh-keygen -t rsa -C "1050794513@qq.com"
1050794513@qq.com是我的邮件名,回车会有以下输出
Last login: Sat Jan  6 14:12:16 on ttys000
WMBdeMacBook-Pro:~ WENBO$ ssh-keygen -t rsa -C "1050794513@qq.com"
Generating public/private rsa key pair.
Enter file in which to save the key (/Users/WENBO/.ssh/id_rsa):
/Users/WENBO/.ssh/id_rsa already exists.
Overwrite (y/n)? n
WMBdeMacBook-Pro:~ WENBO$
由于这里我原来已经创建过,这里我选n,没有创建过的,会要求确认路径和输入密码,我们这使用默认的一路回车就行。成功的话会在~/下生成.ssh文件夹,进去,打开id_rsa.pub,复制里面的key。
终端查看.ssh/id_rsa.pub文件
open .ssh/id_rsa.pub
回车后,就会新弹出一个终端,然后复制里面的key。
或者用cat命令查看
cat .ssh/id_rsa.pub
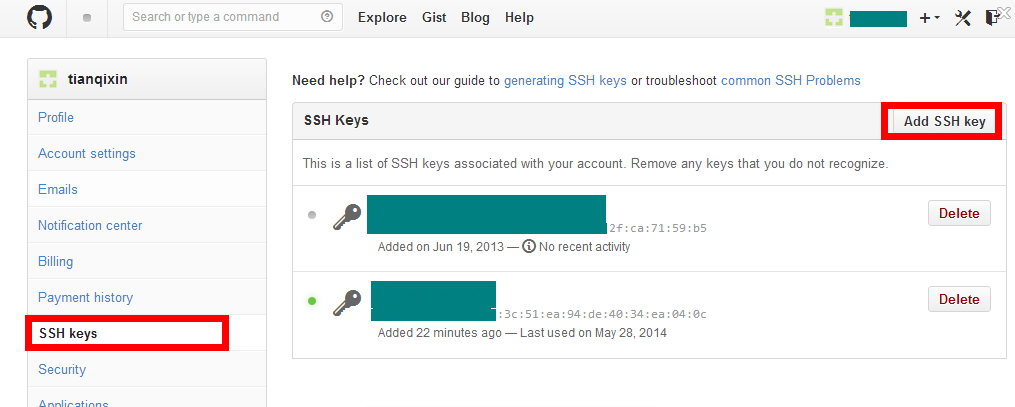
- 3、登录GitHub(默认你已经注册了GitHub账号),添加ssh key,点击Settings,如图
![]()
点击New SSH key,如图![]()
添加key,如图
![]()
- 4、链接验证


ssh -T git@github.com
终端输出结果
Last login: Sat Jan  6 14:42:55 on ttys000
WMBdeMacBook-Pro:~ WENBO$ ssh -T git@github.com
Hi wenmobo! You've successfully authenticated, but GitHub does not provide shell access.
WMBdeMacBook-Pro:~ WENBO$
说明已经链接成功。
三、提交本地项目到GitHub
- 1、在GitHub上新创建一个 repository或者Start a Project,如图:
![]()
- 2、填写项目信息,如下图所示:
![]()
点击Create repository,就创好一个工程了。 -
3、Clone工程到本地,首先复制ssh 地址
![]()
打开终端,这里只是测试,我想把工程克隆在桌面,首先在终端中切换路径到桌面,输入以下命令:


cd /Users/WENBO/Desktop/
然后克隆项目,终端输入
git clone git@github.com:wenmobo/LearnGit.git
git@github.com:wenmobo/LearnGit.git是刚刚复制的ssh路径。
终端完整输出如下:
Last login: Sat Jan  6 15:17:17 on ttys000
WMBdeMacBook-Pro:~ WENBO$ cd /Users/WENBO/Desktop/
WMBdeMacBook-Pro:Desktop WENBO$ git clone git@github.com:wenmobo/LearnGit.git
Cloning into 'LearnGit'...
remote: Counting objects: 5, done.
remote: Compressing objects: 100% (4/4), done.
remote: Total 5 (delta 0), reused 0 (delta 0), pack-reused 0
Receiving objects: 100% (5/5), 5.2
这时,工程已经被克隆到桌面了,如下图:

- 4、在Xcode中新创建一个工程,保存的路径为刚刚克隆下来的LearnGit文件夹下,如下图所示:
![]()
- 5、提交修改,首先切换到LearnGit文件路径:

cd /Users/WENBO/Desktop/LearnGit
然后输入:
//文件添加到仓库(.代表提交所有文件)
git add .
//把文件提交到仓库
git commit -m "First Commit"
//上传到github
git push
终端完整输出如下:
Last login: Sat Jan  6 15:49:54 on ttys000
WMBdeMacBook-Pro:~ WENBO$ cd /Users/WENBO/Desktop/LearnGit
WMBdeMacBook-Pro:LearnGit WENBO$ git add .
WMBdeMacBook-Pro:LearnGit WENBO$ git commit -m "First Commit"
[master ae3bbe9] First Commit
 11 files changed, 649 insertions(+)
 create mode 100644 LearnGitDemo/LearnGitDemo.xcodeproj/project.pbxproj
 create mode 100644 LearnGitDemo/LearnGitDemo.xcodeproj/project.xcworkspace/contents.xcworkspacedata
 create mode 100644 LearnGitDemo/LearnGitDemo/AppDelegate.h
 create mode 100644 LearnGitDemo/LearnGitDemo/AppDelegate.m
 create mode 100644 LearnGitDemo/LearnGitDemo/Assets.xcassets/AppIcon.appiconset/Contents.json
 create mode 100644 LearnGitDemo/LearnGitDemo/Base.lproj/LaunchScreen.storyboard
 create mode 100644 LearnGitDemo/LearnGitDemo/Base.lproj/Main.storyboard
 create mode 100644 LearnGitDemo/LearnGitDemo/Info.plist
 create mode 100644 LearnGitDemo/LearnGitDemo/ViewController.h
 create mode 100644 LearnGitDemo/LearnGitDemo/ViewController.m
 create mode 100644 LearnGitDemo/LearnGitDemo/main.m
WMBdeMacBook-Pro:LearnGit WENBO$ git push
Warning: Permanently added the RSA host key for IP address '192.30.255.112' to the list of known hosts.
Counting objects: 20, done.
Delta compression using up to 4 threads.
Compressing objects: 100% (18/18), done.
Writing objects: 100% (20/20), 6.80 KiB | 0 bytes/s, done.
Total 20 (delta 2), reused 0 (delta 0)
remote: Resolving deltas: 100% (2/2), done.
To github.com:wenmobo/LearnGit.git
   1000218..ae3bbe9  master -> master
WMBdeMacBook-Pro:LearnGit WENBO$
查看GitHub上的项目,LearnGit已经上传成功啦,如下图所示:

什么是 Github?
github是一个基于git的代码托管平台,付费用户可以建私人仓库,我们一般的免费用户只能使用公共仓库,也就是代码要公开。
Github 由Chris Wanstrath, PJ Hyett 与Tom Preston-Werner三位开发者在2008年4月创办。迄今拥有59名全职员工,主要提供基于git的版本托管服务。
目前看来,GitHub这场冒险已经胜出。根据来自维基百科关于GitHub的描述,我们可以形象地看出GitHub的增长速度:
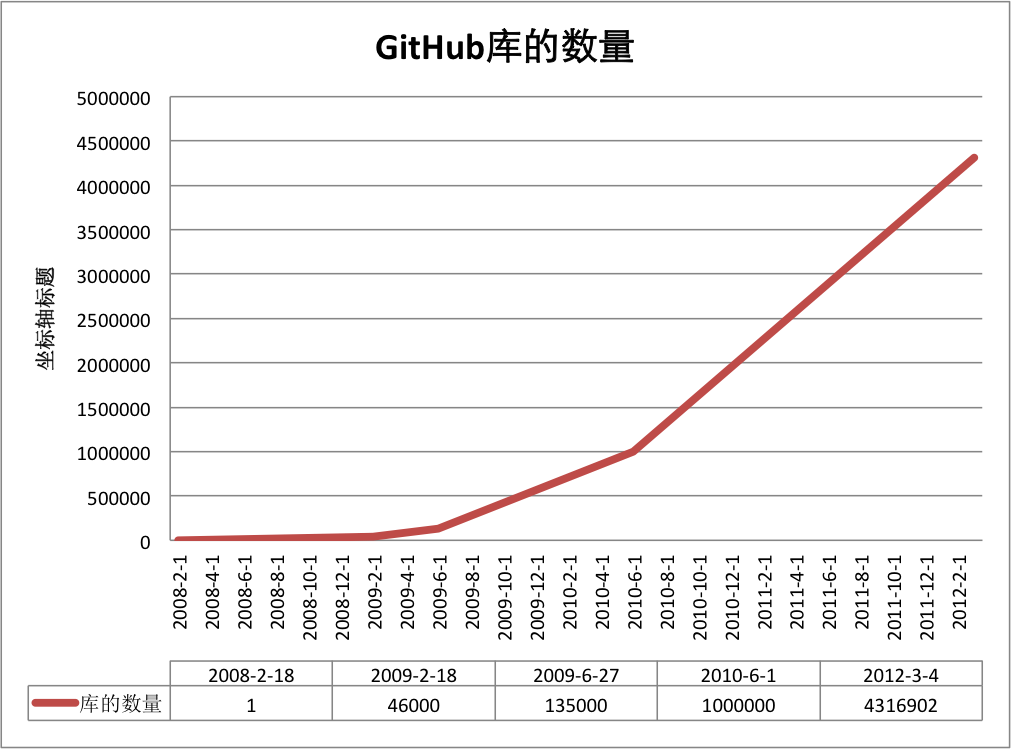
今天,GitHub已是:
- 一个拥有143万开发者的社区。其中不乏Linux发明者Torvalds这样的顶级黑客,以及Rails创始人DHH这样的年轻极客。
- 这个星球上最流行的开源托管服务。目前已托管431万git项目,不仅越来越多知名开源项目迁入GitHub,比如Ruby on Rails、jQuery、Ruby、Erlang/OTP;近三年流行的开源库往往在GitHub首发,例如:BootStrap、Node.js、CoffeScript等。
- alexa全球排名414的网站。
注册账户以及创建仓库
要想使用github第一步当然是注册github账号了, github官网地址:https://github.com/。 之后就可以创建仓库了(免费用户只能建公共仓库),Create a New Repository,填好名称后Create,之后会出现一些仓库的配置信息,这也是一个git的简单教程。
Github 安装
配置Git
首先在本地创建ssh key;
$ ssh-keygen -t rsa -C "your_email@youremail.com"
后面的your_email@youremail.com改为你在github上注册的邮箱,之后会要求确认路径和输入密码,我们这使用默认的一路回车就行。成功的话会在~/下生成.ssh文件夹,进去,打开id_rsa.pub,复制里面的key。
回到github上,进入 Account Settings(账户配置),左边选择SSH Keys,Add SSH Key,title随便填,粘贴在你电脑上生成的key。
为了验证是否成功,在git bash下输入:
$ ssh -T git@github.com
如果是第一次的会提示是否continue,输入yes就会看到:You've successfully authenticated, but GitHub does not provide shell access 。这就表示已成功连上github。
接下来我们要做的就是把本地仓库传到github上去,在此之前还需要设置username和email,因为github每次commit都会记录他们。
$ git config --global user.name "your name"
$ git config --global user.email "your_email@youremail.com"
进入要上传的仓库,右键git bash,添加远程地址:
$ git remote add origin git@github.com:yourName/yourRepo.git
后面的yourName和yourRepo表示你再github的用户名和刚才新建的仓库,加完之后进入.git,打开config,这里会多出一个remote "origin"内容,这就是刚才添加的远程地址,也可以直接修改config来配置远程地址。
<h3创建新仓库< h3="">
创建新文件夹,打开,然后执行 git init 以创建新的 git 仓库。
检出仓库
执行如下命令以创建一个本地仓库的克隆版本:
git clone /path/to/repository
如果是远端服务器上的仓库,你的命令会是这个样子:
git clone username@host:/path/to/repository
工作流
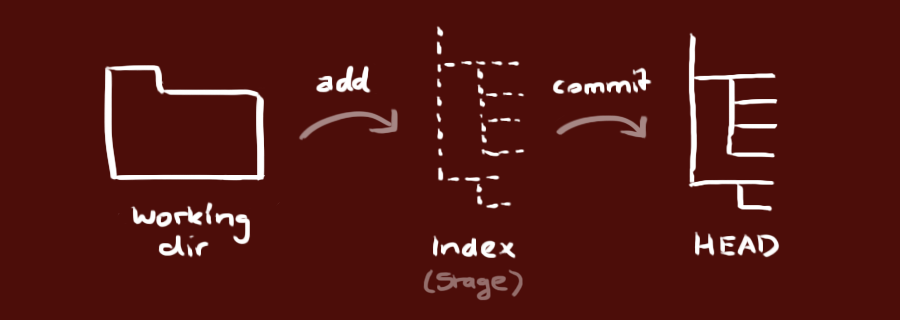
你的本地仓库由 git 维护的三棵"树"组成。第一个是你的 工作目录,它持有实际文件;第二个是 暂存区(Index),它像个缓存区域,临时保存你的改动;最后是 HEAD,它指向你最后一次提交的结果。
你可以提出更改(把它们添加到暂存区),使用如下命令:git add <filename>git add *
这是 git 基本工作流程的第一步;使用如下命令以实际提交改动:git commit -m "代码提交信息"
现在,你的改动已经提交到了 HEAD,但是还没到你的远端仓库。
推送改动
你的改动现在已经在本地仓库的 HEAD 中了。执行如下命令以将这些改动提交到远端仓库:git push origin master
可以把 master 换成你想要推送的任何分支。
如果你还没有克隆现有仓库,并欲将你的仓库连接到某个远程服务器,你可以使用如下命令添加:git remote add origin <server>
如此你就能够将你的改动推送到所添加的服务器上去了。
分支
分支是用来将特性开发绝缘开来的。在你创建仓库的时候,master 是"默认的"分支。在其他分支上进行开发,完成后再将它们合并到主分支上。
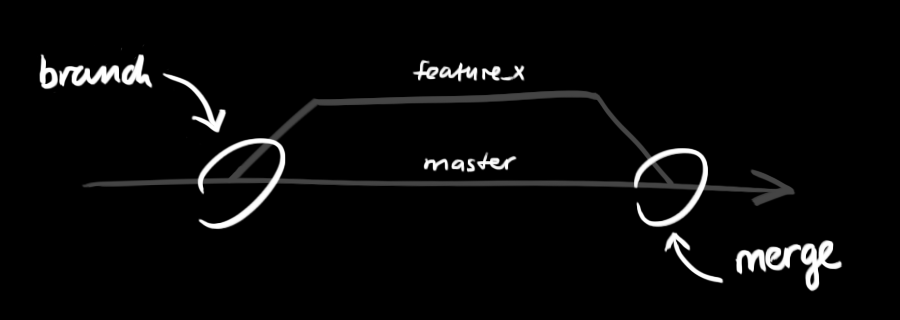
创建一个叫做"feature_x"的分支,并切换过去:git checkout -b feature_x
切换回主分支:git checkout master
再把新建的分支删掉:git branch -d feature_x
除非你将分支推送到远端仓库,不然该分支就是 不为他人所见的:git push origin <branch>
更新与合并
要更新你的本地仓库至最新改动,执行:git pull
以在你的工作目录中 获取(fetch) 并 合并(merge) 远端的改动。
要合并其他分支到你的当前分支(例如 master),执行:git merge <branch>
在这两种情况下,git 都会尝试去自动合并改动。遗憾的是,这可能并非每次都成功,并可能出现冲突(conflicts)。 这时候就需要你修改这些文件来手动合并这些冲突(conflicts)。改完之后,你需要执行如下命令以将它们标记为合并成功:git add <filename>
在合并改动之前,你可以使用如下命令预览差异:git diff <source_branch> <target_branch>
标签
为软件发布创建标签是推荐的。这个概念早已存在,在 SVN 中也有。你可以执行如下命令创建一个叫做 1.0.0 的标签:git tag 1.0.0 1b2e1d63ff
1b2e1d63ff 是你想要标记的提交 ID 的前 10 位字符。可以使用下列命令获取提交 ID:git log
你也可以使用少一点的提交 ID 前几位,只要它的指向具有唯一性。
替换本地改动
假如你操作失误(当然,这最好永远不要发生),你可以使用如下命令替换掉本地改动:git checkout -- <filename>
此命令会使用 HEAD 中的最新内容替换掉你的工作目录中的文件。已添加到暂存区的改动以及新文件都不会受到影响。
假如你想丢弃你在本地的所有改动与提交,可以到服务器上获取最新的版本历史,并将你本地主分支指向它:git fetch origingit reset --hard origin/master
实用小贴士
内建的图形化 git:gitk
彩色的 git 输出:git config color.ui true
显示历史记录时,每个提交的信息只显示一行:git config format.pretty oneline
交互式添加文件到暂存区:git add -i
链接与资源
图形化客户端
- GitX (L) (OSX, 开源软件)
- Tower (OSX)
- Source Tree (OSX, 免费)
- GitHub for Mac (OSX, 免费)
- GitBox (OSX, App Store)
指南和手册
相关文章
- Github 简明指南:http://rogerdudler.github.io/git-guide/index.zh.html
- 如何高效利用GitHub:http://www.yangzhiping.com/tech/github.html
总结

 浙公网安备 33010602011771号