springBoot(2)--初步理解
一、定时任务
1、步骤:
1:在启动类上写@EnableScheduling注解
2:在要定时任务的类上写@component
3:在要定时执行的方法上写@Scheduled(fixedRate=毫秒数)。
2、示例
主类
@SpringBootApplication
@EnableScheduling //开启定时任务
public class MainApplication {

    public static void main(String[] args) {
        SpringApplication.run(MainApplication.class, args);
    }
}
定时任务类
import java.util.Date;
import org.springframework.scheduling.annotation.Scheduled;
import org.springframework.stereotype.Component;

@Component
public class Jobs {

    //表示方法执行完成后5秒
    @Scheduled(fixedDelay=5000)
    public void fixedDelayJob() throws InterruptedException{
        System.out.println("fixedDelay 每隔5秒"+new Date());
    }

    //表示每隔3秒
    @Scheduled(fixedRate=3000)
    public void fixedRateJob(){

        System.out.println("fixedRate 每隔3秒"+new Date());
    }

    //表示每天8时30分0秒执行
    @Scheduled(cron="0 0,30 0,8 ? * ? ")
    public void cronJob(){ System.out.println(new Date()+" ...>>cron...."); } }
效果:

3.总结
1.fixedDelay和fixedRate,单位是毫秒,这里这里就是5秒和3秒,它们的区别就是:
,fixedRate就是每多次分钟一次,不论你业务执行花费了多少时间。我都是1分钟执行1次,而fixedDelay是当任务执行完毕后1分钟在执行。所以根据实际业务不同,我们会选择不同的方式。
2.cron表达式:比如你要设置每天什么时候执行,就可以用它
cron表达式,有专门的语法,而且感觉有点绕人,不过简单来说,大家记住一些常用的用法即可,特殊的语法可以单独去查。
cron一共有7位,但是最后一位是年,可以留空,所以我们可以写6位:
* 第一位,表示秒,取值0-59
* 第二位,表示分,取值0-59
* 第三位,表示小时,取值0-23
* 第四位,日期天/日,取值1-31
* 第五位,日期月份,取值1-12
* 第六位,星期,取值1-7,星期一,星期二...,注:不是第1周,第二周的意思
          另外:1表示星期天,2表示星期一。
* 第7为,年份,可以留空,取值1970-2099
cron中,还有一些特殊的符号,含义如下:
(*)星号:可以理解为每的意思,每秒,每分,每天,每月,每年...
(?)问号:问号只能出现在日期和星期这两个位置。
(-)减号:表达一个范围,如在小时字段中使用“10-12”,则表示从10到12点,即10,11,12
(,)逗号:表达一个列表值,如在星期字段中使用“1,2,4”,则表示星期一,星期二,星期四
(/)斜杠:如:x/y,x是开始值,y是步长,比如在第一位(秒) 0/15就是,从0秒开始,每15秒,最后就是0,15,30,45,60    另:*/y,等同于0/y
下面列举几个例子供大家来验证:
0 0 3 * * ?     每天3点执行
0 5 3 * * ?     每天3点5分执行
0 5 3 ? * *     每天3点5分执行,与上面作用相同
0 5/10 3 * * ?  每天3点的 5分,15分,25分,35分,45分,55分这几个时间点执行
0 10 3 ? * 1    每周星期天,3点10分 执行,注:1表示星期天
0 10 3 ? * 1#3  每个月的第三个星期,星期天 执行,#号只能出现在星期的位置
二、异步任务
1、步骤
1: 启动类里面使用@EnableAsync注解开启功能,自动扫描
2:在要异步任务的类上写@component
3:在定义异步任务类写@Async(写在类上代表整个类都是异步,在方法加上代表该类异步执行)
2、示例
主类
@SpringBootApplication
@EnableAsync   //开启异步任务
public class MainApplication {

    public static void main(String[] args) {
        SpringApplication.run(MainApplication.class, args);
    }
}
异步类
import java.util.concurrent.Future;

import org.springframework.scheduling.annotation.Async;
import org.springframework.scheduling.annotation.AsyncResult;
import org.springframework.stereotype.Component;

/**
 * 功能描述:异步任务业务类
 */
@Component
@Async
public class AsyncTask {

    //获取异步结果
    public Future<String> task4() throws InterruptedException{
        long begin = System.currentTimeMillis();
        Thread.sleep(2000L);
        long end = System.currentTimeMillis();
        System.out.println("任务4耗时="+(end-begin));
        return new AsyncResult<String>("任务4");
    }


    public Future<String> task5() throws InterruptedException{
        long begin = System.currentTimeMillis();
        Thread.sleep(3000L);
        long end = System.currentTimeMillis();
        System.out.println("任务5耗时="+(end-begin));
        return new AsyncResult<String>("任务5");
    }

    public Future<String> task6() throws InterruptedException{
        long begin = System.currentTimeMillis();
        Thread.sleep(1000L);
        long end = System.currentTimeMillis();
        System.out.println("任务6耗时="+(end-begin));
        return new AsyncResult<String>("任务6");
    }

}
controller类
import java.util.concurrent.Future;
import org.springframework.beans.factory.annotation.Autowired;
import org.springframework.web.bind.annotation.GetMapping;
import org.springframework.web.bind.annotation.RequestMapping;
import org.springframework.web.bind.annotation.RestController;
import com.jincou.task.AsyncTask;
import com.jincou.util.JsonData;

@RestController
@RequestMapping("/api/v1")
public class UserController {

    @Autowired
    private AsyncTask task;

    @GetMapping("async_task")
    public JsonData exeTask() throws InterruptedException{

        long begin = System.currentTimeMillis();

        Future<String> task4 = task.task4();
        Future<String> task5 = task.task5();
        Future<String> task6 = task.task6();

        //如果都执行往就可以跳出循环,isDone方法如果此任务完成,true
        for(;;){
            if (task4.isDone() && task5.isDone() && task6.isDone()) {
                break;
            }
        }

        long end = System.currentTimeMillis();
        long total = end-begin;
        System.out.println("执行总耗时="+total);
        return JsonData.buildSuccess(total);
    }
}
结果:
页面:

后台:

3、总结
从上面示例我们可以看出:如果同步方法,那我们需要6秒,而异步执行,我们只需要3秒左右,这就是异步的作用。
1)要把异步任务封装到类里面,不能直接写到Controller
2)增加Future<String> 返回结果 AsyncResult<String>("task执行完成");
3)如果需要拿到结果 需要判断全部的 task.isDone()
logback日志
一、概述
和log4j优点:
实际上,这两个日志框架都出自同一个开发者之手,Logback 相对于 Log4J 有更多的优点
(1)logback不仅性能提升了,初始化内存加载也更小了。
(2)内容更丰富的文档
(3)更强大的过滤器
二、步骤
1、maven配置jar包
logback默认就在spring-boot-starter-web包中,所以我们只要有spring-boot-starter-web
        <dependency>
            <groupId>org.springframework.boot</groupId>
            <artifactId>spring-boot-starter-web</artifactId>
        </dependency>

二、新建logback-spring.xml
springboot官方建议命名为logback-spring.xml,在src/main/resources新建logback-spring.xml,这里不需要在application.properties中配置
默认加载加载配置顺序 logback-spring.xml, logback-spring.groovy, logback.xml, or logback.groovy
<?xml version="1.0" encoding="UTF-8" ?>
<configuration>
        <!--    打印到控制台 -->
     <appender name="consoleApp" class="ch.qos.logback.core.ConsoleAppender">
        <layout class="ch.qos.logback.classic.PatternLayout">
            <pattern>
                %date{yyyy-MM-dd HH:mm:ss.SSS} %-5level[%thread]%logger{56}.%method:%L -%msg%n
            </pattern>
        </layout>
    </appender>


   <!--   打印到文件 -->
    <appender name="fileInfoApp" class="ch.qos.logback.core.rolling.RollingFileAppender">
        <filter class="ch.qos.logback.classic.filter.LevelFilter">
             <level>ERROR</level>
            <onMatch>DENY</onMatch>
            <onMismatch>ACCEPT</onMismatch>
        </filter>
        <encoder>
            <pattern>
                %date{yyyy-MM-dd HH:mm:ss.SSS} %-5level[%thread]%logger{56}.%method:%L -%msg%n
            </pattern>
        </encoder>
        <!-- 滚动策略 -->
        <rollingPolicy class="ch.qos.logback.core.rolling.TimeBasedRollingPolicy">
            <!-- 路径 -->
            <fileNamePattern>app_log/log/app.info.%d.log</fileNamePattern>
        </rollingPolicy>
    </appender>


    <!--  打印到文件 -->
    <appender name="fileErrorApp" class="ch.qos.logback.core.rolling.RollingFileAppender">
        <filter class="ch.qos.logback.classic.filter.ThresholdFilter">
            <level>ERROR</level>
        </filter>
        <encoder>
            <pattern>
                %date{yyyy-MM-dd HH:mm:ss.SSS} %-5level[%thread]%logger{56}.%method:%L -%msg%n
            </pattern>
        </encoder>

        <!-- 设置滚动策略 -->
        <rollingPolicy class="ch.qos.logback.core.rolling.TimeBasedRollingPolicy">
            <!-- 路径,因为有 %d所以每天都会意时间来创建新的文件 -->
            <fileNamePattern>app_log/log/app.err.%d.log</fileNamePattern>

            <!-- 控制保留的归档文件的最大数量,超出数量就删除旧文件,假设设置每个月滚动,
            且<maxHistory> 是1,则只保存最近1个月的文件,删除之前的旧文件 -->
             <MaxHistory>1</MaxHistory>

          <!--   保持30天的历史记录上限为3GB总大小 -->
             <totalSizeCap>3GB</totalSizeCap>

        </rollingPolicy>
    </appender>

 <!--这里选择INFO就代表,进行INFO级别输出记录,那么在控制台也好,log文件也好只记录INFO及以上级别的日志,这里相当于第一道过滤器-->
   <root level="INFO">
        <appender-ref ref="consoleApp"/>
        <appender-ref ref="fileInfoApp"/>
        <appender-ref ref="fileErrorApp"/>
    </root>
</configuration>

有关配置文件详细介绍放到下面讲,这里先跳过
3.controller类
@RestController
@RequestMapping("/api/v1")
public class UserController {

    private Logger logger = LoggerFactory.getLogger(this.getClass());

    @GetMapping("log")
    public Object testLog(){

        logger.debug("---debug---debug---");
        logger.info("---info---信息---");
        logger.warn("---warn ---警告--- ");
        logger.error("---err---错误---");
        //这也是个错误的日志级别
        int i=1/0;
        return "yes";
    }

}
4、效果:

我们发现,在项目中自动创建app_log/log/app.info(当天日期).log和app.err(当天日期).log文件
然后我们看
app.err.2018-05-21.log

它只存放err级别日志
app.info.2018-05-21.log

它只存放的info和warn两种基本日志,这是为什么呢?详细介绍下配置文件
三、配置文件介绍
一:根节点<configuration>
它的三个子节点
(1)<appender></appender> 格式化日志输出节点,有两个必要属性name和class。
(2) <logger></logger> 用来设置某一个包或具体的某一个类的日志打印级别、以及指定<appender>。
(3)<root></root>(要加在最后)(必选,而且只有一个)(用来指定最基础的日志输出级别,他有俩个自己点可以用来应用appender,格式化日志输出)
二、appender节点
它有两个属性name和class
(1) class="ch.qos.logback.core.ConsoleAppender":把日志输出到
(2)class="ch.qos.logback.core.FileAppender":把日志添加到文件
(3)class="ch.qos.logback.core.rolling.RollingFileAppender":滚动记录文件,先将日志文件指定到文件,当符合某个条件时,将日志记录到其他文件
所以上面第一个appender代表输出到控制台,同时并没有进行任何过滤,所以只要是INFO级别以上的都会在控制台输出。
四、filter过滤器
其它的一看就懂,就这里,一开始一直想不明白,为什么上面的info文件里只有info和warn,而err文件中只有err日志。后来明白了。
他有几个常用的过滤器
(1)LevelFilter 过滤器
级别过滤器,根据日志级别进行过滤。如果日志级别等于配置级别,过滤器会根据onMath 和 onMismatch接收或拒绝日志。
  <filter class="ch.qos.logback.classic.filter.LevelFilter">
             <level>ERROR</level>
            <onMatch>DENY</onMatch>
            <onMismatch>ACCEPT</onMismatch>
</filter>
<level>:设置过滤级别
将过滤器的日志级别配置为ERROR,所有ERROR级别的日志交给appender处理,非ERROR级别的日志,被过滤掉。
(这样的话那上面不是只显示ERROR日志,怎么最后显示的是INFO和WARN日志呢?看下面)
<onMatch>: 用于配置符合过滤条件的操作
<onMismatch>:用于配置不符合过滤条件的操作
再看有这么几个单词DENY(拒绝),NEUTRAL(中性),ACCEPT(接受)
(1)返回DENY,日志将立即被抛弃不再经过其他过滤器;
(2)返回NEUTRAL,有序列表里的下个过滤器过接着处理日志;
(3)返回ACCEPT,日志会被立即处理,不再经过剩余过滤器
在理解下:
            <level>ERROR</level>         <!-- 所有ERROR级别的日志交给appender处理,非ERROR级别的日志,被过滤掉 -->
            <onMatch>DENY</onMatch>      <!-- 代表符合过滤条件的拒绝输出 -->
            <onMismatch>ACCEPT</onMismatch>   <!-- 不符合过滤条件的接受输出 -->
我靠,这么绕一圈不还是表示非ERROR级别的输出嘛,DEBUG除外,因为DUBUG在root标签,已经过滤掉,都不会走到appender标签这里
(2)ThresholdFilter 过滤器
临界值过滤器,过滤掉低于指定临界值的日志。当日志级别等于或高于临界值时,过滤器返回NEUTRAL;当日志级别低于临界值时,日志会被拒绝。
<filter class="ch.qos.logback.classic.filter.ThresholdFilter">
            <level>ERROR</level>
 </filter>
这里只会访问ERROR及以上级别的过滤器,而ERROR已经是最高级了,所以就只显示ERROR日志在errer文件中了,所以一切都通了
Springboot整合Active消息队列
简单理解:
Active是Apache公司旗下的一个消息总线,ActiveMQ是一个开源兼容Java Message Service(JMS) 面向消息的中件间. 是一个提供松耦合的应用程序架构.
主要用来在服务与服务之间进行异步通信的。
一、搭建步骤
1、相应jar包
 <!-- 整合消息队列ActiveMQ -->
        <dependency>
            <groupId>org.springframework.boot</groupId>
            <artifactId>spring-boot-starter-activemq</artifactId>
        </dependency>

  <!-- 如果配置线程池则加入 -->
        <dependency>
            <groupId>org.apache.activemq</groupId>
            <artifactId>activemq-pool</artifactId>
        </dependency>
2、application.properties文件
#整合jms测试,安装在别的机器,防火墙和端口号记得开放
spring.activemq.broker-url=tcp://47.96.44.110:61616

spring.activemq.user=admin
spring.activemq.password=admin
#下列配置要增加依赖
spring.activemq.pool.enabled=true
spring.activemq.pool.max-connections=100

#集群配置(后续需要在配上)
#spring.activemq.broker-url=failover:(tcp://localhost:61616,tcp://localhost:61617)
#消息队列默认是点对点的,如果需要发布/订阅模式那么需要加上下面注解(如果同时需要点对点发布订阅这里也需注释掉)
# spring.jms.pub-sub-domain=true
3、Springboot主类
<!-- 主类需要多加一个@EnableJms注解,不过貌似我没有加的时候,也能运行,为安全起见姑且加上 -->
@SpringBootApplication
@EnableJms
4.5.......根据不同消息模式来写了。
二、点对点案例
我在这里案例中创建了两个点对点队列,所以他会有两个queue对象,同样对应每个queue对象,都会有单一对应的消费者。
1、Springboot主类
@SpringBootApplication
@EnableJms
public class Main {

    public static void main(String[] args) {
        SpringApplication.run(Main.class, args);
    }

    //新建一个的Queue对象,交给sringboot管理,这个queue的名称叫"first.queue".
    @Bean
    public Queue queue(){
        return new ActiveMQQueue("first.queue");
    }
}
2.1、first.queue对应消费者
@Component
public class FirstConsumer {

    //名为"first.queue"消息队列的消费者,通过JmsListener进行监听有没有消息,有消息会立刻读取过来
    @JmsListener(destination="first.queue")
    public void receiveQueue(String text){
        System.out.println("FirstConsumer收到的报文为:"+text);
    }
}
2.2、two.queue对应消费者(后面会创建)
@Component
public class TwoConsumer {

    //名为"two.queue"消息队列的消费者
    @JmsListener(destination="two.queue")
    public void receiveQueue(String text){
        System.out.println("TwoConsumer收到的报文为:"+text);
    }
}
3、Service类
   /**
    * 功能描述:消息生产
    */
public interface ProducerService {

    // 功能描述:指定消息队列,还有消息
    public void sendMessage(Destination destination, final String message);


    // 功能描述:使用默认消息队列, 发送消息
    public void sendMessage( final String message);

}
4、ServiceImpl实现类
/**
 * 功能描述:消息生产者实现类
 */
@Service
public class ProducerServiceImpl implements ProducerService{

    //这个队列就是Springboot主类中bean的对象
    @Autowired
    private Queue queue;

    //用来发送消息到broker的对象,可以理解连接数据库的JDBC
    @Autowired
    private JmsMessagingTemplate jmsTemplate;

    //发送消息,destination是发送到的队列,message是待发送的消息
    @Override
    public void sendMessage(Destination destination, String message) {
        jmsTemplate.convertAndSend(destination, message);
    }

    //发送消息,queue是发送到的队列,message是待发送的消息
    @Override
    public void sendMessage(final String message) {
        jmsTemplate.convertAndSend(this.queue, message);
    }
}
5.QueueController类
/**
 * 功能描述:点对点消息队列控制层
 */
@RestController
@RequestMapping("/api/v1")
public class QueueController {

    @Autowired
    private ProducerService producerService;

    // 这里后面调用的是Springboot主类的quene队列
    @GetMapping("first")
    public Object common(String msg){
        producerService.sendMessage(msg);
       return "Success";
    }

    // 这个队列是新建的一个名为two.queue的点对点消息队列
    @GetMapping("two")
    public Object order(String msg){

        Destination destination = new ActiveMQQueue("two.queue");
        producerService.sendMessage(destination, msg);

       return "Success";
    }
}
6、案例演示:

从演示效果可以得出以下结论:
1:当springboot启动时候,就生成了这两个队列,而且他们都会有一个消费者
2:当我通过页面访问的时候,就相当于生产者把消息放到队列中,一旦放进去就会被消费者监听到,就可以获取生产者放进去的值并在后台打印出
顺便对页面中四个单词进行解释:
Number Of Pending Messages :待处理消息的数量。我们每次都会被监听处理掉,所以不存在待处理,如果存在就说这里面哪里出故障了,需要排查
Number Of Consumers : 消费者数量
Messages Enqueued: 消息排列,这个只增不见,代表已经处理多少消息
Messages Dequeued: 消息出队。
三、发布/订阅者模式
在上面点对点代码的基础上,添加发布/订阅相关代码
1.appliaction.properties文件
#消息队列默认是点对点的,如果需要发布/订阅模式那么需要加上下面注解(如果同时需要点对点发布订阅这里也需注释掉)
spring.jms.pub-sub-domain=true
2.Springboot主类添加
//新建一个topic队列
    @Bean
    public Topic topic(){
        return new ActiveMQTopic("video.topic");
    }
3.添加多个消费者类
//这里定义了三个消费者
@Component
public class TopicSub {

    @JmsListener(destination="video.topic")
    public void receive1(String text){
        System.out.println("video.topic 消费者:receive1="+text);
    }

    @JmsListener(destination="video.topic")
    public void receive2(String text){
        System.out.println("video.topic 消费者:receive2="+text);
    }

    @JmsListener(destination="video.topic")
    public void receive3(String text){
        System.out.println("video.topic 消费者:receive3="+text);
    }
}
4.Service类
 //功能描述:消息发布者
    public void publish(String msg);
5.ServiceImpl实现类
//=======发布订阅相关代码=========

        @Autowired
        private Topic topic;

         @Override
        public void publish(String msg) {
            this.jmsTemplate.convertAndSend(this.topic, msg);

        }
6.Controller类
// 这个队列是新建的一个名为two.queue的点对点消息队列
        @GetMapping("topic")
        public Object topic(String msg){

            producerService.publish(msg);

           return "Success";
        }
7.演示效果:

从演示效果总结如下:
1:Springboot启动的时候,在Topics目录下,一共出现了5个消费者。first.queue一个消费者、two.queue一个消费者、video.topic三个消费者
2:当我在控制台输入信息后,video.topic的三个消费者都会监听video.topic发布的消息,并在控制台打印。
四、如何让点对点和发布订阅同时有效
为什么这么说呢,因为当我向上面一样同时开启,会发现点对点模式已经失效了。
效果演示

从演示效果,可以得出如下结论:
1:我们发现我们在页面输入..../two?msg=555消息后,后台并没有成功打印消息。再看Active界面发现,这个queue对象,确实有一条待处理的消息,但是我们发现,它对应的消费者数量是为0.
2:然而我们在打开topic页面发现,这里却存在一个消费者。
所以我个人理解是,当同时启动的时候,所产生的消费者默认都是Topic消费者,没有Queue消费者,所以它监听不到queue所待处理的消息。
当配置文件不加:spring.jms.pub-sub-domain=true 那么系统会默认支持quene(点对点模式),但一旦加上这段配置,系统又变成只支持发布订阅模式。
那如何同时都可以成功呢?
思路如下:
第一步:还是需要去掉配置文件中的:
#消息队列默认是点对点的,如果需要发布/订阅模式那么需要加上下面注解(如果同时需要点对点发布订阅这里也需注释掉)
#spring.jms.pub-sub-domain=true
第二步:在发布订阅者的中消费者中指定独立的containerFactory
因为你去掉上面的配置,那么系统就默认是queue,所以@JmsListener如果不指定独立的containerFactory的话是只能消费queue消息
    @JmsListener(destination="video.topic", containerFactory="jmsListenerContainerTopic")
    public void receive1(String text){
        System.out.println("video.topic 消费者:receive1="+text);
    }


    @JmsListener(destination="video.topic", containerFactory="jmsListenerContainerTopic")
    public void receive2(String text){
        System.out.println("video.topic 消费者:receive2="+text);
    }

    //第三步我不添加containerFactory="jmsListenerContainerTopic"看等下是否会打印出
    @JmsListener(destination="video.topic")
    public void receive3(String text){
        System.out.println("video.topic 消费者:receive3="+text);
    }
第三步:定义独立的topic定义独立的JmsListenerContainer
在springboot主类中添加:
        @Bean
        public JmsListenerContainerFactory<?> jmsListenerContainerTopic(ConnectionFactory activeMQConnectionFactory) {
            DefaultJmsListenerContainerFactory bean = new DefaultJmsListenerContainerFactory();
            bean.setPubSubDomain(true);
            bean.setConnectionFactory(activeMQConnectionFactory);
            return bean;
        }
效果:

得出结论:
1:点对点,和发布订阅都有用
2:receive3没有指定独立的containerFactory一样没有打印出来。
SpringBoot整合ElasticSearch
一、基于spring-boot-starter-data-elasticsearch整合
开发环境:springboot版本:2.0.1,elasticSearch-5.6.8.jar版本:5.6.8,服务器部署ElasticSearch版本:6.3.2
1、application.properties
spring.data.elasticsearch.cluster-name=elasticsearch
spring.data.elasticsearch.cluster-nodes=127.0.0.1:9300
spring.data.elasticsearch.repositories.enabled=true
2、pom.xml
        <!--spring整合elasticsearch包-->
        <dependency>
           <groupId>org.springframework.boot</groupId>
           <artifactId>spring-boot-starter-data-elasticsearch</artifactId>
       </dependency>

        <!--实体工具包-->
        <dependency>
            <groupId>org.projectlombok</groupId>
            <artifactId>lombok</artifactId>
        </dependency>

        <!--集合工具包-->
        <dependency>
            <groupId>com.google.guava</groupId>
            <artifactId>guava</artifactId>
            <version>19.0</version>
        </dependency>
3、Notice实体
@Data
@AllArgsConstructor
@NoArgsConstructor
//indexName代表所以名称,type代表表名称
@Document(indexName = "wantu_notice_info", type = "doc")
public class Notice {

    //id
    @JsonProperty("auto_id")
    private Long id;

    //标题
    @JsonProperty("title")
    private String title;

    //公告标签
    @JsonProperty("exchange_mc")
    private String exchangeMc;

    //公告发布时间
    @JsonProperty("create_time")
    private String originCreateTime;

    //公告阅读数量
    @JsonProperty("read_count")
    private Integer readCount;

}
4、NoticeRepository类
import com.jincou.elasearch.domain.Notice;
import org.springframework.data.elasticsearch.repository.ElasticsearchRepository;
import org.springframework.stereotype.Component;

@Component
public interface NoticeRepository extends ElasticsearchRepository<Notice, Long> {

}
5、NoticeController
@RestController
@RequestMapping("/api/v1/article")
public class NoticeController {


    @Autowired
    private NoticeRepository nticeRepository;

    @GetMapping("save")
    public CommandResult<Void> save(long id, String title){

        Notice article = new Notice();
        article.setId(id);
        article.setReadCount(123);
        article.setTitle("springboot整合elasticsearch,这个是新版本 2018年");
        nticeRepository.save(article);
        return CommandResult.ofSucceed();
    }


    /**
     * @param title   搜索标题
     * @param pageable page = 第几页参数, value = 每页显示条数
     */
    @GetMapping("search")
    public CommandResult<List<Notice>> search(String title,@PageableDefault(page = 1, value = 10) Pageable pageable){

        //按标题进行搜索
        QueryBuilder queryBuilder = QueryBuilders.matchQuery("title", title);

        //如果实体和数据的名称对应就会自动封装,pageable分页参数
        Iterable<Notice> listIt =  nticeRepository.search(queryBuilder,pageable);

        //Iterable转list
        List<Notice> list= Lists.newArrayList(listIt);

        return CommandResult.ofSucceed(list);
    }
}
6、查看运行结果
它会进行中文分词查询,然后安装相识度进行排序

总体步骤还是蛮清晰简单的,因为有spring-boot-starter-data-elasticsearch进行了整合,所以我们可以少敲很多代码。
二、 基于TransportClient整合
首先明白:如果项目SpringBoot1.5.X以下的,那么elasticSearch.jar最高是2.4.4版本的,只有SpringBoot2.X+,elasticSearch.jar才是5.X+
如果你的SpringBoot是1.5.X以下,那你又想用elasticSearch.jar5.X+怎么办呢,那就不要用spring-boot-starter-data-elasticsearch,用原生的TransportClient实现即可。
这个相当于用原生的去使用elasticsearch,这里面并没有用到spring-boot-starter-data-elasticsearch相关jar包,因为我们公司的springBoot版本是1.5.9。
如果用spring-boot-starter-data-elasticsearch的话,那么elasticsearch版本最高只有2.4.4,这也太落后了,现在elasticsearch已经到6.3.2了,为了用更好的版本有两个方案:
1、提高springboot版本到2.X(不过不现实,船大难掉头),2、用原生的TransportClient实现。最终落地实现是通过TransportClient实现
把关键代码展示出来。
1、pom.xml
    <dependency>
            <groupId>org.elasticsearch</groupId>
            <artifactId>elasticsearch</artifactId>
            <version>5.6.8</version>
        </dependency>


        <dependency>
            <groupId>org.elasticsearch.client</groupId>
            <artifactId>transport</artifactId>
            <version>5.6.8</version>
        </dependency>

        <dependency>
            <groupId>org.apache.logging.log4j</groupId>
            <artifactId>log4j-core</artifactId>
            <version>2.7</version>
        </dependency>
2、创建实体
    @Configuration
    public class ServerModule {

        @Bean
        public TransportClient transportClient() {
            Settings settings = Settings.builder().put("cluster.name", "biteniuniu").build();
            //我用6.3.2版本的时候这里一直报异常说找不到InetSocketTransportAddress类,这应该和jar有关,当我改成5.6.8就不报错了
            TransportClient client = new PreBuiltTransportClient(settings);//6.3.2这里TransportAddress代替InetSocketTransportAddress
            client.addTransportAddress(new InetSocketTransportAddress(
                    new InetSocketAddress(InetAddresses.forString("127.0.0.1"), 9300)));
            return client;
        }
    }
3、NoticeController类
@RestController
@RequestMapping("/api/v1/notice")
public class NoticeController {


    @Autowired
    private TransportClient transportClient;

    /**
     *利用TransportClient实现搜索功能
     * @param title   搜索标题
     * @param  page = 从第几条结果返回 | Integer(比如一次size=20,page=0,如果要显示下一页20条记录则需要size=20,page=20)这个和之前有点区别, size = 每页显示条数
     */

    @RequestMapping(value = "trsearch", method = RequestMethod.GET, produces = MediaType.APPLICATION_JSON_UTF8_VALUE)
    public CommandResult<List<Notice>> search(@RequestParam(value = "title", defaultValue = "比特币")String title, @RequestParam(value = "page", defaultValue = "0")Integer page,
                                                              @RequestParam(value = "size", defaultValue = "20")Integer size) {

        BoolQueryBuilder boolQueryBuilder = QueryBuilders.boolQuery();
        //按标题进行查找
        boolQueryBuilder.must(QueryBuilders.matchQuery("title", title));

       //在这里输入索引名称和type类型
        SearchResponse response = transportClient.prepareSearch("wantu_notice_info").setTypes("doc")

                // 设置查询类型java
                .setSearchType(SearchType.DFS_QUERY_THEN_FETCH)
                // 设置查询关键词
                .setQuery(boolQueryBuilder)
                // 设置查询数据的位置,分页用
                .setFrom(page)
                // 设置查询结果集的最大条数
                .setSize(size)
                // 设置是否按查询匹配度排序
                .setExplain(true)
                // 最后就是返回搜索响应信息
                .get();
        SearchHits searchHits = response.getHits();

        List<Notice> list = Lists.newArrayListWithCapacity(size);

        for (SearchHit searchHit : searchHits) {
            Map<String, Object> sourceAsMap = searchHit.getSourceAsMap();
           //获得titie数据
            String titles = (String) sourceAsMap.get("title");
            //获得阅读量数据
            Integer readCount = (Integer) sourceAsMap.get("read_count");
           //把数据装入对象中
            Notice  notice=new  Notice();
            notice.setTitle(titles);
            notice.setReadCount(readCount);
            list.add(notice);
        }

        return CommandResult.ofSucceed(list);
    }

}
4、运行结果

总结下:第一种整合相对简单很多,因为本身封装很多东西,比如分页,封装数据等。第二种的话可以在不用spring的情况下使用它。
Spingboot整合Swagger2
随着互联网技术的发展,一般开发都是前后端分离,那么前端和后端的唯一联系,变成了API接口;API文档变成了前后端开发人员联系的纽带,变得越来越重要,没有API
文档工具之前,大家都是手写API文档的,在什么地方书写的都有,有在confluence上写的,有在对应的项目目录下readme.md上写的,每个公司都有每个公司的玩法,无所谓好
坏。但都有一个很大的诟病就是,如果你的接口改动了,那你必须记得去改你的API文档,而Swagger并不需要。swagger就是一款让你更好的书写API文档的框架。
一、项目搭建
1、pom.xml
        <dependency>
            <groupId>io.springfox</groupId>
            <artifactId>springfox-swagger2</artifactId>
            <version>2.9.2</version>
        </dependency>

        <dependency>
            <groupId>io.springfox</groupId>
            <artifactId>springfox-swagger-ui</artifactId>
            <version>2.9.2</version>
        </dependency>
2、application.yml
server:
  port: 8086

#代表当前环境是dev环境
spring:
  profiles:
    active: dev
3、Swagger2DevConfig(配置类)
注意添加@EnableSwagger2注解,这个注解也可以加在springboot启动类上
@Configuration
@EnableSwagger2
public class Swagger2DevConfig {

    //默认pro环境
    @Profile({"default", "pro"})
    @Bean
    public Docket createWebApi() {
        return new Docket(DocumentationType.SWAGGER_2).enable(false).select().build();
    }

    //dev环境接口访问地址:http://localhost:8086/swagger-ui.html
    @Profile("dev")
    @Bean
    public Docket createWebApiDev() {
        return new Docket(DocumentationType.SWAGGER_2).apiInfo(apiInfoDev()).select()
                .apis(RequestHandlerSelectors.withClassAnnotation(Api.class)).paths(PathSelectors.any()).build();
    }

    //测试环境接口访问地址: test.jincou.com/user/swagger-ui.html
    @Profile("test")
    @Bean
    public Docket createWebApiTest() {
        return new Docket(DocumentationType.SWAGGER_2).host("test.jincou.com/user")
                .protocols(Sets.newHashSet("https")).apiInfo(apiInfoDev()).select()
                .apis(RequestHandlerSelectors.withClassAnnotation(Api.class)).paths(PathSelectors.any()).build();
    }

    private ApiInfo apiInfoDev() {
        return new ApiInfoBuilder().title("用户模块API").description(
                "用户api接口文档\n" + "\n" + "测试环境:https://test.jincou.com/user\n").contact(new Contact("张三", "", ""))
                .version("1.0").build();
    }
}
4、PersonController
这里提供了两个接口
@Api(tags = "用户相关接口")
@RestController
@RequestMapping(value = "/web/api/person")
public class PersonController {


    @ApiOperation(value = "用户详细信息", notes = "通过id获得用户详细信息")
    @ApiImplicitParams({
            @ApiImplicitParam(name = "id", value = "用户ID", required = true, paramType = "query", defaultValue = "0")})
    @RequestMapping(value="page",method = RequestMethod.GET, produces = MediaType.APPLICATION_JSON_UTF8_VALUE )
    public Person  getById(@RequestParam(value="id",defaultValue = "0") Long id){
        return new Person(id,2,"小小","杭州");
    }

    //大咖分页列表
    @ApiOperation(value = "删除用户信息", notes = "通过ID删除用户信息")
    @ApiImplicitParams({
            @ApiImplicitParam(name = "id", value = "用户ID", required = true, paramType = "query", defaultValue = "0")})
    @RequestMapping(value="delete",method = RequestMethod.POST, produces = MediaType.APPLICATION_JSON_UTF8_VALUE )
    public String  delete(@RequestParam(value="id",defaultValue = "0") Long id){

        return "删除成功";
    }
}
5、Person实体类
@ApiModel(description = "用户详细信息")
public class Person {

    @ApiModelProperty(value = "用户Id", position = 1)
    private Long id;

    @ApiModelProperty(value = "用户年龄", position = 2)
    private int age;

    @ApiModelProperty(value = "用户姓名", position = 3)
    private String name;

    @ApiModelProperty(value = "用户所在城市", position = 4)
    private String city;

    public Person(Long id,int age,String name,String city){
        this.id=id;
        this.age=age;
        this.city=city;
        this.name=name;
    }
//提供get和set方法
}
6、本地启动测试
访问:http://localhost:8086/swagger-ui.html。
先献上github代码地址:https://github.com/yudiandemingzi/spring-boot-many-data-source
代码拉下来换下自己的mysql数据库地址,就可以直接运行。Druid的优点很明显,它的可视化界面可以监控Sql语句和URI执行情况在开发中真的很需要。
先说优点吧:
    1) 替换DBCP和C3P0。Druid提供了一个高效、功能强大、可扩展性好的数据库连接池。
    2) 数据库密码加密。直接把数据库密码写在配置文件中,这是不好的行为,容易导致安全问题。
    3) 可以监控数据库访问性能,能够详细统计SQL的执行性能,这对于线上分析数据库访问性能有帮助。
    4) SQL执行日志,Druid提供了不同的LogFilter,监控你应用的数据库   访问情况。
    5)扩展JDBC,如果你要对JDBC层有编程的需求,可以通过Druid提供的Filter-Chain机制,很方便编写JDBC层的扩展插件。
二、配置多数据源
1、pom.xml
只需要添加druid这一个jar就行了,有关springboot项目他还有个整合包,用那个整合包也一样。
       <!-- Druid 数据连接池依赖 -->
        <dependency>
            <groupId>com.alibaba</groupId>
            <artifactId>druid</artifactId>
            <version>1.1.8</version>
        </dependency>
        <dependency>
			<groupId>com.alibaba</groupId>
			<artifactId>druid-spring-boot-starter</artifactId>
			<version>1.1.6</version>
		</dependency>
对于springboot项目来讲,上面任选一个都是可以的,亲测有效。
2、application.yml
我这里是采用application.yml进行添加配置,这里面配置了两个数据源,其实在application.yml也可以不配置这些东西,它的主要作用是给数据源配置类读取数据用的。
spring:
  datasource:
    type: com.alibaba.druid.pool.DruidDataSource
    initialSize: 10
    minIdle: 10
    maxActive: 200
    # 配置获取连接等待超时的时间
    maxWait: 60000
    # 配置间隔多久才进行一次检测,检测需要关闭的空闲连接,单位是毫秒
    timeBetweenEvictionRunsMillis: 60000
    # 配置一个连接在池中最小生存的时间,单位是毫秒
    minEvictableIdleTimeMillis: 30000
    validationQuery: select 'x'
    testWhileIdle: true
    testOnBorrow: false
    testOnReturn: false
    # 打开PSCache,并且指定每个连接上PSCache的大小
    poolPreparedStatements: true
    maxPoolPreparedStatementPerConnectionSize: 20
    # 配置监控统计拦截的filters
    filters: stat,wall,slf4j
    # 通过connectProperties属性来打开mergeSql功能;慢SQL记录
    connectionProperties: druid.stat.mergeSql=true;druid.stat.slowSqlMillis=5000


#配置了两个数据源
master:
  datasource:
    url: jdbc:mysql://localhost:3306/user?useUnicode=true&characterEncoding=utf8&allowMultiQueries=true
    username: root
    password: root
    driverClassName: com.mysql.jdbc.Driver

cluster:
  datasource:
    url: jdbc:mysql://localhost:3306/student?useUnicode=true&characterEncoding=utf8&allowMultiQueries=true
    username: root
    password: root
    driverClassName: com.mysql.jdbc.Driver
3、主数据源配置类(MasterDataSourceConfig)
/**
 * 主数据源配置
 */
@Configuration
@MapperScan(basePackages = MasterDataSourceConfig.PACKAGE, sqlSessionFactoryRef = "masterSqlSessionFactory")
public class MasterDataSourceConfig {

    /**
     * 配置多数据源 关键就在这里 这里配置了不同的数据源扫描不同mapper
     */
    static final String PACKAGE = "com.binron.multidatasource.mapper.master";
    static final String MAPPER_LOCATION = "classpath:mapper/master/*.xml";

    /**
     * 连接数据库信息 这个其实更好的是用配置中心完成
     */
    @Value("${master.datasource.url}")
    private String url;

    @Value("${master.datasource.username}")
    private String username;

    @Value("${master.datasource.password}")
    private String password;

    @Value("${master.datasource.driverClassName}")
    private String driverClassName;


    /**
     * 下面的配置信息可以读取配置文件,其实可以直接写死 如果是多数据源的话 还是考虑读取配置文件
     */
    @Value("${spring.datasource.initialSize}")
    private int initialSize;

    @Value("${spring.datasource.minIdle}")
    private int minIdle;

    @Value("${spring.datasource.maxActive}")
    private int maxActive;

    @Value("${spring.datasource.maxWait}")
    private int maxWait;

    @Value("${spring.datasource.timeBetweenEvictionRunsMillis}")
    private int timeBetweenEvictionRunsMillis;

    @Value("${spring.datasource.minEvictableIdleTimeMillis}")
    private int minEvictableIdleTimeMillis;

    @Value("${spring.datasource.validationQuery}")
    private String validationQuery;

    @Value("${spring.datasource.testWhileIdle}")
    private boolean testWhileIdle;

    @Value("${spring.datasource.testOnBorrow}")
    private boolean testOnBorrow;

    @Value("${spring.datasource.testOnReturn}")
    private boolean testOnReturn;

    @Value("${spring.datasource.poolPreparedStatements}")
    private boolean poolPreparedStatements;

    @Value("${spring.datasource.maxPoolPreparedStatementPerConnectionSize}")
    private int maxPoolPreparedStatementPerConnectionSize;

    @Value("${spring.datasource.filters}")
    private String filters;

    @Value("{spring.datasource.connectionProperties}")
    private String connectionProperties;


    @Bean(name = "masterDataSource")
    @Primary //标志这个 Bean 如果在多个同类 Bean 候选时,该 Bean 优先被考虑。
    public DataSource masterDataSource() {
        DruidDataSource dataSource = new DruidDataSource();
        dataSource.setUrl(url);
        dataSource.setUsername(username);
        dataSource.setPassword(password);
        dataSource.setDriverClassName(driverClassName);

        //具体配置
        dataSource.setInitialSize(initialSize);
        dataSource.setMinIdle(minIdle);
        dataSource.setMaxActive(maxActive);
        dataSource.setMaxWait(maxWait);
        dataSource.setTimeBetweenEvictionRunsMillis(timeBetweenEvictionRunsMillis);
        dataSource.setMinEvictableIdleTimeMillis(minEvictableIdleTimeMillis);
        dataSource.setValidationQuery(validationQuery);
        dataSource.setTestWhileIdle(testWhileIdle);
        dataSource.setTestOnBorrow(testOnBorrow);
        dataSource.setTestOnReturn(testOnReturn);
        dataSource.setPoolPreparedStatements(poolPreparedStatements);
        dataSource.setMaxPoolPreparedStatementPerConnectionSize(maxPoolPreparedStatementPerConnectionSize);

        /**
         * 这个是用来配置 druid 监控sql语句的 非常有用 如果你有两个数据源 这个配置哪个数据源就监控哪个数据源的sql 同时配置那就都监控
         */
        try {
            dataSource.setFilters(filters);
        } catch (SQLException e) {
        	e.printStackTrace();
        }
        dataSource.setConnectionProperties(connectionProperties);
        return dataSource;
    }

    @Bean(name = "masterTransactionManager")
    @Primary
    public DataSourceTransactionManager masterTransactionManager() {
        return new DataSourceTransactionManager(masterDataSource());
    }

    @Bean(name = "masterSqlSessionFactory")
    @Primary
    public SqlSessionFactory masterSqlSessionFactory(@Qualifier("masterDataSource") DataSource masterDataSource)
            throws Exception {
        final SqlSessionFactoryBean sessionFactory = new SqlSessionFactoryBean();
        sessionFactory.setDataSource(masterDataSource);
        sessionFactory.setMapperLocations(new PathMatchingResourcePatternResolver().getResources(MasterDataSourceConfig.MAPPER_LOCATION));

        return sessionFactory.getObject();
    }
}
这里说明几点
  1) @Primary: 多数据源配置的时候注意,必须要有一个主数据源, 用 @Primary 标志该 Bean。标志这个 Bean 如果在多个同类 Bean 候选时,该 Bean优先被考虑。
  2) dataSource.setFilters(filters): 这个是用来配置 druid 监控sql语句的, 如果你有两个数据源 这个配置哪个数据源就监控哪个 数据源的sql,同时配置那就都监控。
  3) 能够做到多个数据源的关键点 就是每个数据源所扫描的mapper包不一样,谁扫描到哪个mapper那么该mapper就用哪个数据源,同时都扫到了呢,
      那当然就得用主数据源咯,也就是添加@Primary 的数据源。
4、次数据源(ClusterDataSourceConfig)
这里省略了部分代码,因为和主是一样的,完整代码在github代码里有。
/**
 * 次数据源 另一个数据源配置
 */
@Configuration
@MapperScan(basePackages = ClusterDataSourceConfig.PACKAGE, sqlSessionFactoryRef = "clusterSqlSessionFactory")
public class ClusterDataSourceConfig {

    /**
     * 配置多数据源 关键就在这里 这里配置了不同数据源扫描不同的mapper
     */
    static final String PACKAGE = "com.binron.multidatasource.mapper.cluster";
    static final String MAPPER_LOCATION = "classpath:mapper/cluster/*.xml";

    @Value("${cluster.datasource.url}")
    private String url;

    @Value("${cluster.datasource.username}")
    private String username;

    @Value("${cluster.datasource.password}")
    private String password;

    @Value("${cluster.datasource.driverClassName}")
    private String driverClass;

    @Bean(name = "clusterDataSource")
    public DataSource clusterDataSource() {
        DruidDataSource dataSource = new DruidDataSource();
        dataSource.setUrl(url);
        dataSource.setUsername(username);
        dataSource.setPassword(password);
        dataSource.setDriverClassName(driverClass);

        //具体配置
        try {
            dataSource.setFilters("stat,wall,slf4j");
        } catch (SQLException e) {
            e.printStackTrace();
        }
        return dataSource;
    }

    @Bean(name = "clusterTransactionManager")
    public DataSourceTransactionManager clusterTransactionManager() {
        return new DataSourceTransactionManager(clusterDataSource());
    }

    @Bean(name = "clusterSqlSessionFactory")
    public SqlSessionFactory clusterSqlSessionFactory(@Qualifier("clusterDataSource") DataSource clusterDataSource)
            throws Exception {
        final SqlSessionFactoryBean sessionFactory = new SqlSessionFactoryBean();
        sessionFactory.setDataSource(clusterDataSource);

        sessionFactory.setMapperLocations(new PathMatchingResourcePatternResolver().getResources(ClusterDataSourceConfig.MAPPER_LOCATION));
        return sessionFactory.getObject();
    }
}
这里说明几点:
   1)发现次数据源所扫描的mapper和主是完全不一样的,说明每个数据源负责自己的mapper
   2)  次数据源是没有加@Primary。
   3)这里也添加了dataSource.setFilters(filters):说明 次数据源也需要监听sql语句。
三、配置可视化界面
直接上代码:
/**
 * druid监控界面设置
 */
@Configuration
public class DruidConfiguration {

    @Bean
    public ServletRegistrationBean druidStatViewServle() {
        //注册服务
        ServletRegistrationBean servletRegistrationBean = new ServletRegistrationBean(
                new StatViewServlet(), "/druid/*");
        // 白名单(为空表示,所有的都可以访问,多个IP的时候用逗号隔开)
        servletRegistrationBean.addInitParameter("allow", "127.0.0.1");
        // IP黑名单 (存在共同时,deny优先于allow) (黑白名单就是如果是黑名单,那么该ip无法登陆该可视化界面)
        servletRegistrationBean.addInitParameter("deny", "127.0.0.2");
        // 设置登录的用户名和密码
        servletRegistrationBean.addInitParameter("loginUsername", "root");
        servletRegistrationBean.addInitParameter("loginPassword", "123456");
        // 是否能够重置数据.
        servletRegistrationBean.addInitParameter("resetEnable", "false");
        return servletRegistrationBean;
    }

    @Bean
    public FilterRegistrationBean druidStatFilter() {
        FilterRegistrationBean filterRegistrationBean = new FilterRegistrationBean(
                new WebStatFilter());
        // 添加过滤规则
        filterRegistrationBean.addUrlPatterns("/*");
        // 添加不需要忽略的格式信息
        filterRegistrationBean.addInitParameter("exclusions", "*.js,*.gif,*.jpg,*.png,*.css,*.ico,/druid/*");
        System.out.println("druid初始化成功!");
        return filterRegistrationBean;

    }
}
这里说明几点
(1)登陆地址:http://127.0.0.1:8080/druid/index.html(端口号看自己设置的端口号)
(2)一旦配置黑名单,那么该ip访问是没有权限的登陆的
(3)如果想看SQL执行结果,那么上面数据源配置一定要添加dataSource.setFilters(filters),我之前就没有添加,所以其它都能正常使用,就是无法监控Sql语句。
效果图

确实很好用。顺便讲下,我遇到其它功能都有用,唯独Sql语句无法监控的问题,之后看界面才看出端倪来。
我发现界面中,filter类名为空,可是在yml确实配置了filters,怎么还是空,原因是数据源里没有配置setFilters(filters)。
SpringBoot(14)—注解装配Bean
SpringBoot装配Bean方式主要有两种
- 通过Java配置文件
@Bean的方式定义Bean。 - 通过注解扫描的方式
@Component/@ComponentScan。
一、当前项目装配Bean
创建项目名称为create-bean。
1、@Component方式
@Component("componentBean")
public class ComponentBean {
    private String type = "@Component实例化bean";
    public String getName(String name) {
        return name + " ___ " + type;
    }
}
说明注解@Component 表明这个类将被Spring IoC容器扫描装配,bean的名称为componentBean。 如果不配置这个值 ,那IoC 容器就会把类名第一个字母作为小写,其他的不变作为 Bean 名称放入到 IoC 容器中。
2、@Bean方式
1)、POJO类
public class ConfigBean {
    private String type = "Configuration注解生成bean实体";
    public String getName(String name) {
        return name + " ___ " + type;
    }
}
2)BeanConfig类
/**
 * @Description: 生成Bean
 */
@Configuration
public class BeanConfig {
    @Bean
    public ConfigBean configBean() {
        return new ConfigBean();
    }
}
@Configuration 代表是一个 Java 配置文件 , Spring会根据它来生成 IoC 容器去装配 Bean。
@Bean 代表将 configBean方法返回的 POJO 装配到 IoC 容器中, name为Bean 的名称,如果没有配置它,则会将方法名称作为 Bean 的名称保存到 Spring IoC 容器中 。
3、测试
/**
 * @Description: 当前工程下的bean实体测试
 */
@RestController
public class BeanController {
    /**
     * 1、经典的注解引入方式 就是在@Configuration注解下生存bean
     */
    @Autowired
    private ConfigBean configBean;
    /**
     * 2、通过@Component方式注入bean 这里通过构造方法引入方式(也可和同上通过@Autowired注入)
     */
    private ComponentBean componentBean;
    public BeanController(ComponentBean componentBean) {
        this.componentBean = componentBean;
    }

    @GetMapping(path = "/bean")
    public String show(String name) {
        Map<String, String> map = new HashMap(16);
        map.put("ComponentBean", componentBean.getName(name));
        map.put("ConfigBean", configBean.getName(name));
        return JSON.toJSONString(map);
    }
}
示例

bean实体成功
二、装配第三方 Bean
上面介绍的Bean,在一个项目中可能不会出现什么问题,可如果你提供了一个Jar包供第三方用户使用,那么你这个jar包中的Bean,就不能被第三方加载,那么如何才能被加载呢?
创建项目名称为third-bean。
1、通过@Bean方式
POJO实体
/**
 * @Description: 通过Configuration注解生成bean实体
 */
@Slf4j
public class ThirdConfigBean {
    private String type = "第三方 ThirdConfigBean注解生成bean实体";
    public String getName(String name) {
        return name + " ___ " + type;
    }
}
BeanConfig
@Configuration
//@ComponentScan("com.jincou.third") 当前项目包名
public class BeanConfig {
    @Bean
    public ThirdConfigBean thirdConfigBean() {
        return new ThirdConfigBean();
    }
}
这个时候在将配置放在指定的文件中即可,使用者会自动加载,从而避免的代码的侵入
- 在资源目录下新建目录 META-INF
- 在 META-INF 目录下新建文件
spring.factories - 在文件中添加
org.springframework.boot.autoconfigure.EnableAutoConfiguration=com.jincou.third.config.BeanConfig
这个时候thirdConfigBean就可以能被第三方jar使用了。
2、@Component方式
@Component
public class ThirdComponentBean {
    private String type = "第三方ThirdComponent注解生成bean实体";
    public String getName(String name) {
        return name + " ___ " + type;
    }
}
说明如果是@Component方式,那么第三方jar包依然无法实例化当前Bean的,除非,在上面的BeanConfig将@ComponentScan注解打开,同时满足@ComponentScan注解能够扫描到ThirdComponentBean实体,那么久可以实例化该Bean。
3、测试
说明 我创建了两个项目 create-bean和third-bean 同时third-bean当作jar被create-bean引用,这个时候测上面的Bean能否被实例化。
在create-bean项目新建ThirdBeanController
/**
 * @Description: 引入第三方的bean实体测试
 */
@RestController
public class ThirdBeanController {
    /**
     * 1、通过@Component方式注入bean
     */
    @Autowired
    private ThirdComponentBean thirdComponentBean;
    /**
     * 2、经典的注解引入方式 就是在@Configuration注解下生存bean
     */
    @Autowired
    private ThirdConfigBean thirdConfigBean;

    @GetMapping(path = "/third-bean")
    public String show(String name) {
        Map<String, String> map = new HashMap(16);
        map.put("ThirdComponentBean", thirdComponentBean.getName(name));
        map.put("ThirdConfigBean", thirdConfigBean.getName(name));
        return JSON.toJSONString(map);
    }
}
测试如下

上面讲的可能并没有那么好理解,这边提供GitHub项目源码: https://github.com/yudiandemingzi/spring-boot-study,
涉及到两个项目 autobean和thirdbean
SpringBoot(15)—@Conditional注解
作用 @Conditional是Spring4新提供的注解,它的作用是按照一定的条件进行判断,满足条件的才给容器注册Bean。
一、概述
1、@Conditional注解定义
@Target({ElementType.TYPE, ElementType.METHOD})
@Retention(RetentionPolicy.RUNTIME)
@Documented
public @interface Conditional {
    Class<? extends Condition>[] value();
}
2、Condition
我们点进去看后,发现它是一个接口,有一个方法。
@FunctionalInterface
public interface Condition {
    boolean matches(ConditionContext var1, AnnotatedTypeMetadata var2);
}
3、ConditionContext
它持有不少有用的对象,可以用来获取很多系统相关的信息,来丰富条件判断,接口定义如下
public interface ConditionContext {
    /**
     * 获取Bean定义
     */
    BeanDefinitionRegistry getRegistry();
    /**
     * 获取Bean工程,因此就可以获取容器中的所有bean
     */
    @Nullable
    ConfigurableListableBeanFactory getBeanFactory();
    /**
     * environment 持有所有的配置信息
     */
    Environment getEnvironment();
    /**
     * 资源信息
     */
    ResourceLoader getResourceLoader();
    /**
     * 类加载信息
     */
    @Nullable
    ClassLoader getClassLoader();
}
二、案例
需求 根据当前系统环境的的不同实例不同的Bean,比如现在是Mac那就实例一个Bean,如果是Window系统实例另一个Bean。
1、SystemBean
首先创建一个Bean类
@Data
@AllArgsConstructor
@NoArgsConstructor
@ToString
public class SystemBean {
    /**
     * 系统名称
     */
    private String systemName;
    /**
     * 系统code
     */
    private String systemCode;
}
2、通过Configuration配置实例化Bean
@Slf4j
@Configuration
public class ConditionalConfig {
    /**
     * 如果WindowsCondition的实现方法返回true,则注入这个bean
     */
    @Bean("windows")
    @Conditional({WindowsCondition.class})
    public SystemBean systemWi() {
        log.info("ConditionalConfig方法注入 windows实体");
        return new SystemBean("windows系统","002");
    }
    /**
     * 如果LinuxCondition的实现方法返回true,则注入这个bean
     */
    @Bean("mac")
    @Conditional({MacCondition.class})
    public SystemBean systemMac() {
        log.info("ConditionalConfig方法注入 mac实体");
        return new SystemBean("Mac ios系统","001");
    }
}
3、WindowsCondition和MacCondition
这两个类都实现了Condition接口, 只有matches方法返回true才会实例化当前Bean。
1)WindowsCondition
@Slf4j
public class WindowsCondition implements Condition {
    /**
     * @param conditionContext:判断条件能使用的上下文环境
     * @param annotatedTypeMetadata:注解所在位置的注释信息
     */
    @Override
    public boolean matches(ConditionContext conditionContext, AnnotatedTypeMetadata annotatedTypeMetadata) {
        //获取ioc使用的beanFactory
        ConfigurableListableBeanFactory beanFactory = conditionContext.getBeanFactory();
        //获取类加载器
        ClassLoader classLoader = conditionContext.getClassLoader();
        //获取当前环境信息
        Environment environment = conditionContext.getEnvironment();
        //获取bean定义的注册类
        BeanDefinitionRegistry registry = conditionContext.getRegistry();
        //获得当前系统名
        String property = environment.getProperty("os.name");
        //包含Windows则说明是windows系统,返回true
        if (property.contains("Windows")){
            log.info("当前操作系统是:Windows");
            return true;
        }
        return false;
    }
}
2) MacCondition
@Slf4j
public class MacCondition implements Condition {

   @Override
    public boolean matches(ConditionContext conditionContext, AnnotatedTypeMetadata annotatedTypeMetadata) {
        Environment environment = conditionContext.getEnvironment();
        String property = environment.getProperty("os.name");
        if (property.contains("Mac")) {
            log.info("当前操作系统是:Mac OS X");
            return true;
        }
        return false;
    }
}
4、测试类测试
/**
 * @author xub
 * @date 2019/6/13 下午10:42
 */
@SpringBootTest(classes = Application.class)
@RunWith(SpringRunner.class)
public class TestConditionOn {

    @Autowired
    private SystemBean windows;
    @Autowired
    private SystemBean mac;

    @Test
    public void test() {
        if (windows != null) {
            System.out.println("windows = " + windows);
        }
        if (mac != null) {
            System.out.println("linux = " + mac);
        }
    }
}
运行结果

通过运行结果可以看出
1、虽然配置两个Bean,但这里只实例化了一个Bean,因为我这边是Mac电脑,所以实例化的是mac的SystemBean
2、注意一点,我们可以看出 window并不为null,而是mac实例化的Bean。说明 只要实例化一个Bean的,不管你命名什么,都可以注入这个Bean。
修改一下
这里做一个修改,我们把ConditionalConfig中的这行代码注释掉。
// @Conditional({WindowsCondition.class})
再运行下代码

通过运行结果可以看出,配置类的两个Bean都已经注入成功了。
注意 当同一个对象被注入两次及以上的时候,那么你在使用当前对象的时候,名称一定要是两个bean名称的一个,否则报错。比如修改为
    @Autowired
    private SystemBean windows;
    @Autowired
    private SystemBean mac;
    @Autowired
    private SystemBean linux;
在启动发现,报错了。

意思很明显,就是上面只实例化成功一个SystemBean的时候,你取任何名字,反正就是把当前已经实例化的对象注入给你就好了。
但是你现在同时注入了两个SystemBean,你这个时候有个名称为linux,它不知道应该注入那个Bean,所以采用了报错的策略。
GitHub源码 https://github.com/yudiandemingzi/spring-boot-study
项目名称 03-conditional
@ConditionalOnBean与@ConditionalOnClass
上一篇讲的@Conditional可以通过条件控制是否注入Bean,这篇讲下有关Bean其它几个常用的注解使用方式
@ConditionalOnBean         //	当给定的在bean存在时,则实例化当前Bean
@ConditionalOnMissingBean  //	当给定的在bean不存在时,则实例化当前Bean
@ConditionalOnClass        //	当给定的类名在类路径上存在,则实例化当前Bean
@ConditionalOnMissingClass //	当给定的类名在类路径上不存在,则实例化当前Bean
下面我通过案例深入讲下@ConditionalOnBean 注解,这个理解其它也就理解了。
一、@ConditionalOnBean概念
需求场景 比如下面一种场景,我在实例化People对象的时候,需要注入一个City对象。这个时候问题来了,如果city没有实例化,那么下面就会报空指针或者直接报错。
所以这里需求很简单,就是当前city存在则实例化people,如果不存在则不实例化people,这个时候@ConditionalOnBean 的作用来了。
    @Bean
    public People people(City city) {
        //这里如果city实体没有成功注入 这里就会报空指针
        city.setCityName("千岛湖");
        city.setCityCode(301701);
        return new People("小小", 3, city);
    }
1、@ConditionalOnBean注解定义
@Target({ ElementType.TYPE, ElementType.METHOD })
@Retention(RetentionPolicy.RUNTIME)
@Documented
@Conditional(OnBeanCondition.class)
public @interface ConditionalOnBean {
    /**
     * 需要作为条件的类的Class对象数组
     */
    Class<?>[] value() default {};
    /**
     * 需要作为条件的类的Name,Class.getName()
     */
    String[] type() default {};
    /**
     *  (用指定注解修饰的bean)条件所需的注解类
     */
    Class<? extends Annotation>[] annotation() default {};
    /**
     * spring容器中bean的名字
     */
    String[] name() default {};
    /**
     * 搜索容器层级,当前容器,父容器
     */
    SearchStrategy search() default SearchStrategy.ALL;
    /**
     * 可能在其泛型参数中包含指定bean类型的其他类
     */
    Class<?>[] parameterizedContainer() default {};
}
下面举例说明。
二、@ConditionalOnBean示例
1、Bean实体
1)City类
@Data
@ToString
@AllArgsConstructor
@NoArgsConstructor
public class City {
    /**
     * 城市名称
     */
    private String cityName;
    /**
     * 城市code
     */
    private Integer cityCode;
}
2)People类
这里City作为People一个属性字段。
@Data
@ToString
@NoArgsConstructor
@AllArgsConstructor
public class People {
  /**
     * 姓名
     */
    private String name;
    /**
     * 年龄
     */
    private Integer age;
    /**
     *  城市信息
     */
    private City city;
}
2、Config类
这里写个正常的配置类,City成功注入到IOC容器中。
@Slf4j
@Configuration
public class Config {
    @Bean
    public City city() {
        City city = new City();
        city.setCityName("千岛湖");
        return city;
    }
    @Bean
    public People people(City city) {
        //这里如果city实体没有成功注入 这里就会报空指针
        city.setCityCode(301701);
        return new People("小小", 3, city);
    }
}
3、Test测试类
@SpringBootTest(classes = Application.class)
@RunWith(SpringRunner.class)
public class TestConditionOn {

    @Autowired(required=false)
    private People people;

    @Test
    public void test() {
        System.out.println("= = = = = = = = = = = = = ");
        System.out.println("people = " + people);
        System.out.println("= = = = = = = = = = = = = ");
    }
}
运行结果

一切正常,这个很符合我们实际开发中的需求。但是如果有一种情况,就是我的city并没有被注入。我把上面这部分注视掉。
//    @Bean
//    public City city() {
//        City city = new City();
//        city.setCityName("千岛湖");
//        return city;
//    }
再运行测试类

发现启动直接报错了,这当然不是我们希望看到的,我们是要当city已经注入那么实例化people,如果没有注入那么不实例化people。
@Slf4j
@Configuration
public class Config {
//    @Bean
//    public City city() {
//        City city = new City();
//        city.setCityName("千岛湖");
//        return city;
//    }

    /**
     * 这里加了ConditionalOnBean注解,就代表如果city存在才实例化people
     */
    @Bean
    @ConditionalOnBean(name = "city")
    public People people(City city) {
        //这里如果city实体没有成功注入 这里就会报空指针
        city.setCityCode(301701);
        return new People("小小", 3, city);
    }
}
再运行测试类

很明显,上面因为city已经注释调,所以也导致无法实例化people,所以people为null。
注意有点要注意的,就是一旦使用@Autowired那就默认代表当前Bean一定是已经存在的,如果为null,会报错。所以这里要修改下。
@Autowired(required=false) //required=false 的意思就是允许当前的Bean对象为null。
总结讲了这个注解,其它三个注解的意思大致差不多,在实际开发过程中可以根据实际情况使用该注解。
SpringBoot整合RocketMQ
上篇博客讲解了服务器集群部署RocketMQ 博客地址:RocketMQ(2)---Docker部署RocketMQ集群
这篇在上篇搭建好的基础上,将SpringBoot整合RocketMQ实现生产消费。
GitHub地址: https://github.com/yudiandemingzi/spring-boot-study
一、搭建步骤
先说下技术大致架构
SpringBoot2.1.6 + Maven3.5.4 + rocketmq4.3.0 + JDK1.8 +Lombok(插件)
1、添加rocketmq包
     <!--注意: 这里的版本,要和部署在服务器上的版本号一致-->
        <dependency>
            <groupId>org.apache.rocketmq</groupId>
            <artifactId>rocketmq-client</artifactId>
            <version>4.3.0</version>
        </dependency>
2、JmsConfig(配置类)
连接RocketMQ服务器配置类,这里为了方便直接写成常量。
/**
 * @Description: 安装实际开发这里的信息 都是应该写在配置里,来读取,这里为了方便所以写成常量
 */
public class JmsConfig {
    /**
     * Name Server 地址,因为是集群部署 所以有多个用 分号 隔开
     */
    public static final String NAME_SERVER = "127.12.15.6:9876;127.12.15.6:9877";
    /**
     * 主题名称 主题一般是服务器设置好 而不能在代码里去新建topic( 如果没有创建好,生产者往该主题发送消息 会报找不到topic错误)
     */
    public static final String TOPIC = "topic_family";

}
3、Producer (生产者)
@Slf4j
@Component
public class Producer {
    private String producerGroup = "test_producer";
    private DefaultMQProducer producer;

    public Producer(){
        //示例生产者
        producer = new DefaultMQProducer(producerGroup);
        //不开启vip通道 开通口端口会减2
        producer.setVipChannelEnabled(false);
        //绑定name server
        producer.setNamesrvAddr(JmsConfig.NAME_SERVER);
        start();
    }
    /**
     * 对象在使用之前必须要调用一次,只能初始化一次
     */
    public void start(){
        try {
            this.producer.start();
        } catch (MQClientException e) {
            e.printStackTrace();
        }
    }

    public DefaultMQProducer getProducer(){
        return this.producer;
    }
    /**
     * 一般在应用上下文,使用上下文监听器,进行关闭
     */
    public void shutdown(){
        this.producer.shutdown();
    }
}
4、Consumer (消费者)
@Slf4j
@Component
public class Consumer {

    /**
     * 消费者实体对象
     */
    private DefaultMQPushConsumer consumer;
    /**
     * 消费者组
     */
    public static final String CONSUMER_GROUP = "test_consumer";
    /**
     * 通过构造函数 实例化对象
     */
    public Consumer() throws MQClientException {

        consumer = new DefaultMQPushConsumer(CONSUMER_GROUP);
        consumer.setNamesrvAddr(JmsConfig.NAME_SERVER);
        //消费模式:一个新的订阅组第一次启动从队列的最后位置开始消费 后续再启动接着上次消费的进度开始消费
        consumer.setConsumeFromWhere(ConsumeFromWhere.CONSUME_FROM_LAST_OFFSET);
        //订阅主题和 标签( * 代表所有标签)下信息
        consumer.subscribe(JmsConfig.TOPIC, "*");
        // //注册消费的监听 并在此监听中消费信息,并返回消费的状态信息
        consumer.registerMessageListener((MessageListenerConcurrently) (msgs, context) -> {
            // msgs中只收集同一个topic,同一个tag,并且key相同的message
            // 会把不同的消息分别放置到不同的队列中
            try {
                for (Message msg : msgs) {

                    //消费者获取消息 这里只输出 不做后面逻辑处理
                    String body = new String(msg.getBody(), "utf-8");
                    log.info("Consumer-获取消息-主题topic为={}, 消费消息为={}", msg.getTopic(), body);
                }
            } catch (UnsupportedEncodingException e) {
                e.printStackTrace();
                return ConsumeConcurrentlyStatus.RECONSUME_LATER;
            }
            return ConsumeConcurrentlyStatus.CONSUME_SUCCESS;
        });

        consumer.start();
        System.out.println("消费者 启动成功=======");
    }
}
大致就是这边简单,下面就是测试。
二、测试
先写个测试接口进行测试。
1、Controller
@Slf4j
@RestController
public class Controller {

    @Autowired
    private Producer producer;

    private List<String> mesList;

    /**
     * 初始化消息
     */
    public Controller() {
        mesList = new ArrayList<>();
        mesList.add("小小");
        mesList.add("爸爸");
        mesList.add("妈妈");
        mesList.add("爷爷");
        mesList.add("奶奶");

    }

    @RequestMapping("/text/rocketmq")
    public Object callback() throws Exception {
        //总共发送五次消息
        for (String s : mesList) {
            //创建生产信息
            Message message = new Message(JmsConfig.TOPIC, "testtag", ("小小一家人的称谓:" + s).getBytes());
            //发送
            SendResult sendResult = producer.getProducer().send(message);
            log.info("输出生产者信息={}",sendResult);
        }
        return "成功";
    }
}
2、测试结果

很明显生产发送消息已经成功,二消费者也成功接收了消息!
另外我们再来看下RocketMQ控制台是否也有消费记录

很明显在控制台这边也会有消费记录!
通过Lua脚本批量插入数据到Redis布隆过滤器
在实际开发过程中经常会做的一步操作,就是判断当前的key是否存在。
那这篇博客主要分为三部分:
1、几种方式判断当前key是否存在的性能进行比较。
2、Redis实现布隆过滤器并批量插入数据,并判断当前key值是否存在。
3、针对以上做一个总结。
一、性能对比
主要对以下方法进行性能测试比较:
1、List的 contains 方法
2、Map的 containsKey 方法
3、Google布隆过滤器 mightContain 方法
前提准备
在SpringBoot项目启动的时候,向 List集合、Map集合、Google布隆过滤器 分布存储500万条,长度为32位的String字符串。
1、演示代码
@Slf4j
@RestController
public class PerformanceController {

    /**
     * 存储500万条数据
     */
    public static final int SIZE = 5000000;
    /**
     * list集合存储数据
     */
    public static List<String> list = Lists.newArrayListWithCapacity(SIZE);
    /**
     * map集合存储数据
     */
    public static Map<String, Integer> map = Maps.newHashMapWithExpectedSize(SIZE);
    /**
     * guava 布隆过滤器
     */
    BloomFilter<String> bloomFilter = BloomFilter.create(Funnels.unencodedCharsFunnel(), SIZE);
    /**
     * 用来校验的集合
     */
    public static List<String> exist = Lists.newArrayList();
    /**
     * 计时工具类
     */
    public static Stopwatch stopwatch = Stopwatch.createUnstarted();

    /**
     * 初始化数据
     */
    @PostConstruct
    public void insertData() {
        for (int i = 0; i < SIZE; i++) {
            String data = UUID.randomUUID().toString();
            data = data.replace("-", "");
            //1、存入list
            list.add(data);
            //2、存入map
           map.put(data, 0);
            //3、存入本地布隆过滤器
            bloomFilter.put(data);
            //校验数据 相当于从这500万条数据,存储5条到这个集合中
            if (i % 1000000 == 0) {
                exist.add(data);
            }
        }
    }
    /**
     * 1、list 查看value是否存在 执行时间
     */
    @RequestMapping("/list")
    public void existsList() {
        //计时开始
        stopwatch.start();
        for (String s : exist) {
            if (list.contains(s)) {
                log.info("list集合存在该数据=============数据{}", s);
            }
        }
        //计时结束
        stopwatch.stop();
        log.info("list集合测试,判断该元素集合中是否存在用时:{}", stopwatch.elapsed(MILLISECONDS));
        stopwatch.reset();
    }
    /**
     * 2、查看map 判断k值是否存在 执行时间
     */
    @RequestMapping("/map")
    public void existsMap() {
        //计时开始
        stopwatch.start();
        for (String s : exist) {
            if (map.containsKey(s)) {
                log.info("map集合存在该数据=============数据{}", s);
            }
        }
        //计时结束
        stopwatch.stop();
        //获取时间差

        log.info("map集合测试,判断该元素集合中是否存在用时:{}", stopwatch.elapsed(MILLISECONDS));
        stopwatch.reset();
    }

    /**
     * 3、查看guava布隆过滤器 判断value值是否存在 执行时间
     */
    @RequestMapping("/bloom")
    public void existsBloom() {
        //计时开始
        stopwatch.start();
        for (String s : exist) {
        if (bloomFilter.mightContain(s)) {
            log.info("guava布隆过滤器存在该数据=============数据{}", s);
        }
        }
        //计时结束
        stopwatch.stop();
        //获取时间差
        log.info("bloom集合测试,判断该元素集合中是否存在用时:{}", stopwatch.elapsed(MILLISECONDS));
        stopwatch.reset();
    }
}
2、测试输出结果

测试结果
这里其实对每一个校验是否存在的方法都执行了5次,如果算单次的话那么,那么在500万条数据,且每条数据长度为32位的String类型情况下,可以大概得出。
1、List的contains方法执行所需时间,大概80毫秒左右。
2、Map的containsKey方法执行所需时间,不超过1毫秒。
3、Google布隆过滤器 mightContain 方法,不超过1毫秒。
总结
Map比List效率高的原因这里就不用多说,没有想到的是它们速度都这么快。我还测了100万条数据通过list遍历key时间竟然也不超过1毫秒。这说明在实际开发过程中,如果数据
量不大的话,用哪里其实都差不多。
3、占用内存分析
从上面的执行效率来看,Google布隆过滤器 其实没什么优势可言,确实如果数据量小,完全通过上面就可以解决,不需要考虑布隆过滤器,但如果数据量巨大,千万甚至亿级
别那种,用集合肯定不行,不是说执行效率不能接受,而是占内存不能接受。
我们来算下key值为32字节的500万条条数据,存放在List集合需要占多少内存。
500万 * 32 = 16000000字节 ≈ 152MB
一个集合就占这么大内存,这点显然无法接受的。
那我们来算算布隆过滤器所需要占内存
-
设bit数组大小为m,样本数量为n,失误率为p。
-
由题可知 n = 500万,p = 3%(Google布隆过滤器默认为3%,我们也可以修改)
通过公式求得:

m ≈ 16.7MB
是不是可以接收多了。
那么Google布隆过滤器也有很大缺点
1、每次项目启动都要重新将数据存入Google布隆过滤器,消费额外的资源。
2、分布式集群部署架构中,需要在每个集群节点都要存储一份相同数据到布隆过滤器中。
3、随着数据量的加大,布隆过滤器也会占比较大的JVM内存,显然也不够合理。
那么有个更好的解决办法,就是用redis作为分布式集群的布隆过滤器。
二、Redis布隆过滤器
1、Redis服务器搭建
如果你不是用docker,那么你需要先在服务器上部署redis,然后单独安装支持redis布隆过滤器的插件rebloom。
如果你用过docker那么部署就非常简单了,只需以下命令:
  docker pull redislabs/rebloom # 拉取镜像
  docker run -p 6379:6379 redislabs/rebloom # 运行容器
这样就安装成功了。
2、Lua批量插入脚本
SpringBoot完整代码我这里就不粘贴出来了,文章最后我会把整个项目的github地址附上,这里就只讲下脚本的含义:
bloomFilter-inster.lua
local values = KEYS
local bloomName = ARGV[1]
local result_1
for k,v in ipairs(values) do
 result_1 = redis.call('BF.ADD',bloomName,v)
end
return result_1
1)参数说明
这里的 KEYS 和 ARGV[1]都是需要我们在java代码中传入,redisTemplate有个方法
execute(RedisScript<T> script, List<K> keys, Object... args)
- script实体中中封装批量插入的lua脚本。
- keys 对于脚本的 KEYS。
- ARGV[1]对于可变参数第一个,如果输入多个可变参数,可以可以通过ARGV[2].....去获取。
2)遍历
Lua遍历脚本有两种方式一个是ipairs,另一个是pairs它们还是有差别的。这里也不做展开,下面有篇博客可以参考。
注意Lua的遍历和java中遍历还有有点区别的,我们java中是从0开始,而对于Lua脚本 k是从1开始的。
3)插入命令
BF.ADD 是往布隆过滤器中插入数据的命令,插入成功返回 true。
3、判断布隆过滤器元素是否存在Lua脚本
bloomFilter-exist.lua
local bloomName = KEYS[1]
local value = KEYS[2]
-- bloomFilter
local result_1 = redis.call('BF.EXISTS', bloomName, value)
return result_1
从这里我们可以很明显看到, KEYS[1]对于的是keys集合的get(0)位置,所以说Lua遍历是从1开始的。
BF.EXISTS 是判断布隆过滤器中是否存在该数据命令,存在返回true。
4、测试
我们来测下是否成功。
@Slf4j
@RestController
public class RedisBloomFilterController {

    @Autowired
    private RedisService redisService;
    public static final String FILTER_NAME = "isMember";

    /**
     * 保存 数据到redis布隆过滤器
     */
    @RequestMapping("/save-redis-bloom")
    public Object saveReidsBloom() {
        //数据插入布隆过滤器
        List<String> exist = Lists.newArrayList("11111", "22222");
        Object object = redisService.addsLuaBloomFilter(FILTER_NAME, exist);
        log.info("保存是否成功====object:{}",object);
        return object;
    }
    /**
     * 查询 当前数据redis布隆过滤器是否存在
     */
    @RequestMapping("/exists-redis-bloom")
    public void existsReidsBloom() {
        //不存在输出
        if (!redisService.existsLuabloomFilter(FILTER_NAME, "00000")) {
            log.info("redis布隆过滤器不存在该数据=============数据{}",  "00000");
        }
        //存在输出
        if (redisService.existsLuabloomFilter(FILTER_NAME, "11111")) {
            log.info("redis布隆过滤器存在该数据=============数据{}", "11111");
        }
    }
}
这里先调插入接口,插入两条数据,如果返回true则说明成功,如果是同一个数据第一次插入返回成功,第二次插入就会返回false,说明重复插入相同值会失败。
然后调查询接口,这里应该两条日志都会输出,因为上面"00000"是取反的,多了个!号。
我们来看最终结果。
符合我们的预期,说明,redis布隆过滤器从部署到整合SpringBoot都是成功的。
三、总结
下面个人对整个做一个总结吧。主要是思考下,在什么环境下可以考虑用以上哪种方式来判断该元素是否存在。
1、数据量不大,且不能有误差。
那么用List或者Map都可以,虽然说List判断该元素是否存在采用的是遍历集合的方式,在性能在会比Map差,但就像上面测试一样,100万的数据,
List遍历和Map都不超过1毫秒,选谁不都一样,何必在乎那0.几毫秒的差异。
2、数据量不大,且允许有误差。
这就可以考虑用Google布隆过滤器了,尽管查询数据效率都差不多,但关键是它可以减少内存的开销,这就很关键。
3、数据量大,且不能有误差。
如果说数量大,为了提升查询元素是否存在的效率,而选用Map的话,我觉得也不对,因为如果数据量大,所占内存也会更大,所以我更推荐用
Redis的map数据结构来存储数据,这样可以大大减少JVM内存开销,而且不需要每次重启都要往集合中存储数据。
4、数据量大,且允许有误差。
如果是单体应用,数据量内存也可以接收,那么可以考虑Google布隆过滤器,因为它的查询速度会比redis要快。毕竟它不需要网络IO开销。
如果是分布式集群架构,或者数据量非常大,那么还是考虑用redis布隆过滤器吧,毕竟它不需要往每一节点都存储数据,而且不占用JVM虚拟机内存。
Github地址:https://github.com/yudiandemingzi/spring-boot-redis-lua
SpringBoot整合Apollo
有关Apollo之前已经写了两篇文章:
这篇文章分为两部分:
1、跟着官网步骤,快速搭建apollo环境。
2、SpringBoot整合apollo,实现配置中心。
一、Apollo快速搭建
apollo环境的搭建主要参考 官方文档 ,我们就直接一步一步跟着官方文档来
1、下载Quick Start安装包
2、创建数据库
之前有说过,apollo会有两个数据库: ApolloPortalDB 和 ApolloConfigDB
3、更新数据库连接信息
在下载下来的Quick Start项目中,有个叫demo.sh的文件,我们需要 修改数据库连接信息,修改里头数据库连接地址/用户名/密码
4、 启动Apollo配置中心
上面三部就已经将环境搭建好,现在我们开始启动Apollo配置中心,来看具体效果。
注意 这里默认暂用三个端口: 8070,8080,8090,所以要先看下这三个端口有木有被暂用。
启动项目
./demo.sh start
5、登录Apollo
登录界面

初始账号密码 : apollo/admin
进入首页之后,我们可以看到: 默认的环境只有dev,m默认有一个SampleApp项目

我们在这里添加两个配置
6. 测试客户代码
上面已经设置了两个配置,这个时候我们就需要通过客户端去获取,我们先不通过SpringBoot去获取,而是官方提供的客户端去获取配置
运行客户端
./demo.sh client
启动后去查询配置
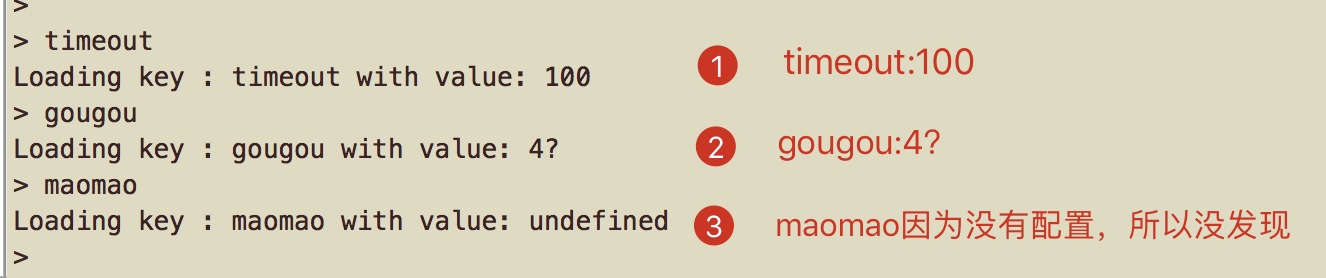
可以看到客户端都能够拿到配置中心的配置。
注意 这里有一点在上面我设了 gougou:4岁。而实际客户端获得的是4?,所以中文没有转义成功,在实际开发中,我们也尽量去避免有中文汉字来当配置。
这样下来,官方给的快速启动apollo是成功了,下面我们把客户端换成SpringBoot,来实现获取配置中心的数据。
二、SpringBoot整合Apollo
从上面我们可以知道在apollo官方给了我们一个默认项目叫:SampleApp。默认的用户名称:apollo。所以这里灵活一点,不用它自己的,而是我们手动新增。
1、Apollo创建新新用户和项目
1)新增新用户
http://{portal地址}/user-manage.html //我们这里设置的是http://localhost:8070/user-manage.html
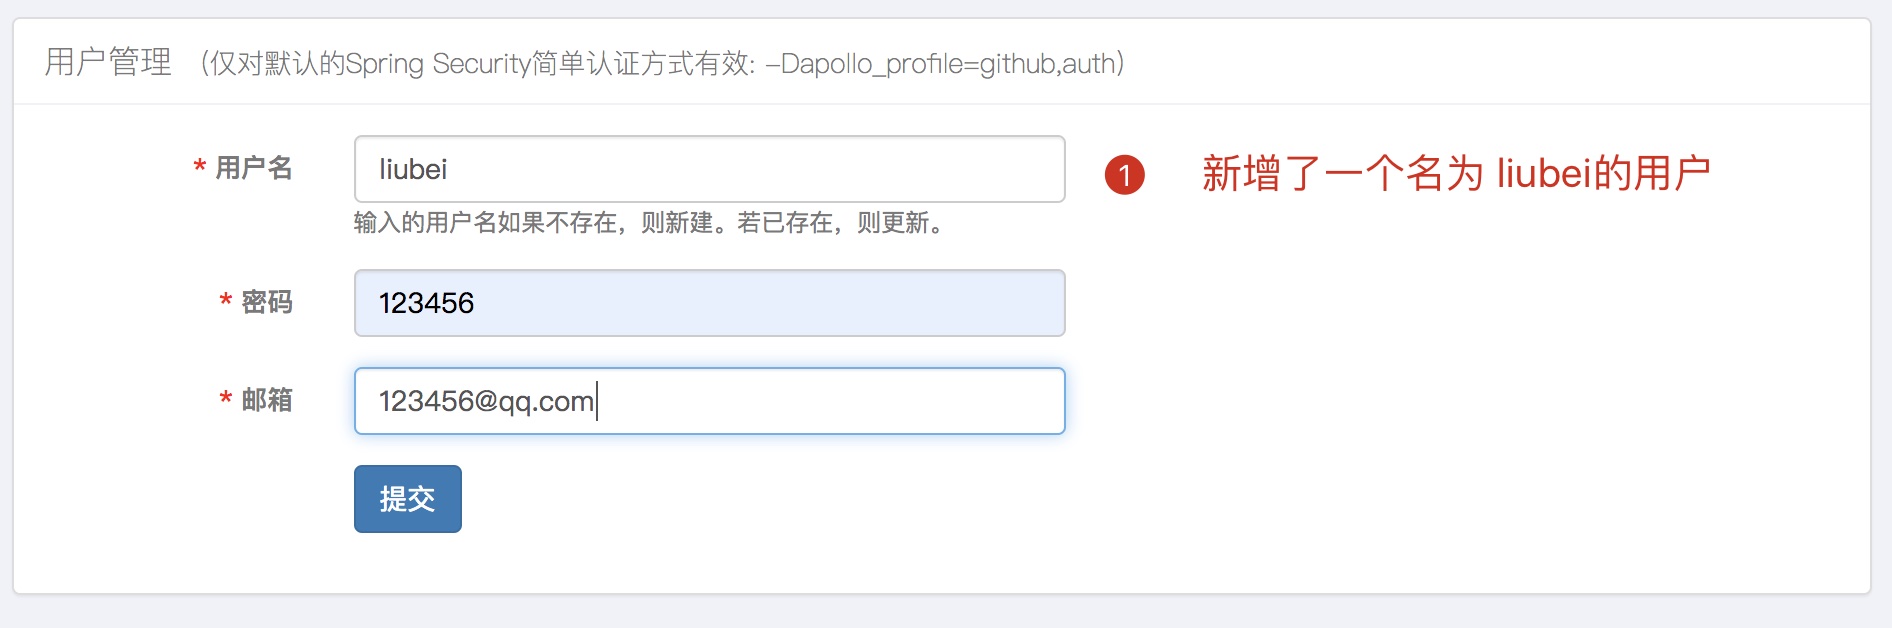
这里新增一个用户名叫:liubei
2)新增项目
访问http://localhost:8070 登录后,选择创建项目。

这里新创建了项目,一个AppId名称叫: springboot-test-apollo。
配置说明:
部门:选择应用所在的部门。(想自定义部门,参照官方文档,这里就选择样例)
应用AppId:用来标识应用身份的唯一id,格式为string,需要和客户端。application.properties中配置的app.id对应。
应用名称:应用名,仅用于界面展示。
应用负责人:选择的人默认会成为该项目的管理员,具备项目权限管理、集群创建、Namespace创建等权限。
提交配置后会出现如下项目配置的管理页面。
3)添加配置

这里先添加一个新配置: date.value = 2020.08.04 。
2、springboot项目搭建
上面把apollo环境搭建好,也创建了新项目,那么这里就去读取新项目的配置信息。
1)pom.xml
添加 Apollo 客户端的依赖,其它依赖这里就不展示了,完整项目会放在github上。
<dependency>
    <groupId>com.ctrip.framework.apollo</groupId>
    <artifactId>apollo-client</artifactId>
    <version>1.3.0</version>
</dependency>
2)application.yml
server:
  port: 8123

app:
  id: springboot-test-apollo
apollo:
  meta: http://127.0.0.1:8080
  bootstrap:
    enabled: true
    eagerLoad:
      enabled: true

#这里说明在将该项目 com目录下的日志,都采用info模式输出
logging:
  level:
    com: info
配置说明
app.id :AppId是应用的身份信息,是配置中心获取配置的一个重要信息。
apollo.bootstrap.enabled:在应用启动阶段,向Spring容器注入被托管的application.properties文件的配置信息。
apollo.bootstrap.eagerLoad.enabled:将Apollo配置加载提到初始化日志系统之前。
logging.level.com :调整 com 包的 log 级别,为了后面演示在配置中心动态配置日志级别。
3) TestController
@Slf4j
@RestController
public class TestController {

    @Value( "${date.value}" )
    String dateValue;

    @GetMapping("test")
    public String test() {
        return "打印配置中心的 dateValue 值: "+ dateValue;
    }

}
4)SpringBoot启动类
@SpringBootApplication
@EnableApolloConfig
public class Application {

    public static void main(String[] args) {
        SpringApplication.run(Application.class);
    }
}
添加 EnableApolloConfig 配置注解
3、测试
我在apollo配置了一个属性: date.value = 2020.08.04,如果从springBoot能够获取到该配置,那么就说明成功了。

很明显,我们通过接口已经成功获取配置中心的配置。这样一个最简单的整合已经完成了,下面我们在来验证其它东西。
三、验证
下面我们来验证一些有意思的东西:
1)、配置修改后能否立即生效。
2)、通过配置日志打印级别,我们来验证能够动态的修改日志级别
3)、能够通过修改端口号,能够修改项目运行的端口号。
下面我们一个一个来验证
1、配置修改后能否立即生效?
新增一个接口
@Slf4j
@RestController
public class TestController {

    @Value( "${date.value}" )
    String dateValue;

    @GetMapping("test1")
    public void test1() {
        log.info("当前配置中心的 dateValue 值 = {}",dateValue);
    }
}
步骤 :1)先请求接口一次。2)然后修改apollo配置中心。3)然后在请求一次该接口。

结论 从图中很明显看出第一次和第二次请求的接口,返回的配置信息已经不一样了。说明配置是会时时更新的。而且当我在apollo界面修改配置的时候,
控制台日志也会输出相关信息。
2、动态修改日志级别
我们来思考有没有这么一种需求,我们在线上的日志级别一般是INFO级别的,主要记录业务操作或者错误的日志。那么这个时候当线上环境出现问题希望输出DEBUG
日志信息辅助排查的时候怎么办呢?
如果以前,我们可以会修改配置文件,重新打包然后上传重启线上环境,以前确实是这么做的。通过Apollo配置中心我们可以实现不用重启项目,就可以实现让日志
基本从INFO变成DEBUG。下面我们来演示一番。
在项目启动之前,我在application.yml配置了日志级别是info模式。我们来请求下面接口验证下。
 @GetMapping("test2")
    public void test2() {
      log.debug("我是 debug 打印出的日志");
      log.info("我是 info 打印出的日志");
      log.error("我是 error 打印出的日志");
    }
请求下接口看下控制台

可以很明显的看出,控制台只打印info级别以上的日志,并没有打印debug日志。
现在我们要做的是将打印日志级别不在交给application.yml而是交给apollo来配置。这里其实要做两步:
1)、在apollo配置一条日志数据。
2)、通过监听配置的变化,来达到热更新的效果。
java配置类
@Configuration
public class LoggerConfig {

    private static final Logger logger = LoggerFactory.getLogger(LoggerConfig.class);
    private static final String LOGGER_TAG = "logging.level.";

    @Autowired
    private LoggingSystem loggingSystem;

    @ApolloConfig
    private Config config;

    @ApolloConfigChangeListener
    private void configChangeListter(ConfigChangeEvent changeEvent) {
        refreshLoggingLevels();
    }

    @PostConstruct
    private void refreshLoggingLevels() {
        Set<String> keyNames = config.getPropertyNames();
        for (String key : keyNames) {
            if (StringUtils.containsIgnoreCase(key, LOGGER_TAG)) {
                String strLevel = config.getProperty(key, "info");
                LogLevel level = LogLevel.valueOf(strLevel.toUpperCase());
                loggingSystem.setLogLevel(key.replace(LOGGER_TAG, ""), level);
                logger.info("{}:{}", key, strLevel);
            }
        }
    }

}
关键点讲解
@ApolloConfig注解:将Apollo服务端的中的配置注入这个类中。
@ApolloConfigChangeListener注解:监听配置中心配置的更新事件,若该事件发生,则调用refreshLoggingLevels方法,处理该事件。
ConfigChangeEvent参数:可以获取被修改配置项的key集合,以及被修改配置项的新值、旧值和修改类型等信息。
从上面可以看出,通过@PostConstruct 项目启动的时候就去获取apollo的日志级别去覆盖application.yml日志级别。我在apollo配置中心,新增加一条日志配置。
把日志级别设置error,那么在项目启动的时候,因为PostConstruct注解的原因,所以会去执行一次refreshLoggingLevels方法,把当前日志级别改成error。
apollo配置

我们重启启动项目再来看下,请求上面接口结果。

从上图我们就可以看出,我们同时在application.yml 和apollo都配置了日志打印级别,但实际上打印出来的结果来看,最终是以apollo为准。
现在我们再来尝试下,我们修改apollo配置,把日志级别修改成debug级别。
apollo配置

因为我们在LoggerConfig中,有个 @ApolloConfigChangeListener注解,我们在修改配置的时候都会被监听到,监听到之后就会把当前的日志级别,换成最新的。
我们再来请求接口,看下控制台。

总结 通过上面的验证,可以得出:我在没有重启服务器的情况下,实现了日志级别动态切换的功能。
3、动态修改端口号
这里我就不把验证的过程发出来了,结论就是不可以。如果要验证,在上面的refreshLoggingLevels方法中,加入修改端口的逻辑。
其实理由很简单,因为端口跟进程绑定在一起的,你的进程起来了,端口就无法改变。如果一定要换端口号,那么就需要有一个独立进程,去杀掉你的项目进程,
再起一个新的不同端口的进程。显然apollo没有这样的功能,而且个人觉得也没啥意义。。
好了,整篇文章到这里就结束了,下面把该项目的具体代码放到github上。
SpringBoot---断言(Assert)
我们在写单元测试的时候,除了接口直接抛异常而导致该单元测试失败外,还有种是业务上的错误也代表着该单元测试失败。好比我们在测试接口的时候,
该接口返回是1代表成功,如果是0那就代表是失败的,这个时候可以考虑使用断言。
一、原理
我们知道,我们可以通过断言来校验测试用例的返回值和实际期望值进行比较,以此来判断测试是否通过。那我们先来看下如果失败的情况下它的流程是怎么样的。
对于断言而言,如果是错误最终都会进入下面的方法
    static public void fail(String message) {
        if (message == null) {
            throw new AssertionError();
        }
        throw new AssertionError(message);
    }
很明显,这里有一个AssertionError对象,我们来看下这个对象。
public class AssertionError extends Error {
 //......
}
我们很明显看到,它实继承是Error,而不是Exception。这说明什么,说明你无法通过try catch去捕获这个异常,只要进入断言fail中,一定会抛出异常。
二、Assert 源码
这里只展示Assert源码中常用的方法,一些不常用或者过期的方法这里就不展示了。
public class Assert {
    /**
     * 结果 = 预期 则正确
     */
    static public void assertEquals(Object expected, Object actual)
    /**
     * 结果 != 预期 则正确
     */
    static public void assertNotEquals(Object unexpected, Object actual)
    /**
     * condition == true 则正确
     */
    static public void assertTrue(boolean condition)
    /**
     * condition == false 则正确
     */
    static public void assertFalse(boolean condition)
    /**
     * 永远是错误
     */
    static public void fail()
    /**
     * 结果不为空 则正确
     */
    static public void assertNotNull(Object object)
    /**
     * 结果为空 则正确
     */
    static public void assertNull(Object object)
    /**
     * 两个对象引用 相等 则正确(上面相当于equels 这里类似于使用“==”比较两个对象)
     */
    static public void assertSame(Object expected, Object actual)
    /**
     * 两个对象引用 不相等 则正确
     */
    static public void assertNotSame(Object unexpected, Object actual)
    /**
     * 两个数组相等 则正确
     */
    public static void assertArrayEquals(Object[] expecteds, Object[] actuals)
    /**
     * 这个单独介绍
     */
    public static <T> void assertThat(T actual, Matcher<? super T> matcher)
}
注意 上面每一个方法,都会有一个多一个参数的方法,这个参数为:String message。意思就是错误的情况下,我们可以输出我们自定义的message
示例
   //这个就表示 结果 != 预期 的情况下,抛出的AssertionError 信息是我们指定的message
   static public void assertEquals(String message,Object expected, Object actual)
上面还有一个方法需要单独介绍,那就是assertThat方法。
三、assertThat方法
大家习惯把assertThat理解成新断言,因为上面所以的功能方法,都可以通过assertThat这一个方法来实现。
1、基本语法
assertThat 的基本语法如下:
assertThat( [value], [matcher statement] );
value 是接口返回信息中,我们想要测试的变量值
matcher statement: 是使用Hamcrest匹配符来表达的对前面变量所期望的值的声明,如果value值与matcher statement所表达的期望值相符,则测试成功,否则测试失败。
2、基本使用
字符串匹配符
  String n = "xiao";
// containsString:字符串变量中包含指定字符串时,测试通过
assertThat(n, containsString("xiao"));
// startsWith:字符串变量以指定字符串开头时,测试通过
assertThat(n, startsWith("xi"));
// endsWith:字符串变量以指定字符串结尾时,测试通过
assertThat(n, endsWith("ao"));
// euqalTo:字符串变量等于指定字符串时,测试通过
assertThat(n, equalTo("xiao"));
// equalToIgnoringCase:字符串变量在忽略大小写的情况下等于指定字符串时,测试通过
assertThat(n, equalToIgnoringCase("xiao"));
// equalToIgnoringWhiteSpace:字符串变量在忽略头尾任意空格的情况下等于指定字符串时,测试通过
assertThat(n, equalToIgnoringWhiteSpace(" xiao   "));
int匹配符
int s = 1;
// allOf:所有条件必须都成立,测试才通过(大于1同时小于3)
assertThat(s, allOf(greaterThan(1), lessThan(3)));
// anyOf:只要有一个条件成立,测试就通过 (大于1或者小于2)
assertThat(s, anyOf(greaterThan(1), lessThan(2)));
// anything:无论什么条件,测试都通过
assertThat(s, anything());
// is:变量的值等于指定值时,测试通过
assertThat(s, is(2));
// not:和is相反,变量的值不等于指定值时,测试通过
assertThat(s, not(1));
double匹配符
double d = 1D;
// closeTo:浮点型变量的值在3.0±0.5范围内,测试通过
assertThat(d, closeTo(3.0, 0.5));
// greaterThan:变量的值大于指定值时,测试通过
assertThat(d, greaterThan(3.0));
// lessThan:变量的值小于指定值时,测试通过
assertThat(d, lessThan(3.5));
// greaterThanOrEuqalTo:变量的值大于等于指定值时,测试通过
assertThat(d, greaterThanOrEqualTo(3.3));
// lessThanOrEqualTo:变量的值小于等于指定值时,测试通过
assertThat(d, lessThanOrEqualTo(3.4));
集合匹配符
List<String> list = new ArrayList();
// hasItem:Iterable变量中含有指定元素时,测试通过
assertThat(list, hasItem("xiao"));
Map<String, String> m = new HashMap<>();
// hasEntry:Map变量中含有指定键值对时,测试通过
assertThat(m, hasEntry("xi", "xiao"));
// hasKey:Map变量中含有指定key时,测试通过
assertThat(m, hasKey("x"));
// hasValue:Map变量中含有指定value值时,测试通过
assertThat(m, hasValue("x"));
四、测试
这里对于老断言,和新断言各测试5个。
1、老断言
示例
public class TestServiceImplTest {

    @Test
    public void test1() {
        String str = "xiao";
        assertEquals(str, "xiaoniao");//不相等,所以错误
    }
    @Test
    public void test2() {
        assertFalse(Boolean.TRUE); //不是false,所以错误
    }
    @Test
    public void test3() {
       fail("直接是错误"); //直接是错误
    }
    @Test
    public void test4() {
        assertNull("xiao"); //不为空所以为错误
    }
    @Test
    public void test5() {
        assertNotNull("xiao");//不为空,所以为正确
    }
}
这里应该只有第5个测试用例通过,前面4个都不通过的,我们在来看实际运行结果

与实际相符,前面4个,测试用例不通过。而且可以看到第3个是我们自定义错误信息,在控制台也打印出来了。
2、新断言
示例
import org.assertj.core.util.Lists;
import org.junit.Test;
import java.util.HashMap;
import java.util.List;
import java.util.Map;
import static org.hamcrest.CoreMatchers.anyOf;
import static org.hamcrest.Matchers.*;
import static org.hamcrest.core.Is.is;
import static org.junit.Assert.assertThat;

public class TestServiceImplTest {

    @Test
    public void test1() {
        String str = "xiao";
        assertThat("这两字符串不相等",str, is("xiaoniao"));//不相等,所以错误
    }
    @Test
    public void test2() {
        int s = 1;
        assertThat(s, anyOf(greaterThan(1), lessThan(2)));//满足 大于1或者小于2 所以正确
    }
    @Test
    public void test3() {
        double d = 1D;
        assertThat(d, allOf(greaterThanOrEqualTo(1D),lessThan(2D)));//满足大于等于1 并且 小于2 所以正确
    }
    @Test
    public void test4() {
        List<String> list = Lists.newArrayList("xiao","zhong","da");
        assertThat(list, hasItem("xiao"));  //包含xiao 所以正确
    }
    @Test
    public void test5() {
        Map<String, String> map = new HashMap<>();
        map.put("xiao", "xiao");
        assertThat(map, hasKey("xiao")); //该map包含该key,所以正确
    }
}
这里应该只有第1个测试用例不通过,其它都是通过的,我们在来看实际运行结果

符合预期。

 浙公网安备 33010602011771号