typescript打包成类库 typescript编译成一个文件
一、typeScript安装以及基础编译
npm i -g typescript
安装完,进入ts文件的项目目录下,在命令行执行 tsc hello.ts(hello.ts是ts文件,执行这个命令可以把ts文件编译为hello.js文件)
tsc hello.ts

这个命令,ts文件里的代码每改变一次,需要执行一次。
如果要实时编译 需要 执行以下命令
tsc hello.ts -w
上面这种方法,只是针对单个文件。如果我们需要对批量的ts文件,进行实时编译,那么我们就需要在根目录下创建一个tsconfig.js文件
二、ts的tsconfig.json配置文件
// npm init -y  对项目进行初始化,在项目下生成package.json
// npm i -D webpack webpack-cli typescript ts-loader  可以生成node_modules
// npm i -D html-webpack-plugin

// tsc -w

// npm i -D webpack-dev-server  内置服务器,自动刷新
// npm i -D clean-webpack-plugin
// npm i -D @babel/core @babel/preset-env babel-loader core-js   适配不同的浏览器
// npm i -D postcss postcss-loader postcss-preset-env

{
    // include代表需要编译哪些文件;路径:两个**,代表当前文件下的所有目录,一个*代表当前文件夹下的所有文件
    "include": [
        "./src/**/*"
    ],

    // 不需要被编译的文件
    "exclude": [
        "./src/hello/**/*"
    ],

    // 定义被继承得配置文件
    // "extends":"",

    // 需要编译的文件,一个一个放这里;
    // "files": [

    // ],

    // 编译器的选项
    "compilerOptions": {

        // 用來指定ts被编译的ES的版本  "target":"esnext"这是最新版本
        "target": "ES6",

        // 指定要使用的模块化规范
        // "module": "es2015",
        // "module":"CommonJS"
        "module": "system",

        // 用来指定项目中用到的库
        "lib": [
            "DOM",
            "ES6"
        ],

        // 用来指定编译后文件所在的目录,编译后的文件放在哪
        "outDir": "./dist",

        // 所有全局作用域中的代码合并为一个文件,如果要使用模块化,必须这么设置模块化"module":"system"
        "outFile": "./dist/app.js",

        // 是否对js文件进行编译,默认是false
        "allowJs": true,

        // 检查js代码是否符合逻辑规范,默认是false
        "checkJs": true,

        //是否移除注释
        "removeComments": true,

        // 不生成编译后的文件,只是执行过程,只是检查语法
        "noEmit": false,

        //当有错误的时候不生成编译后的文件
        "noEmitOnError": true,

        //所有严格检查的总开关
        "strict": false,

        // 用来设置编译后的文件,是否采用严格模式
        "alwaysStrict": true,

        // 不允许出现隐式的any类型
        "noImplicitAny": true,

        // 不允许出现隐式的this
        "noImplicitThis": true,

        // 严格的检查空值  例:div不存在,在获取dom的时候
        "strictNullChecks": true,

    }

}
三、使用webpack打包
1、安装依赖
npm install webpack webpack-cli typescript ts-loader --save -dev
2、webpack配置webpack.config.js
// 引入一个包
const path = require("path");
// 引入html文件
const HTMLWebpackPlugin = require('html-webpack-plugin');
// 引入clean插件
const { CleanWebpackPlugin } = require('clean-webpack-plugin')


// webpack中的所有配置信息,都应该写在这里
module.exports = {

    // 指定入口文件
    entry: "./src/index.ts",

    // 指定打包文件所在目录
    output:{

        // 指定打包文件的目录
        path:path.resolve(__dirname,'dist'),

        // 打包后文件的文件名
        filename:"bundle.js",

        // 告诉webpack不适用箭头
        environment:{
            arrowFunction:false
        }
    },

    //指定webpack打包时要是用的模块
    module:{
        // 指定要加载的规则
        "rules":[
            {
                // test指定的是规则生效的文件
                test:/\.ts$/,
                //要使用的loader
                use:[
                    // 配置babel
                    {
                        // 指定加載器
                        loader: "babel-loader",
                        // 设置babel
                        options: {

                            // 设置预定义的环境
                            presets:[
                                [
                                    // 指定环境的插件
                                    "@babel/preset-env",

                                    // 配置信息
                                    {

                                        // 要兼容的目标浏览器
                                        targets:{
                                            "chrome":"88",
                                        },

                                        // 指定corejs版本
                                        "corejs":"3",

                                        // 使用corejs的方式  按需加载
                                        "useBuiltIns":"usage"

                                    }
                                ]
                            ]

                        }
                    },
                    'ts-loader'
                ],
                // 要排除的文件
                exclude:/node-modules/

            },
            // 设置less文件的处理
            {
                test:/\.less$/,
                use:[//从下往上执行
                    "style-loader",
                    "css-loader",
                    // 引入postcss配置
                    {
                        loader:"postcss-loader",
                        options:{
                            postcssOptions:{
                                plugins:[
                                    "postcss-preset-env",
                                    {
                                        browsers:'last 2 versions'
                                    }
                                ]
                            }
                        }
                    },
                    "less-loader"
                ]
            }
        ]
    },

    // 配置webpack插件
    plugins:[
        new CleanWebpackPlugin(),
        new HTMLWebpackPlugin({
            // title:"这是一个自定义的title"
            template:'./src/index.html'
        })
    ],

    // 用来设置那些后缀名可以设置引用模块
    resolve:{
        extensions:['.ts','.js']
    }

}
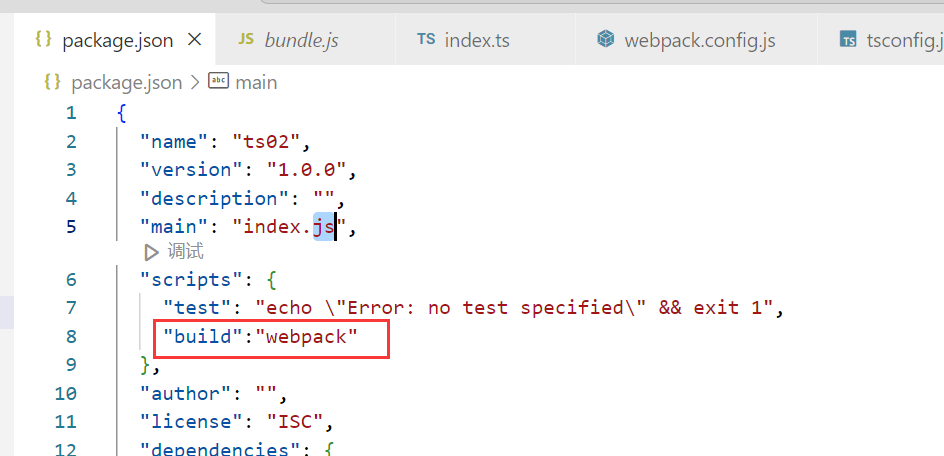
3、package.json添回执行脚本

4、在终端执行命令
npm run build


【推荐】国内首个AI IDE,深度理解中文开发场景,立即下载体验Trae
【推荐】编程新体验,更懂你的AI,立即体验豆包MarsCode编程助手
【推荐】抖音旗下AI助手豆包,你的智能百科全书,全免费不限次数
【推荐】轻量又高性能的 SSH 工具 IShell:AI 加持,快人一步
· TypeScript + Deepseek 打造卜卦网站:技术与玄学的结合
· 阿里巴巴 QwQ-32B真的超越了 DeepSeek R-1吗?
· 【译】Visual Studio 中新的强大生产力特性
· 【设计模式】告别冗长if-else语句:使用策略模式优化代码结构
· 10年+ .NET Coder 心语 ── 封装的思维:从隐藏、稳定开始理解其本质意义
2022-10-13 Vue3动态路由