net core3.1 + signalr + Vue
一、前端用MVC视图
1、新建.net core3.1项目
2、添加nuget添加Microsoft.AspNetCore.SignalR引用
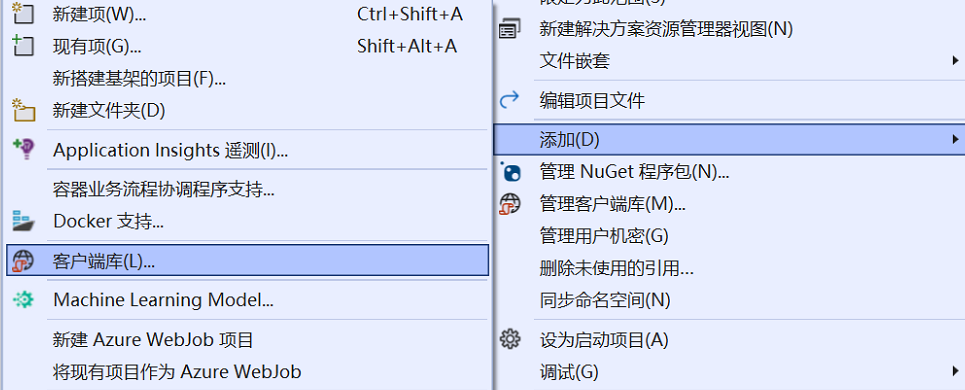
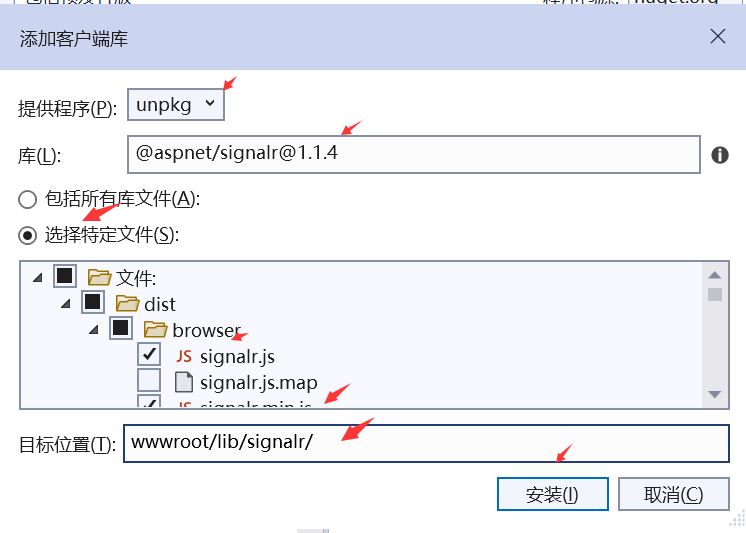
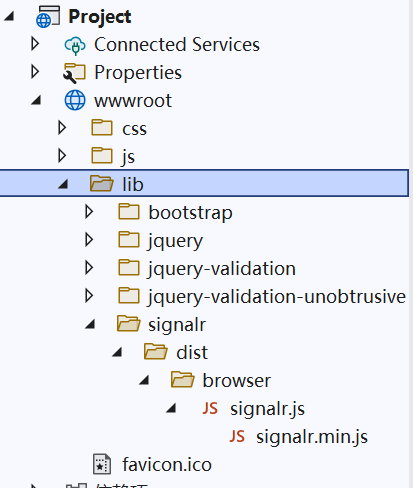
3、添回signalr.js


4、添加类ChatMessageInfo

1 namespace Project.Model
2 {
3     public class ChatMessageInfo
4     {
5         public string UserName { get; set; }
6         public string Message { get; set; }
7     }
8 }
5、添加连接类ChatHub

 1 using Microsoft.AspNetCore.SignalR;
 2 using Project.Model;
 3 using System.Threading.Tasks;
 4
 5 namespace Project
 6 {
 7     public class ChatHub:Hub
 8     {
 9         public override Task OnConnectedAsync()
10         {
11             string connectionId = this.Context.ConnectionId;
12             return base.OnConnectedAsync();
13         }
14
15
16         /// <summary>
17         /// 客户端调用方法
18         /// </summary>
19         /// <param name="data"></param>
20         /// <returns></returns>
21         public Task SendMessage(ChatMessageInfo data)
22         {
23             //服务端返回是调用方法
24             return Clients.All.SendAsync("ReceiveMessage", data);
25         }
26
27         public Task SendMessageToCaller(string message)
28         {
29             return Clients.Caller.SendAsync("ReceiveMessage", message);
30         }
31
32         public Task SendMessageToGroup(string message)
33         {
34             return Clients.Group("SignalR Users").SendAsync("ReceiveMessage", message);
35         }
36
37     }
38 }
6、修改Home/Index的视图index.cshtml

 1 @{
 2     ViewData["Title"] = "测试SignalR";
 3 }
 4
 5     <div class="text-center">
 6         <ul class="form-group" id="messagesListUl" style="margin-bottom:20px"></ul>
 7
 8         <form>
 9             <div class="form-group">
10                 <label for="username">key:</label>
11                 <input type="text" class="form-control" id="username" name="username">
12             </div>
13             <div class="form-group">
14                 <label for="msgcontent">Value:</label>
15                 <textarea rows="5" cols="20" id="msgcontent" name="msgcontent" class="form-control"></textarea>
16             </div>
17             <input type="button" onclick="btnSendMsg()" value="发送">
18         </form>
19
20
21     </div>
22     <script type="text/javascript" src="~/lib/jquery/dist/jquery.min.js"></script>
23 <script type="text/javascript" src="~/lib/signalr/dist/browser/signalr.min.js"></script>
24 <script>
25         const connection = new signalR.HubConnectionBuilder()
26         .withUrl("/ChatHub")
27         .configureLogging(signalR.LogLevel.Information)
28         .build();
29
30          connection.start().then(function(){
31                             console.log("连接成功");
32                         }).catch(function(ex){
33                             console.log("连接失败"+ex);
34                             //SignalR JavaScript 客户端不会自动重新连接,必须编写代码将手动重新连接你的客户端
35                             setTimeout(() => start(), 5000);
36                         });
37
38
39     async function start() {
40         try {
41             await connection.start();
42             console.log("connected");
43         } catch (err) {
44             console.log(err);
45             setTimeout(() => start(), 5000);
46         }
47     };
48
49      connection.onclose(async () => {
50         start();
51     });
52
53
54     //绑定事件("ReceiveMessage"和服务器端的SendMessage方法中的第一个参数一致)
55     //服务器端调用客户端
56     connection.on("ReceiveMessage", function (data) {
57         alert("返回");
58         const li = document.createElement("li");
59         li.innerText = data.userName + " : " + data.message;
60         document.getElementById("messagesListUl").appendChild(li);
61     });
62     //调用服务器端
63     function btnSendMsg() {
64         alert(11);
65         var UserName = $.trim($("#username").val());
66         var Message = $.trim($("#msgcontent").val());
67
68         connection.invoke("SendMessage", {UserName,Message}).catch(err => console.error("发送失败:"+err.toString()));
69     }
70
71 </script>
7、修改Startup.cs,配置跨域和注册ChatHub

 1 using Microsoft.AspNetCore.Builder;
 2 using Microsoft.AspNetCore.Hosting;
 3 using Microsoft.Extensions.Configuration;
 4 using Microsoft.Extensions.DependencyInjection;
 5 using Microsoft.Extensions.Hosting;
 6 using System;
 7 using System.Collections.Generic;
 8 using System.Linq;
 9 using System.Threading.Tasks;
10
11 namespace Project
12 {
13     public class Startup
14     {
15         public Startup(IConfiguration configuration)
16         {
17             Configuration = configuration;
18         }
19
20         public IConfiguration Configuration { get; }
21
22         // This method gets called by the runtime. Use this method to add services to the container.
23         public void ConfigureServices(IServiceCollection services)
24         {
25             //services.AddRazorPages();
26             services.AddControllersWithViews();
27             //运行跨域配置
28             services.AddCors(options => options.AddPolicy("CorsPolicy",
29             builder =>
30             {
31                 builder.AllowAnyMethod().AllowAnyHeader()
32                        .WithOrigins("http://localhost:5000")
33                        .AllowCredentials();
34             }));
35
36             services.AddSignalR();
37         }
38
39         // This method gets called by the runtime. Use this method to configure the HTTP request pipeline.
40         public void Configure(IApplicationBuilder app, IWebHostEnvironment env)
41         {
42             if (env.IsDevelopment())
43             {
44                 app.UseDeveloperExceptionPage();
45             }
46             else
47             {
48                 app.UseExceptionHandler("/Error");
49             }
50
51             app.UseStaticFiles();
52
53             app.UseRouting();
54
55             app.UseAuthorization();
56             app.UseCors("CorsPolicy");
57
58             app.UseEndpoints(endpoints =>
59             {
60                 endpoints.MapHub<ChatHub>("/ChatHub");
61                 endpoints.MapControllerRoute(
62                    name: "default",
63                    pattern: "{controller=Home}/{action=Index}/{id?}");
64                 //endpoints.MapRazorPages();
65             });
66         }
67     }
68 }
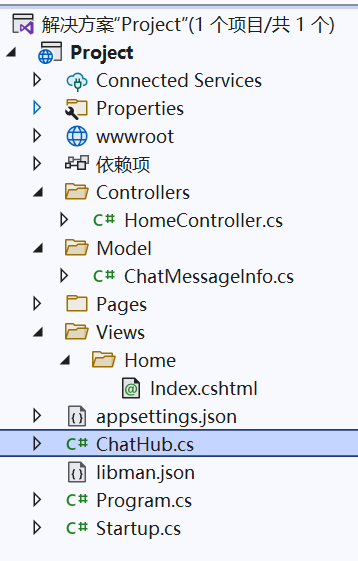
8、项目的目录结构

9、运行程序,设断点查看
二、前端用VUE
1、创建VUE项目
2、项目入引入signalr包
npm install @aspnet/signalr
3、修改Home.vue的代码

 1 <template>
 2  <div class="home">
 3     <h1>前端演示SignalR</h1>
 4     <input v-model="user" type="text" />
 5     <input v-model="message" type="text" />
 6     <button @click="sendAll">发送全部</button>
 7     <button @click="sendOwn">对自己发送</button>
 8     <div>
 9       <ul v-for="(item ,index) in messages" v-bind:key="index +'itemMessage'">
10         <li>{{item.user}} says {{item.message}}</li>
11       </ul>
12     </div>
13   </div>
14 </template>
15
16 <script>
17 import * as signalR from "@aspnet/signalr";
18 export default {
19   name: 'HelloWorld',
20   data () {
21     return {
22       user: "",//用户
23       message: "",//消息
24       connection: "",//signalr连接
25       messages: []//返回消息
26     }
27   },
28   methods:{
29     sendAll: function() {
30        let params = {
31         user: this.user,
32         message: this.message
33       };
34       this.connection
35         .invoke("SendMessage", params)
36         .catch(function(err) {
37           return console.error(err);
38         });
39     },
40      //只给自己发送消息
41     sendOwn: function() {
42       this.connection
43         .invoke("SendMessageToCaller", this.message)
44         .catch(function(err) {
45           return console.error(err);
46         });
47     }
48   },
49   created: function() {
50     let thisVue = this;
51     this.connection = new signalR.HubConnectionBuilder()
52       .withUrl("http://localhost:5000/chathub", {
53         skipNegotiation: true,
54         transport: signalR.HttpTransportType.WebSockets
55       })
56       .configureLogging(signalR.LogLevel.Information)
57       .build();
58       console.log(this.connection)
59     this.connection.on("ReceiveMessage", function(user, message) {
60       thisVue.messages.push({ user, message });
61       console.log({ user, message });
62     });
63     this.connection.start();
64   }
65 }
66 </script>
67
68 <!-- Add "scoped" attribute to limit CSS to this component only -->
69 <style scoped>
70 h1, h2 {
71   font-weight: normal;
72 }
73 ul {
74   list-style-type: none;
75   padding: 0;
76 }
77 li {
78   display: inline-block;
79   margin: 0 10px;
80 }
81 a {
82   color: #42b983;
83 }
84 </style>
4、为了调试方便,将之前Index.cshtml的代码注释掉
5、运行vue项目
npm run start


【推荐】国内首个AI IDE,深度理解中文开发场景,立即下载体验Trae
【推荐】编程新体验,更懂你的AI,立即体验豆包MarsCode编程助手
【推荐】抖音旗下AI助手豆包,你的智能百科全书,全免费不限次数
【推荐】轻量又高性能的 SSH 工具 IShell:AI 加持,快人一步
· TypeScript + Deepseek 打造卜卦网站:技术与玄学的结合
· Manus的开源复刻OpenManus初探
· AI 智能体引爆开源社区「GitHub 热点速览」
· 三行代码完成国际化适配,妙~啊~
· .NET Core 中如何实现缓存的预热?