

用 20 行 python 代码实现人脸识别!
阅读文本大概需要 11分钟。
今天给大家介绍一个世界上最简洁的人脸识别库 face_recognition,你可以使用 Python 和命令行工具进行提取、识别、操作人脸。
基于业内领先的 C++ 开源库 dlib 中的深度学习模型,用 Labeled Faces in the Wild 人脸数据集进行测试,有高达99.38%的准确率。
1.安装
最好是使用 Linux 或 Mac 环境来安装,Windows 下安装会有很多问题。在安装 face_recognition 之前你需要先安装以下几个库,注意顺序!
1.1 先安装 cmake 和 boost
-
pip install cmake
-
pip install boost
复制
1.2 安装 dlib
pip install dlib
复制
此处安装可能要几分钟。如安装出错,建议使用 whl 文件来安装 下载地址:https://pypi.org/simple/dlib/
1.3 安装 face_recognition
face_recongnition 一般要配合 opencv 一起使用
-
pip install face_recognition
-
pip install opencv-python
复制
2. 人脸识别
比如这里总共有三张图片,其中有两张已知,第三张是需要识别的图片

首先获取人脸中的信息
-
kobe_image = face_recognition.load_image_file("kobe.jpg") # 已知科比照片
-
jordan_image = face_recognition.load_image_file("jordan.jpeg") # 已知乔丹照片
-
unknown_image = face_recognition.load_image_file("unkown.jpeg") # 未知照片
-
-
kobe_face_encoding = face_recognition.face_encodings(kobe_image)[0]
-
jordan_face_encoding = face_recognition.face_encodings(jordan_image)[0]
-
unknown_face_encoding = face_recognition.face_encodings(unknown_image)[0]
复制
代码中前三行分别是加载三张图片文件并返回图像的 numpy 数组,后三行返回图像中每个面部的人脸编码
然后将未知图片中的人脸和已知图片中的人脸进行对比,使用 compare_faces() 函数, 代码如下:
-
known_faces = [
-
kobe_face_encoding,
-
jordan_face_encoding
-
]
-
results = face_recognition.compare_faces(known_faces, unknown_face_encoding) # 识别结果列表
-
print("这张未知照片是科比吗? {}".format(results[0]))
-
print("这张未知照片是乔丹吗? {}".format(results[1]))
复制
运行结果如下:

不到二十行代码,就能识别出人脸是谁,是不是 so easy!
3. 人脸标注
仅仅识别图片中的人脸总是感觉差点什么,那么将识别出来的人脸进行姓名标注是不是更加有趣~
已知图片的识别和前面代码基本是一样的,未知图片代码多了人脸位置的识别,并使用了face_locations() 函数。代码如下:
-
face_locations = face_recognition.face_locations(unknown_image)
-
face_encodings = face_recognition.face_encodings(unknown_image, face_locations)
复制
函数传入两个参数,返回以上,右,下,左固定顺序的脸部位置列表的作用是将已知脸部位置和未知面部编码进行比较,得到欧式距离~~~具体是什么我也不知道,距离就相当于相识度。

函数说明:face_distance(face_encodings, face_to_compare)
face_encodings:已知的面部编码 face_to_compare:要比较的面部编码
本次图片前面两张没有变化,第三张换成了科比和乔丹的合影,最终运行之后结果如下:

左边是原图,右边是识别后自动标注出来的图片。
-
import face_recognition
-
from PIL import Image, ImageDraw
-
import numpy as np
-
-
-
def draws():
-
kobe_image = face_recognition.load_image_file("kobe.jpg")
-
kobe_face_encoding = face_recognition.face_encodings(kobe_image)[0]
-
-
jordan_image = face_recognition.load_image_file("jordan.jpeg")
-
jordan_face_encoding = face_recognition.face_encodings(jordan_image)[0]
-
-
known_face_encodings = [
-
kobe_face_encoding,
-
jordan_face_encoding
-
]
-
known_face_names = [
-
"Kobe",
-
"Jordan"
-
]
-
-
unknown_image = face_recognition.load_image_file("two_people.jpeg")
-
-
face_locations = face_recognition.face_locations(unknown_image)
-
face_encodings = face_recognition.face_encodings(unknown_image, face_locations)
-
-
pil_image = Image.fromarray(unknown_image)
-
draw = ImageDraw.Draw(pil_image)
-
-
for (top, right, bottom, left), face_encoding in zip(face_locations, face_encodings):
-
matches = face_recognition.compare_faces(known_face_encodings, face_encoding)
-
-
name = "Unknown"
-
-
face_distances = face_recognition.face_distance(known_face_encodings, face_encoding)
-
best_match_index = np.argmin(face_distances)
-
if matches[best_match_index]:
-
name = known_face_names[best_match_index]
-
-
draw.rectangle(((left, top), (right, bottom)), outline=(0, 0, 255))
-
-
text_width, text_height = draw.textsize(name)
-
draw.rectangle(((left, bottom - text_height - 10), (right, bottom)), fill=(0, 0, 255), outline=(0, 0, 255))
-
draw.text((left + 6, bottom - text_height - 5), name, fill=(255, 255, 255, 255))
-
-
del draw
-
pil_image.show()
-
pil_image.save("image_with_boxes.jpg")

复制
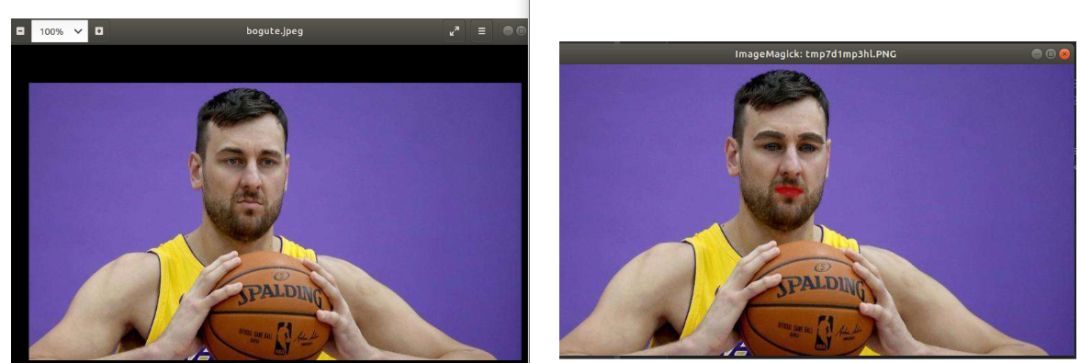
4. 给人脸美妆
这个功能需要结合 PIL 一起使用。用法都差不多,首先就是将图片文件加载到 numpy 数组中,然后将人脸中的面部所有特征识别到一个列表中
-
image = face_recognition.load_image_file("bogute.jpeg")
-
face_landmarks_list = face_recognition.face_landmarks(image)
复制
遍历列表中的元素,修改眉毛
-
d.polygon(face_landmarks['left_eyebrow'], fill=(68, 54, 39, 128))
-
d.polygon(face_landmarks['right_eyebrow'], fill=(68, 54, 39, 128))
-
d.line(face_landmarks['left_eyebrow'], fill=(68, 54, 39, 150), width=5)
-
d.line(face_landmarks['right_eyebrow'], fill=(68, 54, 39, 150), width=5)
复制
给人脸涂口红
-
d.polygon(face_landmarks['top_lip'], fill=(150, 0, 0, 128))
-
d.polygon(face_landmarks['bottom_lip'], fill=(150, 0, 0, 128))
-
d.line(face_landmarks['top_lip'], fill=(150, 0, 0, 64), width=8)
-
d.line(face_landmarks['bottom_lip'], fill=(150, 0, 0, 64), width=8)
复制
增加眼线
-
d.polygon(face_landmarks['left_eye'], fill=(255, 255, 255, 30))
-
d.polygon(face_landmarks['right_eye'], fill=(255, 255, 255, 30))
-
d.line(face_landmarks['left_eye'] + [face_landmarks['left_eye'][0]], fill=(0, 0, 0, 110), width=6)
-
d.line(face_landmarks['right_eye'] + [face_landmarks['right_eye'][0]], fill=(0, 0, 0, 110), wid=6)
复制
根据以上代码做了,我用实力不行,打球又脏的 "大嘴" 博格特来做演示!
左边是原图,右边是加了美妆后的效果


【推荐】国内首个AI IDE,深度理解中文开发场景,立即下载体验Trae
【推荐】编程新体验,更懂你的AI,立即体验豆包MarsCode编程助手
【推荐】抖音旗下AI助手豆包,你的智能百科全书,全免费不限次数
【推荐】轻量又高性能的 SSH 工具 IShell:AI 加持,快人一步
· 阿里最新开源QwQ-32B,效果媲美deepseek-r1满血版,部署成本又又又降低了!
· 开源Multi-agent AI智能体框架aevatar.ai,欢迎大家贡献代码
· Manus重磅发布:全球首款通用AI代理技术深度解析与实战指南
· 被坑几百块钱后,我竟然真的恢复了删除的微信聊天记录!
· 没有Manus邀请码?试试免邀请码的MGX或者开源的OpenManus吧