Vue3教程:Vue3.0 + Vant3.0 搭建种子项目
推荐一下本人近期维护的开源项目:

Spring Boot 开源电商项目(含商城端和后台管理系统):https://github.com/newbee-ltd/newbee-mall
Spring Boot + Vue3 前后端分离商城项目:https://github.com/newbee-ltd/newbee-mall-vue3-app
Vue 3.0 + Vite 2.0 + Vue-Router 4.0 + Element-Plus + Echarts 5.0 + Axios 开发的后台管理系统:https://github.com/newbee-ltd/vue3-admin
最近在用 Vue3 写一个开源的商城项目,开源后让大家也可以用现成的 Vue3 大型商城项目源码来练练手,目前处于开发阶段,过程中用到了 Vant3.0,于是就整理了这篇文章来讲一下如何使用 Vue3.0 + Vant 3.0 搭建种子项目。
前文回顾:《Vue3 来了,Vue3 开源商城项目重构计划正式启动!》
众所周知,Vue 3.0 发布已经有小一个月的时间了,但是市面上能作出快速相应的 Vue UI 组件库并不多,就我目前所知的有 Ant Design of Vue、Vant,这俩组件库迁移的是比较完善的,可能会有一些小遗漏,但是不影响大局,你可以去他们的 Github 仓库提 Issue。
接下来我将带大家手动搭建一个带有组件库 Vant、最新路由 Vue-Router 4.0、最新状态管理插件 Vuex 4.0 的一个 Vue 3.0 种子项目。
创建项目
创建项目有三种形式
- Vue-Cli
- Vite
- Webpack
本文将采用 Vite 创建项目,毕竟人家尤大辛辛苦苦写的一个打包工具,在非生产环境下,我们尽量去把玩最新的东西(不学是不可能的)。
我们按照官方文档给的教程来初始化项目,这里安利一个国内加速版的中文文档,官方给的中文版网址貌似是部署在国外的服务器,国内打开非常非常慢,十分影响学习。
使用 NPM:
$ npm init vite-app vant-v3
$ cd vant-v3
$ npm install
$ npm run dev
使用 yarn:
$ yarn create vite-app vant-v3
$ cd vant-v3
$ yarn
$ yarn dev
个人比较喜欢使用 yarn,因为比较快,喜欢 npm 的同学,建议添加淘宝镜像,用 cnpm 安装,同样也很快。
完成上述操作的过程中,我个人感觉就是非常快。
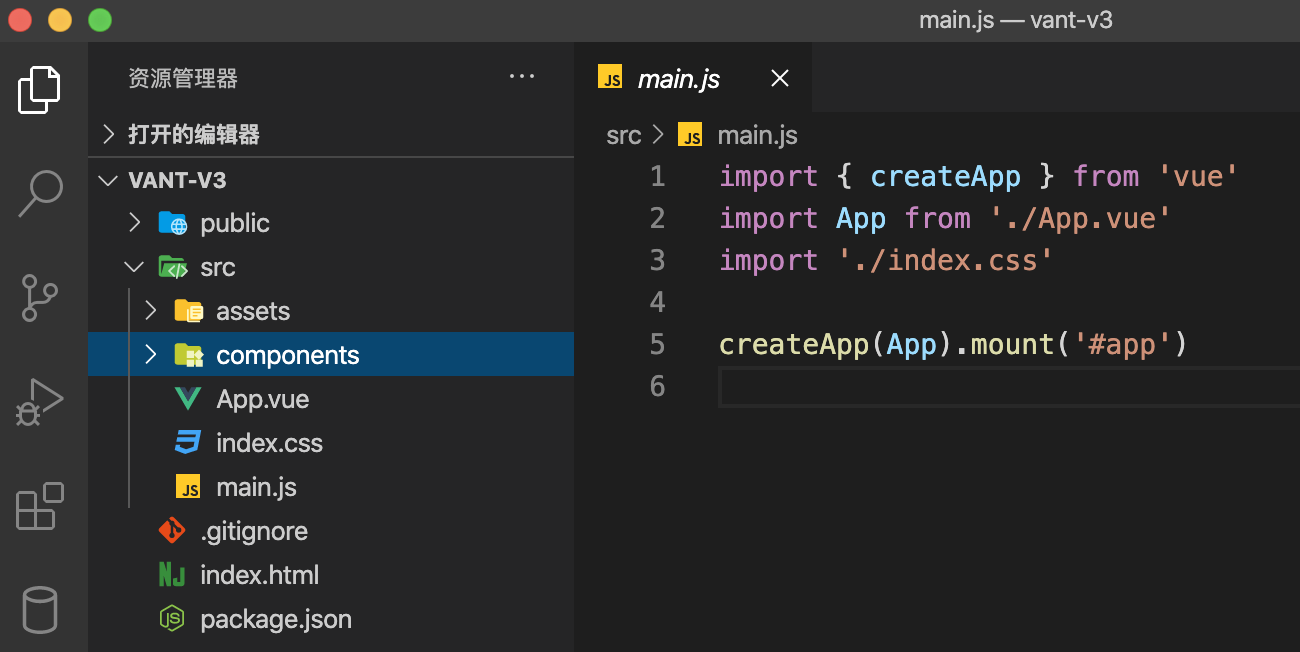
初始化项目目录如下所示:

细心和不细心的同学,都会发现入口文件好像变了。
没错,确实变了,V2 是初始化实例的形式,而 V3 是通过函数式风格。
// Vue2.0
new Vue({
  render: h => h(App)
}).$mount('#app')

// Vue3.0
import { createApp } from 'vue'
createApp(App).mount('#app')
添加路由 Vue-Router 4.0
尤大在发布正式版 Vue 3.0 后说过,周边插件还没有很好的适配更新。
确实,截止目前为止 Vue-Router 4.0 还是 beta.13,也就是说尽量不要在生产环境下使用 beta 版本的插件,或多或少还存在一些未知的小问题没有解决。
但是咱们平时玩耍自己的项目完全可以先睹为快,接下来我们安装一下路由插件。
yarn add vue-router@next
和 V2 一样,我们同样需要在 src 目录下新建 router 文件夹,添加 index.js 文件。
代码如下:
// src/router/index.js
import { createRouter, createWebHashHistory } from 'vue-router'
import Home from '../views/Home.vue'

// createRouter 创建路由实例
const router = createRouter({
  history: createWebHashHistory(), // hash模式:createWebHashHistory,history模式:createWebHistory
  routes: [
    {
      path: '/',
      component: Home
    }
  ]
})

// 抛出路由实例, 在 main.js 中引用
export default router
我们再新建一个 src/views/Home.vue 让 / 路径能渲染出内容:
<template>
  <div>我是十四</div>
</template>

<script>
export default {
}
</script>
紧接着在 App.vue 文件下添加 router-view 组件,渲染路由匹配到的页面组件:
<template>
<!-- 和 vue-router3 一样,展示路由的组件的地方 -->
  <router-view />
</template>

<script>

export default {
  name: 'App'
}
</script>
这里给大家解释一下 Vue-Router 3.x 和 Vue-Router 4.0 不一样的地方。
首先是声明路由实例的形式:
// Vue-Router 3.x
const router = new VueRouter({
  mode: 'history',
  base: process.env.BASE_URL,
  routes:  [
  	// 路由配置不变
  ]
})

// Vue-Router 4.0
const router = createRouter({
  history: createWebHashHistory(), // hash模式:createWebHashHistory,history模式:createWebHistory
  routes: [
    {
      path: '/',
      component: Home
    }
  ]
})
其次是如何使用它:
// Vue-Router 3.x
export default {
  methods: {
    goToHome() {
      this.$router.push('Home')
    }
  }
}

// Vue-Router 4.0
import { useRouter } from 'vue-router'
export default {
  setup() {
    const router = useRouter()
    const goToHome = () => router.push('Home')
    return { goToHome }
  }
}
运行 yarn dev 打开浏览器如下图所示:

添加 Vant UI 组件库
Vant 已经推出 3.0 版本,我们去官网可以看到如何安装。
不会没事,我教你呀。
第一步肯定是安装啦,代码如下:
yarn add vant@next -S
添加之后,我们再添加按需引入的插件(推荐使用按需引入,减少代码提及):
yarn add babel-plugin-import -D
在项目根目录添加 babel.config.js 如下所示:
module.exports = {
  plugins: [
    ['import', {
      libraryName: 'vant',
      libraryDirectory: 'es',
      style: true
    }, 'vant']
  ]
}
在 main.js 内引入一个组件,代码如下:
import { createApp } from 'vue'
import { Button } from 'vant';
import App from './App.vue'
import router from './router'
import 'vant/lib/index.css'; // 全局引入样式
import './index.css'

const app = createApp(App) // 创建实例

app.use(Button) // 注册组件
app.use(router)

app.mount('#app')
在 src/views/Home.vue 随便添加一个组件,代码如下:
<template>
  <div>我是十四</div>
  <van-button type="primary" size="large">大号按钮</van-button>
</template>

<script>
export default {
}
</script>
此时,刷新浏览器,效果如下图所示:

移动端 rem 适配
如果是做 PC 端的网页,无需做 rem 适配,但是做 H5 开发,rem 是需要做一下的,Vant 官方也为我们提供了方案,如下图所示:

咱们就按照官方为我们提供的方案进行适配,安装它们:
yarn add lib-flexible -S
yarn add postcss-pxtorem -D
这里
lib-flexible是网页做 html 的 font-size 适配用的,所以需要安装到 dependencies。而 postcss-pxtorem 是在编译的时候对 px 单位转换为 rem 单位时使用,所以安装到 devDependencies 便可。
安装好后,我们需要在 main.js 引入 lib-flexible,新增如下代码:
import { createApp } from 'vue'
import { Button } from 'vant';
import 'lib-flexible/flexible'
import App from './App.vue'
import router from './router'
import 'vant/lib/index.css'; // 全局引入样式
import './index.css'

const app = createApp(App) // 创建实例

app.use(Button) // 注册组件
app.use(router)

app.mount('#app')
接着我们需要为 px 单位转 rem 单位做配置。
起初我犯了一个错误,在根目录声明 .postcssrc.js 文件,但是目前 Vite 创建的项目已经不支持这种形式的配置文件了,而是需要 postcss.config.js 文件,配置内容如下:
// postcss.config.js
// 用 vite 创建项目,配置 postcss 需要使用 post.config.js,之前使用的 .postcssrc.js 已经被抛弃
// 具体配置可以去 postcss-pxtorem 仓库看看文档
module.exports = {
  "plugins": {
    "postcss-pxtorem": {
      rootValue: 37.5, // Vant 官方根字体大小是 37.5
      propList: ['*'],
      selectorBlackList: ['.norem'] // 过滤掉.norem-开头的class,不进行rem转换
    }
  }
}
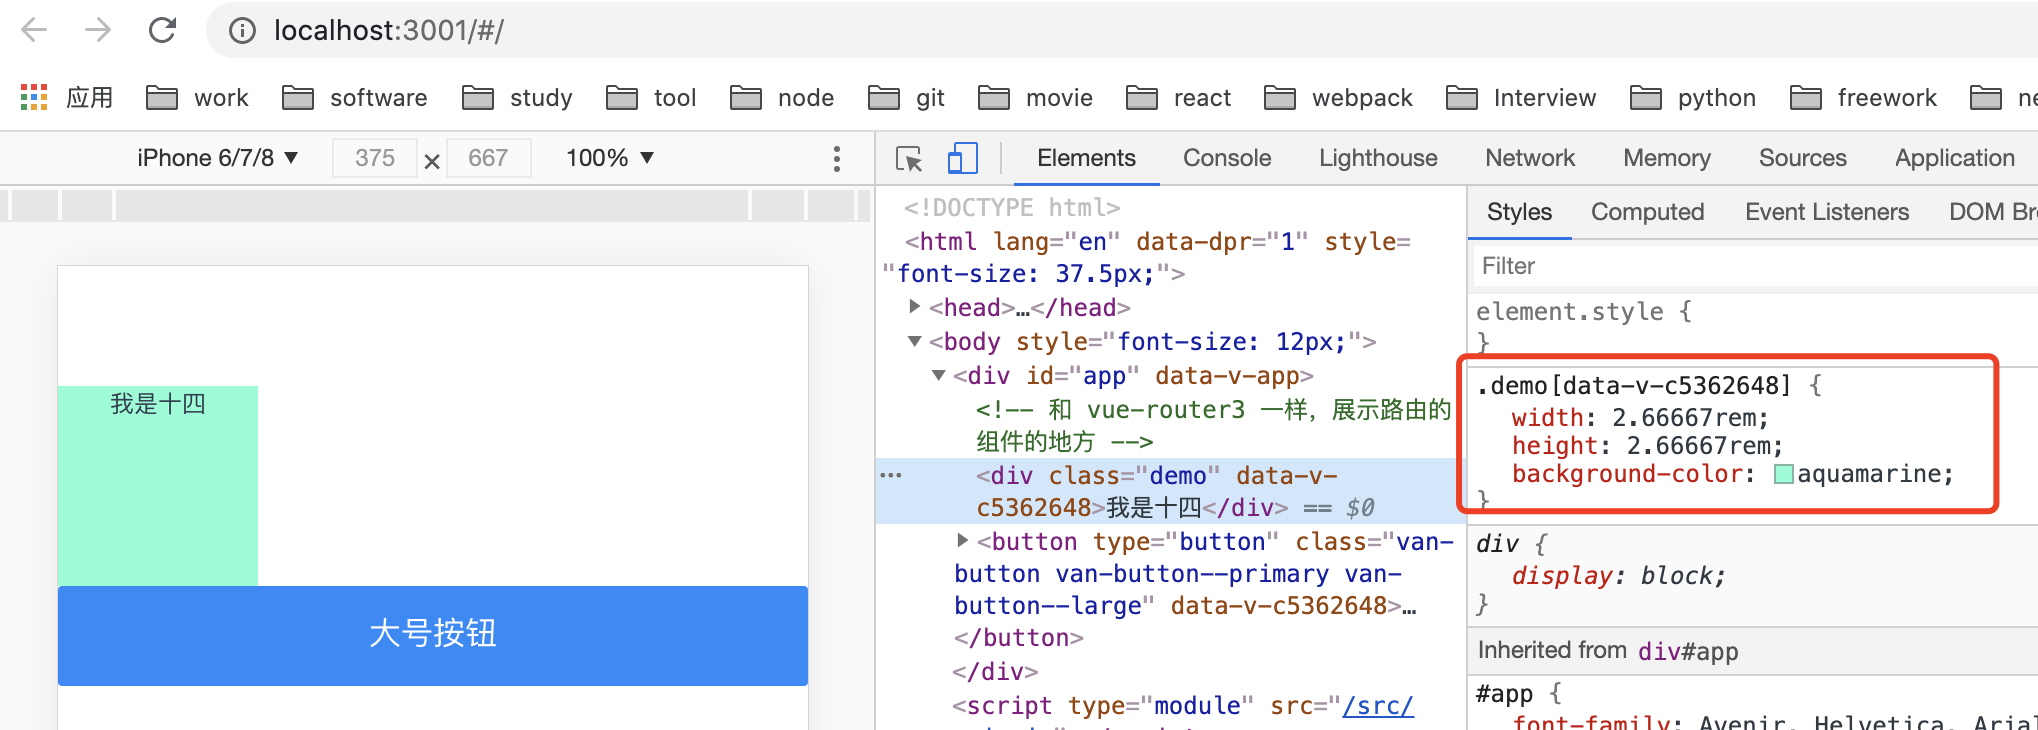
给 src/views/Home.vue 文件里的 div 一个样式,检查一下 rem 适配是否成功:
<template>
  <div class="demo">我是十四</div>
  <van-button type="primary" size="large">大号按钮</van-button>
</template>

<script>
export default {
}
</script>

<style scoped>
.demo {
  width: 100px;
  height: 100px;
  background-color: aquamarine;
}
</style>

如若是上图所示,说明配置已经生效了。
这里还有一个需要注意的小知识点:不需要 px 转 rem 的情况,可以使用大写的 PX 作为单位。
编译时不会将其转化为 rem 单位,也可以通过 selectorBlackList 属性声明的 .norem 前缀的 class 类名,同样也不会被转化。
结尾
以上是搭建 Vue3.0 + Vant3.0 + Vue-Router4.0 移动端种子项目的内容,源代码已经开源到 GitHub vue3-examples仓库中,仓库地址:https://github.com/newbee-ltd/vue3-examples,此仓库将不定期更新各种 Vue3.0 相关的知识及各种整合 Demo 及 Vue3 使用小技巧,大家可以关注一下,有什么建议也欢迎大家给我留言。
第一次,当它本可进取时,却故作谦卑;
第二次,当它空虚时,用爱欲来填充;
第三次,在困难和容易之间,它选择了容易;
第四次,它犯了错,却借由别人也会犯错来宽慰自己;
第五次,它自由软弱,却把它认为是生命的坚韧;
第六次,当它鄙夷一张丑恶的嘴脸时,却不知那正是自己面具中的一副;
第七次,它侧身于生活的污泥中虽不甘心,却又畏首畏尾。

 最近在用 Vue3 写一个开源的商城项目,开源后让大家也可以用现成的 Vue3 大型商城项目源码来练练手,目前处于开发阶段,过程中用到了 Vant3.0,于是就整理了这篇文章来讲一下如何使用 Vue3.0 + Vant 3.0 搭建种子项目。


【推荐】国内首个AI IDE,深度理解中文开发场景,立即下载体验Trae
【推荐】编程新体验,更懂你的AI,立即体验豆包MarsCode编程助手
【推荐】抖音旗下AI助手豆包,你的智能百科全书,全免费不限次数
【推荐】轻量又高性能的 SSH 工具 IShell:AI 加持,快人一步
· 记一次.NET内存居高不下排查解决与启示
· 探究高空视频全景AR技术的实现原理
· 理解Rust引用及其生命周期标识(上)
· 浏览器原生「磁吸」效果!Anchor Positioning 锚点定位神器解析
· 没有源码,如何修改代码逻辑?
· 分享4款.NET开源、免费、实用的商城系统
· 全程不用写代码,我用AI程序员写了一个飞机大战
· MongoDB 8.0这个新功能碉堡了,比商业数据库还牛
· 白话解读 Dapr 1.15:你的「微服务管家」又秀新绝活了
· 上周热点回顾(2.24-3.2)