我常用的tmux命令
tmux安装
各种类unix系统,都有打包好的二进制安装包,具体如下
| Platform | Install Command |
|---|---|
| Arch Linux | pacman -S tmux |
| Debian or Ubuntu | apt install tmux |
| Fedora | dnf install tmux |
| RHEL or CentOS | yum install tmux |
| macOS (using Homebrew | brew install tmux |
| macOS (using MacPorts) | port install tmux |
| openSUSE | zypper install tmux |
当然你也可以源码安装
详见:官方安装向导
tmux美化
花里胡哨的美化可以使用:oh my tmux
不过我不太喜欢,特别是修改了很多默认的快节奏,遇到了没有安装oh my tmux的电脑,就等于半残废了!
但是他的很多东西和配置还是可以参考的
我常用的几个命令和快捷键
| 命令/快捷键 | 描述 | 备注 |
| tmux | 创建新session | name是tmux默认生成的 |
| tmux new -s xxname | 新建时指定session名称 | |
| tmux ls | 查看已经存在的session列表 | |
| tmux a -t xxname | 连接指定的session | |
| <prefix> s | session列表 | |
| <prefix> $ | 关闭当前session | 如果当前session中的所有window都关闭了,当前session也会随之关闭 |
| <prefix> d | 分离当前session与terminal窗口 | |
| <prefix> c | 创建新窗口 | |
| <prefix> n | 下一个window | |
| <prefix> p | 上一个window | |
| <prefix> w | window窗口列表 | |
| <prefix> & | 关闭window | |
| <prefix> , | 重命名window | |
| <prefix> % | 左右分割pane | |
| <prefix> " | 上下分割pane | |
| <prefix> o | 切换到下一个pane | |
| <prefix> ! | 将pane升级为window | |
| <prefix> x | 关闭pane | |
| <prefix> z | 全屏pane/恢复原状 | |
| <prefix> [ | 进入复制模式 |
开启了鼠标模式可以直接用鼠标选择内容,并自动将选择内容放入缓冲区 有没有开启鼠标模式都可以,上、下、左、右、PgUp、PgDn、home和end按键移动光标位置到开始位置, ctrl+space,移动光标开始选择, alt+w 将选择的内容复制到缓冲区 注意,进入复制模式后,上面的所有按键都不需要加<prefix> |
| <prefix> PgUp | 进入复制模式并向上翻一页 | |
| <prefix> = | 缓存区列表 | |
| <prefix> ] | 粘贴最后一个缓存区内容 | |
| <prefix> t | 显示时间 | 花里胡哨,没啥用 |
| <prefix> ? | 命令列表 | 忘记快捷键了,现场学习下 |
| <prefix> : | 在session中输入命令 | 这些命令也可以在terminal窗口中 前面加上tmux 来执行 |
| kill-session | 终止当前session |
在terminal窗口中还可以使用 -t 指定要关闭的session tmux kill-session -t xxsessionname |
| set -g mouse on/off | 开启关闭鼠标模式 |
可以在session使用<prefix> :执行,也可以在terminal窗口中 加上tmux来执行 tmux1.8需要使用 set -g mode-mouse on/off set -g mouse-resize-pane on/off set -g mouse-select-pane on/off set -g mouse-select-window on/off |
| source-file ~/.tmux.conf | 生效配置文件 | 可以在session使用<prefix> :执行,也可以在terminal窗口中 加上tmux来执行 |
| show -g | 限制所有的配置项 | 可以在session使用<prefix> :执行,也可以在terminal窗口中 加上tmux来执行 |
| show -gv xx配置项 | 只显示xx配置项的值 | 可以在session使用<prefix> :执行,也可以在terminal窗口中 加上tmux来执行 |
命令在terminal窗口直接执行的例子
要限制所有的配置项
[liang ~]$ tmux show -g
assume-paste-time 1
base-index 0
bell-action any
bell-on-alert off
default-command ""
default-path ""
default-shell "/bin/bash"
...
一些小定制
上面说过的oh my tmux配置我没有用,但是里面的几个配置我感觉非常好,比如:
| 快捷键 | 描述 | 备注 |
| <prefix> m | 切换鼠标模式 | 开启鼠标模式后,系统的复制粘贴就不太好使了 |
| <prefix> e | 编辑.tmux.conf文件并生效 | |
| <prefix> r | 生效.tmux.conf文件 | |
| <prefix> y | 将缓存区内容复制到系统剪贴板 |
需要额外软件支持 linux:xsel mac: pbcopy windows: clip.exe |
果断抄过来
如果你看不懂下面的任何一行配置,就不要有任何修改,哪怕一个空格都不能少,因为空格也是有用的!
如果你看不懂下面的任何一行配置,就不要有任何修改,哪怕一个空格都不能少,因为空格也是有用的!
如果你看不懂下面的任何一行配置,就不要有任何修改,哪怕一个空格都不能少,因为空格也是有用的!
配置文件for tmux 1.8
# : << EOF
#
set -g history-limit 5000                 # boost history

# toggle mouse
bind m run "cut -c3- ~/.tmux.conf | sh -s _toggle_mouse"

# edit configuration
bind e new-window -n "~/.tmux.conf" "EDITOR=\${EDITOR//mvim/vim} && EDITOR=\${EDITOR//gvim/vim} && \${EDITOR:-vim} ~/.tmux.conf && tmux source ~/.tmux.conf && tmux display \"~/.tmux.conf sourced\""

# reload configuration
bind r source-file ~/.tmux.conf \; display '~/.tmux.conf sourced'

# copy to X11 clipboard
if -b 'command -v xsel > /dev/null 2>&1' 'bind y run -b "tmux save-buffer - | xsel -i -b"'
if -b '! command -v xsel > /dev/null 2>&1 && command -v xclip > /dev/null 2>&1' 'bind y run -b "tmux save-buffer - | xclip -i -selection clipboard >/dev/null 2>&1"'
# copy to macOS clipboard
if -b 'command -v pbcopy > /dev/null 2>&1' 'bind y run -b "tmux save-buffer - | pbcopy"'
if -b 'command -v reattach-to-user-namespace > /dev/null 2>&1' 'bind y run -b "tmux save-buffer - | reattach-to-user-namespace pbcopy"'
# copy to Windows clipboard
if -b 'command -v clip.exe > /dev/null 2>&1' 'bind y run -b "tmux save-buffer - | clip.exe"'
if -b '[ -c /dev/clipboard ]' 'bind y run -b "tmux save-buffer - > /dev/clipboard"'

#
# EOF
# _toggle_mouse() {
#     last=$(tmux show -gv mouse-select-pane)
#     #echo $last
#     new=""
#
#     if [ "$last" = "on" ]; then
#             new="off"
#     else
#             new="on"
#     fi
#
#     tmux set -g mode-mouse $new > /dev/null
#     tmux set -g mouse-resize-pane $new > /dev/null
#     tmux set -g mouse-select-pane $new > /dev/null
#     tmux set -g mouse-select-window $new > /dev/null
# }
#
# "$@"
配置文件for tmux 2+
# : << EOF
#
set -g history-limit 5000                 # boost history

# toggle mouse
bind m run "cut -c3- ~/.tmux.conf | sh -s _toggle_mouse"

# edit configuration
bind e new-window -n "~/.tmux.conf" "EDITOR=\${EDITOR//mvim/vim} && EDITOR=\${EDITOR//gvim/vim} && \${EDITOR:-vim} ~/.tmux.conf && tmux source ~/.tmux.conf && tmux display \"~/.tmux.conf sourced\""

# reload configuration
bind r source-file ~/.tmux.conf \; display '~/.tmux.conf sourced'

# copy to X11 clipboard
if -b 'command -v xsel > /dev/null 2>&1' 'bind y run -b "tmux save-buffer - | xsel -i -b"'
if -b '! command -v xsel > /dev/null 2>&1 && command -v xclip > /dev/null 2>&1' 'bind y run -b "tmux save-buffer - | xclip -i -selection clipboard >/dev/null 2>&1"'
# copy to macOS clipboard
if -b 'command -v pbcopy > /dev/null 2>&1' 'bind y run -b "tmux save-buffer - | pbcopy"'
if -b 'command -v reattach-to-user-namespace > /dev/null 2>&1' 'bind y run -b "tmux save-buffer - | reattach-to-user-namespace pbcopy"'
# copy to Windows clipboard
if -b 'command -v clip.exe > /dev/null 2>&1' 'bind y run -b "tmux save-buffer - | clip.exe"'
if -b '[ -c /dev/clipboard ]' 'bind y run -b "tmux save-buffer - > /dev/clipboard"'

#
# EOF
#
# _toggle_mouse() {
#   old=$(tmux show -gv mouse)
#   new=""
#
#   if [ "$old" = "on" ]; then
#     new="off"
#   else
#     new="on"
#   fi
#
#   tmux set -g mouse $new
# }
#
# "$@"
tmux命令自动attach
如果你用的不是zsh,而是bash,又想用zsh中tmux插件中的tmux自动attach功能
可以在.bashrc中增加下面的函数和别名
function _tmux_auto_attach() {
  if [[ -n "$@" ]]; then
    command tmux "$@"
    return $?
  fi

  local -a tmux_cmd
  tmux_cmd=(command tmux)

  # Try to connect to an existing session.
  ${tmux_cmd[@]} attach

  # If failed, just run tmux, fixing the TERM variable if requested.
  if [[ $? -ne 0 ]]; then
    ${tmux_cmd[@]} new-session
  fi
}

alias tmux=_tmux_auto_attach
生效下配置, 这是再执行tmux时,就会自动attach到一个session,而不是新建一个session
将内容复制到系统剪贴板
开启鼠标模式后,系统的复制粘贴就不太好使了
上面说的<prefix> y 只能是 tmux在本地运行时,将tmux缓冲区复制到tmux所在系统的粘贴板,如果你连上服务器,在服务器上运行tmux,此种方法就不太行了!
下面这种方法就不用区分tmux运行的机器时服务器还是本机了
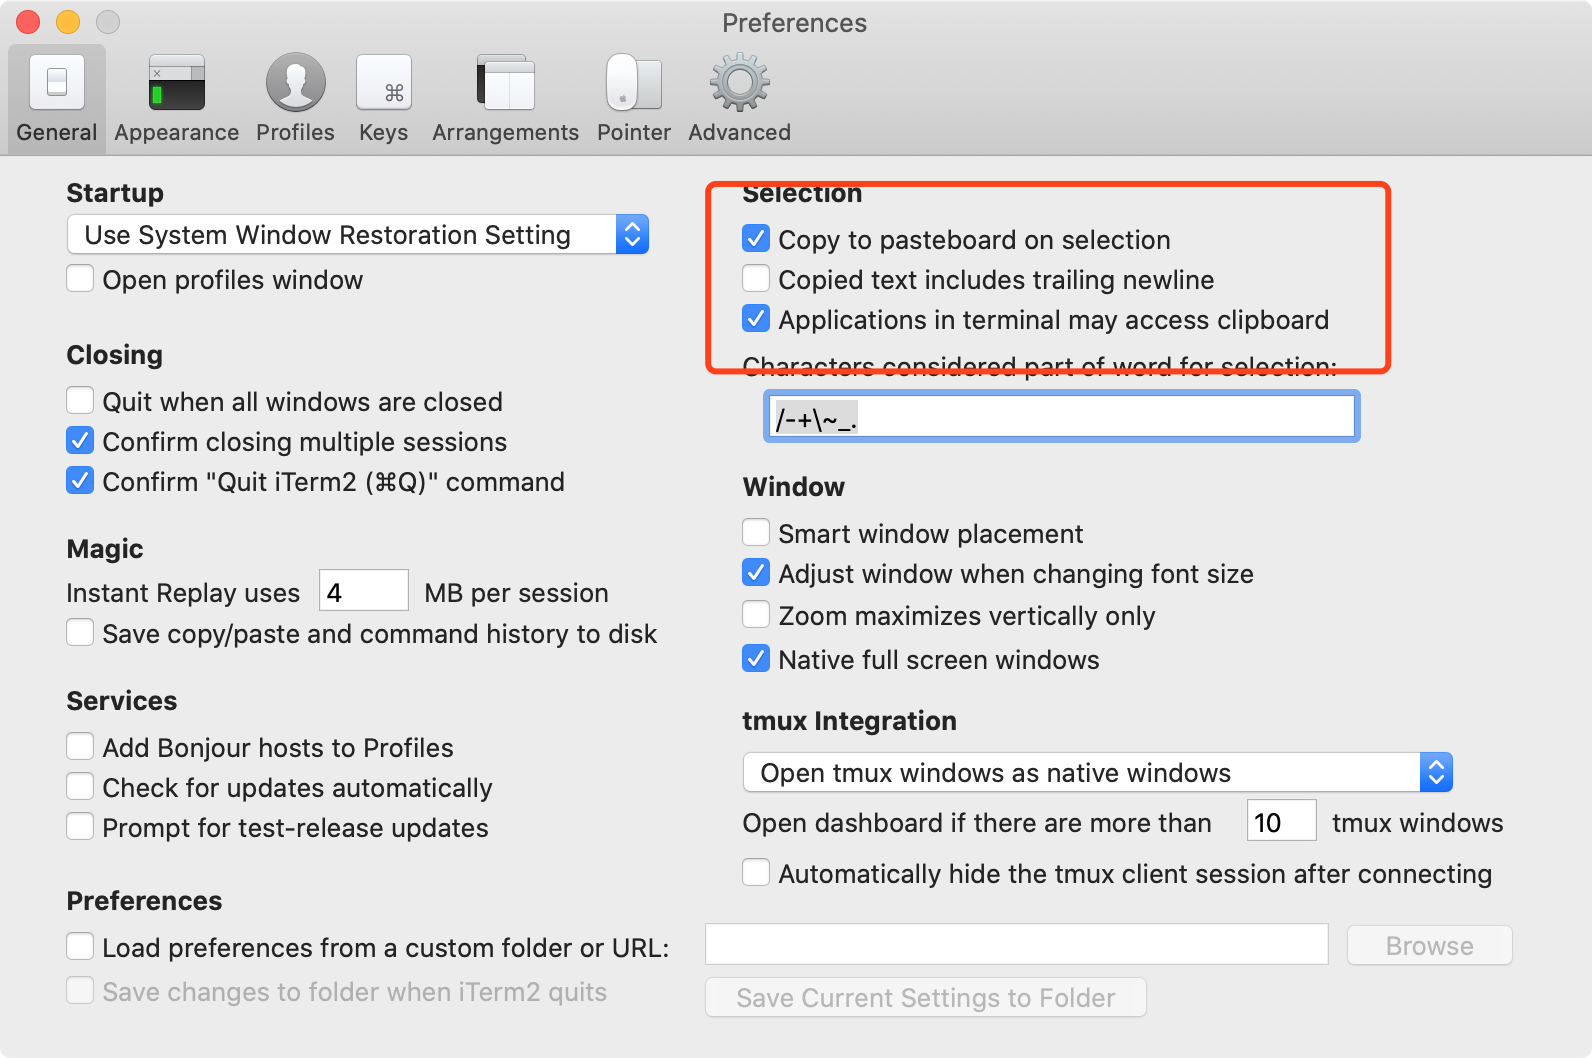
Mac 下如果用 iterm2 可以在 preference 下选择
Applications in terminal may access clipboard。
这一项,如下图, 选择内容会自动复制到剪贴板里, 直接command+v就可以了
参考
https://github.com/tmux/tmux/wiki/Installing

 浙公网安备 33010602011771号