2021/10/12智能家具嵌入式实训第三天 蜂鸣器+按键代码 (1)
完成昨天的蜂鸣器+按键+led代码
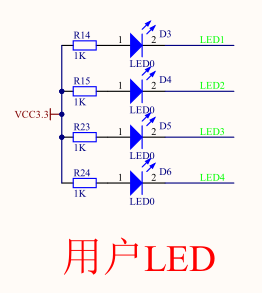
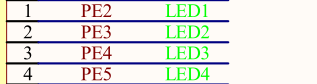
led:
原理图:
代码部分:
先定义led.h
 1  1 #ifndef __LED_H
 2  2 #define __LED_H
 3  3
 4  4 #include "stm32f10x.h"
 5  5 #include "delay.h"
 6  6
 7  7 /* 管脚宏定义*/
 8  8 #define LED1_PORT    GPIOE
 9  9 #define LED1_PIN    2
10 10 #define LED2_PORT    GPIOE
11 11 #define LED2_PIN    3
12 12 #define LED3_PORT    GPIOE
13 13 #define LED3_PIN    4
14 14 #define LED4_PORT    GPIOE
15 15 #define LED4_PIN    5
16 /* 操作宏定义 */
17 enum LED_CONDITION{OFF,ON};
18 #define LED1(x) (x)?GPIO_ResetBits(LED1_PORT,GPIO_Pin_2):GPIO_SetBits(LED1_PORT,GPIO_Pin_2) // 1 -- 打开  0 -- 关闭
19 #define LED2(x) (x)?GPIO_ResetBits(LED2_PORT,GPIO_Pin_3):GPIO_SetBits(LED2_PORT,GPIO_Pin_3)
20 #define LED3(x) (x)?GPIO_ResetBits(LED3_PORT,GPIO_Pin_4):GPIO_SetBits(LED3_PORT,GPIO_Pin_4)
21 #define LED4(x) (x)?GPIO_ResetBits(LED4_PORT,GPIO_Pin_5):GPIO_SetBits(LED4_PORT,GPIO_Pin_5)
enum:枚举 https://www.runoob.com/cprogramming/c-enum.html
#define LED1(x) (x)?GPIO_ResetBits(LED1_PORT,GPIO_Pin_2):GPIO_SetBits(LED1_PORT,GPIO_Pin_2) // 1 -- 打开 0 -- 关闭
#define又称宏定义,标识符为所定义的宏名,简称宏。
定义变量 LED1
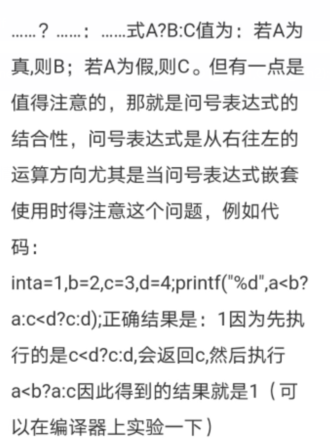
就是x是1执行第一种情况,是0执行第二种情况
x=1是假,A为假,则C
GPIO_SetBits(LED1_PORT,GPIO_Pin_2 打开
x=1是真,A为真,则B
GPIO_ResetBits(LED1_PORT,GPIO_Pin_2) 关闭
这里老师讲的设置led翻转
寄存器ODR就是控制对应引脚的高低电平,每组16位,与寄存器ODR的低16位一致,故若想让LED灯刚开始是灭的,需要输出高电平,那么就将对应的位置1即可,
#define LED1_TOGGLE (LED1_PORT->ODR ^= (1 << LED1_PIN))
#define LED2_TOGGLE (LED2_PORT->ODR ^= (1 << LED2_PIN))
#define LED3_TOGGLE (LED3_PORT->ODR ^= (1 << LED3_PIN))
#define LED4_TOGGLE (LED4_PORT->ODR ^= (1 << LED4_PIN))
^=是C/C++的一个符合运算符。表示异或赋值。
如:
a^=b相当于:a=a^b;
举例:(LED1_PORT->ODR ^= (1 << LED1_PIN))
LED1_PORT->ODR^=1 << LED1_PIN
1<<2= 0000 0001 变为 0000 0100
如果原本是亮的,0000 0100
0000 0100^=0000 0100=00000000
变为0,不亮
在定义函数
/* 函数*/
void LED_Config(int condition);
void LED_Breath(void);
void LED_Twinkle(void);
#endif
整体代码:led.h


 1 #ifndef __LED_H
 2 #define __LED_H
 3
 4 #include "stm32f10x.h"
 5 #include "delay.h"
 6
 7 /* 管脚宏定义 */
 8 #define LED1_PORT    GPIOE
 9 #define LED1_PIN    2
10 #define LED2_PORT    GPIOE
11 #define LED2_PIN    3
12 #define LED3_PORT    GPIOE
13 #define LED3_PIN    4
14 #define LED4_PORT    GPIOE
15 #define LED4_PIN    5
16
17 /* 操作宏定义*/
18 enum LED_CONDITION{OFF,ON};
19 #define LED1(x) (x)?GPIO_ResetBits(LED1_PORT,GPIO_Pin_2):GPIO_SetBits(LED1_PORT,GPIO_Pin_2) // 1 -- ´ò¿ª £¬ 0 -- ¹Ø±Õ
20 #define LED2(x) (x)?GPIO_ResetBits(LED2_PORT,GPIO_Pin_3):GPIO_SetBits(LED2_PORT,GPIO_Pin_3)
21 #define LED3(x) (x)?GPIO_ResetBits(LED3_PORT,GPIO_Pin_4):GPIO_SetBits(LED3_PORT,GPIO_Pin_4)
22 #define LED4(x) (x)?GPIO_ResetBits(LED4_PORT,GPIO_Pin_5):GPIO_SetBits(LED4_PORT,GPIO_Pin_5)
23
24 #define LED1_TOGGLE (LED1_PORT->ODR ^= (1 << LED1_PIN))
25 #define LED2_TOGGLE (LED2_PORT->ODR ^= (1 << LED2_PIN))
26 #define LED3_TOGGLE (LED3_PORT->ODR ^= (1 << LED3_PIN))
27 #define LED4_TOGGLE (LED4_PORT->ODR ^= (1 << LED4_PIN))
28
29 /* 函数定义 */
30 void LED_Config(int condition);
31 void LED_Breath(void);
32 void LED_Twinkle(void);
33
34 #endif
再led.c主代码
#include "led.h"

/***********************************************************************************
函数功能: LED初始化
形参:condition -- 初始状态(ON、OFF)
返回值:无
***********************************************************************************/
/*
    管脚:
    LED1    PE2
    LED2    PE3
    LED3    PE4
    LED4    PE5
*/
首先LED_Config 函数
开关灯
这里老师用了二种方法
void LED_Config(int condition)
{
1.寄存器法
 #if 1
        /* 寄存器法 */
        // 1.时钟使能 -- GPIOE端口时钟
        RCC->APB2ENR |= (0x1<<6);
        // 2.模式配置(通用推挽输出)
        GPIOE->CRL &= ~(0xFFFF<<8); //清零 -- [23:8]位
        GPIOE->CRL |= (0x3333<<8);  //置位
        // 3.初始状态
        if(condition == OFF)
            GPIOE->ODR |= (0xF<<2);
        else
            GPIOE->ODR &= ~(0xF<<2);
配置 RCC->APB2ENR 寄存器 使能时钟端口
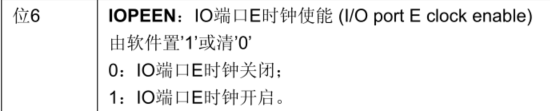
打开STM32中文参考手册,先找到第七章中关于RCC寄存器(APB2外设使能寄存器),找到可以发现以下:
根据电路图可知,我们需要对IO端口E的时钟进行使能,有根据手册可知是第6位置置置为1表示开启。
#if 1
/* 寄存器法 */
// 1.时钟使能 -- GPIOE端口时钟
RCC->APB2ENR |= (0x1<<6);
1移动6位 使第六位变为1 开启 使能
// 2.模式配置(通用推挽输出)
GPIOE->CRL &= ~(0xFFFF<<8); //清零 -- [23:8]位
GPIOE->CRL |= (0x3333<<8); //置位
0xFFFF 左移动8位 1111 1111 1111 1111 变为 1111 1111 0000 0000 0xFF00
GPIOE->CRL =GPIOE->CRL & 0000 0000 1111 1111
后面的都变为0
0x3333左移动 8位置 0100 0100 0100 0100 变为 0x3300
然后初始化状态
// 3.初始状态
if(condition == OFF)
GPIOE->ODR |= (0xF<<2);
else
GPIOE->ODR &= ~(0xF<<2);
如果关闭 0xF <<2 = 1111 变为 1111 00
GPIOE->ODR 同或 相等为1
所以如果关闭 2位置上 与1同或
0与1为0 关闭
如果开启
与1111 00 位与
2位置上 1&1 1 开启
a &= b就是 a= a & b
0xF是二进制的1111,左移1位就是在右边加个0,也就是11110,左移8位就在右边加8个0,也就是1111 0000 0000
char类型的话只有8位,就是后面8个0,前面的4个1移出去了。
2.库函数法
 //1.时钟使能
        RCC_APB2PeriphClockCmd(RCC_APB2Periph_GPIOE,ENABLE);
        //2.模式配置
        GPIO_InitTypeDef GPIO_InitStructure;
        GPIO_InitStructure.GPIO_Mode = GPIO_Mode_Out_PP;
        GPIO_InitStructure.GPIO_Speed = GPIO_Speed_50MHz;
        GPIO_InitStructure.GPIO_Pin = GPIO_Pin_2 | GPIO_Pin_3 | GPIO_Pin_4 | GPIO_Pin_5;
        GPIO_Init(GPIOE, &GPIO_InitStructure);
        //3.初始状态
        if(condition == OFF){
            GPIO_SetBits(GPIOE,GPIO_Pin_2 | GPIO_Pin_3 | GPIO_Pin_4 | GPIO_Pin_5);
        }
        else{
            GPIO_ResetBits(GPIOE,GPIO_Pin_2 | GPIO_Pin_3 | GPIO_Pin_4 | GPIO_Pin_5);
        }
    #endif
正常定义
这里利用了RCC_APB2PeriphClockCmd函数
最后写函数功能
/***********************************************************************************
函数功能: LED 函数接口
***********************************************************************************/
/*
* 呼吸灯(模拟PWM波)
*/
void LED_Breath(void)
{
    int i = 0;
    for(i=0;i<1000;i++)         //逐渐变亮
    {
        LED1(ON);LED2(ON);LED3(ON);LED4(ON);
        Delay_nop_nus(i);
        LED1(OFF);LED2(OFF);LED3(OFF);LED4(OFF);
        Delay_nop_nus(1000-i);
    }
    for(i=0;i<1000;i++)         //逐渐变暗
    {
        LED1(OFF);LED2(OFF);LED3(OFF);LED4(OFF);
        Delay_nop_nus(i);
        LED1(ON);LED2(ON);LED3(ON);LED4(ON);
        Delay_nop_nus(1000-i);
    }
}
/*
* LED闪烁
*/
void LED_Twinkle(void)
{
    Delay_nop_nms(500);
    LED1_TOGGLE;LED2_TOGGLE;LED3_TOGGLE;LED4_TOGGLE;
}
结束
编写主函数 main
main.h
#ifndef __MAIN_H
#define __MAIN_H

#include "stm32f10x.h"
#include "delay.h"
#include "led.h"


#endif
mian.c
#include "main.h"

int main(void)
{
    LED_Config(ON);
    while(1)
    {
        LED_Breath(); //呼吸灯
        LED_Twinkle(); //闪烁灯

    }
}
然后照这个格式写蜂鸣器和按键
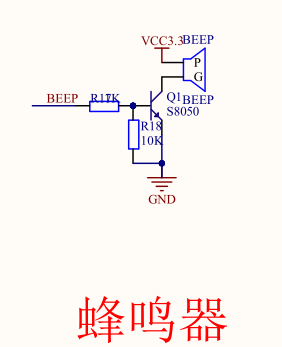
蜂鸣器 BEEP:
beep.h
#ifndef _BEEP_H_
#define _BEEP_H_

#include "stm32f10x.h"
#include "led.h"

#define BEEP(x) (x)?GPIO_SetBits(GPIOC,GPIO_Pin_0):GPIO_ResetBits(GPIOC,GPIO_Pin_0) // 1 -- 打开 , 0 -- 关闭
#define BEEP_TOGGLE (GPIOC->ODR ^= (0x1<<0))

void Beep_Config(uint8_t condition);
void Beep_Twinkle(void);

#endif
#define BEEP_TOGGLE (GPIOC->ODR ^= (0x1<<0))
也是蜂鸣器翻转
BEEP_TOGGLE =GPIOC->ODR异或1
取反
这个蜂鸣器端口正好是pc0
所以0位置 <<0

GPIOC->ODR ^= (0x1<<0) 即为
GPIOC->ODR= GPIOC->ODR 异或 1
如果为开启的时候
GPIOC->ODR为 1 响 高电平
响的时候 1异或1 为0
关闭
condition借用了
led.h
enum LED_CONDITION{OFF,ON};
beep.c
寄存器法
#include "beep.h"

/***********************************************************************************
函数功能: BEEP初始化
形参:condition -- 初始状态(ON、OFF)
返回值:无
***********************************************************************************/
/*
    管脚:
    BEEP -- PC0(通用推挽输出)
*/
void Beep_Config(uint8_t condition)
{
    //1.时钟使能
    RCC_APB2PeriphClockCmd(RCC_APB2Periph_GPIOC,ENABLE);
    //2.配置模式
    GPIO_InitTypeDef GPIO_InitStruct;
    GPIO_InitStruct.GPIO_Mode = GPIO_Mode_Out_PP;
    GPIO_InitStruct.GPIO_Speed = GPIO_Speed_50MHz;
    GPIO_InitStruct.GPIO_Pin = GPIO_Pin_0;
    GPIO_Init(GPIOC,&GPIO_InitStruct);
    //3.初始化
    if(condition == OFF)
        GPIO_ResetBits(GPIOC,GPIO_Pin_0);
    else
        GPIO_SetBits(GPIOC,GPIO_Pin_0);
}
/***********************************************************************************
函数功能: BEEP函数接口
***********************************************************************************/
/*
* BEEP蜂鸣器间断响
*/
void Beep_Twinkle(void)
{
    Delay_nop_nms(1000);
    BEEP_TOGGLE;
}
最后main.c
记得main.h加进去 beep.h
#ifndef __MAIN_H
#define __MAIN_H

#include "stm32f10x.h"
#include "delay.h"
#include "led.h"
#include "beep.h"


#endif
#include "main.h"

int main(void)
{

    LED_Config(ON);
    Beep_Config(OFF);  //刚开始关闭

    while(1)
    {
        //LED_Breath(); //呼吸灯
        //LED_Twinkle(); //闪烁灯
        Beep_Twinkle();//蜂鸣器间断响

    }
}
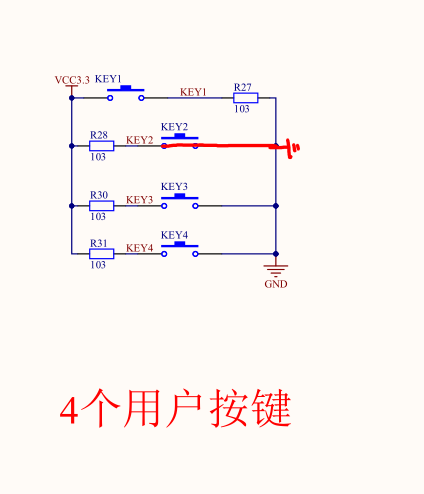
最后按键代码 key:

先写key.h
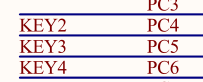
#ifndef _KEY_H_
#define _KEY_H_

#include "stm32f10x.h"
#include "delay.h"

#define KEY1 GPIO_ReadInputDataBit(GPIOA,GPIO_Pin_0)
#define KEY2 GPIO_ReadInputDataBit(GPIOC,GPIO_Pin_4)
#define KEY3 GPIO_ReadInputDataBit(GPIOC,GPIO_Pin_5)
#define KEY4 GPIO_ReadInputDataBit(GPIOC,GPIO_Pin_6)

void KEY_Config(void);
uint8_t KEY_GetVal(void);

#endif
GPIO_ReadInputDataBit 读I/O口的电平 1或者0
按键不需要关闭开启
只要知道压差
再写key.c
#include "key.h"

/***********************************************************************************
函数功能: KEY初始化
***********************************************************************************/
/*
    管脚:
  KEY1 -- PA0(浮空输入模式) 空闲低电平,按下高电平
    KEY2 -- PC4(浮空输入模式) 空闲高电平,按下低电平
    KEY3 -- PC5(浮空输入模式)
    KEY4 -- PC6(浮空输入模式)
*/
void KEY_Config(void)
{
    //1.时钟使能
    RCC_APB2PeriphClockCmd(RCC_APB2Periph_GPIOA | RCC_APB2Periph_GPIOC,ENABLE);
    //2.配置模式
    GPIO_InitTypeDef GPIO_InitStruct;
    GPIO_InitStruct.GPIO_Mode = GPIO_Mode_IN_FLOATING;
    GPIO_InitStruct.GPIO_Speed = GPIO_Speed_50MHz;
    GPIO_InitStruct.GPIO_Pin = GPIO_Pin_0;
    GPIO_Init(GPIOA,&GPIO_InitStruct);

    GPIO_InitStruct.GPIO_Pin = GPIO_Pin_4 | GPIO_Pin_5 |GPIO_Pin_6;
    GPIO_Init(GPIOC,&GPIO_InitStruct);
}
在写函数KEY_GetVal
得到key的返回值
/***********************************************************************************
函数功能: KEY函数接口
***********************************************************************************/
uint8_t KEY_GetVal(void)
{
    uint8_t key_val;
    if(KEY1)
    {
        Delay_nop_nus(10);
        if(KEY1)
        {
            while(KEY1);
            key_val = 1;
        }
    }
    if(!KEY2)
    {
        Delay_nop_nus(10);
        if(!KEY2)
        {
            while(!KEY2);
            key_val = 2;
        }
    }
    if(!KEY3)
    {
        Delay_nop_nus(10);
        if(!KEY3)
        {
            while(!KEY3);
            key_val = 3;
        }
    }
    if(!KEY4)
    {
        Delay_nop_nus(10);
        if(!KEY4)
        {
            while(!KEY4);
            key_val = 4;
        }
    }
    return key_val;
}
最后编写main代码
只要加上就行
#include "main.h"

int main(void)
{

    LED_Config(ON);
    Beep_Config(OFF);  //刚开始关闭
    KEY_Config();

    while(1)
    {

        //LED_Breath(); //呼吸灯
        //LED_Twinkle(); //闪烁灯
        //Beep_Twinkle();//蜂鸣器间断响
        if(KEY_GetVal()==1) //led1
            BEEP_TOGGLE;//BEEP翻转 相当于开


    }
}
最后附上源代码:
https://wwa.lanzoui.com/iFi1Pvcghgh


 浙公网安备 33010602011771号