03 视图
视图
django的视图主要有2种,分别是函数视图和类视图.现在刚开始学习django,我们先学习函数视图(FBV),后面再学习类视图[CBV].
1、请求方式
web项目运行在http协议下,默认肯定也支持用户通过不同的http请求发送数据来。django支持让客户端只能通过指定的Http请求来访问到项目的视图
home/views.py,代码:
# 让用户发送POST才能访问的内容
from django.views.decorators.http import require_http_methods
@require_http_methods(["POST"])
def login(request):
    return HttpResponse("登录成功!")
路由绑定,demo/urls.py,代码:
from django.contrib import admin
from django.urls import path
from home.views import index
urlpatterns = [
    path('admin/', admin.site.urls),
    path("index", index),
    path("login", login),
]
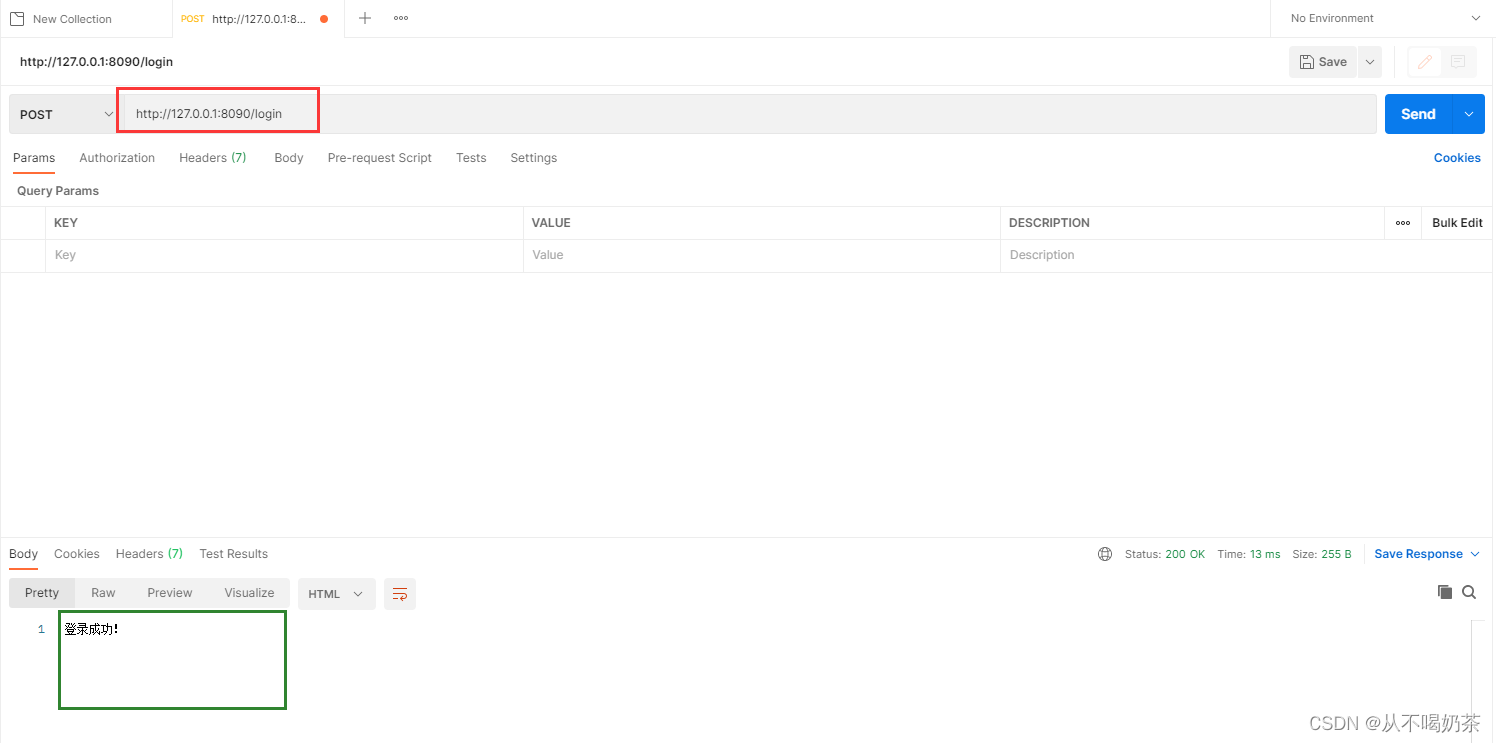
通过浏览器,访问效果http://127.0.0.1:8090/login:


2、请求对象
django将请求报文中的请求行、首部信息、内容主体封装成 HttpRequest 类中的属性。 除了特殊说明的之外,其他均为只读的。
(1)请求方式
print(request.method)
(2)请求体
print(request.body) # 当传输的数据格式是json的时候一般使用此方法,在手动将接受的数据进行反序列化
"""
1. GET方法
请求体为空
2. POST方法
urlencoded: a=1&b=2&c=3
json: {"a":1, "b":2, "c"=3}
"""
#############POST###############
print(request.POST) # 只有数据格式是urlencoded格式才有值
# <QueryDict: {'username': ['hello'], 'pwd': ['123456'], 'hobby': ['football', 'basketball']}>
user = request.POST.get('username')
pwd = request.POST.get('pwd')
hobby = request.POST.getlist('hobby') # 当一个键有多个值
print(user, pwd, hobby)
# hello 123456 ['football', 'basketball']


###############GET#############
print(request.GET)
# <QueryDict: {'hello': ['world']}>
print(request.path) # 只包括路径
print(request.get_full_path())  # 包含get参数

###获取请求头
print(request.META)
(3)请求数据
# 1.HttpRequest.GET:一个类似于字典的对象,包含 HTTP GET 的所有参数。详情请参考 QueryDict 对象。

# 2.HttpRequest.POST:一个类似于字典的对象,如果请求中包含表单数据,则将这些数据封装成 QueryDict 对象。
   # 注意:键值对的值是多个的时候,比如checkbox类型的input标签,select标签,需要用:         		 request.POST.getlist("hobby")

# 3.HttpRequest.body:一个字符串,代表请求报文的请求体的原数据。
(4)请求路径
# HttpRequest.path:表示请求的路径组件(不含get参数)
# HttpRequest.get_full_path():含参数路径
(5)请求头
# HttpRequest.META:一个标准的Python 字典,包含所有的HTTP 首部。具体的头部信息取决于客户端和服务器
3、响应对象
响应对象主要有三种形式:
- HttpResponse()
- render()
- redirect()
(1)HttpResponse()
Django服务器接收到客户端发送过来的请求后,会将提交上来的这些数据封装成一个 HttpRequest 对象传给视图函数。那么视图函数在处理完相关的逻辑后,也需要返回一个响应给浏览器。而这个响应,我们必须返回 HttpResponseBase 或者他的子类的对象。而 HttpResponse 则是 HttpResponseBase 用得最多的子类。
常用属性:
content:返回的内容。
status:返回的HTTP响应状态码。
return HttpResponse('ok', status=xxx)content_type:返回的数据的MIME类型,默认为 text/html 。浏览器会根据这个属性,来显示数据。如果是 text/html ,那么就会解析这个字符串,如果 text/plain ,那么就会显示一个纯文本。
return HttpResponse('ok', content_type='xxx')设置响应头: response[‘X-Access-Token’] = ‘xxxx’ 。
response = HttpResponse("ok")
response["xxx"] = "xxx"
return response
JsonResponse类:
用来对象 dumps 成 json 字符串,然后返回将 json 字符串封装成 Response 对象返回给浏览器。并且他的 Content-Type 是 application/json 。(dict --> json–>object(将content-type设置成了application/json)):
不使用JsonResponse:
from django.shortcuts import HttpResponse
import json

def index(request):
    book = {
        'title':"三国演义",
        'price':199,
    }
    return HttpResponse(json.dumps(book, ensure_ascii=False), content_type='application/json')
使用JsonResponse:
from django.http import JsonResponse

def index(request):

    return JsonResponse({"title":"三国演义","price":199})
默认情况下 JsonResponse 只能对字典进行 dumps ,如果想要对非字典的数据进行 dump ,那么需要给 JsonResponse 传递一个 safe=False 参数。示例代码如下:
from django.http import JsonResponse
def index(request):
 books = [
     {"title":"西游记","price":199},
     {"title":"水浒传","price":200},
 ]
 return JsonResponse(books, safe=False)
(2)render()
render(request, template_name[, context])
#结合一个给定的模板和一个给定的上下文字典,并返回一个渲染后的 HttpResponse 对象。
参数:
 /*
 request: 用于生成响应的请求对象。
 template_name:要使用的模板的完整名称,可选的参数
 context:添加到模板上下文的一个字典,
          默认是一个空字典。如果字典中的某个值是可调用的,视图将在渲染模板之前调用它。
          */
render方法就是将一个模板页面中的模板语法进行渲染,最终渲染成一个html页面作为响应体。
(3)redirect方法
当您使用Django框架构建Python Web应用程序时,您在某些时候必须将用户从一个URL重定向到另一个URL,
通过redirect方法实现重定向。
参数可以是:
- 一个绝对的或相对的URL, 将原封不动的作为重定向的位置.
- 一个url的别名: 可以使用reverse来反向解析url
传递要重定向到的一个具体的网址
def my_view(request):
    ...
    return redirect("/some/url/")
当然也可以是一个完整的网址
def my_view(request):
    ...
    return redirect("http://www.baidu.com")
传递一个视图的名称
def my_view(request):
    ...
    return redirect(reverse("url的别名"))

APPEND_SLASH的实现就是基于redirect
4、登录验证案例

from django.contrib import admin
from django.urls import path, re_path,include

from users.views import index,login,auth
urlpatterns = [
    path("",index),
    path("login",login),
    path("auth",auth),
]
def login(request):

    return render(request,"users/login.html")


def auth(request):

    #  获取数据
    print("request.POST:",request.POST)

    user = request.POST.get("user")
    pwd = request.POST.get("pwd")

    # 模拟数据校验
    if user == "rain" and pwd == "123":
        # return HttpResponse("验证通过")
        return redirect("/users/")
    else:
        # return HttpResponse("用户名或者密码错误")
        # return redirect("/users/login")
        msg = "用户名或者密码错误"
        return render(request,"users/login.html",{"msg":msg})
<!DOCTYPE html>
<html lang="en">
<head>
    <meta charset="UTF-8">
    <title>Title</title>
</head>
<body>


<form action="/users/auth" method="post">
    用户名<input type="text" name="user">
    密码 <input type="password" name="pwd">
    <input type="submit"> <span style="color: red">{{ msg }}</span>
</form>
</body>
</html>
5、 APPEND_SLASH
该变量默认开启,补全在浏览器地址栏中如果忘记写最后的那个"/",则会返回一个301,django默认加上"/"然后进行重定向。


 浙公网安备 33010602011771号