1.使用Spring boot:
- 创建Spring boot的应用,选中我们需要的模块;
- Spring boot已经默认这些场景配置,只需要在配置文件中指定少量文件就可以运行起来;
- 自己编写业务代码;
需要我们对spring boot的自动配置原理非常熟悉,能够明白:
- 这个场景下 spring boot 帮我们配置了什么?
- 能不能修改这些自动配置?
- 能修改哪些配置?
- 能不能进行扩展?
这些原理到哪里去找,要去: jar下的:
xxxxAutoConfiguration,帮我们在容器中配置相关组件;
xxxxProperties:配置类来封装配置文件的内容;
2.Spring boot对静态资源的映射规则
2.1查看源码,org.springframework.boot.autoconfigure.web.WebMvcAutoConfiguration
@ConfigurationProperties(prefix = "spring.resources", ignoreUnknownFields = false)
public class ResourceProperties implements ResourceLoaderAware, InitializingBean {
ResourceProperties :可以用来设置和静态资源有关的参数。比如说缓存时间;
@Override
        public void addResourceHandlers(ResourceHandlerRegistry registry) {
            if (!this.resourceProperties.isAddMappings()) {
                logger.debug("Default resource handling disabled");
                return;
            }
            Integer cachePeriod = this.resourceProperties.getCachePeriod();
            if (!registry.hasMappingForPattern("/webjars/**")) {
                customizeResourceHandlerRegistration(registry
                        .addResourceHandler("/webjars/**")
                        .addResourceLocations("classpath:/META-INF/resources/webjars/")
                        .setCachePeriod(cachePeriod));
            }
            String staticPathPattern = this.mvcProperties.getStaticPathPattern();
            if (!registry.hasMappingForPattern(staticPathPattern)) {
                customizeResourceHandlerRegistration(
                        registry.addResourceHandler(staticPathPattern)
                                .addResourceLocations(
                                        this.resourceProperties.getStaticLocations())
                                .setCachePeriod(cachePeriod));
            }
        }
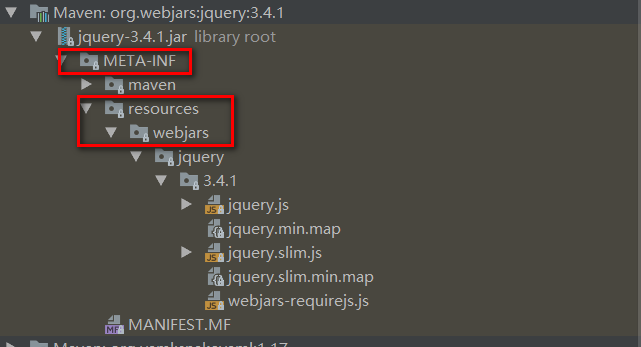
- 从上面源码中可以得到规则一:所有 /webjars/**,都去 classpath:/META-INF/resources/webjars/ 下找资源;
-webjars:以 jar 包的方式引入静态资源;
-引入方式,可以通过 maven 的 pom.xml 文件引入 jar 包
    <!--引入Juery-webjars-->
        <dependency>
            <groupId>org.webjars</groupId>
            <artifactId>jquery</artifactId>
            <version>3.4.1</version>
        </dependency>
-目录结构如下:

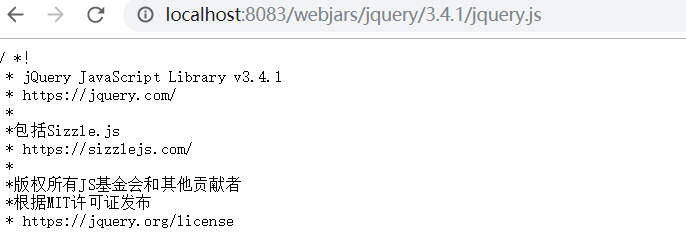
访问静态资源的时候,只需要写 webjars 下面资源的名称即可;例如访问 jquery.js,我们需要这样写:http://localhost:8083/webjars/jquery/3.4.1/jquery.js

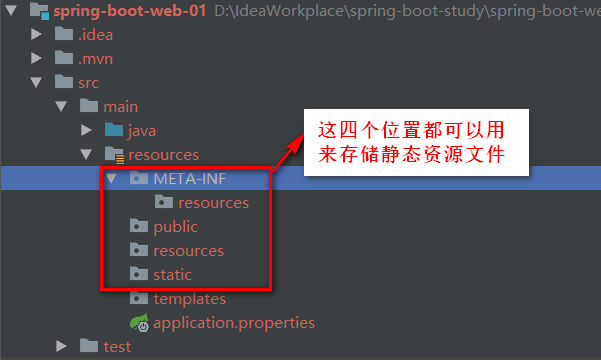
- 规则二:/** 访问当前项目的任意资源(静态资源的文件夹),包括以下几种情况:
1."classpath:/META-INF/resources/"
2. "classpath:/resources/"
3."classpath:/static/"
4. "classpath:/public/"
5."/":当前项目的根路径
即可以访问项目中以下位置的静态资源文件:

此时假如我们访问:localhost:8080/hai,就会去上面标注的静态资源文件夹里面去找
- 规则三:欢迎页:静态资源文件夹下的所有 index.html 页面;被" /** "映射;
public Resource getWelcomePage() {
        for (String location : getStaticWelcomePageLocations()) {
            Resource resource = this.resourceLoader.getResource(location);
            try {
                if (resource.exists()) {
                    resource.getURL();
                    return resource;
                }
            }
            catch (Exception ex) {
                // Ignore
            }
        }
        return null;
    }
此时我们输入 localhost:8083/ 后面不指定文件夹以及具体文件时,就会到以下五个文件夹中去寻找 Index.html 文件进行返回;
1."classpath:/META-INF/resources/"
2. "classpath:/resources/"
3."classpath:/static/"
4. "classpath:/public/"
5."/":当前项目的根路径

- 规则四:所有的 **/favicon.ico 都是在静态资源文件夹 " /** "下找;
源码如下:
    @Bean
            public SimpleUrlHandlerMapping faviconHandlerMapping() {
                SimpleUrlHandlerMapping mapping = new SimpleUrlHandlerMapping();
                mapping.setOrder(Ordered.HIGHEST_PRECEDENCE + 1);
                mapping.setUrlMap(Collections.singletonMap("**/favicon.ico",
                        faviconRequestHandler()));
                return mapping;
            }
2.2手动修改静态资源映射的文件夹
当然我们也可以不使用 spring boot 自身的静态资源文件夹,我可以自己配置静态资源文件夹的位置,配置方法如下:
- 在 application.properties(或application.yaml)全局配置文件中加入如下配置:
spring.resources.static-locations=classpath:/hello/,classpath:/haibao/
- 多个路径中间用逗号进行分隔;
- 此时我们在访问 localhost:8083/

可见无法访问;
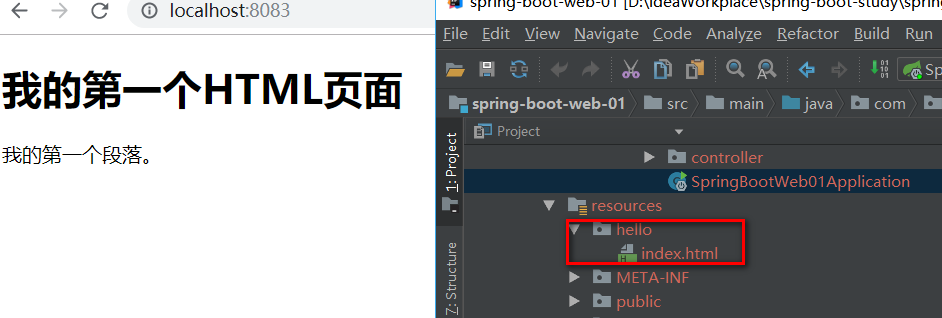
- 此时我们新建 hello 文件夹,将欢迎页置入;

此時就恢复了首页的访问,可见我们的修改的静态资源路径已经生效;


