Spring Boot学习日志------连接数据库三方法之Springboot yml注入
目录
基础调用操作
不同的配置文件的调用
基础调用操作
目录

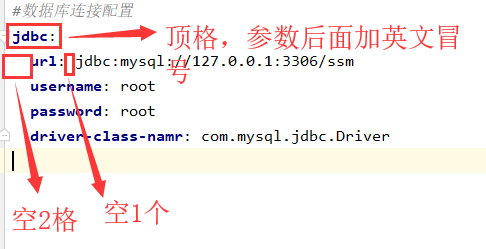
application.yml文件
#数据库连接配置
jdbc:
  url: jdbc:mysql://127.0.0.1:3306/ssm
  username: root
  password: root
  driver-class-namr: com.mysql.jdbc.Driver

HelloController 文件
package com.example.ycrk.controller;

import org.springframework.beans.factory.annotation.Autowired;
import org.springframework.web.bind.annotation.GetMapping;
import org.springframework.web.bind.annotation.RestController;

import javax.sql.DataSource;

@RestController
public class HelloController {
    @Autowired
    private DataSource dataSource;

    @GetMapping("hello")
    public String hello(){
        System.out.println("dataSource="+dataSource);
        return "Hello,Spring Boot!";
    }
}
JdbcProperties文件
package com.example.ycrk.config;

import org.springframework.boot.context.properties.ConfigurationProperties;
import org.springframework.stereotype.Component;

/**
 * ConfigurationProperties从application配置文件中读取配置
 * prefix配置项前缀
 * 配置项前缀的类变量名必须与前缀之后的配置项名称保持 松散绑定
 */
@Component
@ConfigurationProperties(prefix="jdbc")
public class JdbcProperties {
    private String driverClassNamr;
    private String url;
    private String username;
    private String password;

    public String getDriverClassNamr() {
        return driverClassNamr;
    }

    public void setDriverClassNamr(String driverClassNamr) {
        this.driverClassNamr = driverClassNamr;
    }

    public String getUrl() {
        return url;
    }

    public void setUrl(String url) {
        this.url = url;
    }

    public String getUsername() {
        return username;
    }

    public void setUsername(String username) {
        this.username = username;
    }

    public String getPassword() {
        return password;
    }

    public void setPassword(String password) {
        this.password = password;
    }
}
JdbcConfig文件
package com.example.ycrk.config;

import com.alibaba.druid.pool.DruidDataSource;
import org.springframework.beans.factory.annotation.Value;
import org.springframework.boot.context.properties.ConfigurationProperties;
import org.springframework.boot.context.properties.EnableConfigurationProperties;
import org.springframework.context.annotation.Bean;
import org.springframework.context.annotation.Configuration;
import org.springframework.context.annotation.PropertySource;

import javax.sql.DataSource;

@Configuration
@EnableConfigurationProperties(JdbcProperties.class)
public class JdbcConfig {
    @Bean
    public DataSource dataSource(JdbcProperties jdbcProperties){
        DruidDataSource druidDataSource=new DruidDataSource();
        druidDataSource.setDriverClassName(jdbcProperties.getDriverClassNamr());
        druidDataSource.setUrl(jdbcProperties.getUrl());
        druidDataSource.setUsername(jdbcProperties.getUsername());
        druidDataSource.setPassword(jdbcProperties.getPassword());
        return druidDataSource;
    }
}
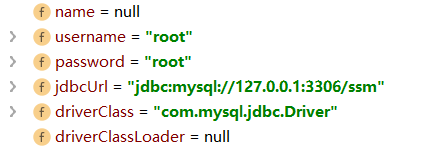
操作结果

不同的配置文件的调用
文件格式:application-XXX.yml
调用在application.yml文件中使用
添加文件application-test.yml
baidu:
  url: http://www.baidu.com
修改application.yml,在active后面添加参数横线后面的名字
#数据库连接配置
jdbc:
  url: jdbc:mysql://127.0.0.1:3306/ssm
  username: root
  password: root
  driver-class-namr: com.mysql.jdbc.Driver

spring:
  profiles:
    active: test
输出,修改HelloController.java
package com.example.ycrk.controller;

import org.springframework.beans.factory.annotation.Autowired;
import org.springframework.beans.factory.annotation.Value;
import org.springframework.web.bind.annotation.GetMapping;
import org.springframework.web.bind.annotation.RestController;

import javax.sql.DataSource;

@RestController
public class HelloController {
    @Autowired
    private DataSource dataSource;

    @Value("${baidu.url}")
    private String baidu;

    @GetMapping("hello")
    public String hello(){
        System.out.println("baidu="+baidu);
        System.out.println("dataSource="+dataSource);
        return "Hello,Spring Boot!";
    }
}
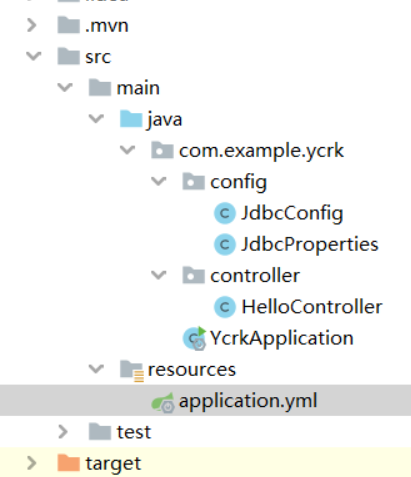
文件目录


