SpringMvc新建实例配置
一、创建项目:
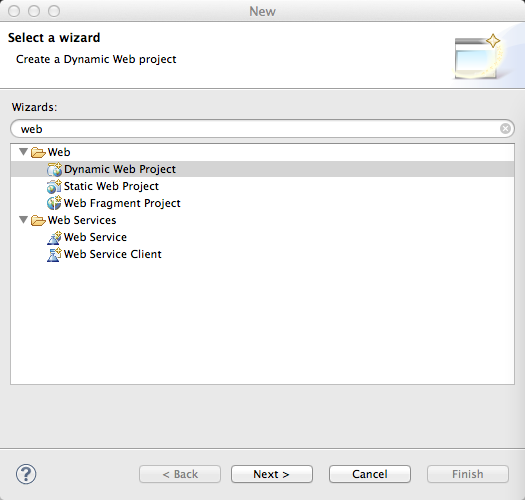
1、建立新的动态web项目:
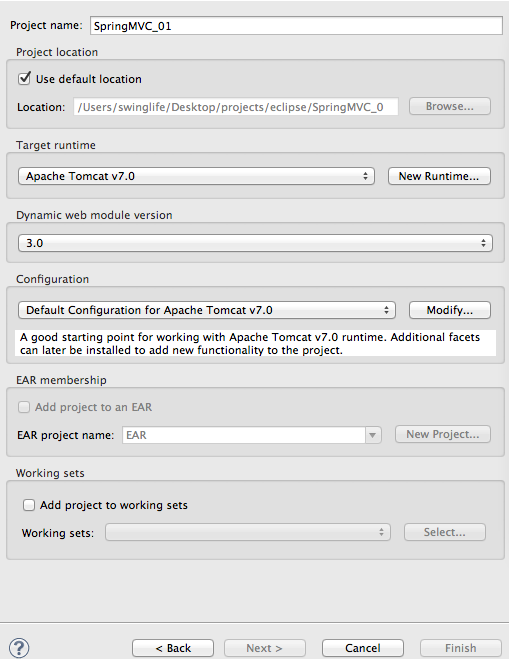
2、为项目命名为:SpringMVC_01
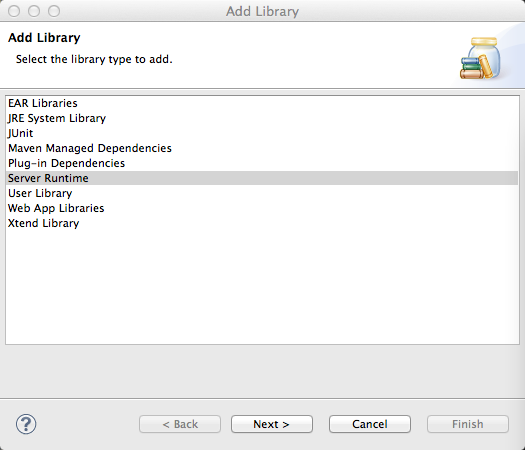
3、添加tomcat运行时环境\依赖库 如果是MyEclipse的话创建web项目时就不需要此步骤
右键项目,点击Build Path->Add Librares:
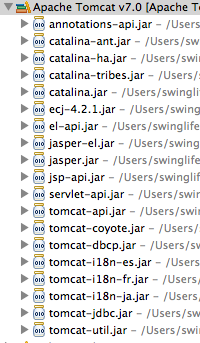
添加完后会多出tomcat 的 Servlet包
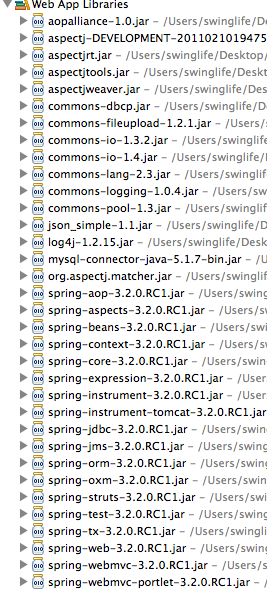
4、最后添加Spring及SpringMVC所需要的jar,我添加以下jar到项目中
二、配置文件:
1、首先在web.xml中配置一个DispatcherServlet,并通过<servlet-mapping>指定需要拦截的url。 下面xml中配置一个拦截.html为后缀的url.
[html] view plaincopyprint?![]()
![]()
-
<!-- 配置Spring MVC DispatcherServlet -->
-
<servlet>
-
<servlet-name>MVC</servlet-name>
-
<servlet-class>org.springframework.web.servlet.DispatcherServlet</servlet-class>
-
<!-- 初始化参数 -->
-
<init-param>
-
<!-- 加载SpringMVC的xml到 spring的上下文容器中 -->
-
<param-name>contextConfigLocation</param-name>
-
<param-value>
-
/WEB-INF/classes/mvc*.*
-
</param-value>
-
</init-param>
-
<load-on-startup>1</load-on-startup>
-
</servlet>
-
-
<!-- 配置DispatcherServlet所需要拦截的 url -->
-
<servlet-mapping>
-
<servlet-name>MVC</servlet-name>
-
<url-pattern>*.html</url-pattern>
-
</servlet-mapping>
先配置一个servlet 然后 加载SpringMVC的xml文件到Spring的上下文中。然后配置servlet-mapping,servlet-name为刚刚的servlet中的配置的name,然后指定要拦截的url为*.html
2、配置Spring的上下文监听器,并且指定Spring的xml配置文件的路径。
[html] view plaincopyprint?![]()
![]()
-
<!-- 监听spring上下文容器 -->
-
<listener>
-
<listener-class>
-
org.springframework.web.context.ContextLoaderListener
-
</listener-class>
-
</listener>
-
-
<!-- 加载spring的xml配置文件到 spring的上下文容器中 -->
-
<context-param>
-
<param-name>contextConfigLocation</param-name>
-
<param-value>classpath:root-context.xml</param-value>
-
</context-param>
这里指定的路径classpath为 项目编译后的classes文件中。
最终web.xml文件内容:
[html] view plaincopyprint?![]()
![]()
-
<?xml version="1.0" encoding="UTF-8"?>
-
<web-app version="3.0" xmlns="http://java.sun.com/xml/ns/javaee"
-
xmlns:xsi="http://www.w3.org/2001/XMLSchema-instance"
-
xsi:schemaLocation="http://java.sun.com/xml/ns/javaee
-
http://java.sun.com/xml/ns/javaee/web-app_3_0.xsd">
-
<display-name></display-name>
-
-
-
<!-- 监听spring上下文容器 -->
-
<listener>
-
<listener-class>
-
org.springframework.web.context.ContextLoaderListener
-
</listener-class>
-
</listener>
-
-
<!-- 加载spring的xml配置文件到 spring的上下文容器中 -->
-
<context-param>
-
<param-name>contextConfigLocation</param-name>
-
<param-value>classpath:root-context.xml</param-value>
-
</context-param>
-
-
<!-- 配置Spring MVC DispatcherServlet -->
-
<servlet>
-
<servlet-name>MVC</servlet-name>
-
<servlet-class>org.springframework.web.servlet.DispatcherServlet</servlet-class>
-
<!-- 初始化参数 -->
-
<init-param>
-
<!-- 加载SpringMVC的xml到 spring的上下文容器中 -->
-
<param-name>contextConfigLocation</param-name>
-
<param-value>
-
/WEB-INF/classes/mvc*.*
-
</param-value>
-
</init-param>
-
<load-on-startup>1</load-on-startup>
-
</servlet>
-
-
<!-- 配置DispatcherServlet所需要拦截的 url -->
-
<servlet-mapping>
-
<servlet-name>MVC</servlet-name>
-
<url-pattern>*.html</url-pattern>
-
</servlet-mapping>
-
-
<welcome-file-list>
-
<welcome-file>index.html</welcome-file>
-
</welcome-file-list>
-
-
-
</web-app>
3、创建SpringMVC所需要的xml文件和applicationContext的xml文件,这里由于第一步中配置的servlet中init-param所需要加载的格式为:mvc*.* 就是去寻找为mvc开头的文件所以创建SpringMVC的xml文件时必须要有mvc开头,我命名为:mvc-context.xml,并且按照context-param中的配置,将applicationContext文件命名为:root-context.xml;

4、配置mvc-context.xml:
首先通过import标签 导入root-context.xml,然后通过component-scan标签扫描指定包名,让该包下的所有java类的spring注解生效
然后配置SpringMVC的视图渲染解析器,让其前缀为/page/ 后缀为.jsp 这样能够SpringMVC 所需要渲染的路径能够在/page/返回值.jsp中寻找。
[html] view plaincopyprint?![]()
![]()
-
<!-- 加载Spring的全局配置文件 -->
-
<beans:import resource="root-context.xml" />
-
-
<!-- SpringMVC配置 -->
-
-
<!-- 通过component-scan 让Spring扫描org.swinglife.controller下的所有的类,让Spring的代码注解生效 -->
-
<context:component-scan base-package="org.swinglife.controller"></context:component-scan>
-
-
<!-- 配置SpringMVC的视图渲染器, 让其前缀为:/page/ 后缀为.jsp 将视图渲染到/page/<method返回值>.jsp中 -->
-
<beans:bean
-
class="org.springframework.web.servlet.view.InternalResourceViewResolver"
-
p:prefix="/page/" p:suffix=".jsp">
-
</beans:bean>
最后mvc-context.xml和root-context.xml为:
mvc-context.xml:
[html] view plaincopyprint?![]()
![]()
-
<?xml version="1.0" encoding="UTF-8"?>
-
<beans:beans xmlns="http://www.springframework.org/schema/mvc"
-
xmlns:xsi="http://www.w3.org/2001/XMLSchema-instance" xmlns:beans="http://www.springframework.org/schema/beans"
-
xmlns:p="http://www.springframework.org/schema/p" xmlns:aop="http://www.springframework.org/schema/aop"
-
xmlns:context="http://www.springframework.org/schema/context"
-
xsi:schemaLocation="http://www.springframework.org/schema/mvc http://www.springframework.org/schema/mvc/spring-mvc.xsd
-
http://www.springframework.org/schema/aop
-
http://www.springframework.org/schema/aop/spring-aop-3.2.xsd http://www.springframework.org/schema/beans http://www.springframework.org/schema/beans/spring-beans.xsd
-
http://www.springframework.org/schema/context http://www.springframework.org/schema/context/spring-context.xsd">
-
<!-- 加载Spring的全局配置文件 -->
-
<beans:import resource="root-context.xml" />
-
-
<!-- SpringMVC配置 -->
-
-
<!-- 通过component-scan 让Spring扫描org.swinglife.controller下的所有的类,让Spring的代码注解生效 -->
-
<context:component-scan base-package="org.swinglife.controller"></context:component-scan>
-
-
<!-- 配置SpringMVC的视图渲染器, 让其前缀为:/ 后缀为.jsp 将视图渲染到/page/<method返回值>.jsp中 -->
-
<beans:bean
-
class="org.springframework.web.servlet.view.InternalResourceViewResolver"
-
p:prefix="/page/" p:suffix=".jsp">
-
</beans:bean>
-
</beans:beans>
root-context.xml:
[html] view plaincopyprint?![]()
![]()
-
<?xml version="1.0" encoding="UTF-8"?>
-
<beans xmlns="http://www.springframework.org/schema/beans"
-
xmlns:xsi="http://www.w3.org/2001/XMLSchema-instance" xmlns:context="http://www.springframework.org/schema/context"
-
xsi:schemaLocation="http://www.springframework.org/schema/beans http://www.springframework.org/schema/beans/spring-beans-3.2.xsd
-
http://www.springframework.org/schema/context
-
http://www.springframework.org/schema/context/spring-context-3.2.xsd
-
http://www.springframework.org/schema/tx http://www.springframework.org/schema/tx/spring-tx-3.2.xsd">
-
<!-- Root Context: defines shared resources visible to all other web components -->
-
-
-
</beans>
-

 浙公网安备 33010602011771号